A forum for discussing wooden boats and boat building
You are not logged in.
- Topics: Active | Unanswered
#1 9 Nov 2011 12:19 am
- pam5
- Member
- Registered: 16 Jun 2011
- Posts: 92
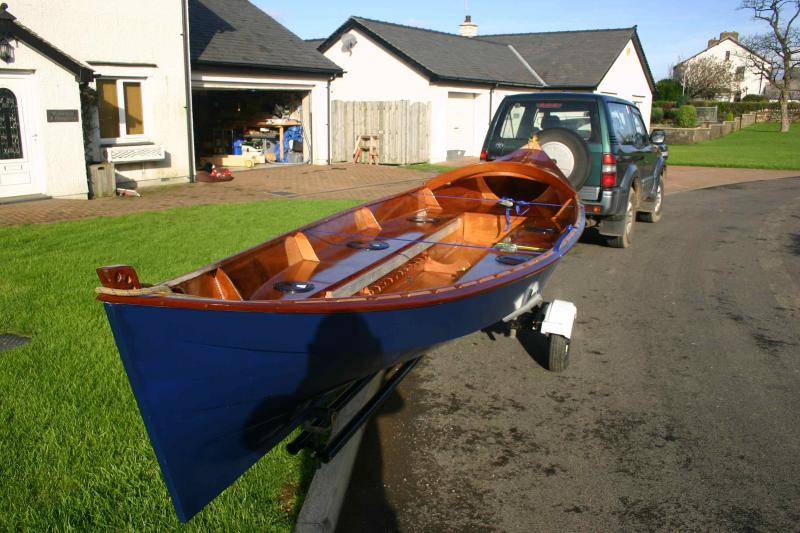
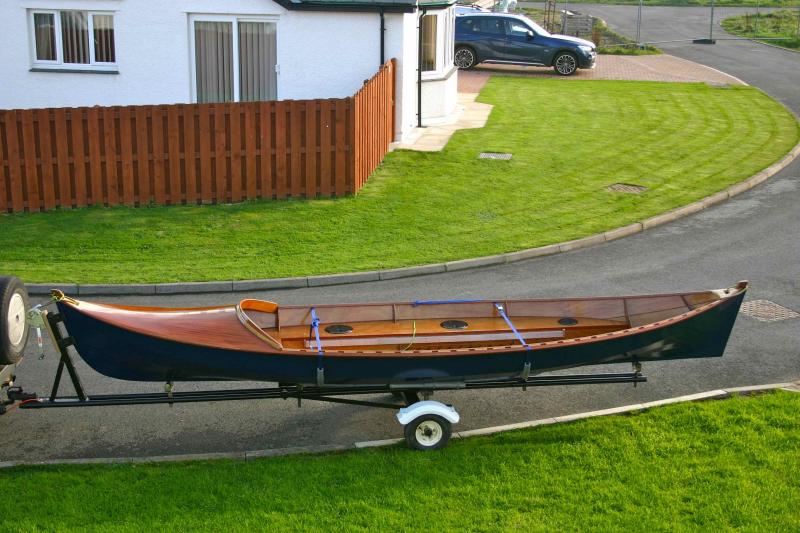
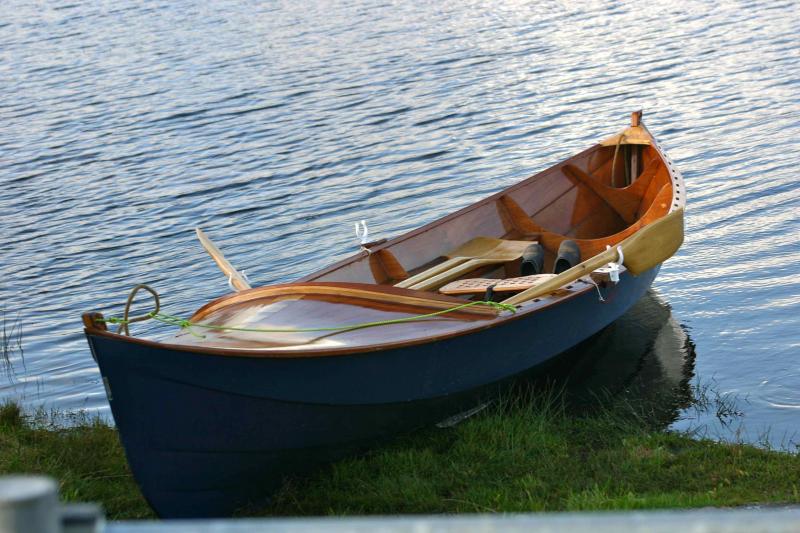
20 ft sea going rowing boat
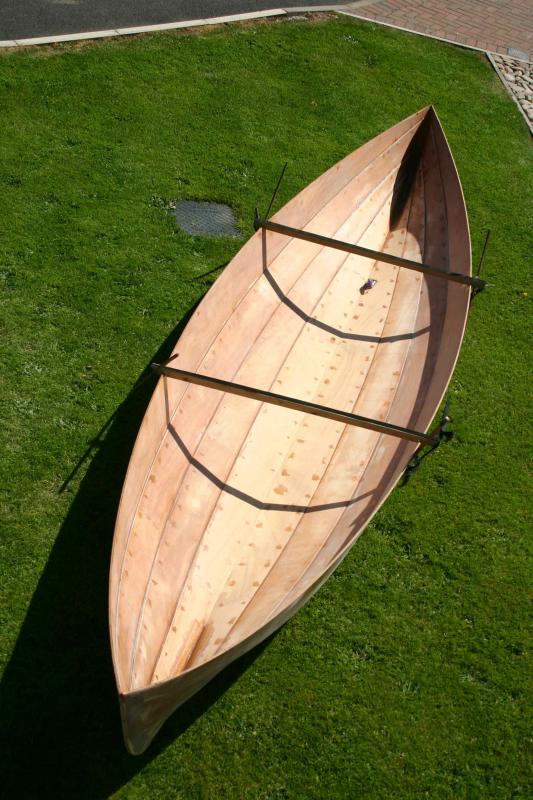
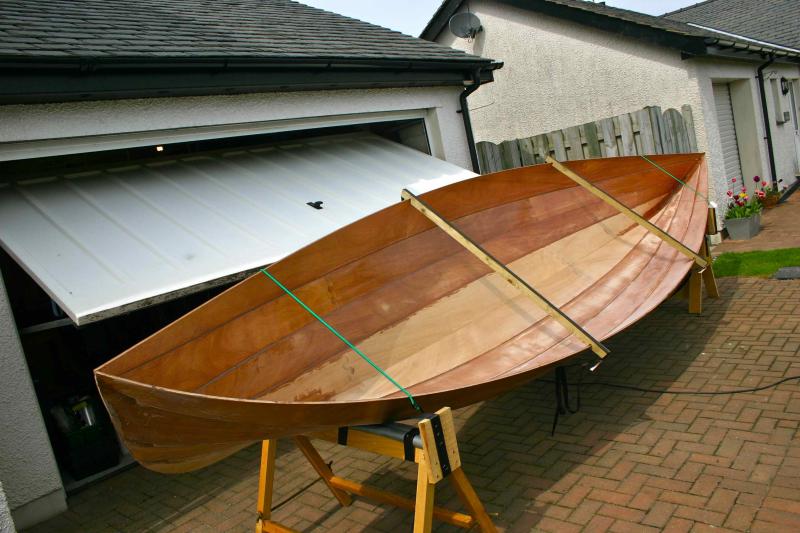
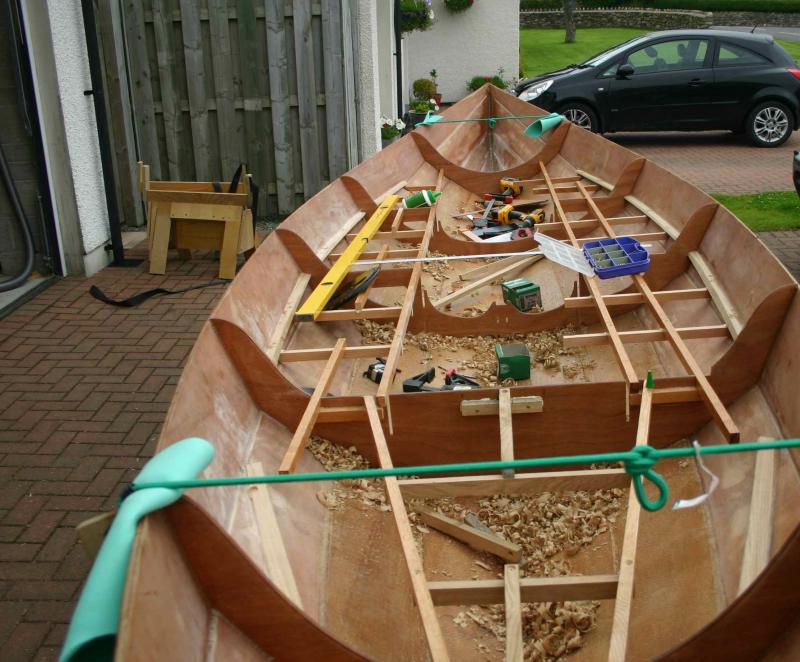
As a sea canoeist who is getting on, I decided last year that I would like to build a sea going rowing boat, that could hold sliding seats for two, would be reasonably light, safe, buoyant in a capsize, able to carry a reasonable amount of camping equipment and if I wanted to, be able to fit a small outboard engine. I thought it was quite a simple spec really, however when I approached Fyne, there were a few weird looks and quite a bit of head scratching. After 1 month and a few more phone calls (obviously demonstrating I was serious), they came up with a prototype boat that had not been built in the UK. I agreed to be the guinea pig and 6 months later, we launched the boat on Loch Sunart and started out sea trials. If anyone is interested I will put the story on the forum and give you some of the details of the build and give details how I used recycled wood from old signposts to make up the ancillary bits such as the gunnels and deck etc. Here are a few photos to wet your apatite.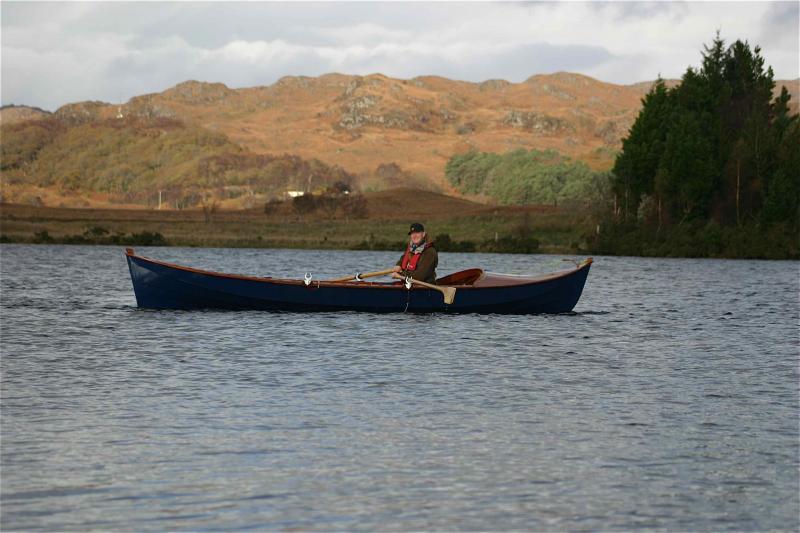
Offline
#2 9 Nov 2011 8:20 am
- fairplay
- Member
- Registered: 16 Jun 2011
- Posts: 109
Re: 20 ft sea going rowing boat
...very nice!...
...and: yes, please take the time to put down some more details - while it is unlikely that i myself would build this boat, i found interesting bits (usable for my own projects) in every build-description i was reading...
'...so, how many kayaks do you really need?...' - '...one more!...'
Offline
#3 9 Nov 2011 9:08 am
- Richard
- Member
- From: East Sussex
- Registered: 7 Jun 2011
- Posts: 75
Re: 20 ft sea going rowing boat
Beautiful. Need to know more. I am still kayaking but who knows about the future and I may need to do the same as you
Canoe & Kayak Owner
Offline
#4 9 Nov 2011 5:52 pm
- Dinky Doris
- Member
- From: Wales
- Registered: 25 Aug 2011
- Posts: 23
Re: 20 ft sea going rowing boat
Appetite whetted. Well done!
DD
Offline
#5 9 Nov 2011 8:38 pm
- jerryferry
- Member
- Registered: 13 Jun 2011
- Posts: 18
Re: 20 ft sea going rowing boat
lovely shape
Lifelong Angler ![]()
Offline
#6 9 Nov 2011 9:33 pm
- beaker
- Member
- Registered: 9 Oct 2011
- Posts: 81
Re: 20 ft sea going rowing boat
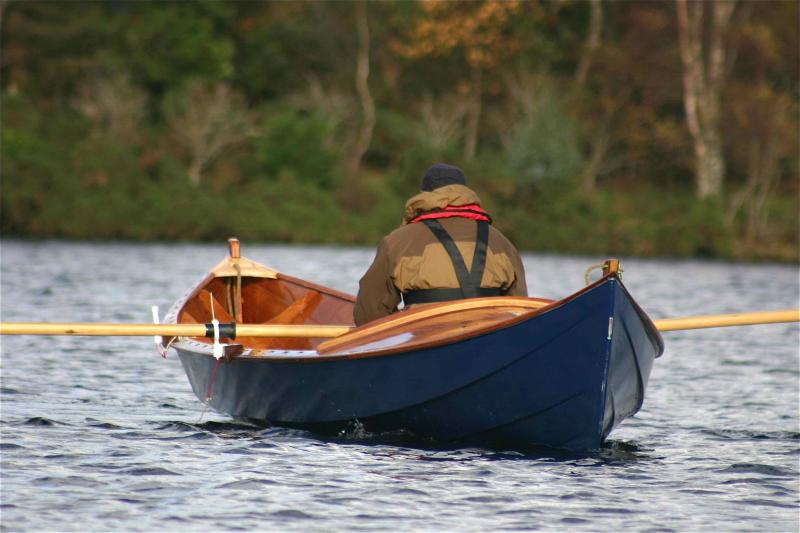
Gorgeous, lovely boat. I want to read all about the build, especially that swooping deck.
Offline
#7 1 Dec 2011 11:42 pm
- pam5
- Member
- Registered: 16 Jun 2011
- Posts: 92
Re: 20 ft sea going rowing boat
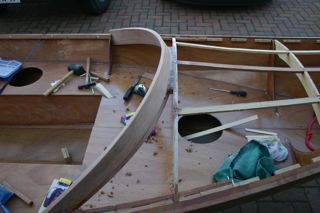
I have bit of time now so I will start the build log proper. If you want any specific info that I have not included, just reply to me and I will add that detail. As I have so many photos etc I don't feel it would be appropriate to add it all so I will keep it to a number of sections based on the build main steps.
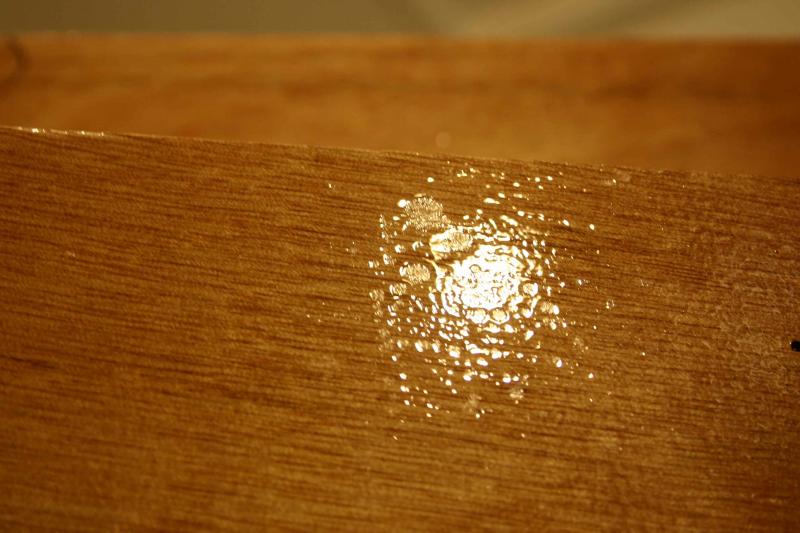
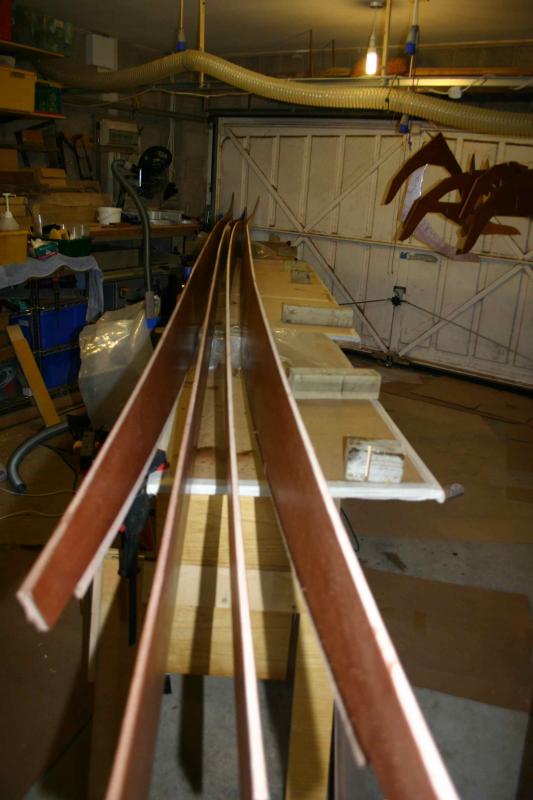
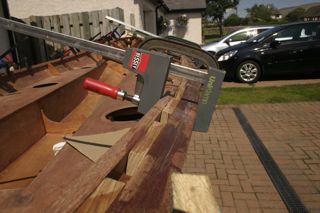
first off, was joining the boards, what I hadn’t appreciated was the size of the strakes (planks that make up the boat), they were very long, approx 22-23ft long once joined together. The strake joining went quite well, I followed the instructions that Fyne had provided. There was mixed views if I should resin the strakes before joining together, I did this but regretted it. If this is your first time with this resin, don’t do it on the strakes as there is a degree of learning how to resin before you commit resin to the real parts. I found that of the whole boat build, the resin application was the hardest thing, and even after a full 6 months of building, I still don’t feel I have got to grip with it. I dint particularly like the resin, it was temperamental and in my view gave very variable results. Also the practicalities of applying resin to 23ft strakes and positioning them in a way that they dry is quite difficult unless you have the room of a warehouse ! I got an orange peel effect with the resin, it came from the fact I applied too much, even though it felt that it was applied very light.
Last edited by pam5 (2 Dec 2011 8:12 am)
Offline
#8 2 Dec 2011 12:33 am
- pam5
- Member
- Registered: 16 Jun 2011
- Posts: 92
Re: 20 ft sea going rowing boat
As this was the first boat of this design for Fyne, there was no manual for the build. The quote from Fyne was " don’t worry about the build, we will be on the end of a telephone line and we will visit you when you get to the difficult bits".....and you know what, they did just that. I couldn’t have asked for more support, and over the 6 month build the guys always took my calls and were patient/supportive of all of my questions however remedial they were, their input has been invaluable.
The next stage was the joining of the strakes, what a job this was. It was suggested that I assemble all of the strakes and then add the internal bulkheads once together. it didn’t quite go like that, I had to add the bulkheads more or less after the first two strakes had been put together. I didn’t feel there would have been sufficient rigidity to build the shape without the bulkheads being in position at an early stage. Having done it like this I would do it again the same way. Putting the bulkheads in position gave me something to tie the very floppy strakes onto as the strakes were added and the boat sides got higher and higher. the other lesson learned was that the whole floppy arrangement needs to be free to sit on two trestles positioned at the end of the boat, this encourages the boat to bend in the middle, without this bend being introduced (Fyne called it the boat rocker) the joining of the strakes would not be possible. I found this out the hard way when I tried to assemble the boat on a flat surface, it just didn’t work. After this point you reach a big psychological point, a s the boat takes shape, planks of floppy wood take on the shape of a hull......you almost feel that you are making progress and at this rate, you should have it finished in a couple more weeks ! dream on, it didn’t quite work like that unfortunately.

Offline
#9 2 Dec 2011 10:36 pm
- pam5
- Member
- Registered: 16 Jun 2011
- Posts: 92
Re: 20 ft sea going rowing boat
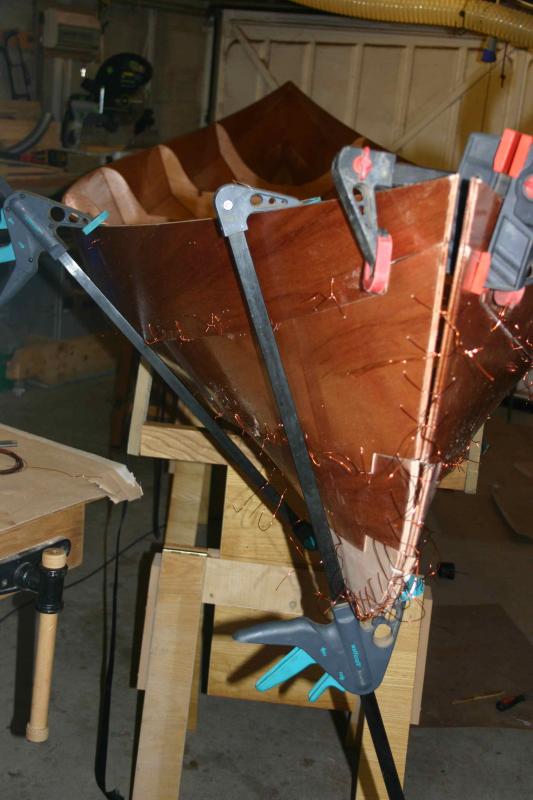
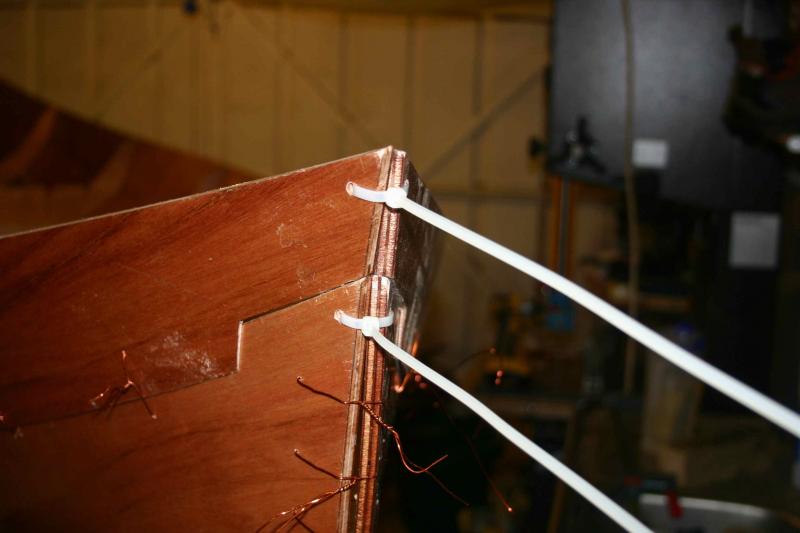
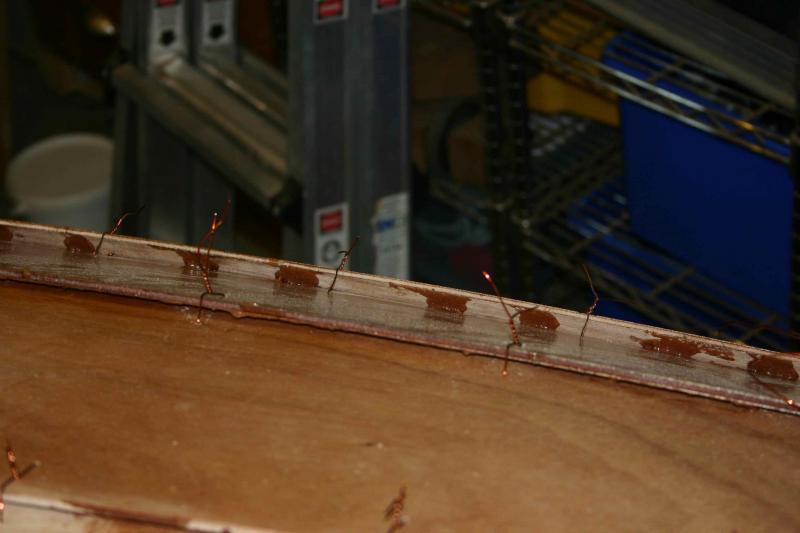
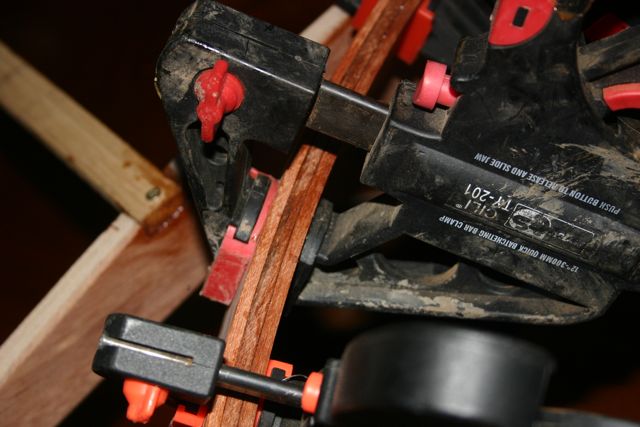
Eventually all of the strakes were on, but I deliberately left the ends at the bow and stern unfastened for about 500mm. they required a lot of bending in two dimensions, squeezing together to join and bending up towards the top edge of the boat. This was quite difficult to do. I had advice to use water to wet and soften the wood in an effort to help the bend. I decided not to do this as I was worried about staining the wood with water. Instead I used quick clamps and over two evenings I gently clamped them together and upwards....and it worked. At this point I joined the edges together with copper wire but due to the stress of the wood they pulled apart, so I supplemented them with some plastic cable ties.
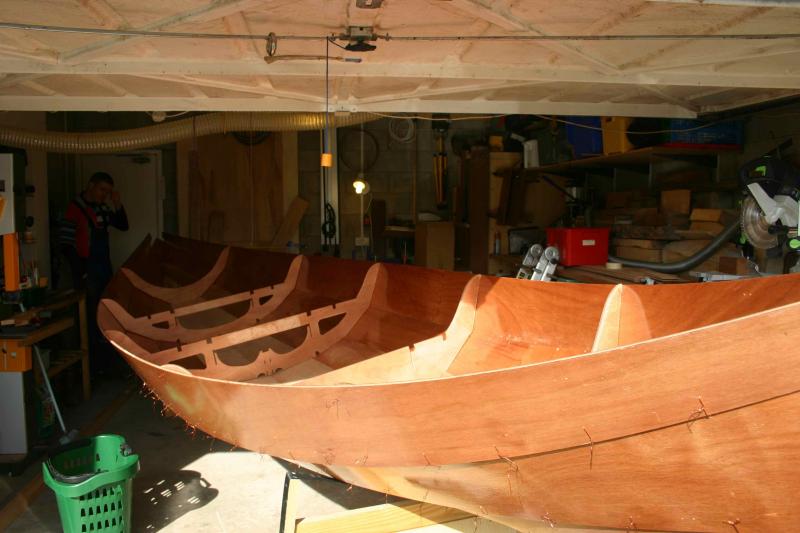
The boat took on a whole new dimension, it looked huge. Phil from Fyne visited me at this point and between us we tightened up all of the wires, put the boat on a couple of level trestles and levelled the hull. Simply this involved using the line of sight between to bit of wood positioned top edge then basically holding one end of the boat and twisting the other. we found that the stakes and wire holes were cut so accurately the amount of straightening on the hull was minimal. 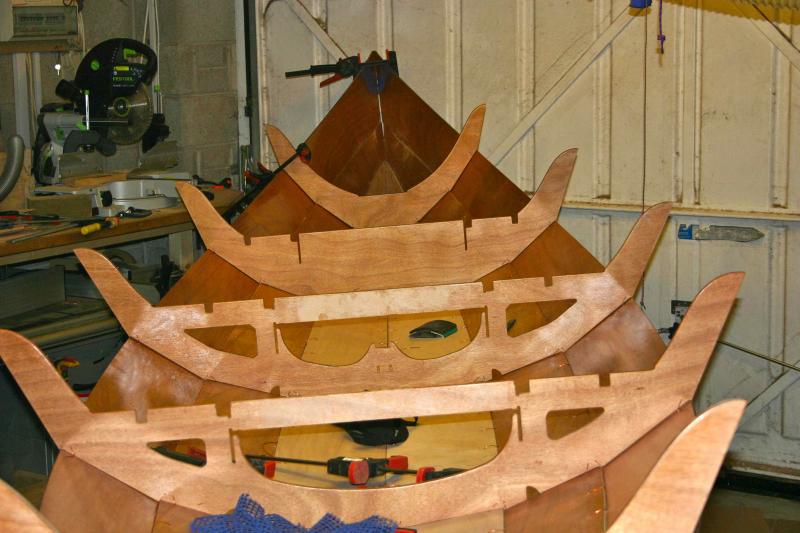
Offline
#10 2 Dec 2011 11:06 pm
- pam5
- Member
- Registered: 16 Jun 2011
- Posts: 92
Re: 20 ft sea going rowing boat
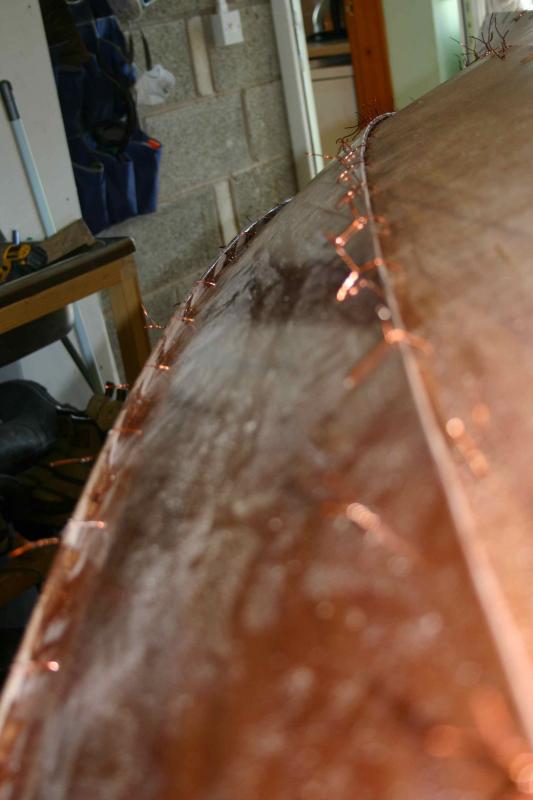
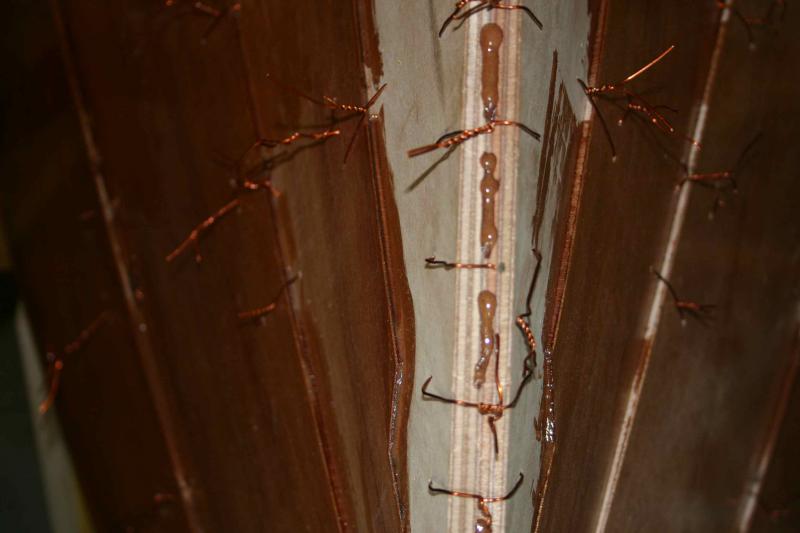
The next stage was to spot weld the outside of the hull together between the copper wires. The interesting thing about this boat was the size of the overhangs on the clicker build, they were huge On the strakes nearer the top edge they must have been 2-3 inches deep, and when back filled with resin silica mix these will form the longitudinal ribs of the boat and provide rigid strength.. As the boat was so big and the amount of mix needed to spot weld so large, I decided to make a 4 pump mix (quite a large quantity) and dispense it from a mastic type gun. I bought a number of very cheep tubes of caulk from Wilkinsons, they cost £1 each. I emptied the contents of the tube in the bin, removed the plunger, and cleaned the tube out and then filled it with my resin mix. It worked very well and made the application easy quick and with minimal mixing sessions.
Once the spot welds had dried I was able to snip the copper wire (a bit scarey as I thought the whole thing would spring apart) and even more scary, cut the wire holding he internal bulkheads I removed the internal bulkheads. it was amazing the hull stayed together. very very carefully I turned the boat the right way up and filled the strakes from the inside. I did use masking tape on the outside to stop any resin running through and also used masking tape on the inside on both edges of each strake joint to keep the mess down to a minimum. Tip make sure you remove the internal masking tape before the resin starts going off. All in all this initial joint filling worked very well and the dispenser was a success. I was able to fill the dispenser about 5-6 times before having to replace it. The boat was flipped over (once the resin had dried) and the external overlaps of the strakes were backfilled the following day. the amount of resin mix needed to do this was amazing. I made sure the nozzle of the dispenser was kept to a fine opening and I pushed it right down to the root of the joint and made the mix quite a sloppy mix to help the flow of the resin to the root of the joint. when the bulkheads were out, I added a couple of notched bits of wood as edge holders
Offline
#11 4 Dec 2011 10:14 am
- jerryferry
- Member
- Registered: 13 Jun 2011
- Posts: 18
Re: 20 ft sea going rowing boat
quite a challenge but thats the beauty of building your own boat, worth all of the sweat
Lifelong Angler ![]()
Offline
#12 4 Dec 2011 10:23 pm
- pam5
- Member
- Registered: 16 Jun 2011
- Posts: 92
Re: 20 ft sea going rowing boat
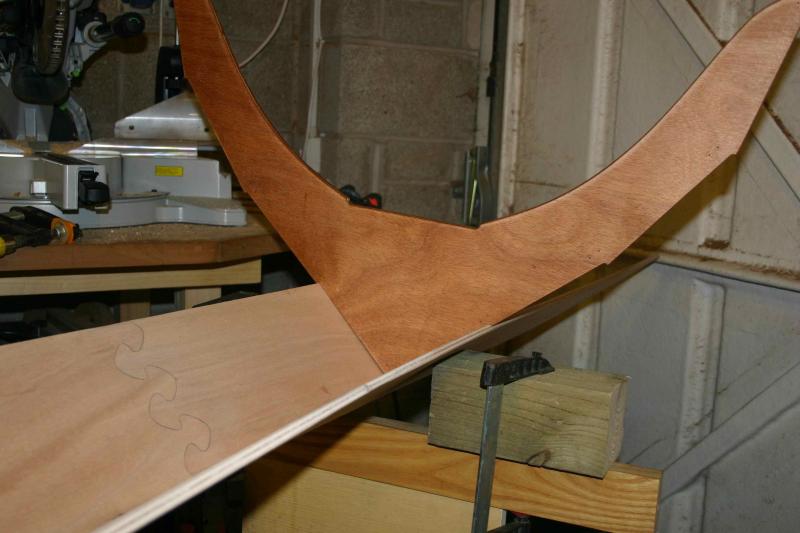
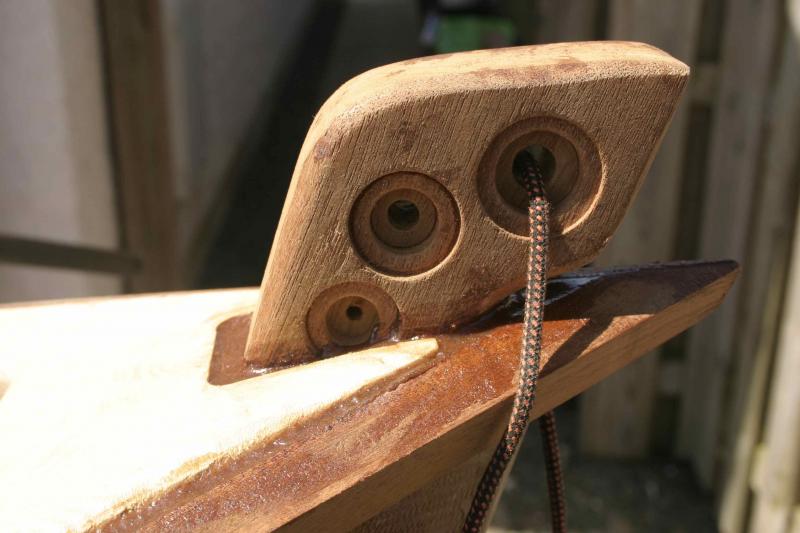
Making of the bow and stern bits that stick up over gunnels (don't know their technical name). First of all I cut a bit of cardboard to get a good fit in the bow and another for the stern internals. I wanted the pieces of wood for these parts to be a sort of a laminate, so I cut some oak bits for the centre and some teak bits for the outside surfaces (bit like a sandwich of oak between two bits of teak). I placed bits of oak on the cardboard and roughly marked out the angled joints, then cut them. I joined them using waterproof glue. As clamping was going to be difficult, I drilled the bits to my workbench and one by one glued the end, pushed it hard against the adjacent bit and when held tight, screwed that on to the bench as well (bench had sheet of plastic paper on it) as these bits were going to be covered by the teak, the holes did not matter. the glue used was bought from screwfix. The process worked well. Once I completed the oak internal, I then cut some strips of teak and roughly positioned on top of the oak making sure they covered the oak. I made sure the angled joints for these pieces, did not coincide with the angles of the oak, this in effect gave the oak joints additional strength from the teak. I glued and clamped the whole thing up. Finally I marked the cardboard profile back onto the wood and shaped it on the band saw and routed a nice round edge on it. Unfortunately I dint take a photo of this bit but I have one of the completed thing, you can see the two different types of wood. Unfortunately it turned out to be a bit short when I finished it and as a result I ended making it a funny shape to get the best out of it, I drilled the holes for decorative effect....some days I like it some days I don't.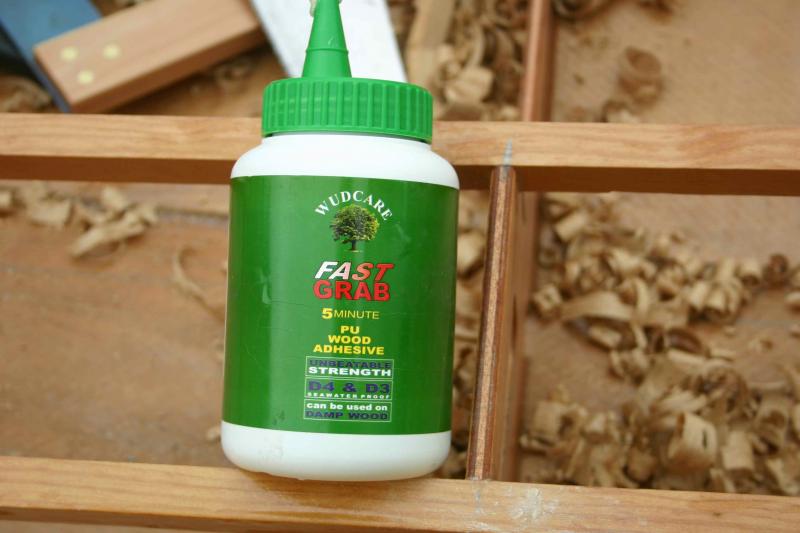
Offline
#13 4 Dec 2011 10:55 pm
- pam5
- Member
- Registered: 16 Jun 2011
- Posts: 92
Re: 20 ft sea going rowing boat
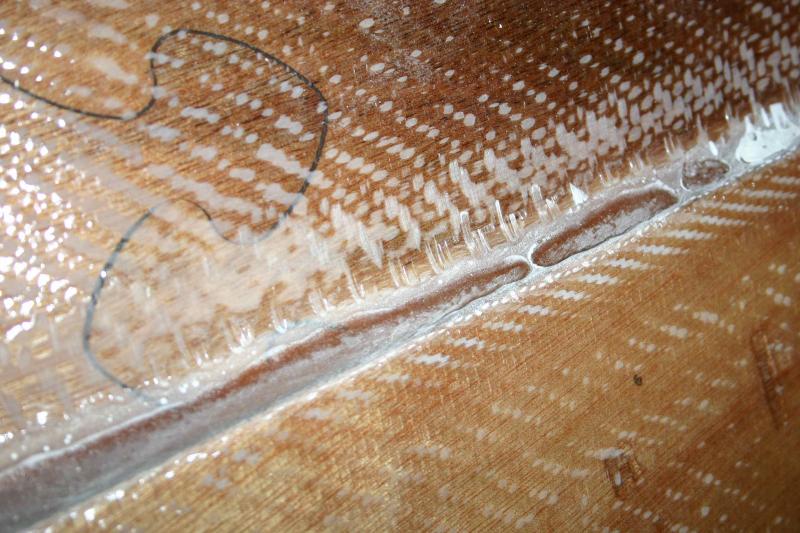
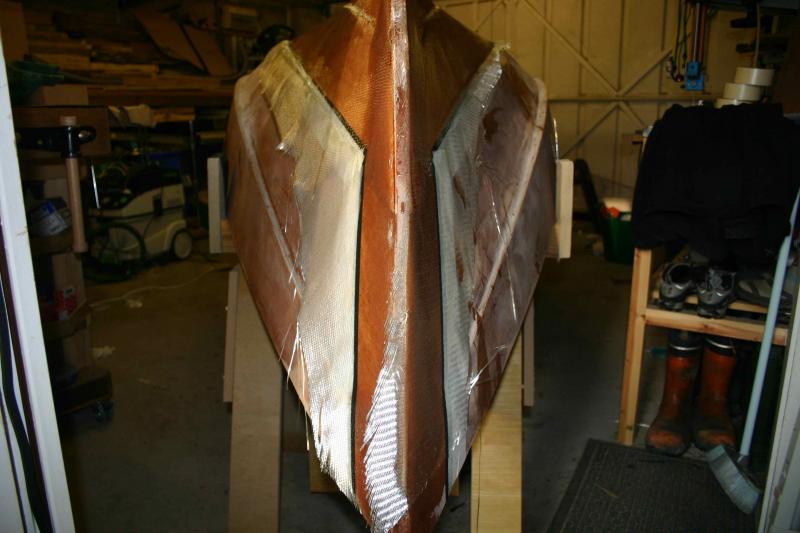
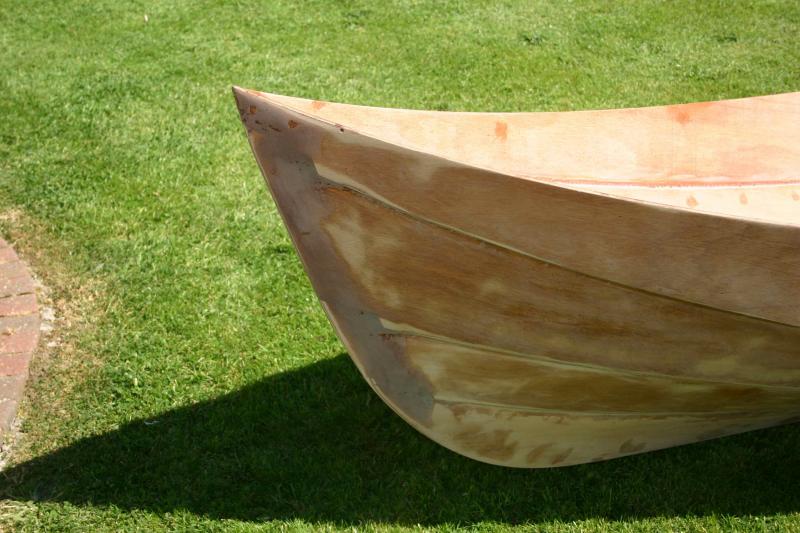
The next stage was to cover the first two strakes internal surfaces with fibreglass matting. Even thought the plywood was 10mm thick I was told the boat would need matting on the internal and external surfaces of the first two strakes. I decided that it would be easier to put the internal matting down in single long pieces, one for each strake. I done a test prior to this to see if the single piece would mould over the individual strake joints, it concluded the matting would not bend enough and would probably lift over the joints and end up leaving bubbles, so I ended up doing it in 4 long bits. Fyne told me not to go too far towards into the bow and stern as the matting again might have difficulty with the sharp angles, I ended up covering these with tape matting rather than sheet. As you can see from the photo, I used masking tape, I put the black tape right on the edge as it helped me cut right to the edge with a stanley knife when the resin had dried. I found that using masking tape alone made it difficult to differentiate between masking and resin, the black tape was easier. 
Offline
#14 4 Dec 2011 11:41 pm
- pam5
- Member
- Registered: 16 Jun 2011
- Posts: 92
Re: 20 ft sea going rowing boat
The outside matting....tuned out to be a bit difficult and a bit of a dogs breakfast. I did a test and placed a single piece of matting over the whole external surface it seemed to shape itself quite well over the joints/overlaps. I left it overnight and applied the resin the next day, at various points on the hull where the angle of joint were steep, the matting came away from the resin, and it couldn’t be flattened down, so I ended up with some longitudinal bubbles. When the whole thing was dry I had a bit of rework to do to remove the affected areas and fix. It was quite difficult as every one was on the angled joint area. If doing it again, I would use single strips for each strake. as you can see I carried the resin up the bow, this was also the case on the stern.
Offline
#15 4 Dec 2011 11:58 pm
- pam5
- Member
- Registered: 16 Jun 2011
- Posts: 92
Re: 20 ft sea going rowing boat
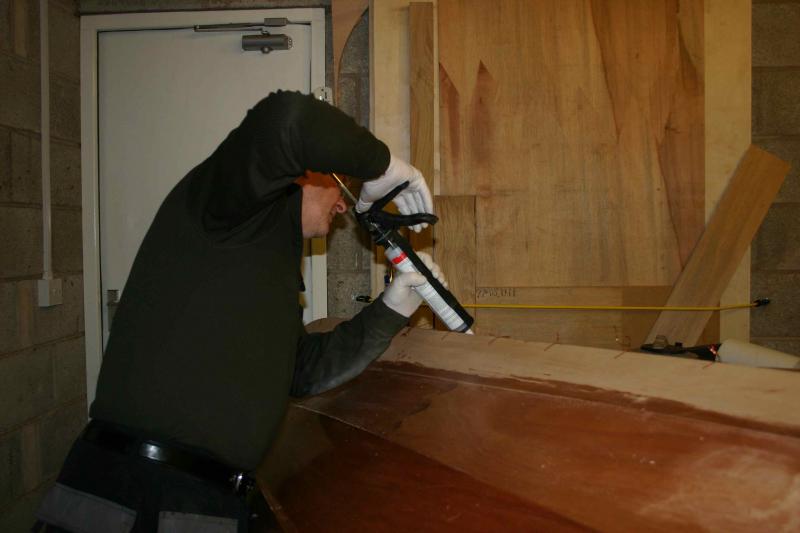
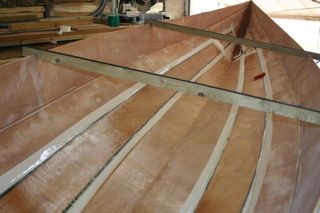
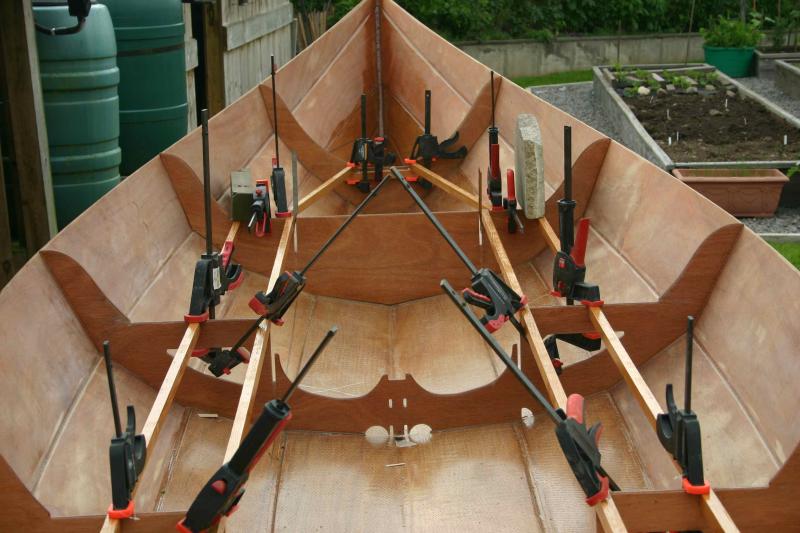
Next step was refitting the bulkheads, I held them in position with quick clamps, and one bit of copper wire at their lowest point, I measured the position of each one form both sides of the boat to make sure they were square and roughly in the position of the original copper wire holes that held them in place. I applied masking tape, then I made good batch of resin and filler. Again I used my cheap dispenser and made the fillets for each bulkhead in quick succession using a 5-pump mix in each one ! In hindsight I think I placed the masking tape too close to the bulkheads and as a consequence, the fillets were medium in size and should have been large in size. I felt at this point with the matting on inside and outside of the hull and bulkheads secured in place, the boat took on a whole new rigid strength. it was the first time that I felt that it would be capable of going onto the sea chop and not flexing.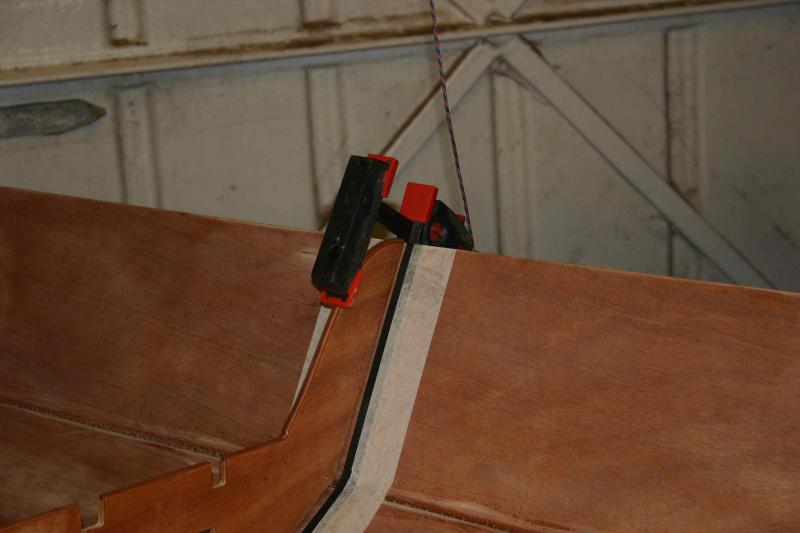
Offline
#16 5 Dec 2011 12:26 am
- pam5
- Member
- Registered: 16 Jun 2011
- Posts: 92
Re: 20 ft sea going rowing boat
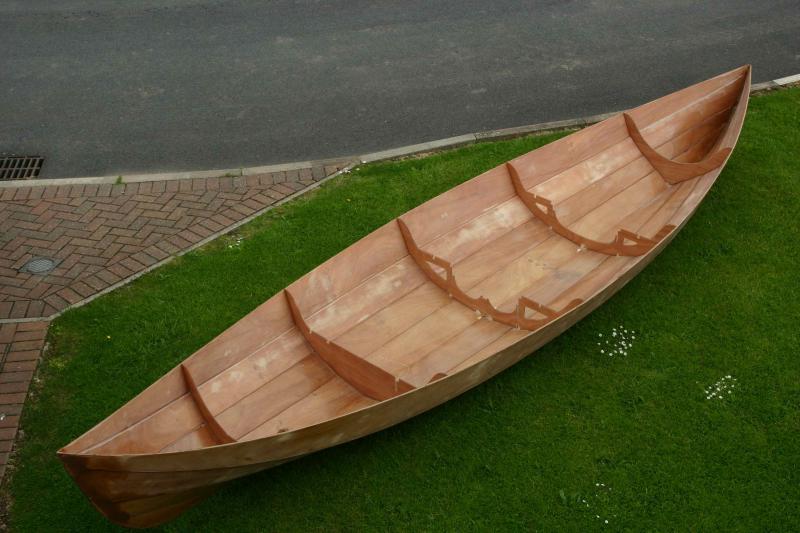
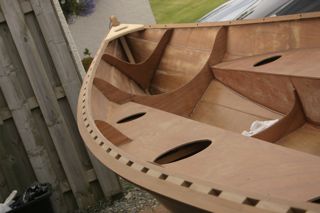
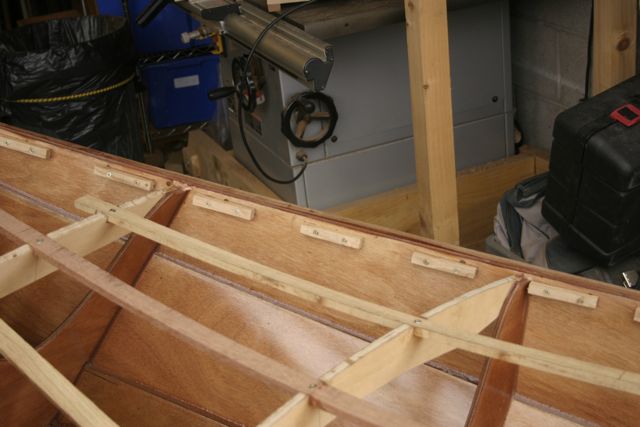
Fitting out the internals. The first stage was to assemble the buoyancy tank sides, and internal decks. The fore deck was in a single large piece and the tank tops were assembled with finger joints along with the tank sides. I took care with the joints having learned a lot from my other joints and it paid, off they looked very good. I also applied resin in a completely new way. I only applied the very smallest amount by pouring a thin thread of it from the mixing cup directly onto the surface, then immediately spreading it around with my plastic spatula, if the resin was warm enough it would spread a long way. The most important thing I found was that you are attempting to do nothing more than change the wood tone from a dry look to a just damp look, if you achieve this , rather than a glossy look you will get a good result. Once the resin had been spread as far as possible with the spatula, I then run the sponge roller over it (not adding any resin just using what was already on the wood) to even out the colour tone to all one colour. When finished it just looked like I had dampened the surface. Once dry, give it the lightest of rub with 120 grit paper and repeat the process. I got a very effective coating that when sanded, took the varnish very well.
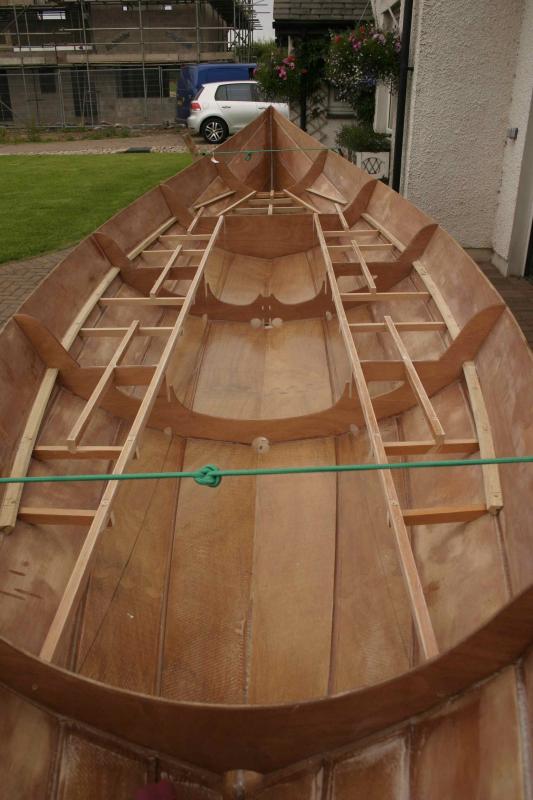
Phil joined me at this point and we had to do a bit of fettling of the tank sides and deck to get them to fit, ant it was at this point that we concluded the fore deck and tank sides if joined together to make one very large 'n' shaped bit, would be almost impossible to fit into the boat and positively mate up on all of the tops of the bulkheads, so we took the decision to cut the fore deck into two pieces and join it up as two separate bits. We were careful to cut it neatly as we were going to have to join it back together again. Once the tank sides and fore decks were joined together I set up all of the internal support struts and used resin to secure them in place. As the boat was going to get bit of stick in Scotland, I added s little more support struts under the tank tops, fore deck and sides, they were all secured using resin and silica mix. At this point I fitted the bow and stern raised bits of wood (still dont know their name)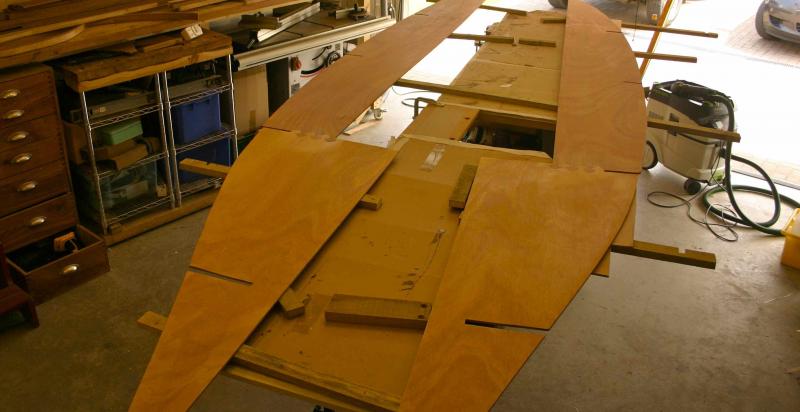
Offline
#17 5 Dec 2011 10:28 pm
- pam5
- Member
- Registered: 16 Jun 2011
- Posts: 92
Re: 20 ft sea going rowing boat
With the support struts in place, the next job was to prepare the inside areas that were going be hard to get at after the tanks and deck has been installed. I sanded everything down with 120 grit paper. I did not try to fill the weave of the matting on the inside of the boat, I wanted it to keep its weave so it added a bit of grip. All in all, I added 2 good coats of resin throughout (on top of the previous coats). I spent a bit of time pouring some resin silica mix down in between the prow bit and the very front of the boat to secure it in place. I did a dry fit of the tank tops, sides, and decks and spent a little of time trimming up bits and bobs that overhung before I stuck them down. Sticking them down was a straightforward affair; I did the tank sides first and clamped them onto the struts. Once dry I did a little more trimming ready to take the decks. for these I added a fillet of resin silica mix along the tops of all of the struts that contacted the decks, I carefully placed the decks in place and weighed the whole thing down with loads of broken paving slabs, making sure all the decks contacted the struts. This worked very well. 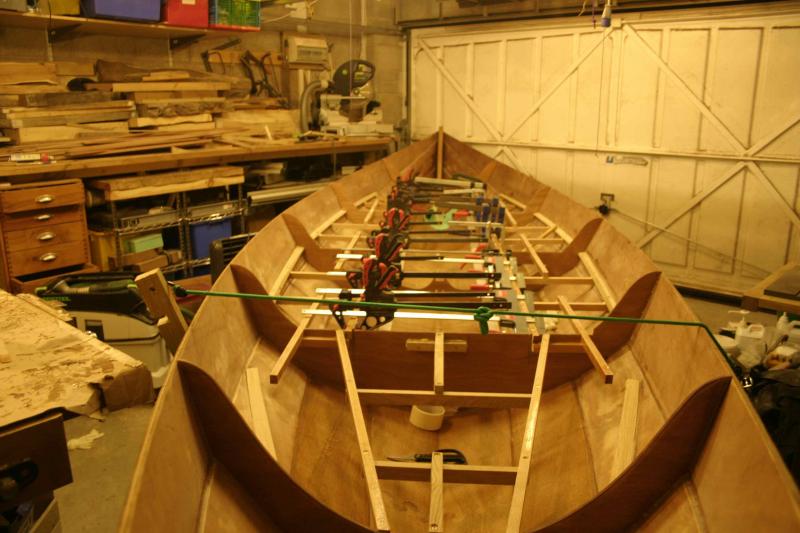
Offline
#18 5 Dec 2011 10:31 pm
- pam5
- Member
- Registered: 16 Jun 2011
- Posts: 92
Re: 20 ft sea going rowing boat
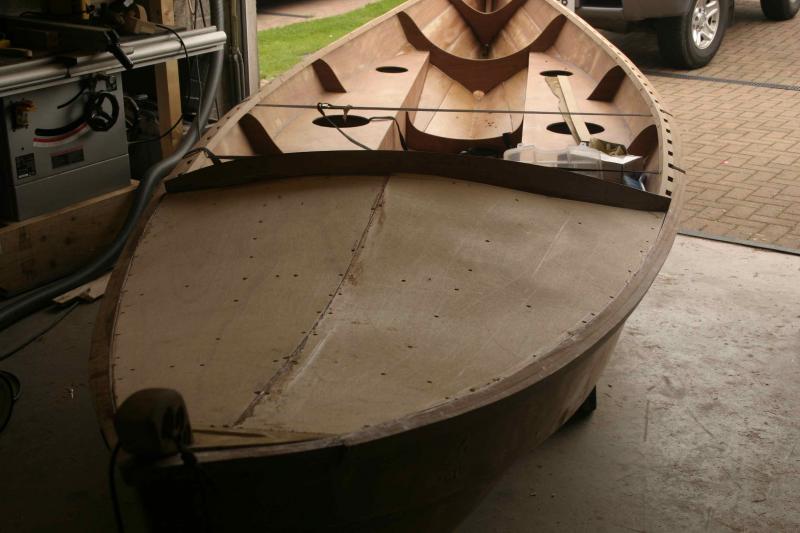
Once the sides and decks were in, it was clear there was a little bit of misalignment that would need a bit of filling. I was difficult to know if it was a result of some inaccuracies in the supplied panels or in the final shape of the hull as a consequence of discrepancies in the build, I suggest it was the latter. considering the boat was now 20ft long, I think you will agree the errors were only very small.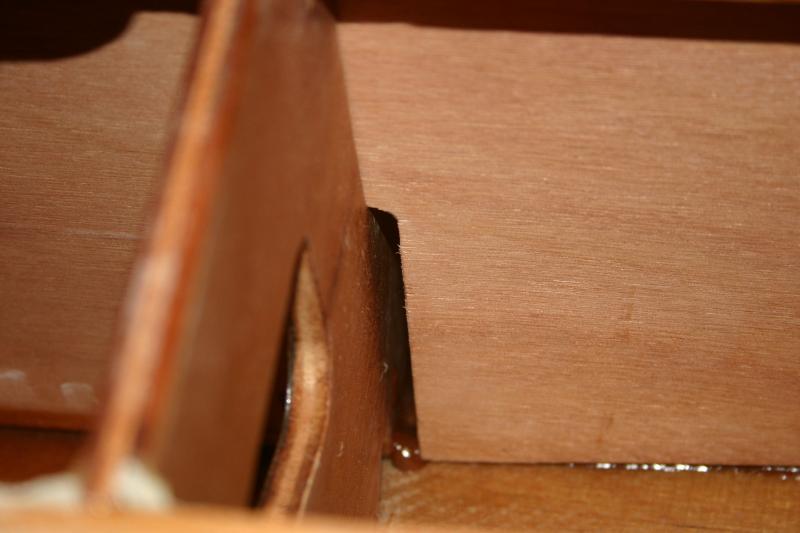
Offline
#19 5 Dec 2011 11:01 pm
- pam5
- Member
- Registered: 16 Jun 2011
- Posts: 92
Re: 20 ft sea going rowing boat
I cut the water tight hatches with a jig saw and placed the hatches in without securing them down.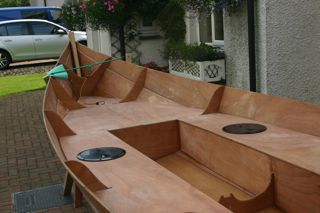

Offline
#20 5 Dec 2011 11:11 pm
- pam5
- Member
- Registered: 16 Jun 2011
- Posts: 92
Re: 20 ft sea going rowing boat
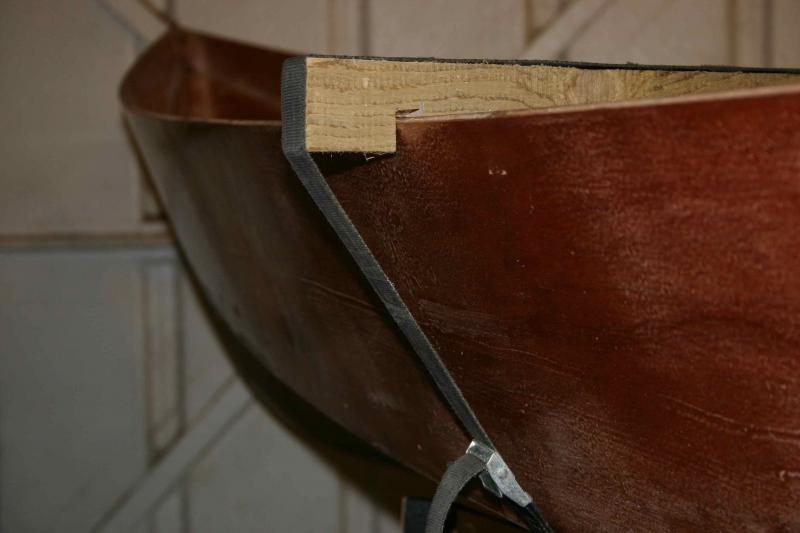
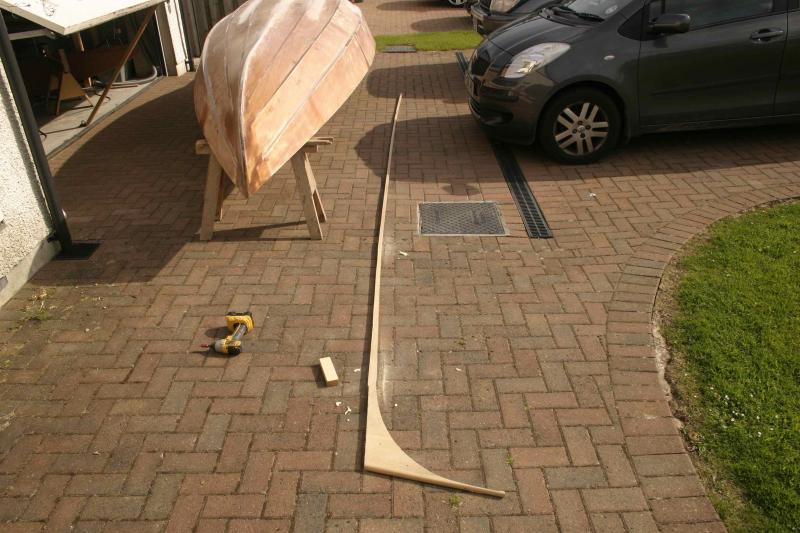
A little note about the wooden bits that will be used to make up the things like the gunnels, decks and rubbing strips on the outside of the hull. Ultimately I wanted to keep the cost down as much as possible but I also wanted it to look good and a bit classic in design. I was passed a number of National Park signposts, these had been cut down and replaced with new ones as they were looking worst for wear, they had been passed to me for fire wood. When I picked them up I was surprised to feel how heavy they were, indicating they were either very wet soft wood or good quality hard wood. The posts were about 6ft long ad 5x5 inches. Once I cut through the first one on my band saw, I was shocked to find it was a beautiful dark wood (don’t know the type) and some of the other ones were English oak. That was it, I used these to make up my gunnels, I did a quick calculation and found I would have enough for all of my extra wooden bits like decks etc.
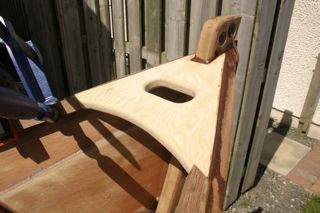
I made a couple of breast hooks out some different colour wood and secured them in place
I wanted to make quite thick gunnels that were ornate yet would also provide a good degree of strength, I wanted to have a slatted design that could be used for fastening dry bags etc on with straps, and I wanted the slats to be used to hold the rowlocks. I settled on the design that used oak blocks and dark wood externals. It was actually quite an easy thing to do, cut all of the oak block the same size and carefully drilled each bit with two small holes, I used one block to create the spacer between the blocks, and added the resin silica mix to the to one side and screwed the block onto the internal top edge of the boat, the screws were there to do nothing more than clamp the blocks in place. Once the resin had gone off, I removed the screws. The dark wood edges were then resin to the oak blocks and held in place with clamps, as the bits of wood were only 6 ft, I had to scarf them together to get the full gunnels length. when finished it looked fantastic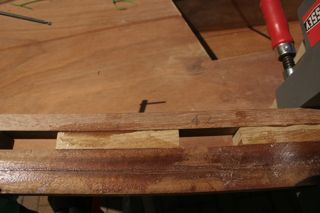
Offline
#21 6 Dec 2011 10:34 pm
- pam5
- Member
- Registered: 16 Jun 2011
- Posts: 92
Re: 20 ft sea going rowing boat
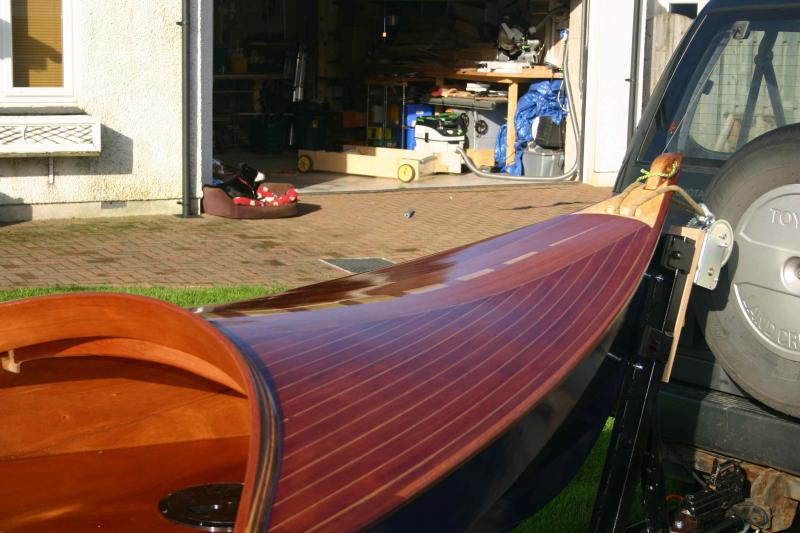
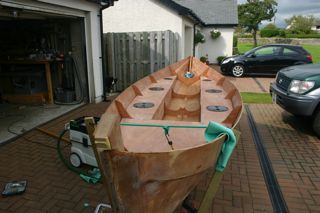
When you get to this stage you get the feeling you are on the home run, but you are wrong, there is so much to do to tidy up the outside of the hull, the cleaning off of redundant resin and filler, all those little bits you thought didn’t matter because it was only a little bit and would easily clean off at a later date. Unfortunately for me, over the entire surface area of this 20ft boat, that equates to quite a bit of work and it was quite a bit of work. Sanding is a hard work even with the orbital sander, it is essential that you always think how the pad is touching the surface and there is the tendency to want to tilt the pad to get the sanding action just in the right place. if you are not careful you can make a right mess of it. Ultimately I had quite large problems with the initial coats of resin I applied, it all took on an orange peel effect and it was the devil to sort out. As you can see from the photos, the fairing up of the bow and stern was a multi stage process, add a little, allow it to dry and sand off, then add a little......etc etc. I wanted to use a solid wood keel rather than the ply keel that was supplied, I applied a resin silica mix but screwed it from inside the hull and this made sure it was clamped down onto the hull, it removed the screws once the resin had gone off. I also added a couple of rubbing strips on either side of the keel as I knew the boat would be pulled up the beach and on stony shores. the gunnels lough rough in the photo but they sanded down to a nice taper front and back.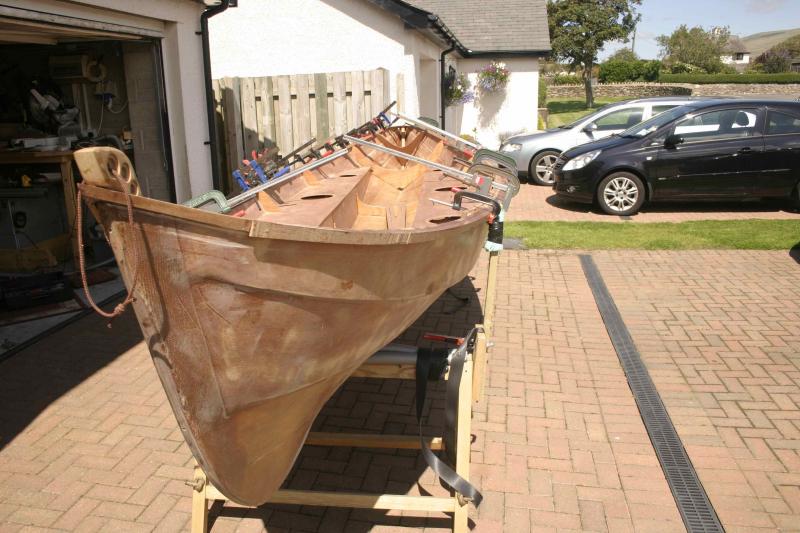
Offline
#22 6 Dec 2011 10:58 pm
- pam5
- Member
- Registered: 16 Jun 2011
- Posts: 92
Re: 20 ft sea going rowing boat
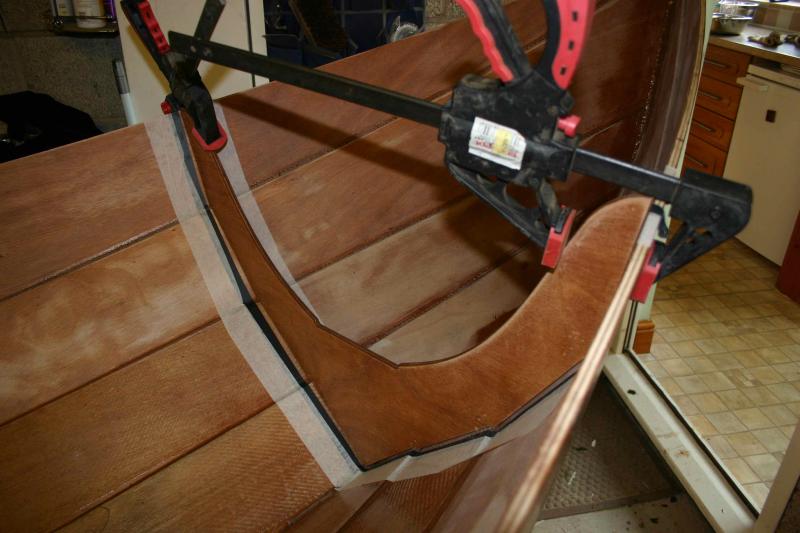
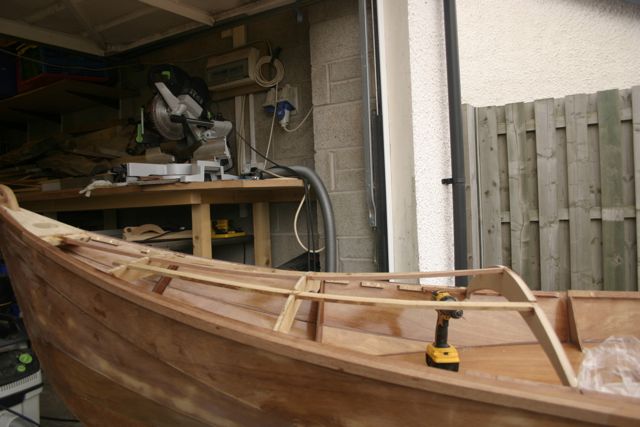
The 'curvy' deck as someone called it. it was quite a dilemma as we didn’t have any plans for it and really it was down to trial and error. I talked to Paul at Fyne and he gave me some ideas, I was supplied with some extra ply to use. I made a couple of mock-ups using cardboard. first attempt involved a straight forward curved single dimension deck, something similar to and Atlantic rowing boat, it looked horrid and took the lovely 'lift line' away from the bow, it also looked like it would catch the wind as well. I looked on some websites for inspiration and came across a couple of cedar strip decked sea kayaks, that had a compound curved deck, I decided this is what I wanted. I wanted to carry through my oak and dark wood effect and have some form of classic strip design and at the edge of the deck have a dark wood raised dodger to deflect splashes. I built a few ply wood webs and positioned them in the bow section and secured them with clamps to the bulkheads. I adjusted the curves up and down, and then added a bendy stick from the bow to the end of the deck and the some bendy stick across the width, the idea was to create the deck profile so I could stand back and look at it to see if it curved right and was in proportion. some of the above photos show the support strips then secured in place to make the framework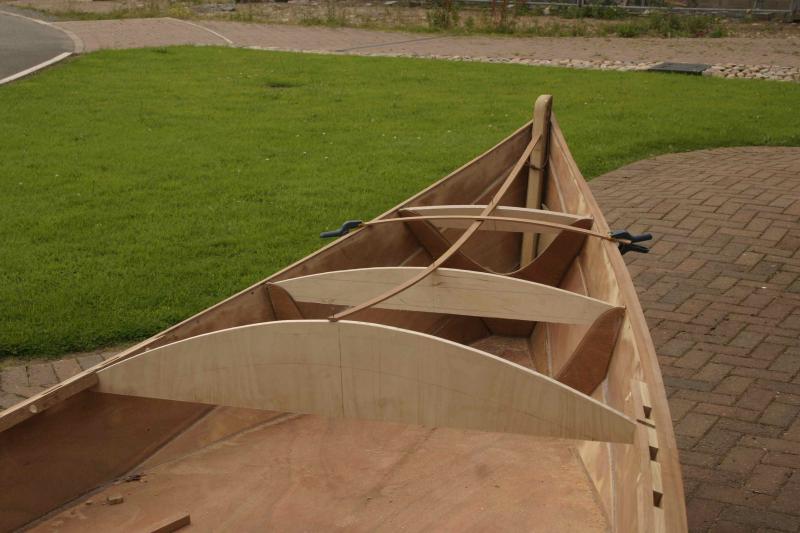
Offline
#23 6 Dec 2011 11:05 pm
- pam5
- Member
- Registered: 16 Jun 2011
- Posts: 92
Re: 20 ft sea going rowing boat
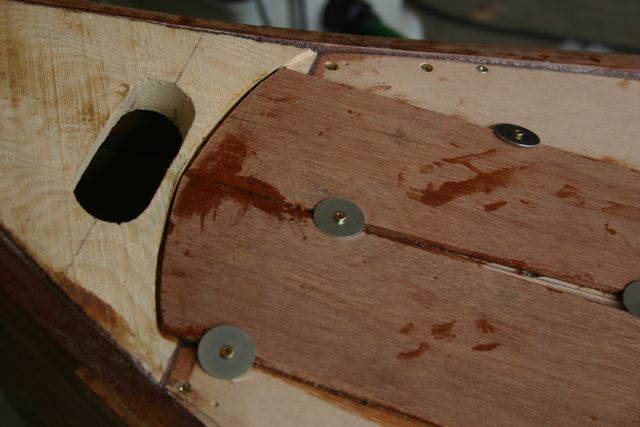 I looked on the internet to see how you do a strip deck and how you hold everything down, it seemed that you could use a screw and washer method, and key to this process is the thin plywood deck below the strip effect. the screws serve two purposed, they hold down the washer holding down the strip and secondly, for the strips they act as spacers between the strips, something like tiling a bathroom !
Offline
#24 6 Dec 2011 11:18 pm
- pam5
- Member
- Registered: 16 Jun 2011
- Posts: 92
Re: 20 ft sea going rowing boat
So back to the beginning, I had to make a frame, glue the ribs of the fram to the curved support webs (see photos in previous posts) and once dries I committed a sin and cut up that lovely bit of ply wood (5mm I think) to a rough shape in tow bits to fit tightly over the framework. it took a bit of messing about and fettling but I got it to fit. the side blocks were set at a level below the top edge to a distance that would allow both the ply wood and strip deck to come just flush with the top of the gunnels. I marked the position of the frame onto the top side of the ply wood, lashed the frame up with a resin silica mix and then placed the play wood carefully on top. I screwed the plywood to the frame using the lines I marked earlier to guide my screws through into the frame. Again when the resin dried I removed the screws. This in effect made up the base for building the strip deck.
I have got out of sequence I should have told you how to make the curved dodger....I will do this next. It should have be talked about this before I talked about the ply deck
Last edited by pam5 (6 Dec 2011 11:20 pm)
Offline
#25 7 Dec 2011 11:47 pm
- pam5
- Member
- Registered: 16 Jun 2011
- Posts: 92
Re: 20 ft sea going rowing boat
The bend. As you can se from the first photo, the deck frame ended at a certain point, I wanted a spray dodger on the front and could have just had a straight one that run across the boat however I wanted to have a curve effect that looked good yet would provide a nice sort of back rest for anyone sitting on the fore deck. I used the sign post wood and cut it into 5mm strips about 120mm wide. working out the length was experimental, as I wanted the edges to end at the bulkheads and in effect sort of lock into that position. The bending was trial and error, I would lock one side of the wood against the bulkhead with a clamp then using both hands gently bend the wood bit by bit until I could squeeze the edge right up against the opposite side bulkhead. The key to it not snapping was to do it a little at a time to allow the wood to relax. It took a few minutes before it could be gently persuaded in. I snapped a couple before I got the knack. Having proved that the bend was possible, I cut the rest of the strips as I wanted it to be a laminate of three strips to give it strength and rigidity. 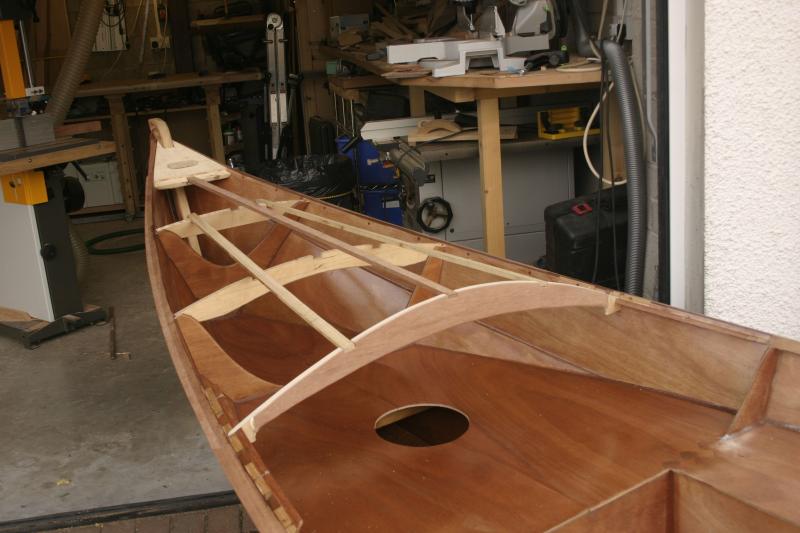
Offline