A forum for discussing wooden boats and boat building
You are not logged in.
- Topics: Active | Unanswered
#376 21 Jul 2020 6:34 pm
- Bergen_Guy
- Member
- Registered: 6 Feb 2020
- Posts: 353
Re: Waterlust sailing canoe in Norway
Gents, both boats are looking very very good. SP, your level of preparation, as always, is exemplary. I am sure that your deck will go on just fine! Martin, I think your row of cleats looks pretty neat, everything is easily at hand, and after a few sails I guess you will automatically reach for the right line. I like the piece they are attached to, that’s neat. I use a canoe portage trolley a lot for moving Svale around. Like you I put the wheels under the bow, and just hold under the skeg aft. The weight of the boat appears to be sufficient to keep the wheels in place with my wheels, apart from if I try to go over small kerbs, or transition from gravel to tarmac, then I wish the tie down strops were long enough to make an arrangement like yours! Good luck with the first sail. (When is that?). Nice hatch covers too, where did you find them?
In the few places I have used screws to attach either the deck or the rubbing stake, I had no issues at all getting them out, so I am sure your method will work fine SP, I also love your screw sculpture- I spotted it in the first pic before you introduced its function and wondered what it was!
Good luck with the next steps to you both!
Guy
Last edited by Bergen_Guy (21 Jul 2020 6:58 pm)
Offline
#377 22 Jul 2020 8:21 am
- MartinC
- Member
- Registered: 3 Apr 2020
- Posts: 353
Re: Waterlust sailing canoe in Norway
Thanks Guy.
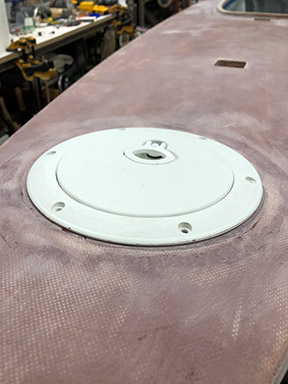
Not sure when the first sail will be - probably early August. I am waiting for inflatable launching rollers delivery from FBK.The hatch covers came from Classic Marine.
One thought:- The only part of the boat which is truly unique to our boats and therefore irreplacable is the forward hatch cover - matching as it does the wood grain of the deck. It is probably impractical to secure it, but I am thinking of sticking a square of polystyrene to the underside so at least it will float high in the water giving me time to retreive it (or time to say goodbye!) if it goes in. Do you two have any ideas on this?
Any thoughts on the best way of securing the tiller to the rudder yoke?
Offline
#378 22 Jul 2020 9:22 am
- Bergen_Guy
- Member
- Registered: 6 Feb 2020
- Posts: 353
Re: Waterlust sailing canoe in Norway
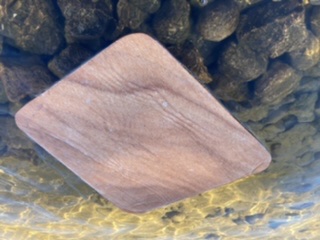
That is a very good point in the forward hatch covers. I suspect they float anyway (I can do a test in a few minutes...) but additional floatation sounds like a good idea. The other option is some sort of tether attached to the underside of the hatch cover and the underside of the deck, but that could get in the way.
As for attaching the tiller to the yoke, I was imagining I would use thin rope for that job and simply lash the two together. Here is an article in the small boats magazine showing a few variations; https://smallboatsmonthly.com/article/t … an-tiller/
The nice subtle coloured hatch covers and bronze eyes really look classy. Nice.
Back with the results of a flotation test in a bit!
Last edited by Bergen_Guy (22 Jul 2020 9:24 am)
Offline
#379 22 Jul 2020 9:36 am
- Bergen_Guy
- Member
- Registered: 6 Feb 2020
- Posts: 353
Re: Waterlust sailing canoe in Norway
It floats awash!
Offline
#380 22 Jul 2020 9:37 am
- Bergen_Guy
- Member
- Registered: 6 Feb 2020
- Posts: 353
Re: Waterlust sailing canoe in Norway
Offline
#381 22 Jul 2020 1:21 pm
- spclark
- Member
- From: "Driftless" Wisconsin USA
- Registered: 19 Mar 2020
- Posts: 478
Re: Waterlust sailing canoe in Norway
Haven't gotten to details about keeping stuff tethered in the event of a spill but it's not too soon to begin thinking about it, yes! As I'm planning to add a couple of stiffeners to my hatch there'll be ample opportunity for forming an attachment point for a thin cord or lanyard that then would be secured to the hull. Good knowing it floats though!
Took all of 3-1/2 hours yesterday afternoon - one solid respirator & gloves-all-the-time-session mixing batch after batch of epoxy (4 pumps! 4 pumps!) to get my deck bonded. I lost count of just how many batches but as I approached the task in stages there were three of unthickened mix to wet out the hull's contact surfaces in all: forward section to mid-way along cockpit, then another back to the frame behind the cockpit, then the last 1/3 to the stern.
Other batches were thickened as needed with cell-o-fill then loaded into 75ml plastic syringes equipped with shortish pieces of small vinyl tubing. This allowed getting the mix into spaces that otherwise would be too tight for the syringe and my hands while dispensing.
I was careful to time the thickened mix's placement so that the epoxy previously placed had begun to firm up a bit otherwise I'd found earlier that the stuff can get kind of runny. Dispensing through syringes demands a thickened mix that's already thinner than one might employ if spreading with other tools so it's a fine line.
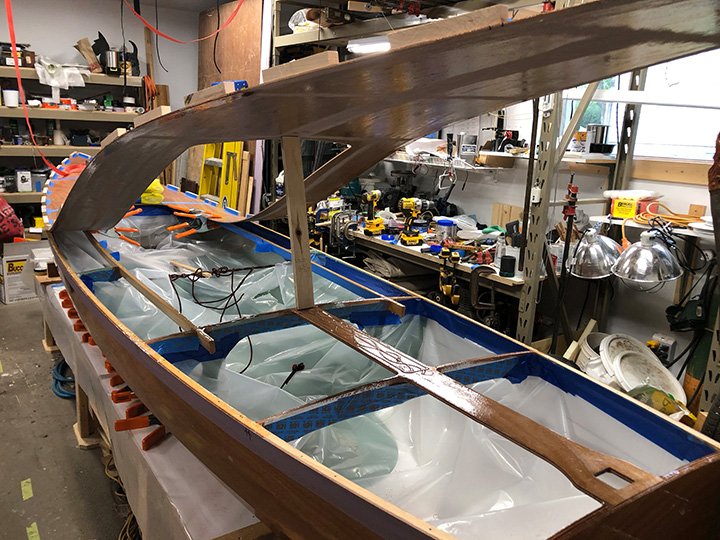
This shows the forward 1/3 bonded then secured with the cauls & screws I prepared prior to dry-fitting over the last couple of days. Weights were used where screws would have risked splitting frames and where I wanted to ensure good contact between deck and the forward mast pocket cap at frame #1. This is at part 2 where the forward deck's secured and I've placed epoxy prior to bringing deck down onto hull.
Only dicey part was with the deck held aloft by my Harken Hoister at the very beginning. I had to remove the forward hoister's strap to allow the deck to touch the hull at the stem. A couple of screws at the very stem got things secured enough I could then work my way back along each sheer clamp until I'd approached the point where I stopped with the epoxy, where the two deck sections' puzzle joint is located, shown above. Having drilled all the screw holes during the last dry-fit stage helped keep things lined up once it got really serious.
This last image shows the completed operation from the stern end, all cauls & screws in place and some hefty weights used to bring deck and hull bits together at the centerline before the edges are pinched together:
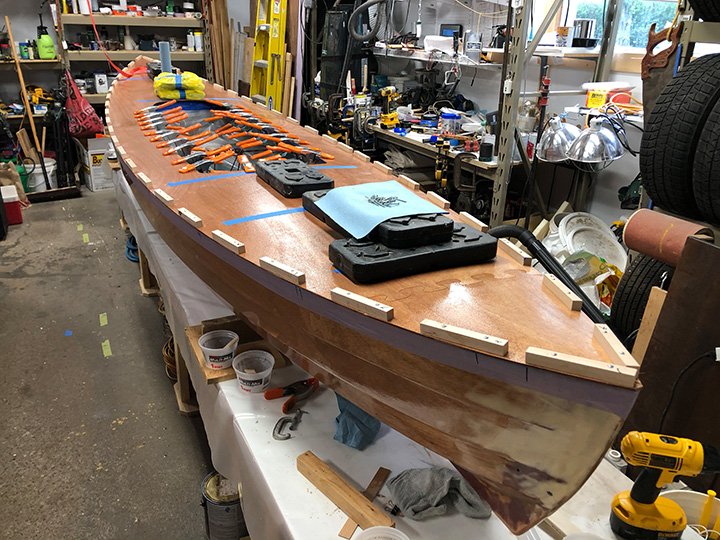
Squeeze-out was removed as further work proceeded. There's a smallish gap - on the order of 1/32" / ~ 0.3mm or less - at the shear/deck joint. That appears to have been nicely filled with the thickened epoxy, the cauls helping to keep things under pressure despite the screws not being cinched down tightly.
Just this morning, roughly 16 hours after the bonding operation was completed, I broke all the screws free by hand with a satisfying snap from each. Only one screw failed to loosen, breaking off about 0.5cm under the head. Probably a defective screw... came away easily in a pair of vice grips after I pulled the caul free exposing the broken shank.
So tonight after work I'll fill all the screw holes with a thinnish mix of epoxy & cell-o-fill using a syringe & needle. Expect to place deck's fiberglass sheathing this weekend.
Did any of you add fillets to the deck stringer - deck angle or the frames at both ends of the cockpit once you'd bonded your deck in place? I'm contemplating that as something worth doing while I can have the hull held aloft upside down now.
And a last note: with all the weights off but the cauls still screwed down, I got an idea of weight at this stage - 115 lbs / 52.3kg.
Last edited by spclark (22 Jul 2020 1:23 pm)
Offline
#382 22 Jul 2020 1:58 pm
- MartinC
- Member
- Registered: 3 Apr 2020
- Posts: 353
Re: Waterlust sailing canoe in Norway
Well done SP! That's the last major milestone passed.
Yes. With the boat bottom up, I knealt underneath the cockpit and applied fillets where I could reach, partly to give extra strength but mainly to tidy up the join where epoxy had squeezed out and I couldn't chip it off neatly.
You have just got the final 'breath holding' moment of cutting the deck hatch now!
Offline
#383 22 Jul 2020 8:52 pm
- Bergen_Guy
- Member
- Registered: 6 Feb 2020
- Posts: 353
Re: Waterlust sailing canoe in Norway
Exemplary SP, as we have come to expect from you now! Well done, I look forward to seeing the rest come together. Yes, I also did a round of fillets on the inside where I could easily reach them.
Offline
#384 25 Jul 2020 8:09 am
- MartinC
- Member
- Registered: 3 Apr 2020
- Posts: 353
Re: Waterlust sailing canoe in Norway
Single handed car topping technique is developing. Getting Gaia up onto the roof is OK now, but I am still working at a slick removal technique which isn't too fast! It is the length rather than the weight which is causing me some headscratching!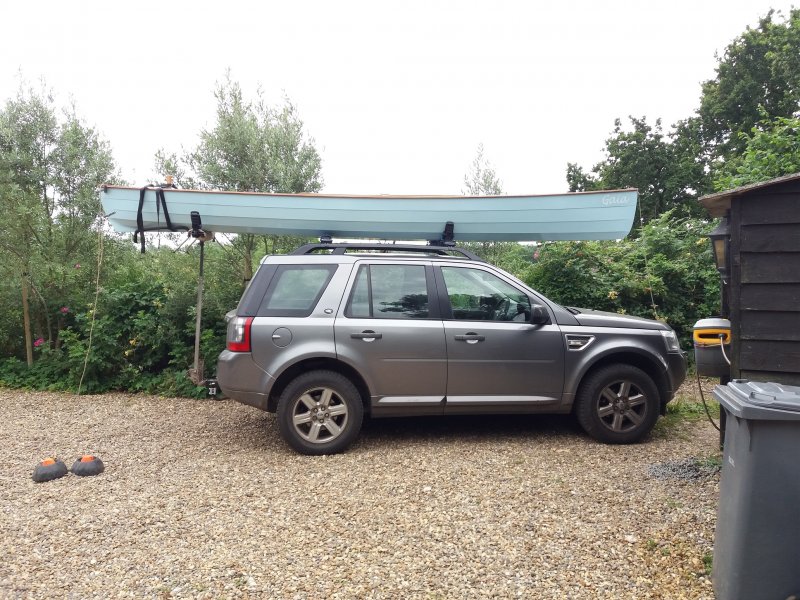
Offline
#385 25 Jul 2020 2:41 pm
- MartinC
- Member
- Registered: 3 Apr 2020
- Posts: 353
Re: Waterlust sailing canoe in Norway
I stumbled across this https://www.youtube.com/watch?v=x75AlukV3q4 which may be of interest.
It is a bit late for me at my stage of the build, and the fitting out is not the direction I am going in, but it has some interesting ideas.
I had not thought of securing the masts in place (presumably in the event of a capsize), but I have asked Dillon for his thoughts having sailed one for several years. If I do put them in I think I'll do it below the deck rather than above.
Offline
#386 27 Jul 2020 4:18 pm
- MartinC
- Member
- Registered: 3 Apr 2020
- Posts: 353
Re: Waterlust sailing canoe in Norway
Dillon felt that pinning the masts in isn't really necessary as the downhaul keeps them in. He has never had an issue with this.
Offline
#387 27 Jul 2020 6:35 pm
- spclark
- Member
- From: "Driftless" Wisconsin USA
- Registered: 19 Mar 2020
- Posts: 478
Re: Waterlust sailing canoe in Norway
Dillon felt that pinning the masts in isn't really necessary as the downhaul keeps them in. He has never had an issue with this.
I'd think so too, and for the mizzen the halyard ought to serve the same purpose. It's unlikely that its halyard'd be in play during a capsize so it'd be holding the mast in nicely until things are brought back to something approaching normal orientation once again.
Offline
#388 27 Jul 2020 6:41 pm
- spclark
- Member
- From: "Driftless" Wisconsin USA
- Registered: 19 Mar 2020
- Posts: 478
Re: Waterlust sailing canoe in Norway
As for me I overlooked how opaque the microballoon-filled epoxy'd be when I 'filled the weave' yesterday after sticking the 'glass to my deck.... Gonna be a struggle finding those registration holes for the forward hatch cover cut-out and the two mast pockets up that way. (Put an e-mail to Dillon earlier so maybe he can get me some numbers I can measure back from the stem to locate those things along the deck's centerline.)
I made a small plastic radius template before I set out to plane-then-sand the sheer's edges. Seemed to work as intended, got a nice even 5/16" radius the 'glass was reasonably easy to stick to:
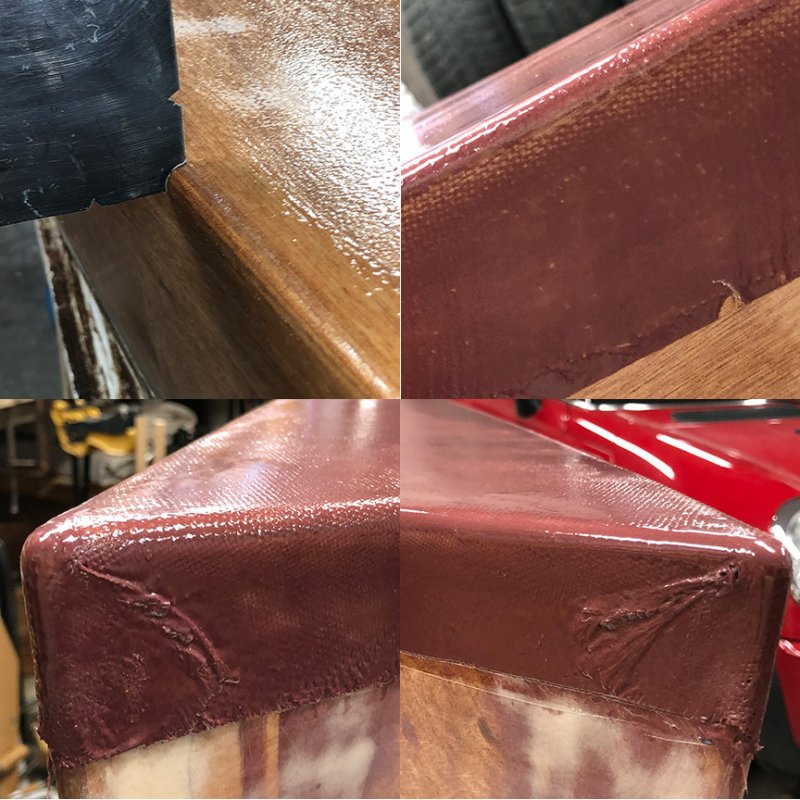
'Glass overlapped onto panel #4 minimum 1-1/2" in some areas, others closer to the recommended 2". Will be sanding this down carefully once that stuff's cured a bit more, then I'll add more fairing mix to ensure there's nothing weird once it's time to paint.
(Sure hope to find the CLC forum members' suggestions about filling the weave this way turns out to be true! I'd hate to have to be sanding stuff as hard as unfilled epoxy at this stage! The microballoon mix is supposed to be much easier to sand as well as lighter than an equal volume of unfilled resin mix!)
Offline
#389 27 Jul 2020 7:21 pm
- MartinC
- Member
- Registered: 3 Apr 2020
- Posts: 353
Re: Waterlust sailing canoe in Norway
Looking good SP. I really like the colour!
You could cut the forward and aft access panels first, and from there you could find the mast cutouts and hatch location by measurement. Just a thoought.
Offline
#390 27 Jul 2020 7:39 pm
- spclark
- Member
- From: "Driftless" Wisconsin USA
- Registered: 19 Mar 2020
- Posts: 478
Re: Waterlust sailing canoe in Norway
Good point MartinC, I hadn’t thought of that!
I was going to wait until that filler’s sanded before doing any cutting though, but that idea has merit if I don’t hear back from Dillon in the mean time.
As for the color? That’s just the MAS folks’ idea of what color microballoons should be! I have some from WEST also, it’s much lighter, more like pine than mahogany. Only problem using it is it’s ~ 40 years old... kinda lumpy. Needs to be run through a sieve to break it up before adding to mixed epoxy, kind of a pain when I need a lot of it.
I’ll be painting the hull and deck once that stage arrived. Figure paint’s easier to maintain, easier to
look at with an eye to wear and tear.
Last edited by spclark (27 Jul 2020 7:39 pm)
Offline
#391 9 Aug 2020 2:04 pm
- spclark
- Member
- From: "Driftless" Wisconsin USA
- Registered: 19 Mar 2020
- Posts: 478
Re: Waterlust sailing canoe in Norway
In the two weeks since my last post I've bonded the coaming then done a second, very thin microballoon-filled coat of epoxy onto the deck after it'd been sanded as smooth as I dared.
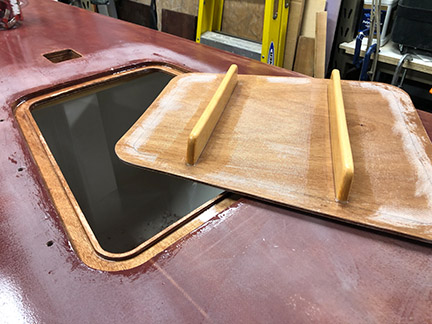
Found hints for all the holes (but one of the six hatch toggles') that are now in my deck. Added some microballoon-thickened pads for the two access hatches too, thinking that if they'd been mounted slightly bent from the deck's camber they may not seal as well as they ought to:
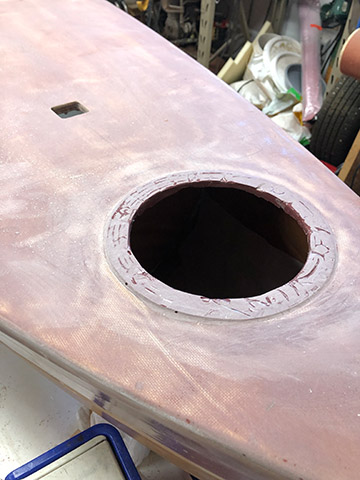
(Jeff Perkins reassured me yesterday that, while he'd not done something like this, his two hatches are quite tight!)
Do you other builders have any numbers for the lengths and diameters of the lines you've chosen for running rigging?
Now that my hull's nearing completion I'm looking ahead to the time for setting up the sailing part of this endeavor. Have some of the hardware Dillon's plans indicate (some salvaged from that 14' scow I built almost 50 years ago!) but have yet to work out how much cordage to order up. I'm thinking 5/16" / 8mm max, likely only for main sheet, the other stuff 1/4" / 6mm. Lighter lines not actively handled during sailing could be 3/16" / 5mm or even 5/32" / 4mm for the lines securing sails to spars. I'd welcome thoughts from more experienced hands at this.
Last edited by spclark (9 Aug 2020 2:18 pm)
Offline
#392 10 Aug 2020 12:05 pm
- MartinC
- Member
- Registered: 3 Apr 2020
- Posts: 353
Re: Waterlust sailing canoe in Norway
Well done SP! Excellent progress.
Rigging:- I can't claim to be an expert on this and everyone will have their own ideas and preferences, but you will need to work out what size blocks/cleats/fairleads you can get (and in the style you want) and then match the rope sizes accordingy.
Personally I used 10mm braided for the mainsheet. 8mm braided for the mizzen sheet.
For everything else I used 6mm 3 strand except for lacing which I used 4mm braided.
As for lengths of rope I used very cheap nylon stuff to mock it up first so I didn't order far too much. Even then, I found I had under ordered!
I have spent much time working out the two person seating arrangement and single handed car rooftop carrying arrangement and I have just about sorted it now, so plan to launch on the River Waveney (Norfolk Broads) this week weather permitting. If I can get a photographer I will post some photos (because I certainly won't have enough hands to do the photography myself!).
Offline
#393 10 Aug 2020 12:34 pm
- spclark
- Member
- From: "Driftless" Wisconsin USA
- Registered: 19 Mar 2020
- Posts: 478
Re: Waterlust sailing canoe in Norway
Looking forward to what pics you can arrange MartinC! And your advice on line selection and the mock-up idea’s splendid thinking! Thanks & fair winds!
Offline
#394 13 Aug 2020 7:56 am
- Bergen_Guy
- Member
- Registered: 6 Feb 2020
- Posts: 353
Re: Waterlust sailing canoe in Norway
I am now a few steps behind the rest of you all, but as holidays are over, I am starting to make progress again. All I can say is I wish I had fitted the rudder before the deck. It’s now on, but quite a faff. I went with a ‘sternpost’ type re-enforcement for the lower fitting, and plywood pads for the upper one, but very had to see if everything went to plan working through the tiny access hatch. I then did ‘drill-fill-drill’ for the forward screws, the rear ones being mostly into epoxy anyway. I then covered the screws with thickened resin before tightening everything up. I found it hard to maintain everything in exactly the same plane during the live fitting as I had managed during the ‘dry fit’. So the rudder is not quite so free as it was during the dry fitting. I will check if it’s alignment, or that the gudgeon holes are now slightly smaller diameter as the tangs have be pulled a bit tighter together when I screwed everything down ‘right’. Still - progress.

(Sorry photo orientation going funny again...)
The rudder stock is screwed at the front as the holes are so close to the edge I did not dare drill all the way through, the rear though has a machine screw all the way through an epoxy ‘tunnel’. I hope the combination is sufficient.
Next is probably the main mast, which I have been keeping till last as it appears to be the most challenging of the spars. I might have a go at making the upper parts round in section, just to see if I can.
Nice touch on making flat pads for the hatch covers SP, I think that’s a good idea, I find one of my hatches doesn’t close as easily as the other and I think this is probably because it was slightly pulled out of shape when it got bolted to the deck.
Last edited by Bergen_Guy (13 Aug 2020 7:57 am)
Offline
#395 13 Aug 2020 5:22 pm
- MartinC
- Member
- Registered: 3 Apr 2020
- Posts: 353
Re: Waterlust sailing canoe in Norway
Hi Guy. The rudder gudgeon fixing sounds fine to me and looks good. It doesn't have to be that strong as it is not taking any significant load (unless you hit something hard and the rudder doesn't lift...but then something's got to give and the replacement of the rudder pintle fixings might be the easiest option?).
I think I would agree with the round section to the upper mast, as I can see already on mine that the spar doesn't rest very easily against the square section and is rubbing quite badly on the edges. I think rounding mine off at the top and leathering will be a job for the winter.
Gaia still not in the water I'm afraid. We have experienced 33 degree heat here all week which is almost unheard of and with thunder storms forecasted to follow, I have chickened out for the time being! After all the hard work I really want the launching to be a pleasurable occasion!
Offline
#396 15 Aug 2020 10:07 am
- MartinC
- Member
- Registered: 3 Apr 2020
- Posts: 353
Re: Waterlust sailing canoe in Norway
Hello SP. I wonder if you can help me please.
The small hole in the end of the boom is just about big enough for the lacing of the outhaul, but there is no space for two reefing lines as well. I noticed on a previous photo you posted of the other US builder, that he had reefing lines but I couln't see how they were arranged at the outhaul end of the boom. Do you have a photo which shows this please?
Offline
#397 20 Aug 2020 4:41 pm
- MartinC
- Member
- Registered: 3 Apr 2020
- Posts: 353
Re: Waterlust sailing canoe in Norway
Rigging:-
This is a bit more involved than I had originally imagined as the spars are so light, they do not fall down manageably when the halyard or topping lift is released! I have therefore reverted to lazyjacks rather than a topping lift and this takes quite a bit of working out.
I have also decided to fit reefing lines, as I think that even tied up to the river bank it will be a difficult operation getting to the bow end of the boom to lash it.
Finally, I am working out a way of easy rigging and de-rigging using snap shackles to release the boom, sail and spar together with associated ropes. I have found that it makes for a terrible mess if you try and keep everything connected when you remove them from the boat.
When I have worked through all this I will post some pictures and a description.
Offline
#398 21 Aug 2020 7:28 am
- Bergen_Guy
- Member
- Registered: 6 Feb 2020
- Posts: 353
Re: Waterlust sailing canoe in Norway
Martin, That's interesting to hear. Did you put the halyard through a hole in the mast, or do you have a block up there?
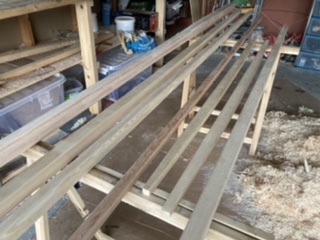
I have just finished shaping the spars. The mainmast I have tapered to a round section, but the others are all pretty much as per the plans. I have not yet drilled holes in them.
I was out with Svale for a one night camping tour to an island close to home last week with the twins. This was the first time I used the boat with all the foils - mostly for fun and so the boys can start getting used to tiller steering. It's interseting how much more solid in the water the boat is with the foils down. Also quite a bit slower, so I am looking forward to being able to sail! I will be very interested to see pictures and read the description of your rigging solution Martin.
What's going on stateside SP? any progress of late?
Last edited by Bergen_Guy (21 Aug 2020 7:30 am)
Offline
#399 21 Aug 2020 4:30 pm
- MartinC
- Member
- Registered: 3 Apr 2020
- Posts: 353
Re: Waterlust sailing canoe in Norway
Hi Guy.
I have put two blocks at the top of the mast. One double for the lazyjacks and one single for the halyard. A hole would do though, but you would have to rig some sort of rope strop to take the second block.
You probably know this, but for lazyjacks you need a line coming down either side of the sail (and joining under the boom) so you have two lines going up and over a double block joined to one line coming down.
It is easier to show with a photo, so as soon as the present gale has blown over I'll take some photos.
Very interested to hear about stability. I have to confess I was a bit worried about the tenderness of the boat when I had it in the pool (without the foils down).
Offline
#400 24 Aug 2020 4:21 am
- spclark
- Member
- From: "Driftless" Wisconsin USA
- Registered: 19 Mar 2020
- Posts: 478
Re: Waterlust sailing canoe in Norway
Somehow the 'subscription' function here got disabled for me? I’ve been missing getting notice of your most recent posts for a couple of weeks now....
MartinC here's the best pic I have from Jeff's files. Seems he mounted a block atop the boom, uses a snap shackle for the outhaul that then leads forward:
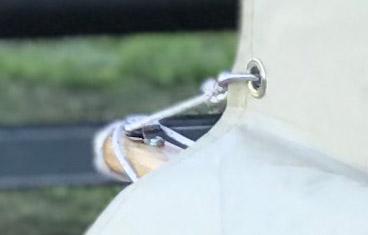
Makes sense, given the nature of the task, but maybe a simple hook (id available) might be faster & easier?
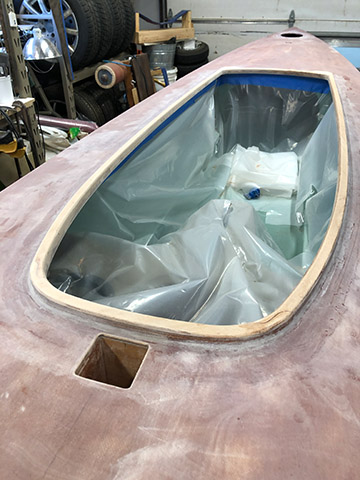
Meanwhile, I’ve been making slow progress, focused on getting hull ready to prime. My last post showed filled deck weave, after which came bonding the coaming then cutting hatch opening, assembling & bonding hatch sill & spacer, adding a couple of stiffener ribs to hatch cover:
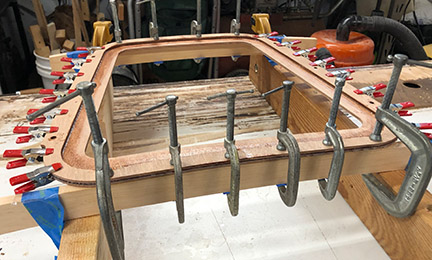
(I used the spiled-curve-off-deck roughed-out ribs as forms to hold the sill and spacer to the deck's camber during bonding.)
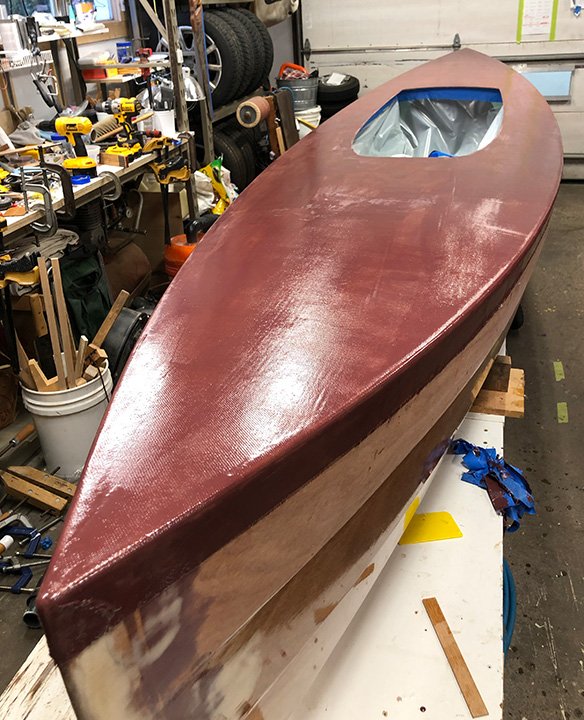
Yesterday I removed the last of the building platform, using the trailer I assembled last weekend now to support my Waterlust during finishing. As of yesterday evening the deck & hull have been sanded smooth. In a bit I'll be touching up a few areas along the chines where the epoxy got sanded through then later on today priming begins.
Here's a pic from Saturday afternoon when I moved the project onto the trailer & out of the garage, giving me more space to remove half the building platform:
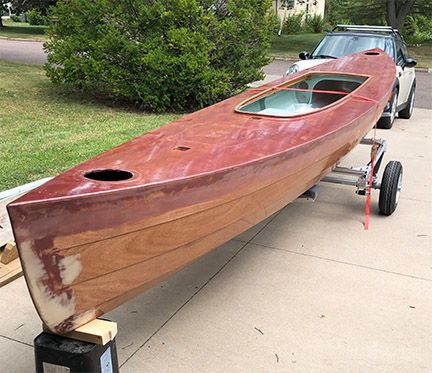
And I'm right curious about the tenderness of this hull too! Getting really anxious about the first day out to come, closer now than ever!
Last edited by spclark (24 Aug 2020 12:40 pm)
Offline