You are not logged in.
- Topics: Active | Unanswered
#1151 13 Jan 2023 3:18 pm
- Bergen_Guy
- Member
- Registered: 6 Feb 2020
- Posts: 353
Re: Waterlust sailing canoe in Norway
Yes, indeed - that looks like a lot of good and sensible modifications Martin. I haven't got quite as far as you with thinking about how to cook on board. I was half thinking of investing in a jetboil though and seeing if I could find a good place to secure it. I hope the raid goes well. I would love to join you there, but I suspect family commitments will make that hard.
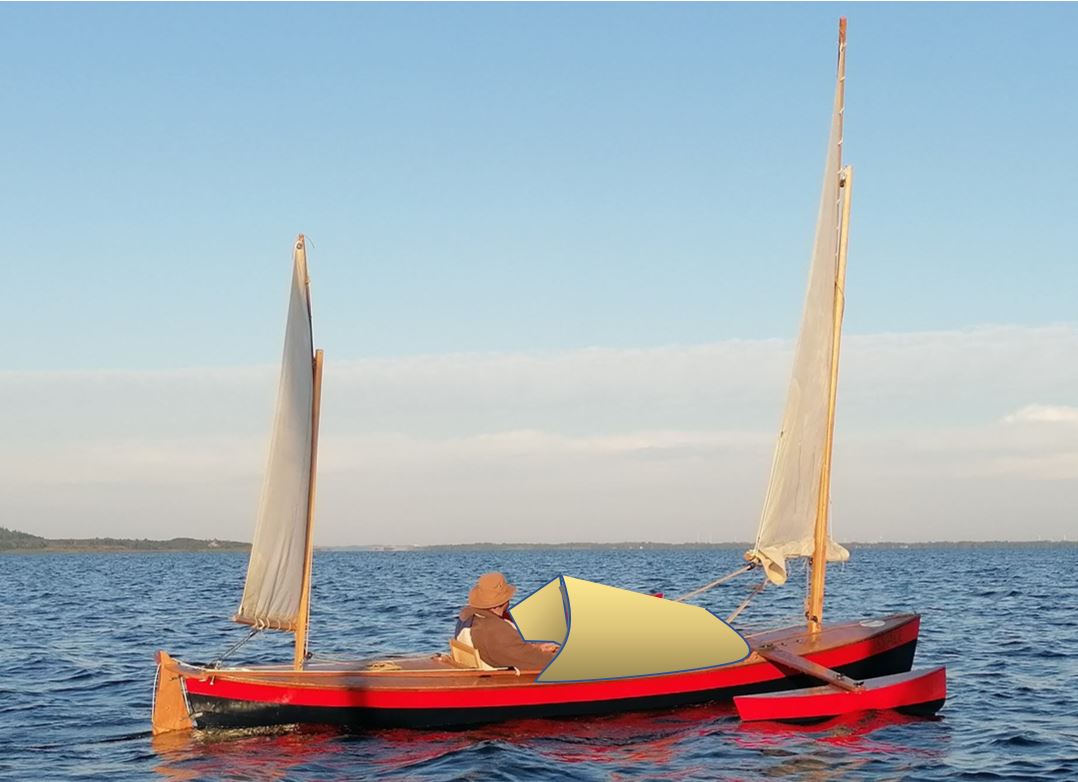
I have also been thinking of a sprayhood type thing - and have been sketching all sorts of elaborate but likely impractical soluctions! I feel the two main restrictions are the need to lift the dagger board and the fact that the natural main sheet run gets in the way of anything that comes too far aft. I will probably start with a tarpaulin, gaffa tape and some redundant tent poles and see if I can get something practical in place. A little more shelter could increase the range of comfortable sailing weather of the boat without resorting to a dry suite!
Offline
#1152 14 Jan 2023 7:50 am
- MartinC
- Member
- Registered: 3 Apr 2020
- Posts: 348
Re: Waterlust sailing canoe in Norway
Thanks for the comment regarding the gas, SP. I had forgotten how much the temperature affects a butane cooker. You are quite right, cold water will have a considerable effect. Perhaps I will construct a drop-down box to slot into the well to keep it warm and dry.
Getting to Holland is easy for me as I live on the East coast and the ferry port of Harwich is only an hour's drive. The other side I estimate is 2 hours drive from the port (The Hook of Holland); so all pretty easy! I reckon on carrying maybe 4/5 days stock of provisions onboard as although the raid is only 4 days, if the weather is fine I will take advantage of the extra time to explore and there must be places I can re-stock.
I will carry the boat on the roof as this is cheaper than taking a trailer on the ferry and it also means I can travel faster on the roads.
We have been thinking along similar lines, Guy, regarding the sprayhood. I have decided to keep the fixed 'cuddy' small (just covering the pedals) and then have a kayak type sprayhood which I wear around my middle when sitting in the pedaling position, and which attaches to the cuddy and the cockpit sides with velcro. In this way the windage will be kept to a minimum and all the controls will still be accessible - I think you may have a spinaker effect with yours, which will be exciting going downwind but may be tiresome when beating!
Offline
#1153 14 Jan 2023 7:59 am
- MartinC
- Member
- Registered: 3 Apr 2020
- Posts: 348
Re: Waterlust sailing canoe in Norway
These are the people I thought I would contact regarding the bespoke spray cover:-https://foldingkayaks.co.uk/spray_covers.html
Offline
#1154 14 Jan 2023 1:33 pm
- spclark
- Member
- From: "Driftless" Wisconsin USA
- Registered: 19 Mar 2020
- Posts: 478
Re: Waterlust sailing canoe in Norway
https://smallcraftadvisor.substack.com/ … eaths-door
Posted so others who add their experiences to this thread may gain some insights into what's out there, near where I am, undertaken by similarly like-minded folk. The author recently took a position in Poland as a teacher so he's closer to a couple of you presently than he used to be to me. Hope you enjoy the read!
Offline
#1155 31 Jan 2023 4:42 pm
- MartinC
- Member
- Registered: 3 Apr 2020
- Posts: 348
Re: Waterlust sailing canoe in Norway
Thinking about how to make a lip on the cockpit rim to take the sprayhood.
I have come across this oak product used for oak flooring. https://www.oakfloorsonline.com/product … wood2wood/ and by cutting off one side and gluing it to the underside of the other side I can create a nice looking capping piece with a lip, which will screw on top of the present plywood rim. It is even sold with tapered oak wood plugs to fill the screw holes!
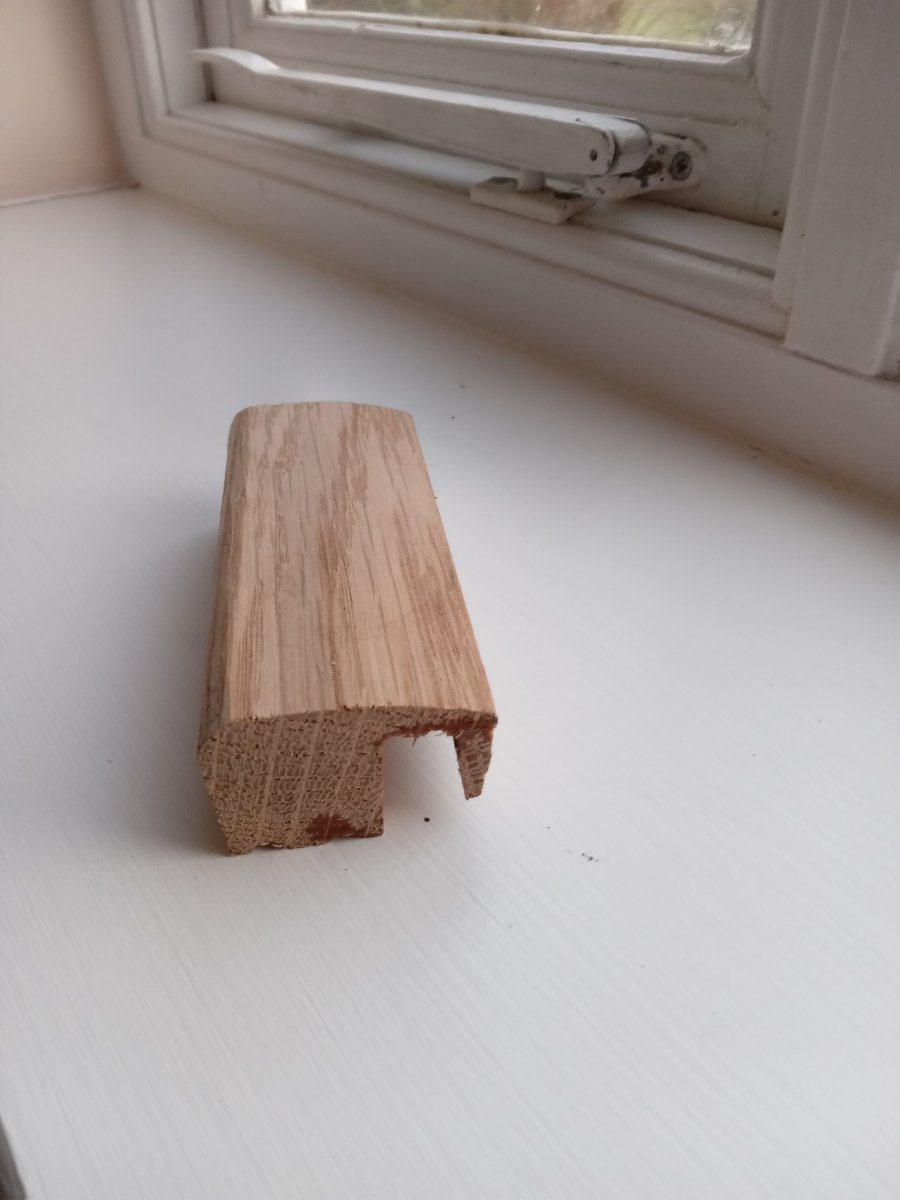
However, here is a question for you more experienced woodworkers than me:- How do I 'bend' it around the 90 degree back corners of the cockpit? I could mitre it but this would be rather a sharp right angle on top of the swept bend of the existing rim. Any ideas?
Offline
#1156 31 Jan 2023 5:11 pm
- spclark
- Member
- From: "Driftless" Wisconsin USA
- Registered: 19 Mar 2020
- Posts: 478
Re: Waterlust sailing canoe in Norway
Yikes. Methink's that's not gonna 'bend' easy MartinC. Were I you I'd try to fashion a workpiece from laminations that I then could shape using whatever tools I had handy to do the job.
Years ago I made some headboards for my parents out of Walnut that featured some (for me) fairly complex hand-joinery. Turned out better than I could have hoped once completed, then mom used her skills to add woven cane to fill the open space.
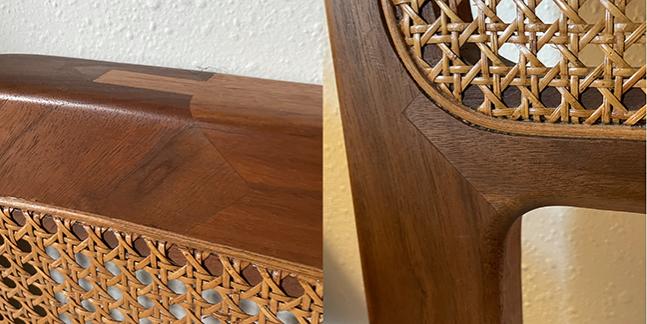
Takes some planning working with solid wood but not impossible.
Offline
#1157 31 Jan 2023 9:59 pm
- Bergen_Guy
- Member
- Registered: 6 Feb 2020
- Posts: 353
Re: Waterlust sailing canoe in Norway
I guess the options are either some nice joint, or to have a go at steam bending… I guess if it’s machined profile then it’s probably kiln dried and may not take very well to steaming as the moisture content will likely be very low. You could try soaking it for a few weeks first if you were to try that. I think the moisture content is needed to conduct the heat to the middle of the wood.
Otherwise I think the idea of some nice joints could be useful - maybe like what was done on this bufflehead : http://port-na-storm.blogspot.com/2015/ … e.html?m=1
If you zoom in on some of the photos there you get some idea how Jamie Clay handled a similar shaped cockpit coaming.
Svale is in the garage getting a bit of tlc before the season begins. Some epoxy fill for some hastily drilled holes from last year, and a cleat on the back of the daggerboard case to take a loop of mainsheet around. Then a sand and varnish job I think.
Your coaming looks like a great idea, will be interesting to see how you get on! Good luck.
Offline
#1158 1 Feb 2023 8:20 am
- MartinC
- Member
- Registered: 3 Apr 2020
- Posts: 348
Re: Waterlust sailing canoe in Norway
Many thanks for your advice SP and Guy. Great help.
Your headboards are a fantastic piece of joinery SP! I certainly won't be able to match this level of skill, but I think I will be able to fashion something out of a block of 400 year old oak I have in the garage (I rescued it many years ago from a Jacobean building which was beening demolished!). As it will be epoxied and screwed on the top of the existing coaming and therefore no strength at the join is required, I was just going to butt the profile up to the hand carved corner pieces.
Your comments about the machined profile and water content are helpful Guy. I think I will try and steam to get the slight bend in the sides and back, but even this might not be possible and I may have to resort to laminating.
I like the idea of mainsail block/cleat on the back of the daggerboard Guy. I might do something similar.
Offline
#1159 1 Feb 2023 2:26 pm
- spclark
- Member
- From: "Driftless" Wisconsin USA
- Registered: 19 Mar 2020
- Posts: 478
Re: Waterlust sailing canoe in Norway
Hand-carved is what I was thinking Martin, easily achieved with some time and sharp tools. We do it when working with traditional boatbuilding techniques, I'm thinking of the work of rabbeting stems for plank ends & stuff, just done to a tighter radius in your case!
Offline
#1160 9 Feb 2023 5:57 pm
- spclark
- Member
- From: "Driftless" Wisconsin USA
- Registered: 19 Mar 2020
- Posts: 478
Re: Waterlust sailing canoe in Norway
Pondering benefits / drawbacks of hinging my aka.
The one outing I managed early last June, first time w/ stability package mounted, proved difficulties of launch/recovery from a dock.
The hinged aka concept was the one really appealing feature of Mike Water's W-17 trimaran design. Problem being his amas are longer & skinnier, and are attached to the center hull by paired akas front & back.
For a Waterlust, its open cockpit precludes having a second aka crossing the hull just aft of the daggerboard's well. I did toy with his proposal, looking for some means to securely attach that second aka to the deck back there, until CLC released their package.
Mike's concept didn't include hinged akas for the Waterlust, rather pivoting ones that would allow the amas to be 'retracted' in storage, transport and launching then 'deployed' by means of lines once on the water. A bit too complicated for my brain to get comfortable with....
Offline
#1161 13 Feb 2023 7:29 am
- MartinC
- Member
- Registered: 3 Apr 2020
- Posts: 348
Re: Waterlust sailing canoe in Norway
Hi SP. Yes. A while ago I considered the hinged akas and couldn't get my brain around it either, which is why I abandoned the idea and settled for single hull sailing (with ballast).
I have moved on from the oak cockpit lip idea as although it was doable and would look nice, a compromise had to be made for usability and safety. I couldn't see a way the spray cover could easily come off in the event of a capsize.
I have therefore now resorted to the less elegant but safer Velcro fixing option. I'll post some photos once I have refined my needlework skills!
Offline
#1162 13 Feb 2023 7:37 am
- Bergen_Guy
- Member
- Registered: 6 Feb 2020
- Posts: 353
Re: Waterlust sailing canoe in Norway
I must admit I had not considered hinging Akas - I though a bit over the weekend, and can't help but feel you would end up with something rather heavy and cumbersome to maintain the required strength when deployed.
I look forward to seeing what you come up with Martin. I have been re-reading Baden Powel, and Dixon Kemp's chapter on canoe sailing recently and it seems that a 'mackingtosh' spray deck was quite the thing back then, but I feel our cocktpit is rather larger than what they had. I guess the normal 'sea kayak' way of removing a spray deck in a hurry of grabbing a webbing strap at the front of the spray deck and pulling it off from there is not really practical on our vessels as that 'front' is so far away.
The Nautilus of 1881 also had two removable wooden cocktpit covers, one in front and one behind the skipper to reduce the size of the opening and keep water out.
Happy sewing!
Offline
#1163 13 Feb 2023 1:24 pm
- spclark
- Member
- From: "Driftless" Wisconsin USA
- Registered: 19 Mar 2020
- Posts: 478
Re: Waterlust sailing canoe in Norway
Hi SP. Yes. A while ago I considered the hinged akas and couldn't get my brain around it either, which is why I abandoned the idea and settled for single hull sailing (with ballast).
I'm waffling back'n'forth on the single vs. 'augmented' hull thing. Probably out of lack of experience with either to date. I have my ballast additions ready & waiting for the season to arrive....
I must admit I had not considered hinging Akas - I though a bit over the weekend, and can't help but feel you would end up with something rather heavy and cumbersome to maintain the required strength when deployed.
After abandoning work I'd started on what Mike Waters had suggested before CLC came up with their concept and package, the fiberglass hinge idea Mike uses on his W17 is where I'm focusing my present project. Made up from epoxy & fiberglass, there's two components at each connection; the hinge itself (top) and a latch (bottom) secured by a removable bolt.
https://smalltridesign.com/W17/FG-hinges.html
His W17 akas are box-beam designs because of the much larger forces his amas impose on the main hull. These hinges have been tested destruction, capable of enduring 5,000 lbs & are used by many W17 builders with success. I'm looking for something a little less robust as the forces of our amas are considerably less while 'borrowing' the design principles.
Placed just outboard of the aka saddles I don't expect a major increase in weight from these parts. I'm planning to build a set first, see what they weigh, maybe try to destroy a pair fixed to some 2x6 sections before I cut my aka's ends off.
We'll see....
Last edited by spclark (13 Feb 2023 1:38 pm)
Offline
#1164 14 Feb 2023 4:59 am
- Chuck
- Member
- Registered: 24 Nov 2020
- Posts: 138
Re: Waterlust sailing canoe in Norway
Hi all-
Not a whole lot of boatbuilding lately for me, unfortunately.
On the plus side, the weather tomorrow is looking sailable at 13 knots and a temperature of 68 F! Too bad I have to work, but even worse is thinking about what this unseasonably warm weather could mean...
SP: I will be very interested to see how your tests on the fiberglass hinges/latches go! That looks very intriguing and might be a good way to enable us to get our amas out of the way when at the dock (and enable easier storage of the aka in the hull for transport) -- do let us know how it goes, and send pictures!
In any event, I wanted to ask the group a question: Have any of you thought about installing a removable waterproof bulkhead to seal off the back part of the boat that is under the deck? I have been thinking that this might be a very good way to minimize water incursion in case of a capsize, but still have access to the back to do things like pull out the peddling chair and/or the Mirage drive while out on the water. I have been thinking that after sealing off the weight-reduction cutouts in the existing bulkhead, a simple panel could do the job with the help of an appropriate gasket and clamps like those used to lock double-hung window sashes to each other. But, I haven't figured out yet how a gasket could seal both along the bottom of the removable bulkhead (where it meets the floor), and where the removable bulkhead would interface with the already present fixed bulkhead.
Any thoughts?
Last edited by Chuck (14 Feb 2023 5:10 am)
Offline
#1165 14 Feb 2023 5:46 am
- MartinC
- Member
- Registered: 3 Apr 2020
- Posts: 348
Re: Waterlust sailing canoe in Norway
Hi Chuck.
I know Guy was thinking about this, but I warned him that the excess of buoyancy you will have created at the back might make the vessel float so high in the water when capsized that it will be impossible to get back on board. I know you have added considerable lead ballast to your boat and this will help, so it may all work fine for you, but if you go down this route I would advise you to do a capsize test in friendly water before heading too far from shore. Let us know how you get on!
As for the construction, I think I would build a frame (probably in two or more parts to get it in) making sure that the 'door' fitted snugly to the frame before fitting the frame to the boat.
Offline
#1166 14 Feb 2023 11:39 am
- spclark
- Member
- From: "Driftless" Wisconsin USA
- Registered: 19 Mar 2020
- Posts: 478
Re: Waterlust sailing canoe in Norway
Not a whole lot of boatbuilding lately for me, unfortunately.
Same here, prolly why I'm entertaining thoughts about cutting up a portion of what I've already built....
On the plus side, the weather tomorrow is looking sailable at 13 knots and a temperature of 68 F! Too bad I have to work, but even worse is thinking about what this unseasonably warm weather could mean...
You take regular baths in cold water?
I bought a wetsuit last fall, anticipating one of those "last opportunities" for getting out, but nothing came of it. Still, even with 68° air the water's gonna be what, 50° if you're lucky?
SP: I will be very interested to see how your tests on the fiberglass hinges/latches go! That looks very intriguing and might be a good way to enable us to get our amas out of the way when at the dock (and enable easier storage of the aka in the hull for transport) -- do let us know how it goes, and send pictures!
By all means! That's why we're all here after all, share our experiences, learn from one another. (You had any further thoughts about adding a sprit & jib?) MartinC's steel daggerboard inspired me to put a lead brick into my plywood one, his water ballast the thinking behind my removable lead ballast adapter in the same compartment.
As of now I've ordered up a yard of a couple types of fiberglass fabrics suggested in Mike Water's hinge/latch manual. In that his akas are box-beam style, and that there are two of 'em, what I'm mulling over now is how to go about limiting the twisting effect our single ama would impart on a hinge/latch fabrication.
With a cross section 1" thick by ~ 6" wide in laminated ply, I'm thinking something on the order of a tongue and groove might be suitable. Tongue shaped as a reversed dovetail of low angle on the tongue part so as to make for easy closure in use, then the latch pin inserted to secure the ama end from lifting. That ought redirect much of any twisting force back into the aka rather than having to count on the hinge/latch construction to bear the brunt of it.
Have any of you thought about installing a removable waterproof bulkhead to seal off the back part of the boat that is under the deck? <snip> But, I haven't figured out yet how a gasket could seal both along the bottom of the removable bulkhead (where it meets the floor), and where the removable bulkhead would interface with the already present fixed bulkhead.
Noting cautions raised by MartinC, I'd copy the detail already evident in the forward storage compartment's hatch seal. Water incursion into that space is going to come from the cockpit area so I'm thinking something rigid but thin, held in place by toggles and sealed with some kind of weatherstrip might work. Perhaps two pieces? Keep in mind too that you may need a seal at the mizzen mast socket to slow displacement of air by water coming in from forward.
After my one unscheduled (but not unanticipated, hence the bilge pump's presence) dunking I'm an advocate of 'in-use testing' as MartinC's mentioned so we have an idea of what happens when things go awry, and what we have to do to get ourselves back upright safely.
I did initially note that trying to climb back aboard over the low side of the cockpit did result in my body weight forcing the hull lower into the water that afternoon. So I abandoned that exercise, in favor of letting said pump do its job evacuating much of what was where it wasn't welcome, while I swam around the stern (and under the floating mizzen) to get to the port side. Even then I waited a few minutes for more of the water inside to return to its customary domain before attempting to reboard, which turned out not to be difficult at all.
If you haven't already, I urge you to view the video I caught of the experience; here's the link once again: https://youtu.be/e8LJorVSCiQ
Last edited by spclark (14 Feb 2023 11:41 am)
Offline
#1167 15 Feb 2023 1:38 pm
- MartinC
- Member
- Registered: 3 Apr 2020
- Posts: 348
Re: Waterlust sailing canoe in Norway
Thanks for your post SP. Very interested in your folding amas experiment although unfortunately it won't suit my sailing area.
Your email acted as a reminder to me to box off the mizzen step. I am doing it with very thin epoxied ply and I'll glue it in position with Sikaflex to avoid resin asphyxiation when I am head first down the canoe.
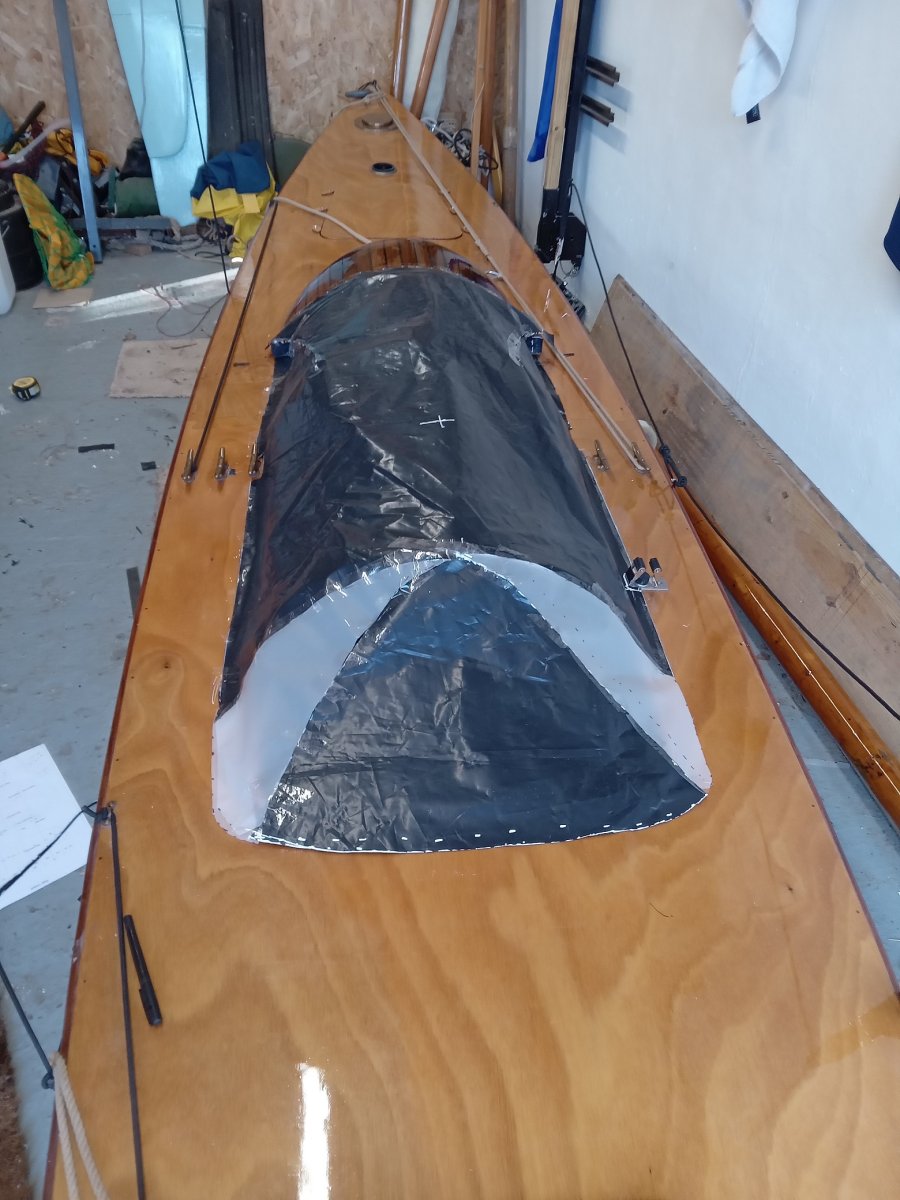
Here is the start of my spray deck project. The hoops work well in small hardwood fittings glued to the coaming. 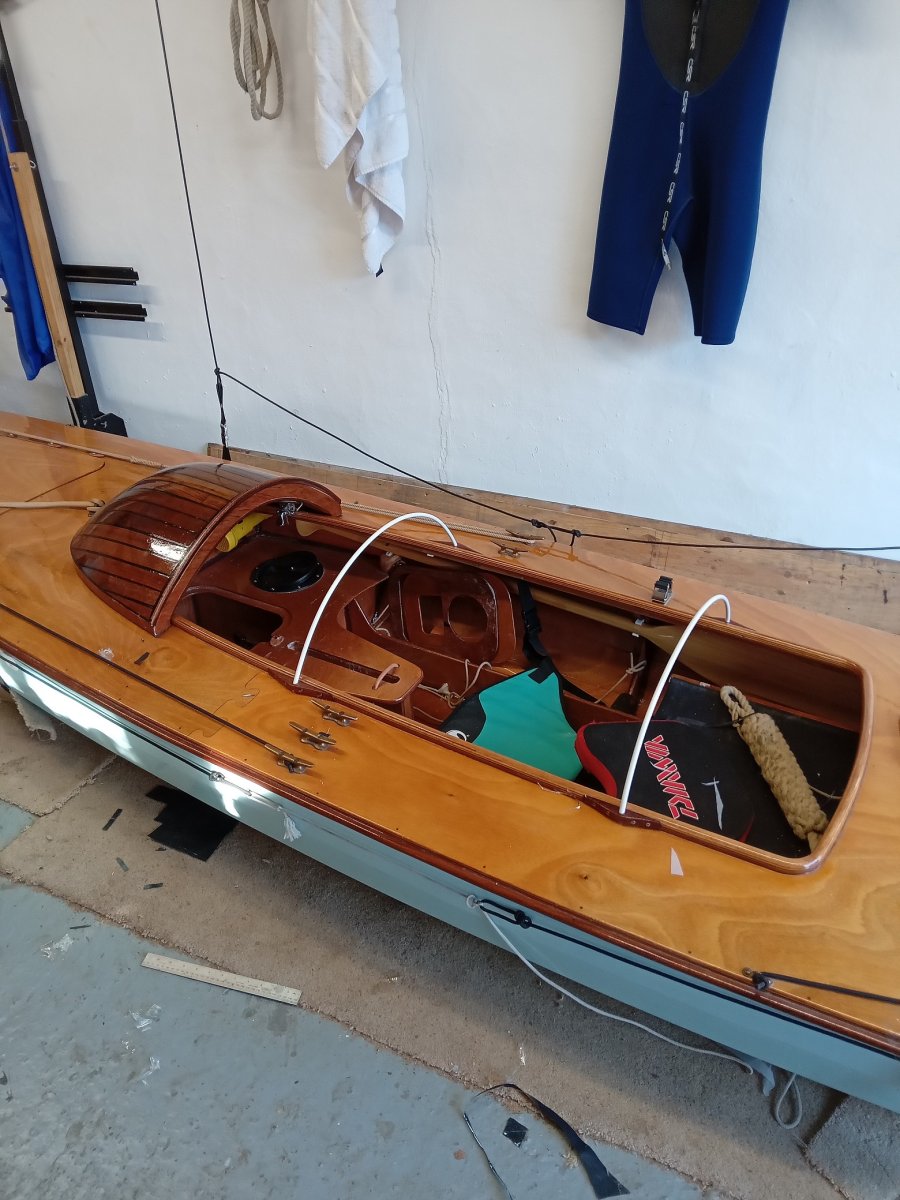
My pattern making wasn't as successful as I had hoped. It is much more difficult than it looks, but I eventually got there. Just waiting for the material to arrive now and then the fun begins with the sewing. Gulp!
Offline
#1168 15 Feb 2023 2:08 pm
- spclark
- Member
- From: "Driftless" Wisconsin USA
- Registered: 19 Mar 2020
- Posts: 478
Re: Waterlust sailing canoe in Norway
Yep, making a pattern can be a daunting exercise even when it's just in two dimensions. Add the third it gets really tricky. You look like you're well prepared for the tricks MartinC, what you're after seems entirely appropriate.
That 'resin asphyxiation' is new to me; care to elaborate? Once the two-part stuff's cured fully there's no inordinate risks from exposure I'm aware of....
Offline
#1169 16 Feb 2023 7:19 am
- MartinC
- Member
- Registered: 3 Apr 2020
- Posts: 348
Re: Waterlust sailing canoe in Norway
Sorry SP. I wasn't clear about the 'asphyxiation' remark.
What I meant was that to fix the box in position requires me going head first down the bottom of the boat and I didn't fancy using epoxy in this situation. As the box isn't structural I thought I would superglue it in position and then squirt Sikaflex around the joins to make it watertight.
Offline
#1170 16 Feb 2023 1:34 pm
- spclark
- Member
- From: "Driftless" Wisconsin USA
- Registered: 19 Mar 2020
- Posts: 478
Re: Waterlust sailing canoe in Norway
Makes sense MartinC, I likely would use the same solution for that.
Closest thing I can relate to is fixing a leaking bathroom ventilator duct a couple years ago. Had me up in the space under our roof, about 5' high max. I decided that while I was doing that I'd re-route the other bath's vent duct (they'd both been routed into one roof vent) out through the nearby soffit, a shorter & more straightforward path.
Problem being that the space there measured about 16" max. at the ventilator itself. No way I could reach the position of the vent I'd installed in the soffit from the inside. All the while crawling on my stomach on the boards I'd pulled up there to span the ceiling joists.
Meanwhile... I've worked out a concept for separating the twisting force imparted on my aka from the sheer forces on the hinge and latch bonds where they'll be added to the aka once its ends are cut away. My plan is to make those cut ply ends more durable as well by creating a cap piece for each face that'll protect the ply itself, at the same time provide a mechanical means of maintaing their alignment exclusive of the hinge & latch portions.
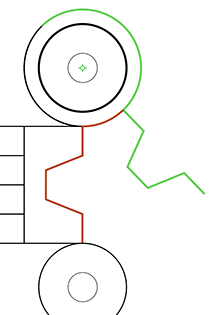
Shown are the endcap faces with their T&G profile; red shows how they'd mate in the locked position, green when the latch pin underneath isn't present and the outer ama-bearing end rotated upward a little. Have to take maybe an inch out of the aka on both sides to allow for the T&G end caps, the remainder follows Mike Water's hinge/latch concept.
Once the outer aka end has been latched in place any tendency to twist should be mitigated by the T&G caps, reducing potential stress on the adjacent hinge/latch portions. We'll see....
Last edited by spclark (16 Feb 2023 2:34 pm)
Offline
#1171 23 Feb 2023 9:52 am
- MartinC
- Member
- Registered: 3 Apr 2020
- Posts: 348
Re: Waterlust sailing canoe in Norway
Excellent SP. I watch your progress with great interest.
I have been pondering on how to organise the storage in the front locker. In the front half I have my water ballast container with electric pump for filling and emptying with river water. In the rear I decided that I would dispense with my large fresh water container in favour of a shelf with cutouts for three 2 litre water bottles (plus wine and Scotch spaces).
There is still room for plenty of lightweight luggage on top.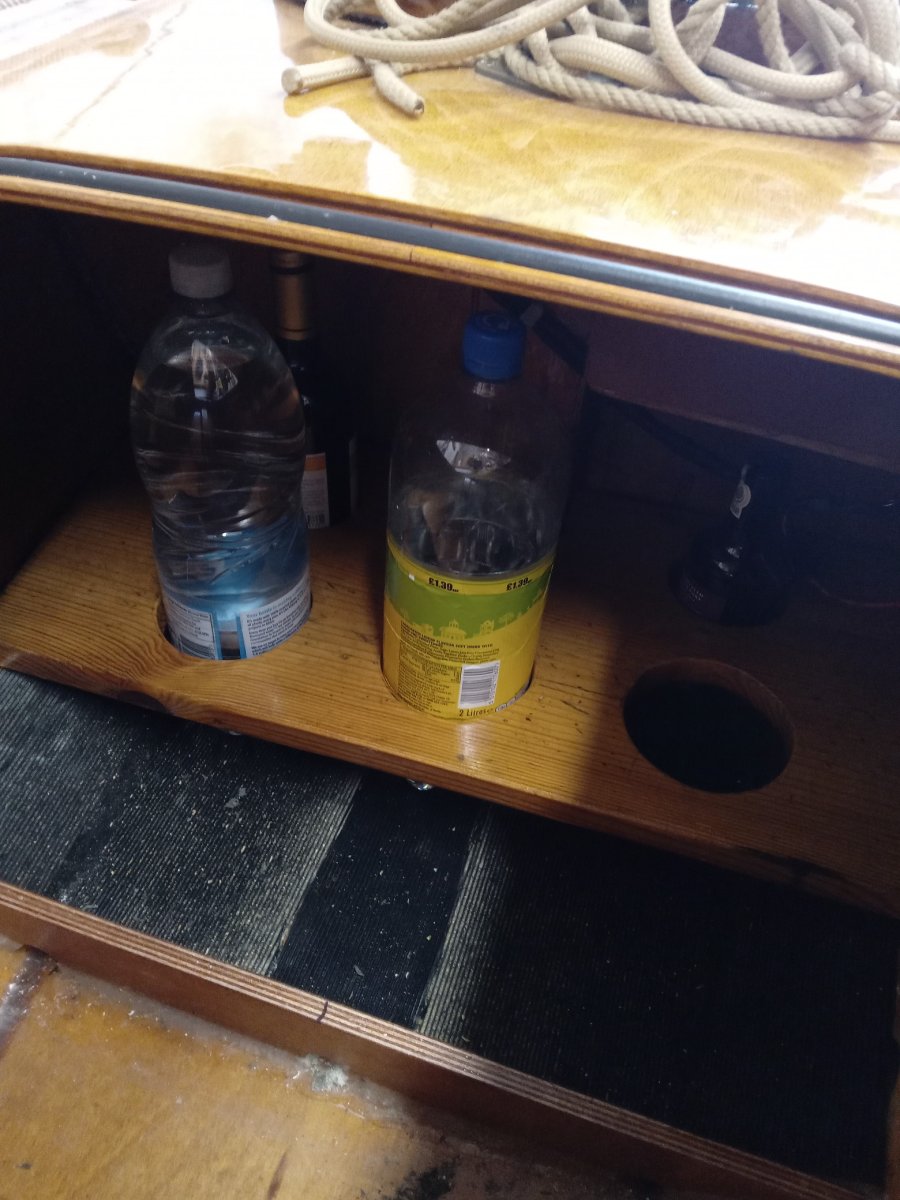
I have now boxed in the mizzen mast step and I am in the awkward process of applying 5mm self-adhesive closed cell insulation to all the surfaces, as I discovered last year that condensation is an issue when sleeping aboard.
This is tiresome and time consuming but does have the advantage of hiding all the internal joints where I did not clean off the resin as I should have done during the build process!
Offline
#1172 25 Feb 2023 1:41 pm
- spclark
- Member
- From: "Driftless" Wisconsin USA
- Registered: 19 Mar 2020
- Posts: 478
Re: Waterlust sailing canoe in Norway
"Creature comforts" are what I believe those amenities are called MartinC! Libations are often in order at the end (sometimes the beginning!) of an adventure.
Hinge endeavor proceeding. Got patterns made for moulding the tongue & groove profile I have in mind for the hinged aka ends:
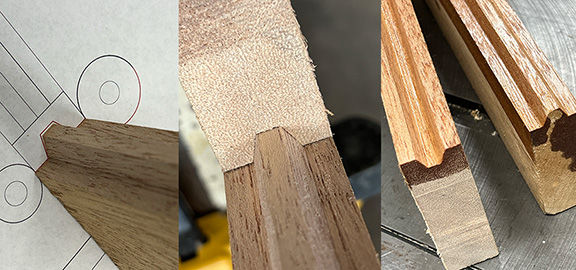
- which will be used to mold mating fiberglas & epoxy shapes that then will be bonded to the but ends of my aka.
The hinges themselves are more complicated, being hand-laid up from different types of fiberglass cloth according to the design Mike Waters evolved for his W17 trimaran.
First step is forming fiberglass 'bushing' stock that will serve as the foundation for the hinge sections' layups:
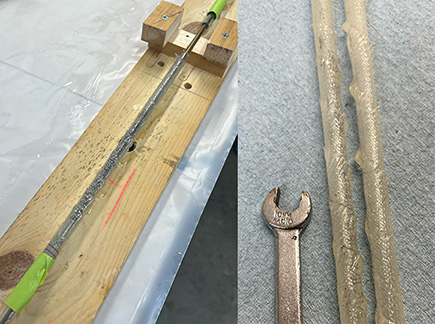
Concept is to use a mandrel (he suggests cheap ballpoint pens, I'm using vinyl tube with a brass rod stiffener inserted) over which is wrapped a spiral layer of fiberglass in epoxy. Once cured the rough surface is smoothed then sections are cut out to serve as bushings for the stainless steel bolts that will serve as hinge and connecting pin.
May try vacuum bagging the actual hinge plate assemblies if I can get the surplus pump I bought used four decades ago to pull a vacuum. Received rebuild kit yesterday I'd ordered kit for it, will be installing that this coming week while I wait for the next batch of epoxy to cure....
Last edited by spclark (25 Feb 2023 1:43 pm)
Offline
#1173 25 Feb 2023 6:02 pm
- Chuck
- Member
- Registered: 24 Nov 2020
- Posts: 138
Re: Waterlust sailing canoe in Norway
Wow, lots of good work proceeding here!
SP, I like your hinged aka idea, but I have a question: What are you going to do with your aka and amas when they are hinged up? How do you keep them up there? How will you keep thing from banging around on things (like the mast)? I've been thinking about hinges myself given the amount of trouble I had docking with the outriggers, but I haven't yet gotten mind around lifting those things up.
Martin- I like your creature comforts as well. I've thought of sleeping aboard, but have a hard time imaging being confined to such a small space. What was your experience? How often do you envision sleeping aboard?
On my own end I went into the garage this morning and started laying out lines and fairleads for lazy jack and jib rigging. I think I can fit a jib halyard and tack line in, but the fairleads and blocks for the sheets are going to be a challenge...
Last edited by Chuck (25 Feb 2023 6:08 pm)
Offline
#1174 26 Feb 2023 2:20 pm
- spclark
- Member
- From: "Driftless" Wisconsin USA
- Registered: 19 Mar 2020
- Posts: 478
Re: Waterlust sailing canoe in Norway
SP, I like your hinged aka idea, but I have a question: What are you going to do with your aka and amas when they are hinged up? How do you keep them up there? How will you keep thing from banging around on things (like the mast)? I've been thinking about hinges myself given the amount of trouble I had docking with the outriggers, but I haven't yet gotten mind around lifting those things up.
I've asked myself those same questions Chuck.
Relegated them to a 'back burner' until I've worked through the mechanics of getting aka hinged reliably.
Plan view puts the aft ends of the amas at about the back end of the daggerboard trunk so there ought to be ample head room left for boarding at a dock with them folded up. How to keep them there until away from the dock's my next focus; maybe bungee cord? Or some kind of hooked strut like a whisker pole... remains to be determined what'll work best.
Another aspect is what degree of instability will be imparted as each ama is lowered once away from a dock as the locking pin (lower companion to the hinge's pivot bolt) is put into place. While folded those amas each add about 7 pounds to weight aloft that wasn't there before they were added. A single crew, forward in the cockpit and reaching out over the side to install a bolt will affect balance of course, so much needs to be left to be decided whether a practical solution is possible.
My thinking currently is that sails need to be down when leaving a dock, raised only once the amas are locked in place. Whether this applies to the mizzen depends a lot on conditions at the time. If it can be raised but left unsheeted it may not add much to any tendency to roll the main hull as the amas are locked down.
On my own end I went into the garage this morning and started laying out lines and fairleads for lazy jack and jib rigging. I think I can fit a jib halyard and tack line in, but the fairleads and blocks for the sheets are going to be a challenge...
Ambitious endeavor! Paper and pencil are your friends in this I think, though if your Waterlust is stored the off-season still 'upright' you have an advantage over me, mine being hung upside-down in garage. I'll have to wait a few more weeks for weather more appropriate for bringing her back out of storage & onto her trailer, currently outside & covered with a few inches of ice & snow.
Offline
#1175 26 Feb 2023 4:15 pm
- MartinC
- Member
- Registered: 3 Apr 2020
- Posts: 348
Re: Waterlust sailing canoe in Norway
Sleeping onboard:- This really depends on your physique and the thickness of your sleeping mat. Unless you have very broad hips and shoulders, sleeping on your back isn't a problem, but you do need to have your head nearer the daggerboard casing if you sleep on your side so your hips are clear of the aft deck. (However, this may only be an issue for me as my aft deck starts 200mm further forward than standard).
I enjoy 'wild camping' and you can't beat being on the water alone with mother nature, so I intend to do much more of this this season, culminating with my trip to Holland in September.
Offline
