You are not logged in.
- Topics: Active | Unanswered
#1076 5 Sep 2022 10:53 am
- Bergen_Guy
- Member
- Registered: 6 Feb 2020
- Posts: 353
Re: Waterlust sailing canoe in Norway
I am almost tempted to add a large square hatch in the aft deck, partly to allow that job to be done, but also to allow maintenance of the paint / varnish work inside that part of the boat. Let's see. I also picked up some more deck hardware at the weekend to shift the mizzen sheet to being in front of me while sitting inside.
Offline
#1077 5 Sep 2022 12:40 pm
- spclark
- Member
- From: "Driftless" Wisconsin USA
- Registered: 19 Mar 2020
- Posts: 478
Re: Waterlust sailing canoe in Norway
Interesting discussion re: mizzen step open to water intrusion. So much material and effort went in to providing the boxed-in steps for both forward pockets, I can't fathom why the mizzen's got shorted? I'll have to look back & see if I saved the e-mails between myself & Dillon when I asked about providing drainage for the forward pockets.
I'm moving my bilge pump forward, will sit next to drive trunk & frame #2, discharge out thru-hull port mounted in port sheer strake. This will leave rear bin open for seat, maybe Mirage drive too when not in use, other stuff as needed. Thought about porting discharge into drive well but word from Texas builder nixed that. He related his experience running down wind with a following sea last year in big water had him bailing despite his auto-pumps efforts! Both drive well and board slot can ship water under those circumstances.
With your permission I may post something on the CLC forum about the mizzen step as a caution to current and potential Waterlust builders who intend to use theirs as you do MartinC. It's an infrequent (understated!) event finding anyone posting there about this design besides m'self, sadly.
https://www.clcboats.com/forum/clcforum … 55382.html
Last edited by spclark (5 Sep 2022 1:03 pm)
Offline
#1078 5 Sep 2022 3:16 pm
- Chuck
- Member
- Registered: 24 Nov 2020
- Posts: 138
Re: Waterlust sailing canoe in Norway
Hi Guy -
I have also been using the 'sponge on a stick' method to clean out the mast steps. I've found that evaporation will not clear them out, even after a few months (which I found out once when I forgot to clean them out). So far, I can't tell whether the water has leaked into the plywood. I've thought about holes through the hull too, but then it just guarantees that water will get in while sailing...
I have been thinking about gaskets, too. I was thinking leather ones, but rubber would probably work better. Martin, would you be willing to post a photo of your gasket setup?
I also need to find a better way to cover while sailing the mast step not in use. So far I have been using clear packing tape, but something a little less messy would be better.
Last edited by Chuck (5 Sep 2022 3:18 pm)
Offline
#1079 5 Sep 2022 6:31 pm
- spclark
- Member
- From: "Driftless" Wisconsin USA
- Registered: 19 Mar 2020
- Posts: 478
Re: Waterlust sailing canoe in Norway
If one can build a Waterlust (kit or from plans) one ought to be capable of making up a plug to fit into an unused mast pocket. Piece of wood, maybe 'glassed, edges wrapped in the kind of foam weatherstripping used to provide a gasket for the storage compartment hatch up forward, done.
The mizzen step issue's got me thinking. With the deck doubler (reinforcement) in place back there, once ought to be able to fashion a suitable square box-like assembly that can be inserted from above, then bonded to the existing mast step. Minimal prep would be sanding the step's epoxy first, or removing paint then sanding if that's been painted.
Putting the mizzen mast 6-12mm higher isn't gonna hurt anything, or take a saw to it.
Obviously a larger, rectangular opening'd be needed, just enlarge the existing mast aperture to fit the box snugly. Then 'glass over the exposed ply edges, varnish or paint as desired.
What little water's entered my pockets I've sucked out using a t-shirt pushed in with a stick while I hold onto a corner. I agree standing water oughtn't be left in there for an extended time, it'll find a way thru the epoxy if there is one.
Last edited by spclark (5 Sep 2022 6:34 pm)
Offline
#1080 6 Sep 2022 6:56 am
- Bergen_Guy
- Member
- Registered: 6 Feb 2020
- Posts: 353
Re: Waterlust sailing canoe in Norway
I have seen a few plans, including from renowned designers and builders like Paul Gartside, who on one of his lug rigged dinghy / mini cruisers, has a drain hole through the hull of the boat to allow water to drain out. Yes, the mast will get wet, but it will anyway if there is enough spray or water over the deck to start filling the mast steps. For our boats where the mast doesn't live stepped most of the time, this should be fine.
I guess one has to be very careful to do a nice job of drill / fill / drill to ensure that the water doesn't have a chance of penertating into the hull itself. That's one thing against drilling these holes, right now the hull is encapsulated in glass on both sides, and quite a few layers of epoxy, making a hole through that (currently most likely impermeable) sandwich is asking for trouble. I will continue with my sponge on a stick for a bit yet I think.
Offline
#1081 6 Sep 2022 8:32 am
- MartinC
- Member
- Registered: 3 Apr 2020
- Posts: 348
Re: Waterlust sailing canoe in Norway
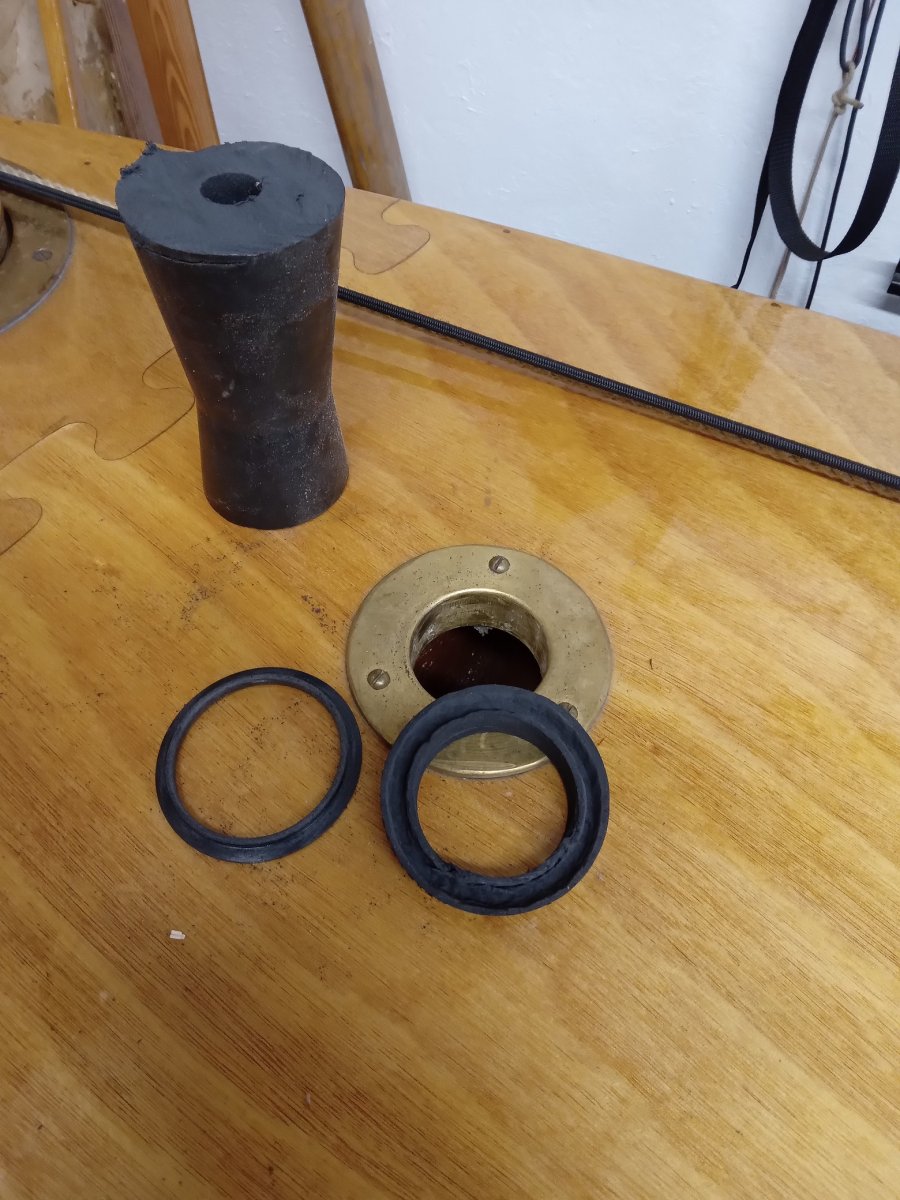
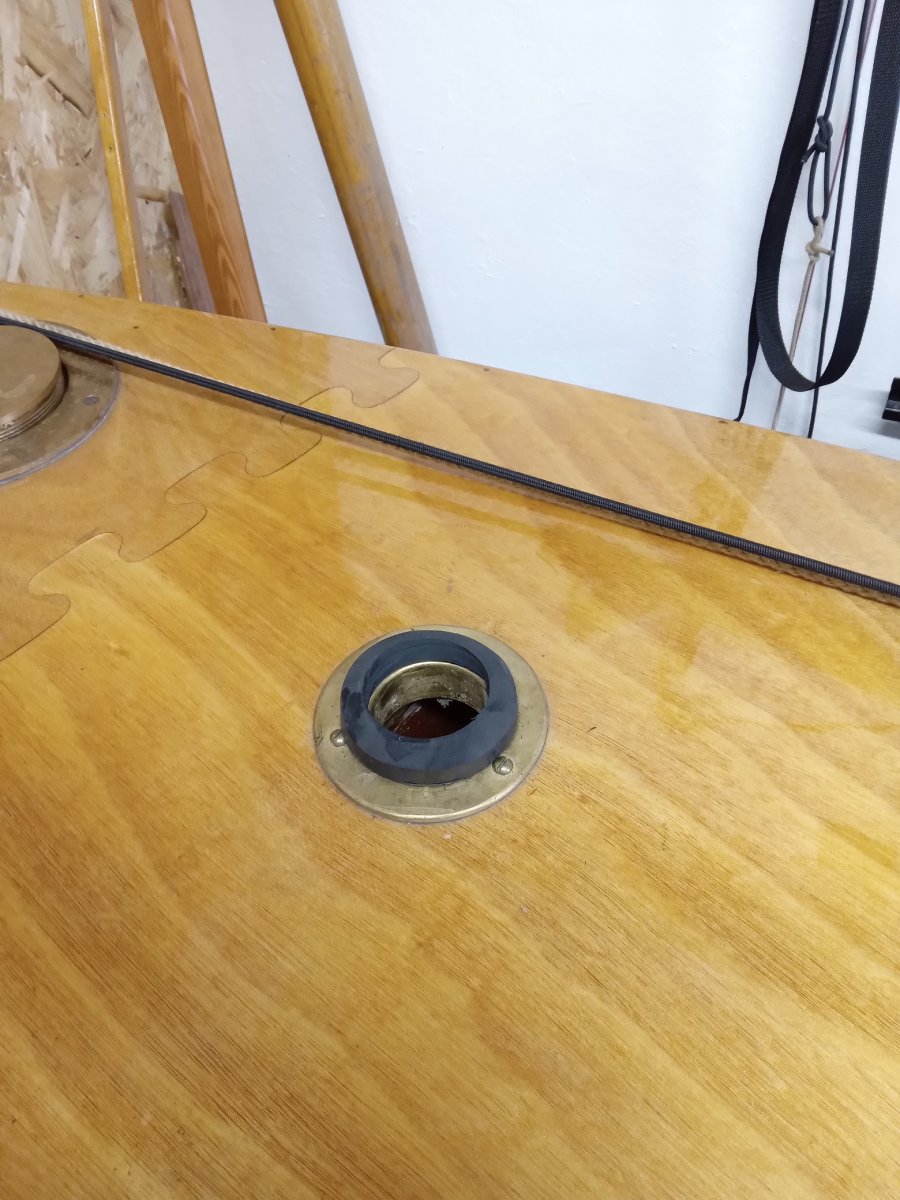
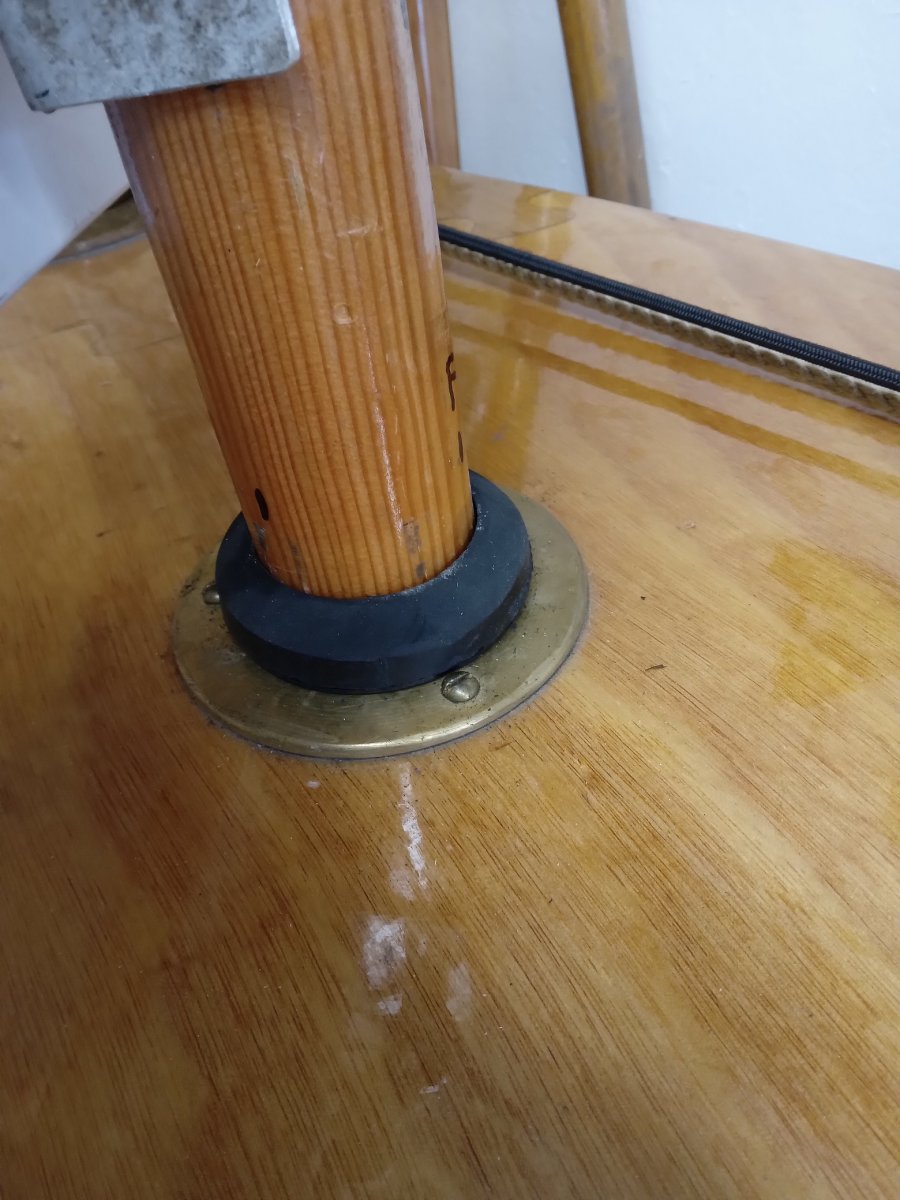
I converted my two mast steps (and masts) to circular sections and used copper/bronze plumbing flange fittings to reinforce the deck. (See post 782 on page 32). This has made the gasket issue easier.
In both cases I used rubber from a trailer roller. This is great as it is tapered and you can use the diameter which suits your application.
1. Main mast. For the main mast (I only have the one forward position), I simply wedge in a tapered piece of roller rubber. My forward hatch tends to get damp anyway with the cover and water ballast storage so I have drilled a hole in the bottom of the mast step to let any trapped water drain into the locker. Before doing this I filled the bottom of the mast step with resin so it drains towards the hole.
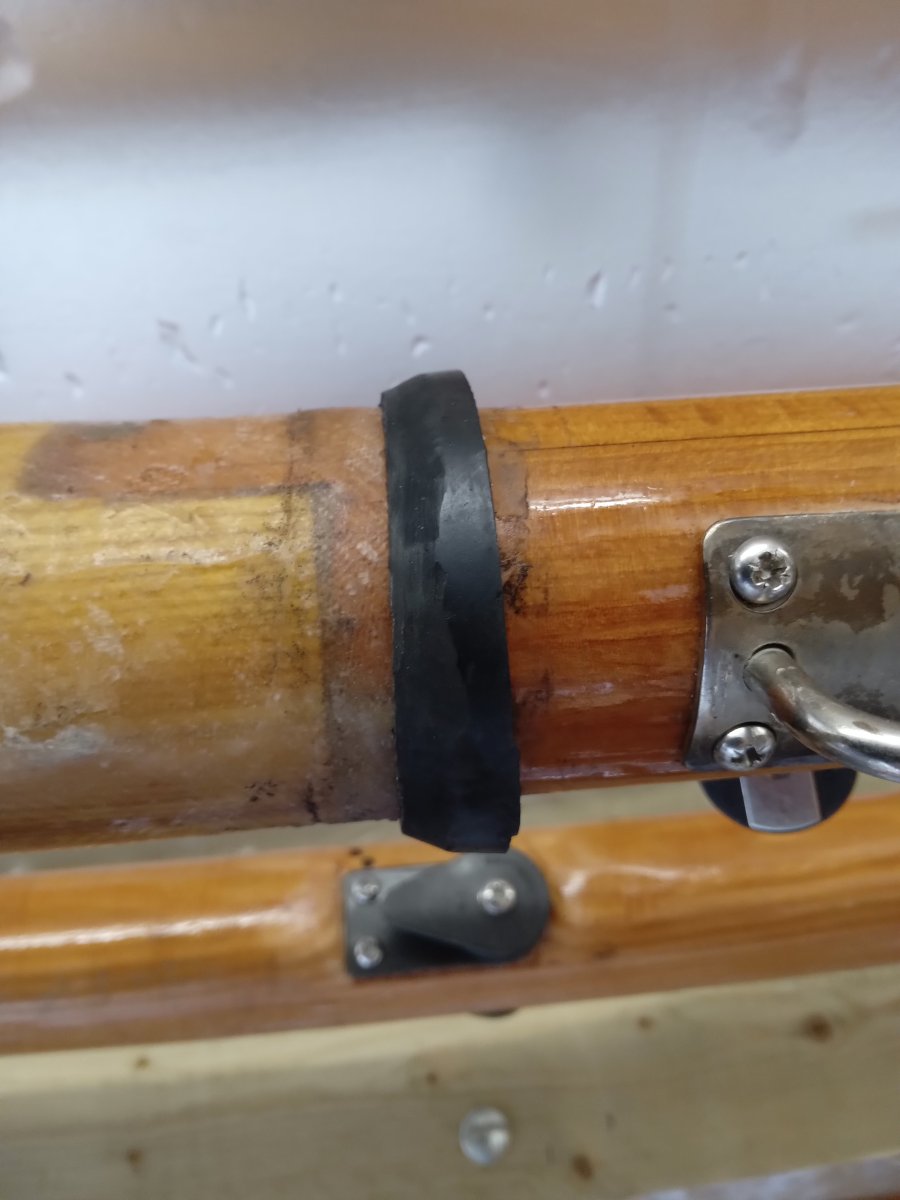
2. Mizzen mast. I am in the process of making this one and it is a little more complicated as I don't want any water coming in.This time I will glue a small plastic upstand (cut and adapted from a bottle top in the garage) to the top of the brass flange. I have routered out a groove in the underside of the rubber gasket to go over the upstand and the gasket fits tightly to the mast although it can slide up and down. (The one shown below isn't the mast).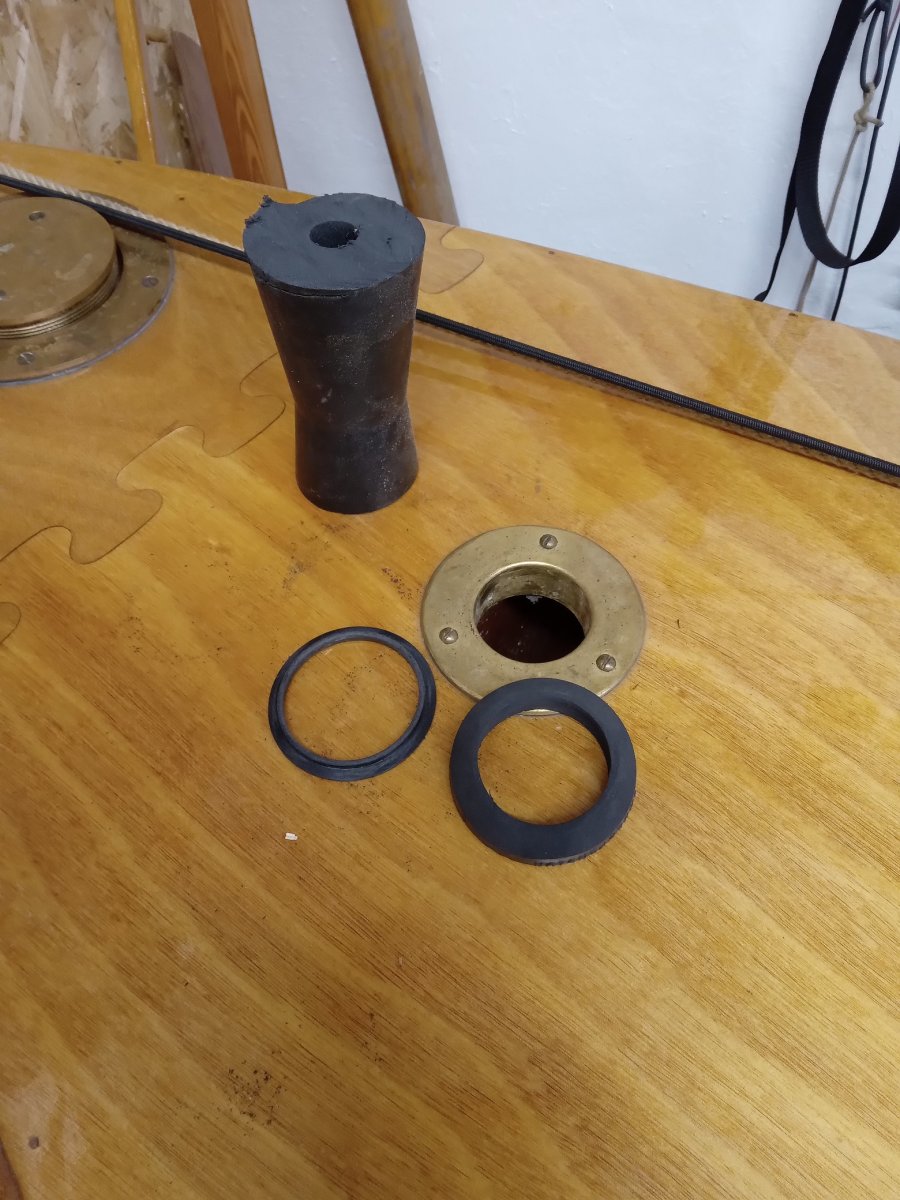
Offline
#1082 6 Sep 2022 1:59 pm
- spclark
- Member
- From: "Driftless" Wisconsin USA
- Registered: 19 Mar 2020
- Posts: 478
Re: Waterlust sailing canoe in Norway
MartinC I admire your inspiration and creativity!
Taking a (mostly) stock design then adapting it to better suit your expected usage, to the extent you've expressed with this project, deserves recognition. Then seeing what positive effects your mods' have on performance and reliability ought to be truly gratifying!
I – for one – am glad you, Guy and Chuck have chosen to add all of your contributions to this thread. All of it vastly increases the pleasure I'm getting out of my project.
Offline
#1083 6 Sep 2022 2:40 pm
- MartinC
- Member
- Registered: 3 Apr 2020
- Posts: 348
Re: Waterlust sailing canoe in Norway
Thanks SP... But don't underestimate your own contribution to this endeavour.
The standard of your workmanship and attention to detail is something I can only dream of.
I feel we have all benefitted from our collaboration on this voyage of discovery, and long may it continue!
Offline
#1084 6 Sep 2022 4:12 pm
- spclark
- Member
- From: "Driftless" Wisconsin USA
- Registered: 19 Mar 2020
- Posts: 478
Re: Waterlust sailing canoe in Norway
Details... yeah, they tend to catch my attention.
Like for moving my bilge pump forward, opening up aft bin for stuff. Means hole where thru-hull port had been fitted needs plugging:
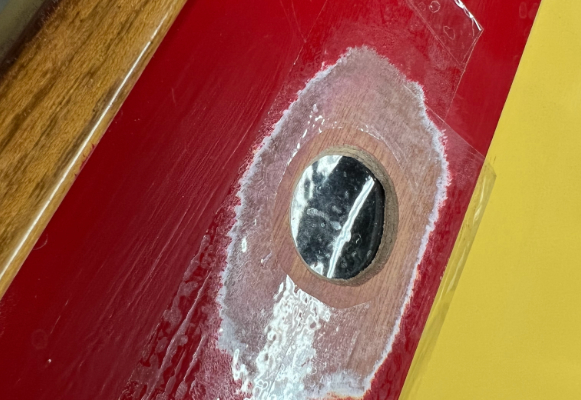
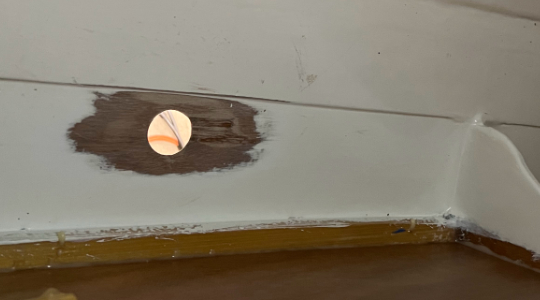
Sand away paint, fit a small ply plug w/tapered sides so it won't fall through. Tape off outside to minimize clean-up, then epoxy in plug, manage to press into place just a wee bit so squeeze-out fills imperfections in fitment:
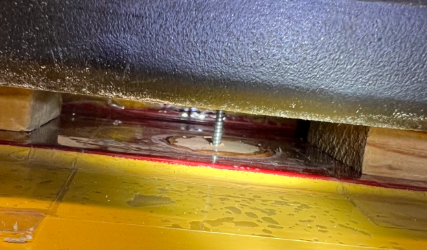
Out & inside'll get a couple layers of 'glass in epoxy just for endurance sake, then paint.
Yesterday I reconfigured bits for pump, cut away what wasn't doing much of its enclosure so it fits between board trunk & port stringer:
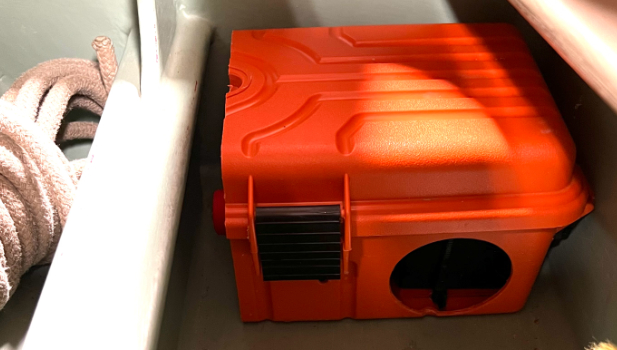
Relocating bronze thru-port for discharge'll be piece of cake after all this fussing.
Hoping to get out again next few days. Either there's not enough wind predicted to make it worth the effort or gusts to 20+, more challenge than I want to take on.
Offline
#1085 7 Sep 2022 6:05 am
- MartinC
- Member
- Registered: 3 Apr 2020
- Posts: 348
Re: Waterlust sailing canoe in Norway
Guy:- Many thanks for your excellent video of 24 August. One word of warning though.
I see you tied your reefing ties around the boom. Unless the the cringles have been specially reinforced, reefing ties should only be tied around the sail (simply to gather up the surplus sail, not to take any strain).
With slab reefing like ours, the strain should be only be taken by the reefing lines at the tack and clew, otherwise you risk tearing the sail or even breaking the boom as I did once rather dramatically (and expensively!) on a 32ft gaff sloop.
Offline
#1086 8 Sep 2022 7:21 am
- Bergen_Guy
- Member
- Registered: 6 Feb 2020
- Posts: 353
Re: Waterlust sailing canoe in Norway
Thanks for that tip Martin!
I must admit I hadn't really thought about it, as the foot of the sail is tied to the boom when I have the full sail up, I figured that my reefed sail should be tied in the same way, but hadn't thought about it since!
It may be tricky to get the reefing ties between the boom and the sail as the foot of the sail is pulled quite tight along the boom. I will give it a go next time I am out and see how it looks. In terms of re-enforcement or not, I will take a look, the foot has eyes all along it, and the reefing points also, and a square of sail cloth as re-enforcement, albeit slightly smaller than those at the tack and clew. After your prompting I may ask my sailmaker what he had in mind when he sewed the sail!
On the workbench now is one outrigger, getting a ventilation bung put in the top after I detected some water sloshing about inside. I couldn't quite work out how it got in, so I found every tiny crack I could, and after drying it for a week or so, filled them in with epoxy. It's just a small bung type thing, the sort Lazers get in their transoms, so I hope it will be enough to keep water out, and allow me to store them 'open' when not in use.
Offline
#1087 8 Sep 2022 7:57 am
- MartinC
- Member
- Registered: 3 Apr 2020
- Posts: 348
Re: Waterlust sailing canoe in Norway
Thinking more about the reefing thing, I could be wrong in applying big boat principles to little ones.
If your sail tie cringles have the same reinforcement as those at the foot of the sail, I am sure you will be OK. It could be that for a boat as light as ours, it doesn't make any difference anyway as the boat will capsize before any damage is done.
Offline
#1088 8 Sep 2022 1:52 pm
- spclark
- Member
- From: "Driftless" Wisconsin USA
- Registered: 19 Mar 2020
- Posts: 478
Re: Waterlust sailing canoe in Norway
My limited experience with sailboats would lead me to agree with you MartinC. If sails sized such as ours are properly built for reefing the boom's at little risk when reefed.
As for foot rope tied tightly to it Guy I set mine just barely touching. May have read this recommendation in one of Michael Storer's recommendations for setting up a lug rig. Would seem to let the boom do its job better, help sail achieve its proper shape w/o ropes tight against spars.
Offline
#1089 21 Sep 2022 2:13 am
- spclark
- Member
- From: "Driftless" Wisconsin USA
- Registered: 19 Mar 2020
- Posts: 478
Re: Waterlust sailing canoe in Norway
Fellow's posted on the CLC Builders' Forum today about a seat he's using with his Waterlust.
https://clcboats.com/forum/clcforum/thread/55273.html
https://pelicansport.com/products/seat- … -ps3104-00
I've not heard of this previously but it certainly looks interesting.
Been hinting he should look at what we've been building here the last 30 months... I (for one) would like to know more about his experiences.
Last edited by spclark (21 Sep 2022 2:14 am)
Offline
#1090 5 Oct 2022 2:50 am
- Chuck
- Member
- Registered: 24 Nov 2020
- Posts: 138
Re: Waterlust sailing canoe in Norway
Rope Steering!
I've just finished rigging it up. I hope to try it this weekend, and see if it needs a 2:1 purchase anywhere. So far, it feels like 1:1 might work just fine.


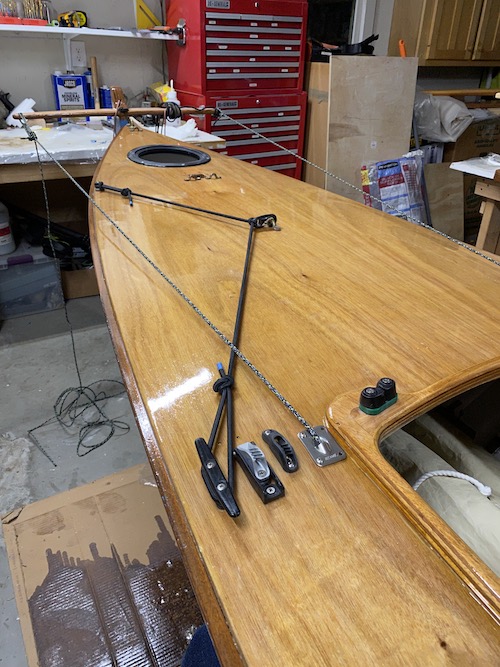

The idea is to be able to steer from anywhere, even the front position. And, to eliminate the sometimes awkward push-pull tiller. Lots of improvements could be made in this (eg, tiller lock-off, etc), but I'll see how it works like this first...
I have a pretty ambitious trip planned for the weekend, a 7-mile crossing of Chincoteague Bay to get to Assateague Island in Maryland. The weather looks good at the moment, so I hope it works out!
Offline
#1091 5 Oct 2022 6:58 am
- Bergen_Guy
- Member
- Registered: 6 Feb 2020
- Posts: 353
Re: Waterlust sailing canoe in Norway
Good luck with the trip Chuck!
I really like the idea of the rope steering - I will be fascinated to hear how you get on. Herreshoff uses it on Coquina - and I think it's generally liked by those who have one. Very neat through deck solution you have found there.
I made a start on my hollow mast, it's going to be a square section thing, with a 'ladder' of small blocks inside. It will certainly be lighter, whether it proves to be stiff enough, we will have to wait and see! I am currently debating how to finish the outside, Deksolje 1 and 2, just 1, or a full epoxy and varnish treatment. The deksolje 1 on the original mast works very well, so I mat start with that, and can always varnish after that. I am reluctant to encapsulate in epoxy as any cracks that let water in really seem to be a liability, as I have found out on the pram -where I had a crack and ended up having to rip out quite a bit of delminated ply.
Offline
#1092 5 Oct 2022 12:25 pm
- spclark
- Member
- From: "Driftless" Wisconsin USA
- Registered: 19 Mar 2020
- Posts: 478
Re: Waterlust sailing canoe in Norway
Those bearing fairleads Chuck, where'd you source 'em?
Found these: https://www.deckhardware.com.au/blocks/ … xit-boxes/
- so far, not quite what your's look like.
Be looking forward to your reportage of this upcoming outing!
I'd like to think you won't need a 2:1 mechanism Chuck. LFH's design Coquina had a larger rudder that our craft, would need more force to effect movement. Too, newer materials reduce the friction of what was available in his day for stuff like this.
I had plans to try out my ballasting concept yesterday. Wife's plans conflicted a bit so I'm keeping a weather eye on what days may be left for a Fine Day Out before winter's inevitable arrival up this way.
This shows what I've fabricated:
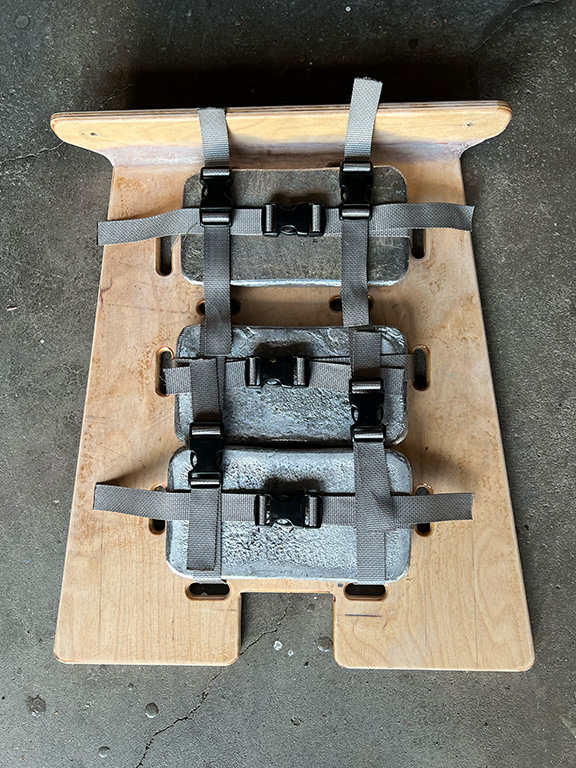
Lead alloy 'bricks' from 17# to 27# can be strapped down to the carrier that's fitted to the bottom of the storage bin between mast pockets. Idea being to load my Waterlust as if an extended expedition were in the offing, rather than simply an afternoon out. What's shown is 55# in place, the two remaining heavies swapped out for the lightest pair'd raise total to 74#. With a 9# brick embedded in the daggerboard I'm hoping the resulting waterline better suits her 'as loaded' design principals, perhaps reduce need of amas as conditions merit.
I've added two 'horn' tabs in that space, well bonded (carbon fiber ribbon in epoxy) to the first hull panels on either side that allow the extended ends of the front piece (at top) to be bolted in place. The rear edge straddles midship mast pocket, held in place by two cleats bonded to frame #2. Dacron webbing's fitted with plastic connectors to make securing bricks prior to launch easier than trying to put the entire assembly in place through the access port.
Looking around for GoPro mounting options led me to an outfit in TX that sells stuff like this contraption I'd believe will facilitate beach launching next season. Sometimes it's not practical to get a vehicle-towed trailer to a prospective launch site where I'm at. Maybe you others have a similar impediment once in awhile.
Last edited by spclark (5 Oct 2022 12:54 pm)
Offline
#1093 5 Oct 2022 1:04 pm
- Bergen_Guy
- Member
- Registered: 6 Feb 2020
- Posts: 353
Re: Waterlust sailing canoe in Norway
That looks good SP! I look forward to your reports when you get on the water. As for those launching wheels -I find mine that I got from Klepper in Germany really useful, I use them a lot, also just for moving the hull around at home. I am sure you will find that a help for those situations you can't get the trailer close to the launch site.
Offline
#1094 5 Oct 2022 1:19 pm
- spclark
- Member
- From: "Driftless" Wisconsin USA
- Registered: 19 Mar 2020
- Posts: 478
Re: Waterlust sailing canoe in Norway
We can hope! I recall you'd mentioned something similar in an earlier post Guy, why this caught my eye as I surfed past last week.
And I've bought a wetsuite too, with a mind to not only staying warm if I get to go out "post season" but also as an aid to survival if by some chance I should find myself on the wrong side of a gunnle again.
Offline
#1095 5 Oct 2022 3:33 pm
- Chuck
- Member
- Registered: 24 Nov 2020
- Posts: 138
Re: Waterlust sailing canoe in Norway
SP- the fairleads are from Ronstan. They come lined with stainless and without it in all sorts of sizes.
Eg, https://www.velasailingsupply.com/ronst … sku=RONRF9
Thanks for the post on the sand wheels! I love the video of the man in a kayak riding down a sand dune on the wheels. I have smaller, harder wheels with the same basic design that were intended for kayaks. But, when I went to Cedar Key this year and launched from the beach, the worst part of the trip was moving the boat across 30 feet of sand (nearly gave myself a hernia!)
Last edited by Chuck (6 Oct 2022 5:27 am)
Offline
#1096 5 Oct 2022 4:35 pm
- MartinC
- Member
- Registered: 3 Apr 2020
- Posts: 348
Re: Waterlust sailing canoe in Norway
Good to hear from you all again!
Very interesting developments from all of you. Thanks for sharing.
Re. Wheels. I find kayak wheels at the stern handy for manoevring short distances, but I agree with Chuck she is a heavy boat and with the wheels at the back you are taking a lot of the weight at the front. I haven't been able to find a way of using the wheels further forward (to take more weight), so I bought a very cheap launching trolly (modified it to the unique shape of the Waterlust) and rather than bolt it together as instructed,I have simply put pins (with split pin retainers)through the bolt holes so I can carry it dismantled in the back of the car.
I have found that launching down a slipway on the kayak wheels is very unstable as the wheels are not wide enough apart to support the hull half in/half out of the water and the demountable trolly works fine for this.
I would say that the inflatable launching rollers like these https://www.force4.co.uk/item/Force-4/I … gLYQfD_BwE work really well if you can co-opt two or more people to help. It is amazingly easy to roll the boat over them with very little effort. I carry a couple of them deflated in the boat as they are a useful backup and they dont take up any space. Also they double up as useful fenders if an onshore wind gets up when you are moored.
Good luck Chuck with the trip. Looks a lovely stretch of water (when calm!).
Offline
#1097 5 Oct 2022 4:55 pm
- spclark
- Member
- From: "Driftless" Wisconsin USA
- Registered: 19 Mar 2020
- Posts: 478
Re: Waterlust sailing canoe in Norway
Racelite pass-thru's from Duckworks?
https://duckworks.com/racelite-stainless-exit-plates/
When this topic appeared earlier I fell short of finding a suitable pass-thru for what I felt would be a functional rope path.
Have to thank you Chuck for pushing through the thick of it to come up with a workable solution!
I waz gonna order up a couple today, then thought instead maybe I'll wait to see what you report from your planned Virginia shore expedition as to how it works in practice. Main concern is whether running a steering line in close proximity to that deck stiffener & the deck above makes for easy access or if a different layout, making for an easier grab of the line, might be a more practical alternative. Or mayhap routing steering line around the coaming on top of the deck, instead of underneath?
Things to ponder 'till you get back to us.
Last edited by spclark (6 Oct 2022 12:37 am)
Offline
#1098 6 Oct 2022 5:26 am
- Chuck
- Member
- Registered: 24 Nov 2020
- Posts: 138
Re: Waterlust sailing canoe in Norway
You've found them, SP -- I used the Racelite deck pass throughs from Duckworks.
My goal for the steering line was to have it easily accessible while sitting anywhere on the side decks. So, that makes putting the line up top just outside the coaming not work for me as it would be sat upon there. So far (in my garage) I find that it is easy to grab while sitting in the cockpit and when sitting on the side deck. And, my thoughts on the 2:1 purchase is that it may be desired to change the relative motion of rudder and steering line (not for increased mechanical advantage).
I think if I was doing the steering line again I would have it pass through the deck much closer to the rudder (to make for a cleaner back deck)
Martin -- I have had decent luck with kayak wheels under the balance point of the boat (except when going over sand). The main problem is getting the wheels on and off when the boat is in the water ( but I have done it mostly successfully a couple of times).
The other thing I have done is to carve down the main yard to have a much more aerodynamic shape (and reduced weight). The literature says some springiness is good there to help depower the main in gusts. We will see. My main goal in doing it is to try to sail closer to the wind. 110-120 degrees between tacks still frustrates me.
Last edited by Chuck (6 Oct 2022 5:49 am)
Offline
#1099 6 Oct 2022 1:01 pm
- spclark
- Member
- From: "Driftless" Wisconsin USA
- Registered: 19 Mar 2020
- Posts: 478
Re: Waterlust sailing canoe in Norway
...my thoughts on the 2:1 purchase is that it may be desired to change the relative motion of rudder and steering line (not for increased mechanical advantage).
I think if I was doing the steering line again I would have it pass through the deck much closer to the rudder (to make for a cleaner back deck)
https://www.dhylanboats.com/design/plans/coquina_plans/
Halfway down the page there's a link that will bring the reader a free set of study plans in PDF format. Much clearer detail (than what I posted back a few pages, earlier this year) is available on p. 5 for the layout of the steering tackle; looks to be a simple 2:1.
On our Waterlust, with that vast space below deck behind the cockpit I think something mimicking LFH's concept is possible. Also like his detail of the easier-to-hand, thicker tiller line up in cockpit than what's used to lead from rudder.
One potential hurdle: piercing frame #6 so lines from tiller yoke can be kept close to deck's underside, unless they can be brought thru deck ahead of that partial frame. Have to get out my stud finder after coffee, see just where that frame is in relation to width of hull & yoke's eyes.
Fair winds for your outing the weekend Chuck!
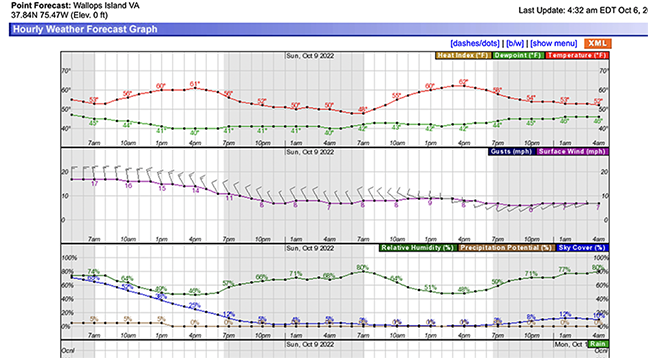
You planning that as solo or with your sailing buddy along from earlier adventures? Amas aboard too?
Offline
#1100 7 Oct 2022 9:33 am
- MartinC
- Member
- Registered: 3 Apr 2020
- Posts: 348
Re: Waterlust sailing canoe in Norway
Hi Chuck.
Some advice please.
I am curious how you lift the boat onto kayak wheels positioned at the balance point of the canoe. With my wheels it would mean lifting the canoe over a metre off the ground at the bow end whilst balancing it on its keel.
Doesn't this require superhuman strength to lift it and keep it from flipping over as soon as you lift it off the ground?
I am obviously doing something wrong! Can you advise me of your technique.
Offline
