You are not logged in.
- Topics: Active | Unanswered
#1051 26 Aug 2022 1:26 pm
- Bergen_Guy
- Member
- Registered: 6 Feb 2020
- Posts: 353
Re: Waterlust sailing canoe in Norway
SP. I have relied on blind luck, and friction! My dagger board is made of a board made up of staves glued together, here in norway it's called 'hobby board'. This, by chance was exactly the right depth fore and aft for my board. It was however a touch thin, just a few MM. As luck would have it, I had a piece of scrap ply kicking around after the build which I glued to the side of the board, this makes it an interference fit in the c'board case when it's down, or mostly down. When its as far up as it is in the picture above, then I think it's supported by it's own buoyancy pretty much, and held in place by the fact that it's almost a perfect fit for and aft. It does wobble a bit side to side when the plywood pad is more than half way out of the case, and does need a proper tug to free it if there is any sort of load on it. I am not sure I would recommend the design, but it does work. I do wonder if I will regret the friction part when the board case demands attention inside. I think i may put another layer of epoxy with some graphite powder in during the winter, just to keep wear at bay. I would rather have to modify the board than replace the case!
A new board is further down the list, which would be the correct width to have a close fit side to side and fore and aft till at least half way, or 2/3 of the way down the board, have a nice NACA foil section, decent epoxy strips for, aft and at the base as well as nicely glassed, but that's for a rainy day a bit further into the future!
I do find the board is a helpful stabilizing element usually, but with the outriggers and a solid breeze, I didn't really notice any downside of sailing with it up on the downwind legs, but did convince myself it was a bit quicker - but with no means of measuring, I can't be certain that was real, or just in my mind.
Last edited by Bergen_Guy (26 Aug 2022 1:28 pm)
Offline
#1052 27 Aug 2022 7:46 am
- MartinC
- Member
- Registered: 3 Apr 2020
- Posts: 348
Re: Waterlust sailing canoe in Norway
Before I changed my daggerboard for the steel one, I found that the bungee cord which keeps the board from falling out (in the event of a capsize) provided enough fore/aft friction to keep the board up. That being said, I only used it when approaching shallow water. Like Guy, I rather doubt that it is worth raising it for a very marginal (if any) increase in speed downwind unless you are racing. Remember, you will need it down in the event of a capsize!
With your heavier board SP, you may find it necessary to have some clamp arrangement like mine, although you will be surprised how light the board is when mostly supported by the water, and I would guess that the bungee will still cope.
Offline
#1053 27 Aug 2022 7:23 pm
- Chuck
- Member
- Registered: 24 Nov 2020
- Posts: 138
Re: Waterlust sailing canoe in Norway
Hi Guy-
I hear you about needing to figure out a way to deal with the mainsheet. My original configuration was a fiddle block with cam cleat attached to the center console, and it works wonderfully: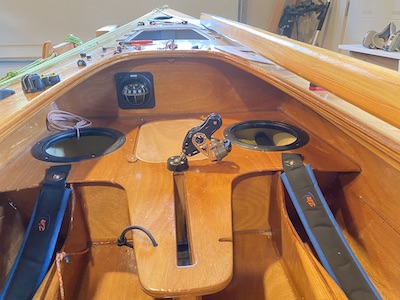
However, I found that it gets in the way when using the Mirage drive. When that is in place, I use the standard method drawn on the plans, but I also don't like having to hold the sheet all the time and worry that sometimes it might find its way overboard
Offline
#1054 27 Aug 2022 7:32 pm
- Chuck
- Member
- Registered: 24 Nov 2020
- Posts: 138
Re: Waterlust sailing canoe in Norway
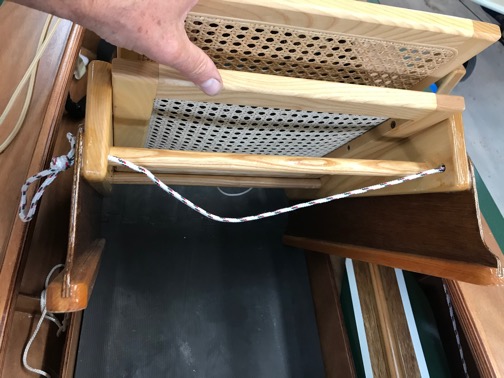
Here are some pictures of a solution I worked up for the chair problem:
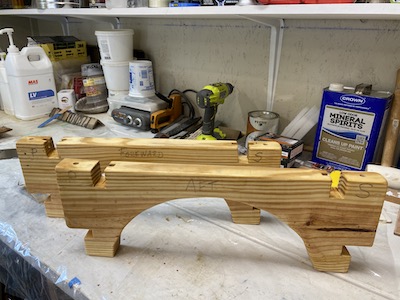
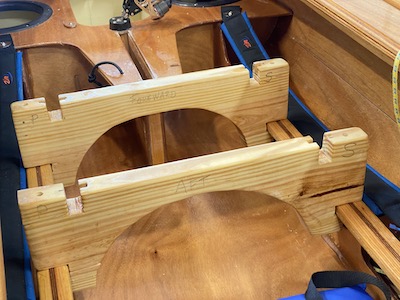
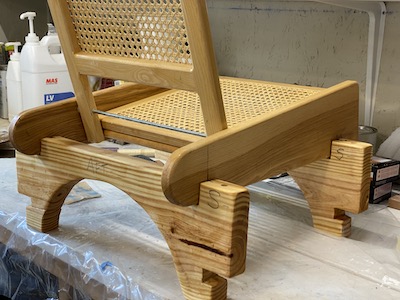
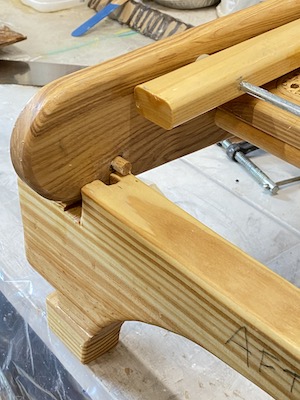
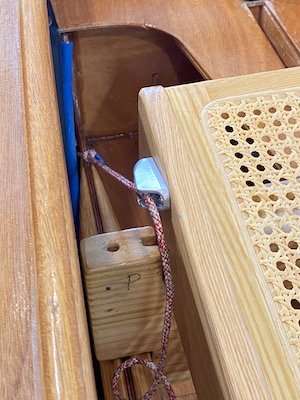
The red cord to a V-cleat serves to hold the front of the chair from moving backwards while peddling. However, the rear of the chair can pop out of its peg hole in the support, so needs another cord to hold it in place.
Unfortunately, I think this design is not usable long term, because rocking motions of the chair put tremendous stress on the wood tabs underneath the grooves where the supports interface with the rails on the boat longitudinals, and I have broken them in the past. So, I think I am going to have to find another solution (and probably with a smaller, more manageable seat!) One of the nice things about these supports is that they don't take up much space laying on the cockpit sole, or in the back.
Last edited by Chuck (27 Aug 2022 7:37 pm)
Offline
#1055 27 Aug 2022 8:22 pm
- spclark
- Member
- From: "Driftless" Wisconsin USA
- Registered: 19 Mar 2020
- Posts: 478
Re: Waterlust sailing canoe in Norway
Many areas for 'fine-tuning' such a multi-purpose design. I have yet to deal much with the sheeting question so will be looking forward to solutions offered up here.
Raising the seat I found makes Mirage pedaling more comfortable at the expense of raising the CG of 'movable ballast'. Perhaps my ballasting efforts will affect this in a positive direction? Yet TBD. I too raised my seat by means of additional 'riders' secured to the stock seat sides. These rest upon the stringer caps I added, the seat tethered with a thin Dacron cord (mine's secured with small SS carabiners) in a manner similar to our Texas builder's idea:
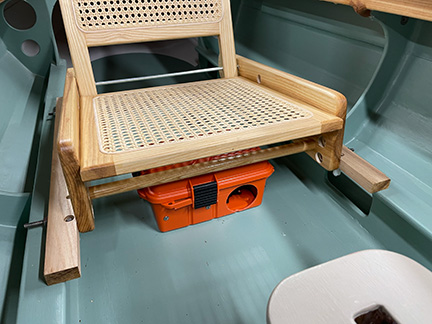
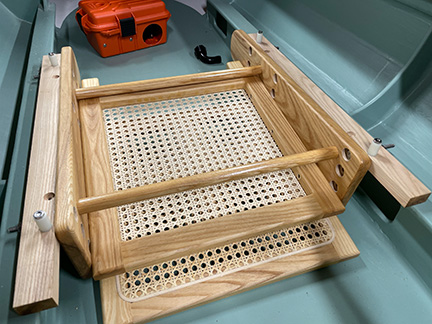
(He too felt need of raising seat as shown there. His addition rests on the floor panel.)
Works well enough yet I'm leaning towards stowing the seat aft when sailing, making cockpit navigation less troublesome.
I still want to explore the possibility of adding a set of oars... have to turn the seat around, maybe fashion a seat that mounts on drive well cap... for use of course without the amas!!
MartinC I hope your prediction for a 'lighter' d'board when in use proves out! I certainly is awkward carrying it around on land what with that hunk'a lead I've put innit!
Last edited by spclark (27 Aug 2022 8:26 pm)
Offline
#1056 29 Aug 2022 2:03 pm
- Bergen_Guy
- Member
- Registered: 6 Feb 2020
- Posts: 353
Re: Waterlust sailing canoe in Norway
Ah! I see I have it reasonably 'easy' with respect to not having to bother getting my feet up to the pedal drive! I have arranged a couple of slats to put the seat on if I want to paddle with the double bladed paddle, but they pale into insignificance when I see the efforts that have gone into your seat arrangements. (they just have small tabs on the end to keep them from slipping off the longitudinal stringers, and some old strips of foam sleeping pad to stop the seat sliding about)
I do like to be able to kick the seat under the aft deck, as usually the transition from sitting in, to sitting out happens when the wind is getting up, and then I want the space quickly. That said, now with the outriggers that transition can be made at a more leisurely pace and all I did on the last trip was flip the back of the seat flat so it didn't get knocked over by the tiller. I have been half thinking of semi sealing off the big volume under the back deck for added seaworthiness in the event of swamping, but don't think I would want to seal it off forever. That would probably mean that kicking the chair back there would also no longer be an option.
Chuck, thanks for those detailed cockpit photos - nice and tidy there, I do like your bulkhead mounted compass too, a very nice touch. Do you find you are able to cleat and uncleat the main sheet easily with it so far forward?
Offline
#1057 29 Aug 2022 3:46 pm
- spclark
- Member
- From: "Driftless" Wisconsin USA
- Registered: 19 Mar 2020
- Posts: 478
Re: Waterlust sailing canoe in Norway
When I capsized a year ago my experience was that there’s little chance of being swamped, i.e. water up to gunwales. I was Very Glad I’d fitted an automatic bilge pump (that orange thing in my last pics) though, pumped out enough water to allow me easy access once I got my upper body across cockpit.
(If you go back to where I posted the video of that event you’ll see I made things a tad worse trying to climb back in from the starboard side I went out on. That only added to how much water got into the cockpit!)
Conditions will affect stability of course; waves were minimal that afternoon.
I’ve been meaning to figure a better way to secure that pump. it’s in the way as it sits now though the seat can be lifted over it. Otherwise that space is empty back to the last bulkhead.
Offline
#1058 30 Aug 2022 12:34 am
- Chuck
- Member
- Registered: 24 Nov 2020
- Posts: 138
Re: Waterlust sailing canoe in Norway
I really like the fiddle block for the main sheet on the center console.
In practice it doesn't get cleated very often. Very rare upwind, and occasionally downwind. The block has a ratcheting sheave, which really helps make it easy to hold the sheet.
All three ropes of the system going to the same place means that there is no sheet hanging under the boom to snag on things while tacking or gybing. But, there is a bit more stress and bending of the boom. So far it hasn't been an issue for me.
Last edited by Chuck (30 Aug 2022 12:37 am)
Offline
#1059 30 Aug 2022 7:58 am
- Bergen_Guy
- Member
- Registered: 6 Feb 2020
- Posts: 353
Re: Waterlust sailing canoe in Norway
Thanks Chuck, interesting info :-)
SP - I wasn't thinking about swamping in terms of a capsize, it was more that as I start to head further away from shelter, I have a picture of sailing in a building breeze, with seas building and starting to break onboard, and filling the boat before I managed to stop and bail her out, all the while getting lower in the water and taking on more and more water... It's likely not a scenario that will happen, but the huge internal volume is a weakness of the design when heading out into open water! By the way, I picked up a nice second hand drysuite yesterday - so my sailing season looks like it can now be more safely extended into winter.
Offline
#1060 30 Aug 2022 12:01 pm
- spclark
- Member
- From: "Driftless" Wisconsin USA
- Registered: 19 Mar 2020
- Posts: 478
Re: Waterlust sailing canoe in Norway
Guy you're more adventurous than I can claim but heck you have vastly more opportunities for adventure close at hand!
With that scow from half a century ago I fitted a pair of these things (it was often a wet ride even on the inland lakes I used here on) which proved their worth:
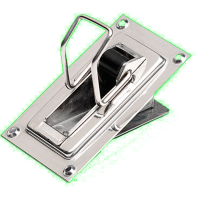
Low enough in profile the handle (bail?) wasn't a hazard while I admit the cockpit of that scow was twice the width of what we cram ourselves into in a Waterlust. She needed a pair, rarely was there much level sailing at a speed that would have made just one worth the hassle.
Otherwise you may want to consider adding an auto-bailer such as what MartinC and I have contrived, leaves your hands free for other tasks.
Offline
#1061 30 Aug 2022 7:27 pm
- spclark
- Member
- From: "Driftless" Wisconsin USA
- Registered: 19 Mar 2020
- Posts: 478
Re: Waterlust sailing canoe in Norway
Getting done w/upgraded connection between rudder arm & tiller extension. My marlinspike skills leave a lot to be desired, never felt really positive over lashing that. Found an interesting Ronstan ‘universal’ at Duckworks, figured out a way to employ one in this manner -
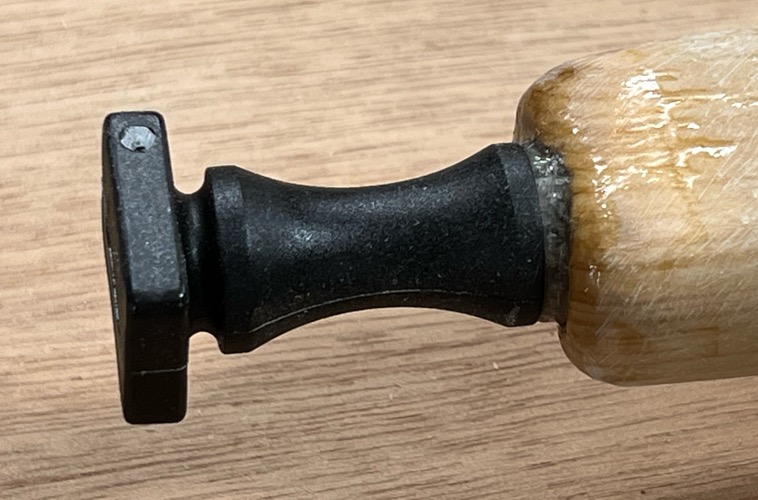
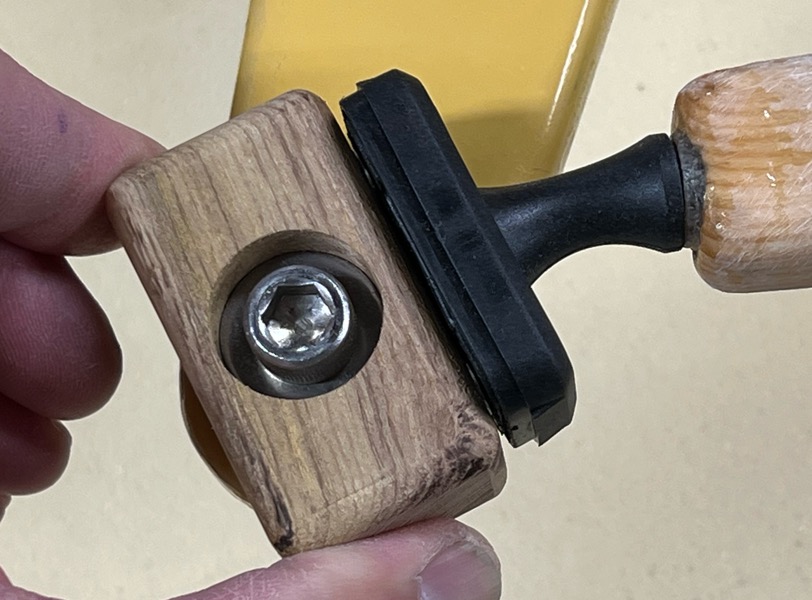
Comes apart by popping adapter cap piece off base, makes for easier transport w/o extension. Seems robust enough, they’ve been out for years. Black locust adapter’s bolted on w/rubber hose bushing filling space where lashing’d be otherwise. I’m hoping this effects a more positive sense of control that I’d had previous to adding this.
Offline
#1062 1 Sep 2022 5:43 am
- MartinC
- Member
- Registered: 3 Apr 2020
- Posts: 348
Re: Waterlust sailing canoe in Norway
Some very interesting ideas here. Thanks to all.
One word of warning about reducing the internal volume. Although it would assist pumping out prior to capsize, during my pool capsize tests, I found that when the boat was lower in the water aft because of the swamping, it was considerably easier to climb aboard. In fact, when there was very little water in the boat (in the absence of ballast) I found it impossible to get back in! This would spell disaster if you were out at sea!
Also, you would need to encapsulate the mizzen mast step if you sealed off the aft compartment as water does find its way down the mast and into the compartment. I found this on my recent 3 day camping trip when sleeping aboard!
With regard to the Andersen self bailers SP pictured above, you would have to be quite careful to only operate it when there is sufficient forward motion, otherwise you simply fill up even more! I am not sure the Waterlust is a good candidate for these, as when the aft compartment is flooded it is extremely difficult to get any forward motion at all. Personally, I am convinced that the electric pump is the answer here. Mine works perfectly. I can post fitting details if anyone is interested.
When I have unpacked Gaia (and dried out!), I'll post details of camping modifications I have made. All I'll say at the moment is that she really comes into her own as a camper and I can highly recommend living aboard.
Offline
#1063 1 Sep 2022 12:47 pm
- Bergen_Guy
- Member
- Registered: 6 Feb 2020
- Posts: 353
Re: Waterlust sailing canoe in Norway
Martin,
Thanks for that input! I would be interested to see details of your pump setup, and am very keen to hear how you got on 'living aboard'. Once dried out, I would love a bit of a write up!
Offline
#1064 1 Sep 2022 12:55 pm
- spclark
- Member
- From: "Driftless" Wisconsin USA
- Registered: 19 Mar 2020
- Posts: 478
Re: Waterlust sailing canoe in Norway
Agree on the electric pump aspect. I want to reconsider where I put mine, in that where it is now – behind the seat – makes access to the aft compartment tricky at best. It did facilitate adding a thru-hull fitting for pump discharge however, to me a plus over something sticking up & over the side deck somewhere.
When I capsized I found there was more water at the forward end of the cockpit once the pump had done its best. I may relocate mine up by the drive trunk, add another thru-hull port up that way, opening up access to that aft compartment.
Yes an Elvestrom/Andersen bailer needs forward motion to draw. On mine there was a small flap that would close off the discharge orifice but it wasn't water-tight when close by any means. Still, if on a reach or pointed into the wind sufficient speed would have them working well enough to justify their addition I think, but their usefulness is minimal in the event of a serious swamping or capsize.
Once the bailer's closed by means of the wire lever I had no leakage. With frequent open/close or if one sails in sandy water their seal can wear but are fairly easy to replace as needed.
Last edited by spclark (1 Sep 2022 12:58 pm)
Offline
#1065 1 Sep 2022 1:12 pm
- spclark
- Member
- From: "Driftless" Wisconsin USA
- Registered: 19 Mar 2020
- Posts: 478
Re: Waterlust sailing canoe in Norway
Martin, Thanks for that input! I would be interested to see details of your pump setup...
I remember what he'd posted but using the forum's 'search' function I can't locate it in this thread. Hopefully he can re-post w/o adding to his uploads quota! I know he'd mounted his pump forward in the cockpit, perhaps outside one of the long stringers? His pump is long and skinny with a remote-mounted battery where mine's more coffee-mug size with the battery close by, all in a box-like housing.
Offline
#1066 2 Sep 2022 4:46 am
- MartinC
- Member
- Registered: 3 Apr 2020
- Posts: 348
Re: Waterlust sailing canoe in Norway
Hi. The pump is featured on post 558 (Page 23).
It worked well for me in this position as it is out of the way and pumps most of the water out if you sit on the same side.
The pump does need to to be fitted at an angle as the sensor is in the end of the pump and it mustn't be touching (or too near) the hull. I made up a simple aluminium angle bracket for this.
Since fitting it I have fitted a very simple on/off manual switch so I can tell if the pump is working before each trip.
Hopefully I won't ever have to use it in anger but it is a great comfort knowing it is thereand will work when it needs to. I just need to remember to keep the battery charged.
Offline
#1067 2 Sep 2022 7:26 am
- MartinC
- Member
- Registered: 3 Apr 2020
- Posts: 348
Re: Waterlust sailing canoe in Norway
PS The pump I fitted was this one:- https://marinestore.co.uk/Merchant2/mer … gJRzfD_BwE
Offline
#1068 3 Sep 2022 7:45 pm
- MartinC
- Member
- Registered: 3 Apr 2020
- Posts: 348
Re: Waterlust sailing canoe in Norway
Norfolk Broads Trip
They say ‘a picture paints a thousand words’, but I am afraid I can’t sail and take pictures at the same time; so here are the thousand words.
The trip started on Wednesday, when I launched Gaia down the very steep slipway at the ‘Three Rivers’ campsite at Geldeston, which lies at the southern extremity of the river Waveney; the most beautiful of all the seven rivers on the 117sq miles of waterway on the Norfolk Broads .
I have learnt the hard way that when launching Gaia down steep slipways or a riverbank, the weight in the canoe must be kept to a minimum to avoid flipping over when it is only supported by the water at one end. Therefore, once launched, I tied up at the little jetty and loaded up with provisions, rigging and water ballast. On this occasion, the ballast comprised the 14.5kg steel daggerboard and one 23 litre fresh water tank in the front of the forward locker.
The plan was to have three nights aboard, although the beauty of self-contained dinghy cruising is that you are not time-constrained. My only plan was to go where the wind took me and be home for the weekend.
The first day I paddled around locally getting used to the weight and balance of the boat and sorting out the storage issues. I ventured up to the ‘Locks’ pub at Geldeston and then drifted down about a mile south of Beccles where I anchored for the night. My total mileage for the day was less than 4 miles, but I was delighted with my ‘sea trials’. The forward ballast tank added considerably to stability when sailing and when simply moving about onboard, without noticeably affecting the ease of peddling or sailing performance. In fact, I found that the additional weight reduced the dominant effect of the mizzen, such that it could now be a ‘set-and-forget’ sail.
Experimenting with fenders I found that the most satisfactory arrangement was to tie each of them to a centre point underneath the cockpit coaming fore and aft so that they could be flung out to port or starboard and would always be the right length.
I had two small folding kedge anchors which I used fore and aft and stored in old hiking socks to prevent them damaging the hull.
My first night was surprisingly comfortable. The new Exped Ultra 3R Mummy inflatable bed fits the shape of the boat so neatly it could have been made for it and the boat is very stable and cosy. Regrettably, my Exped had a leak and I had to pump it up every 3 hours!
The next day I headed into the northerly moderate breeze (10-15 knots) pedalling most of the way against wind and tide until I reached Burgh St Peter where I arrived after 5 hours and stopped for a large brunch ashore in the waterside pub. I then pedal/sailed on to Oulton Broad before deciding not to go any further north into the headwind, but to return to Beccles with the wind behind me. And what a lovely sail it was! The wind had risen to about 15 knots and was either on the beam or astern and we sped along in the sunshine (much admired and photographed by onlookers!).
At Beccles I had to lower the masts to get under the old Victorian cast iron bridge which was now lower than my 2.5 metres air draft, as the tide had risen. I did this underway and both lowering and raising of sails and masts were surprisingly trouble free. The additional ballast in the fore locker allowed me to kneel safely on the foredeck, and the weight of the galley box, bedding and clothing in the aft section made the aft deck steadier as well. Chuck’s bungee sail tamer idea for keeping the sails and spars on deck worked a treat. Thanks Chuck!
I had travelled 38 miles, and that night I slept soundly despite the airbed losing all its air within 2 hours. We also had rain for the first time in nearly three drought ridden months. Fortunately I erected the tarpaulin tent before the worst of it hit, but I had forgotten that the mizzen step is not encased and the rain ran down the mast and into the aft compartment where it wet my feet and bedding. (I made a rubber gasket to fit around the mast when I got home).
The next day the wind had risen to 20 knots and again was right on the nose, so I headed under Beccles bridge to do battle once again with wind and tide. Pedal/sailing against this wind was tiring but illuminating. I could remain seated on the pedal seat and pedal/tack against the wind quite comfortably without any danger of heeling excessively. By holding the tiller in my right hand and the main and mizzen sheets in my left hand I found I could adjust the sails simultaneously by an upwards or downwards movement of my arm. (Downwards tightened the sails; upwards released them).
Once again the sail home was exhilarating. The shortened main mast and mainsail meant that jibing held no terrors, as the shorter boom simply swung harmlessly across in front of me when it felt like it, without risking a head injury or affecting the stability of the boat at all.
I reached Geldeston after a twenty mile sail, clocking up about 60 miles in total and arrived home very tired and damp but with a huge smile on my face. ‘Gaia’ was all I had hoped for...and more!
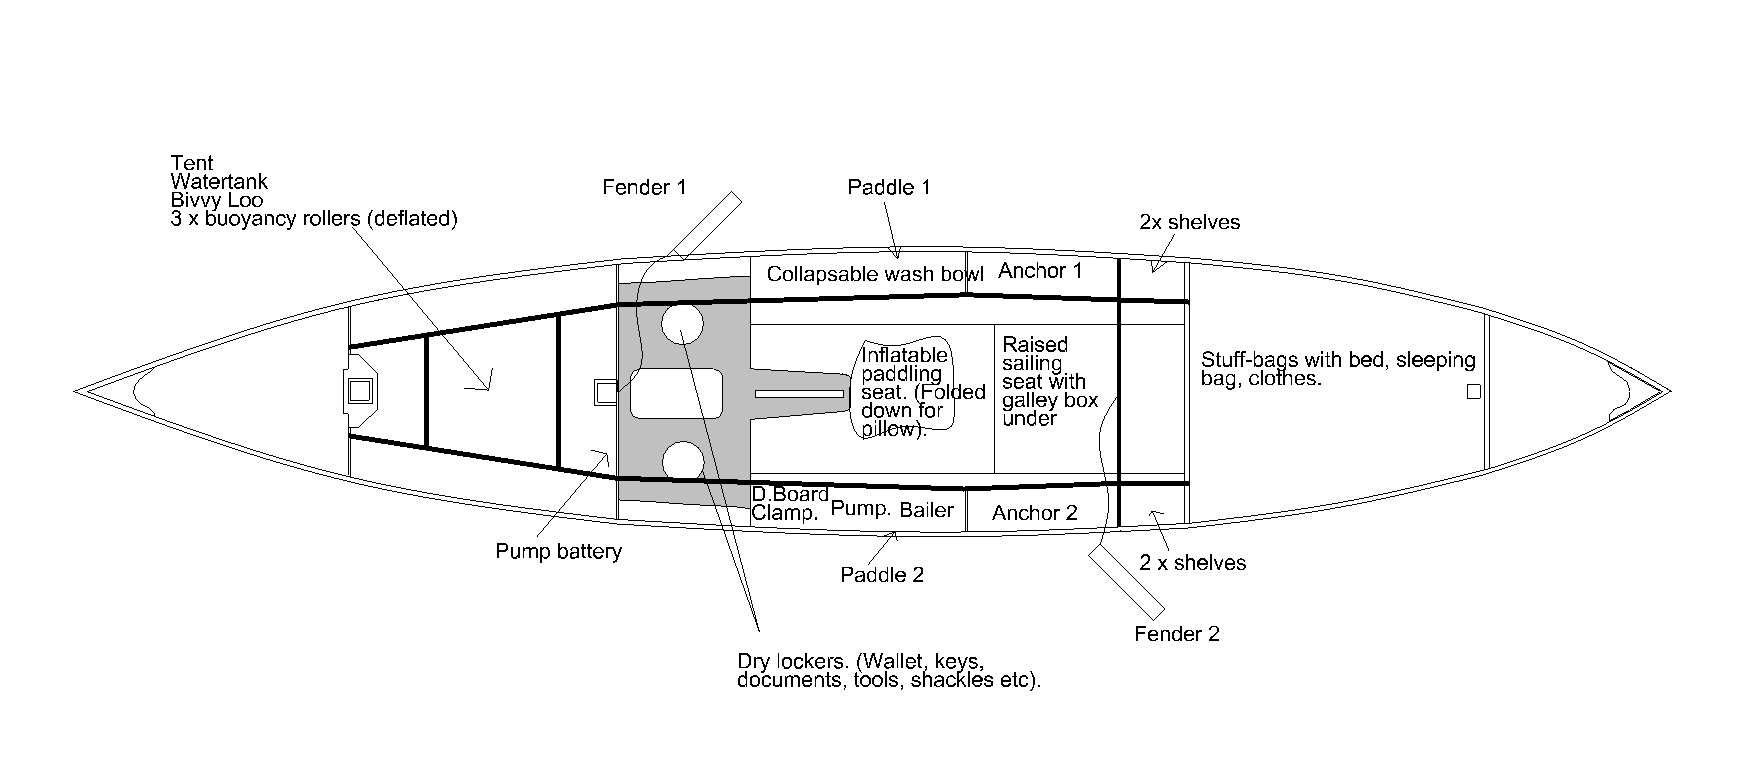
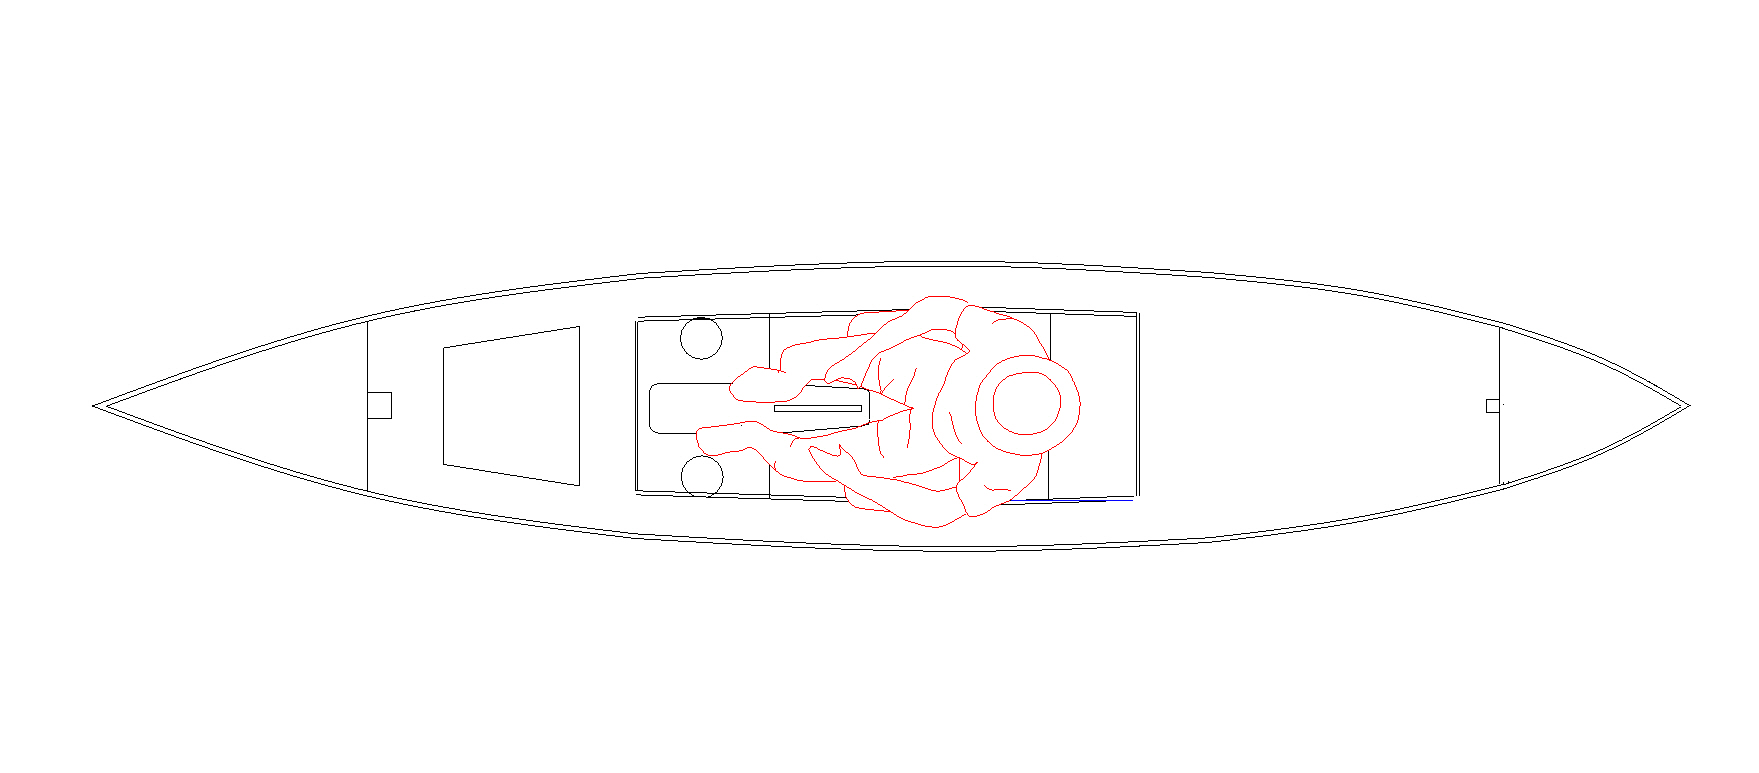
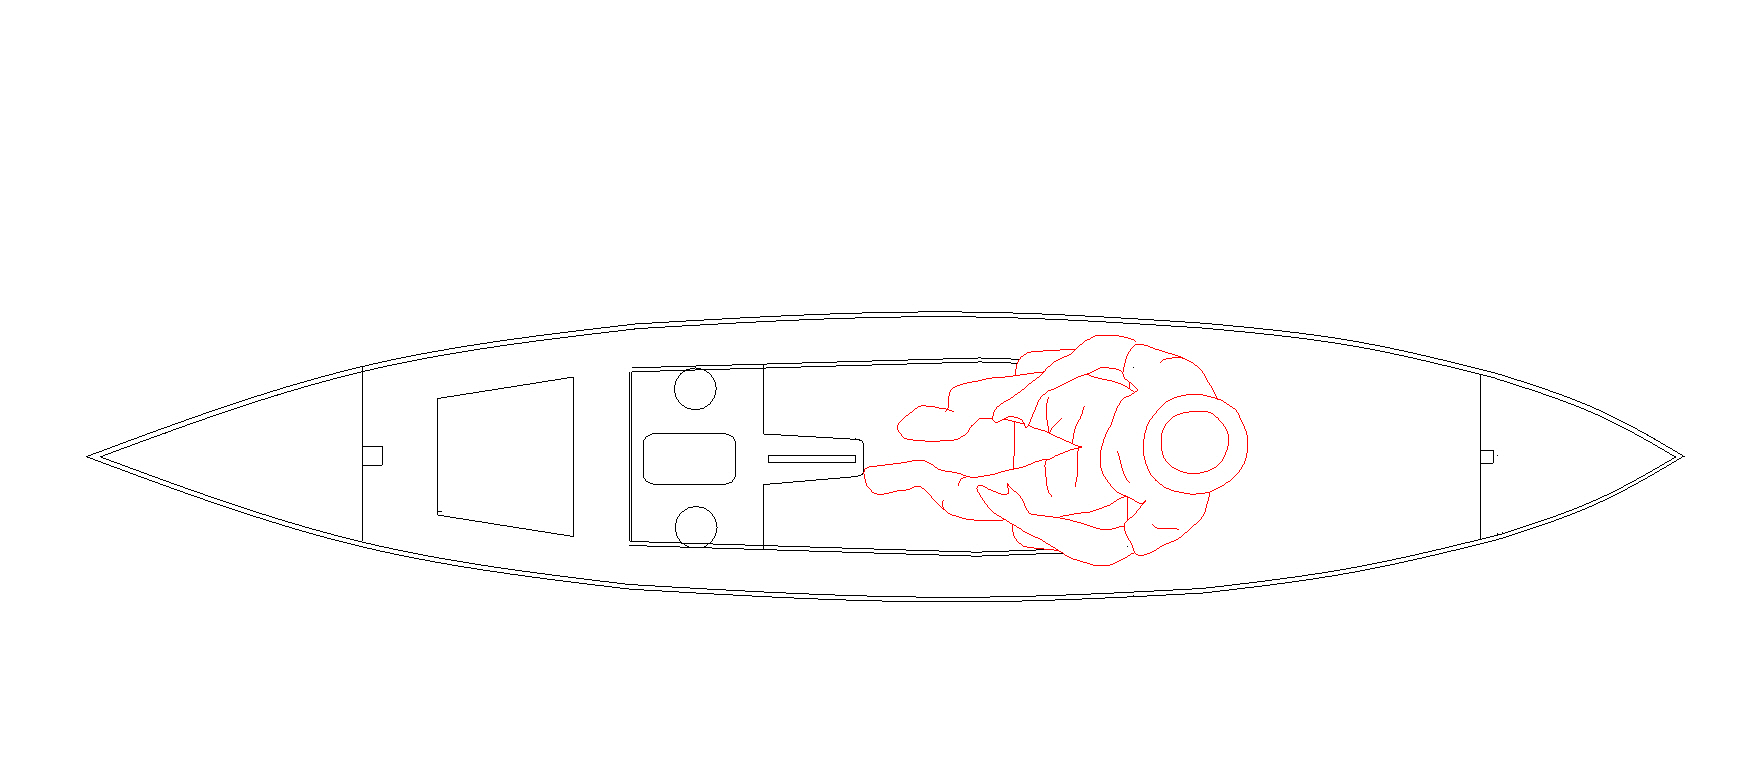
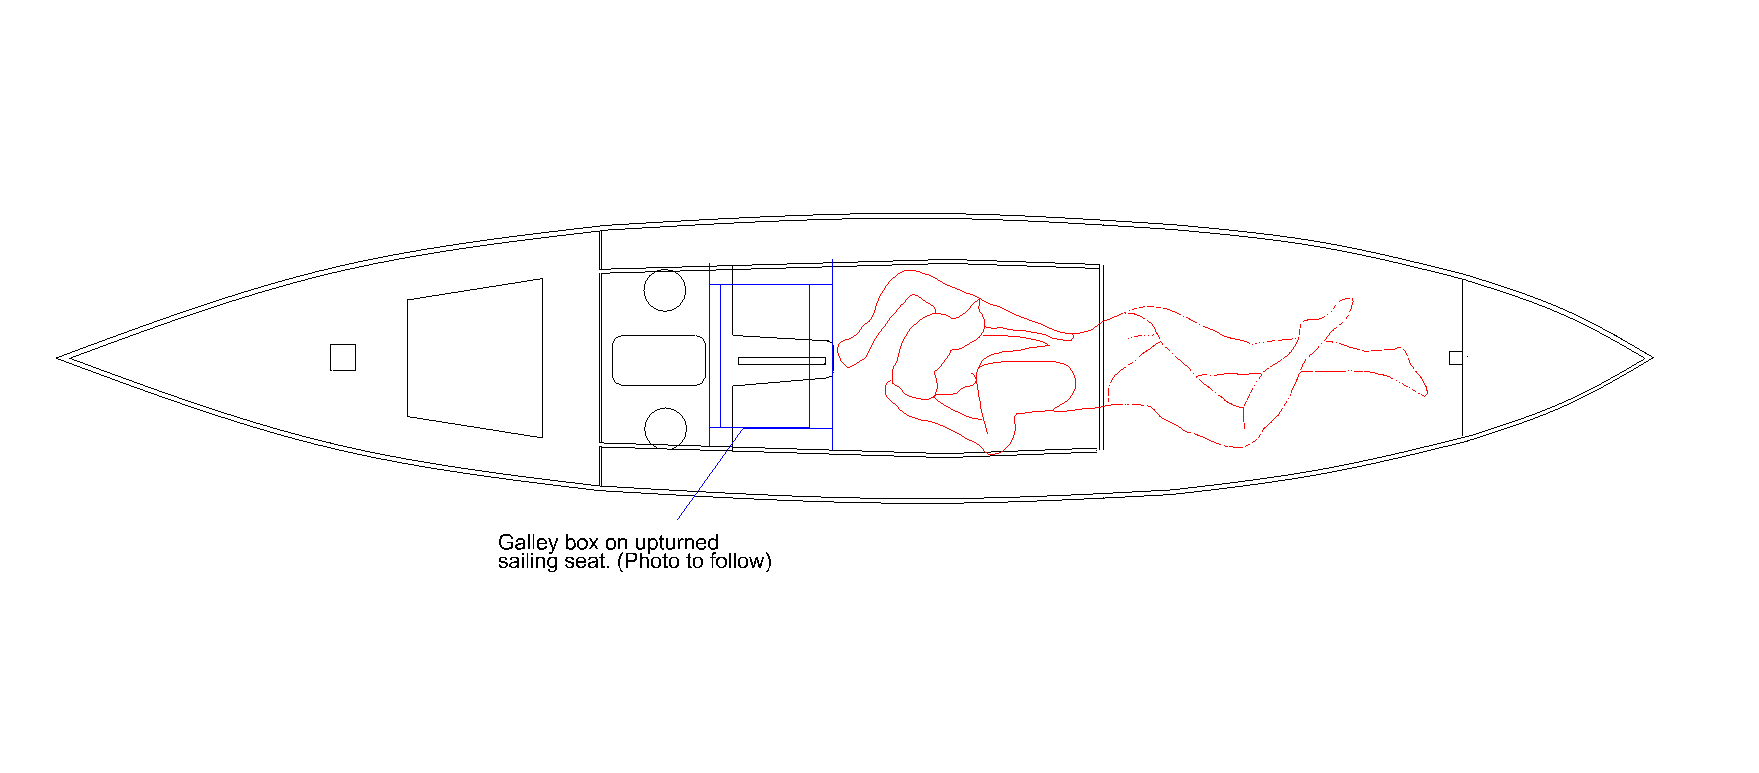
Here are the arrangements I used for living aboard (apologies for scantily clad female in drawing no. 4, it is the only ‘lying down’ human template on my CAD programme!).
I’ll be pleased to post photos of any part of the boat’s layout on request.
Offline
#1069 3 Sep 2022 7:52 pm
- MartinC
- Member
- Registered: 3 Apr 2020
- Posts: 348
Re: Waterlust sailing canoe in Norway
Sorry! I missed off the drawing headings. The first is the general arrangement. The second is the pedal sailing position. The third is the sailing and paddleing seat and the fourth is the sleeping position. The following is the cooking/eating position which works very well as the aft deck is at just the right height when sitting on the floor...Although you do have to face backwards!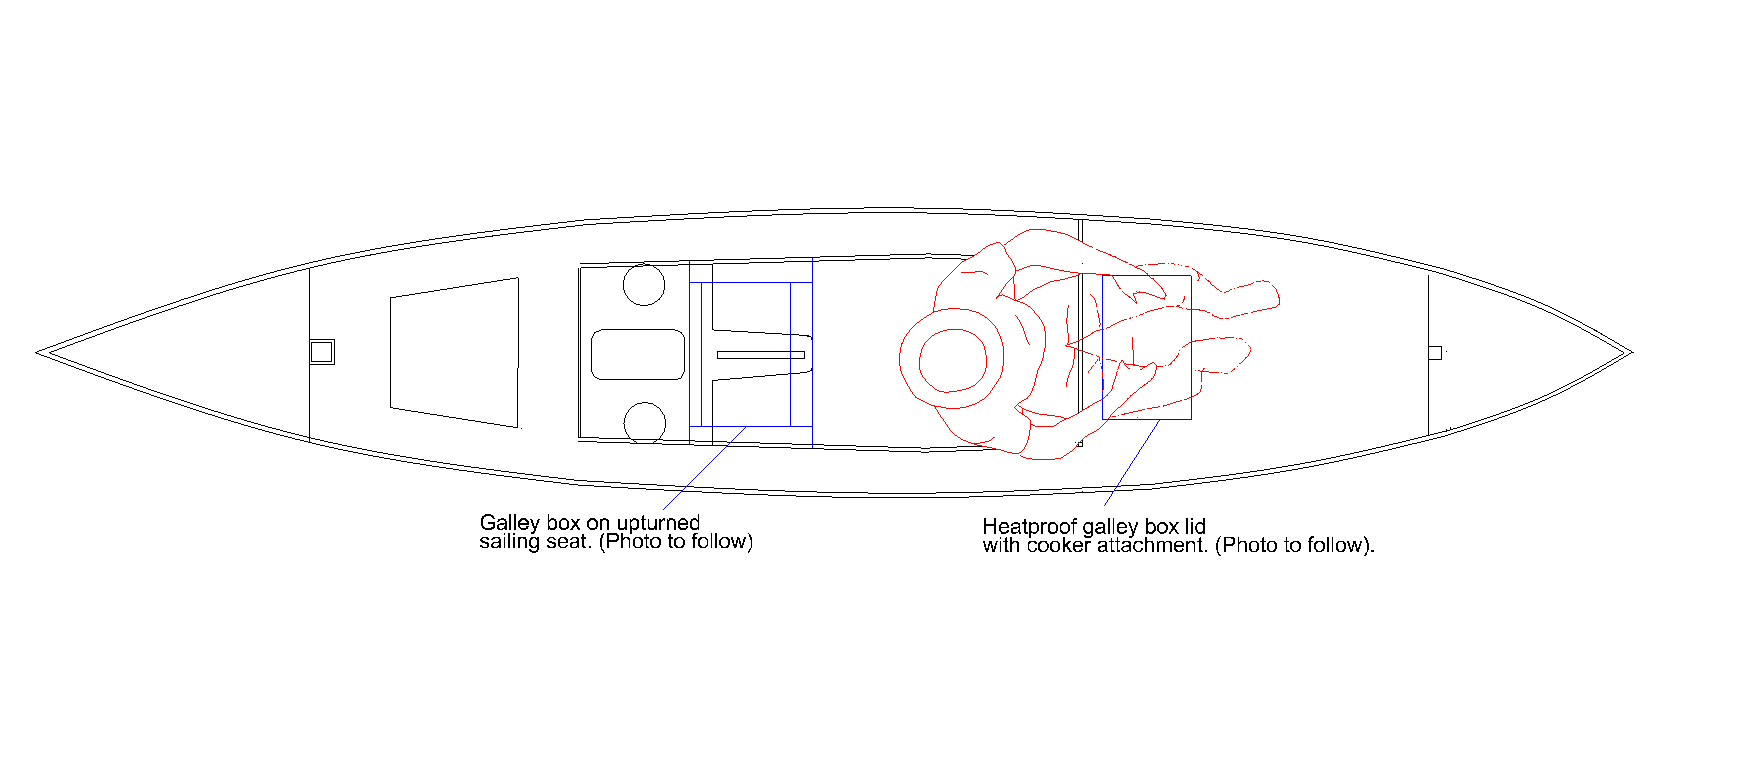
Offline
#1070 3 Sep 2022 9:23 pm
- spclark
- Member
- From: "Driftless" Wisconsin USA
- Registered: 19 Mar 2020
- Posts: 478
Re: Waterlust sailing canoe in Norway
Wow. Just wow!
Thanks so much for taking time to draw those images, then drafting all the details of your excursion MartinC!
Your's is proof positive this Waterlust design can be everything the commission by the Waterlust folks had in mind!
(I'd like to see a pic or two of the "2x shelves" to port & starboard aft please!)
I've just been painting my aka, fitting the last hardware bits that secure my 'ballast carrier' in the forward storage bin. Have some rigging details on the mizzen to effect tomorrow, hope to put out again soon... very soon, see what the additional ballast has on stability, how sail management changes with the tweaks I've been doing.
You shortened your cockpit aft? I've taken the liberty of borrowing one of your drawings, adding a ghosted image I snagged off the CLC build manual for reference. Vertical red line is where your aft deck starts, the kit deck is open further aft:

Would also like to return to a review of details about your custom sail dimensions, spars lengths. > 16 knot (18+ mph) winds'd have me seeking shelter ashore as it is now!!
Last edited by spclark (3 Sep 2022 9:56 pm)
Offline
#1071 4 Sep 2022 6:07 am
- MartinC
- Member
- Registered: 3 Apr 2020
- Posts: 348
Re: Waterlust sailing canoe in Norway
Thanks SP.
The drawings weren't a problem as knowing I was going to do extensive modifications later I took the opportunity of doing detailed scaled drawings during the build before I put the deck on.
Yes, you are right about my cockpit size. I asked Dylan to make my cockpit 200mm shorter than standard. I then made an extra frame to go immediately behind the seat so the space between the two frames is where I have installed the shelves.They are not big, but in a useful place for the cooking and sleeping positions (but not the sailing positions, as the sailing seat blocks access to them). I therefore use them for the gas bottle and cooking things and for small overnight items (toothbrush ect).
The boat and I won't be in the same place for a few days but I will send some photos when when we are!
Offline
#1072 4 Sep 2022 12:56 pm
- spclark
- Member
- From: "Driftless" Wisconsin USA
- Registered: 19 Mar 2020
- Posts: 478
Re: Waterlust sailing canoe in Norway
I did much the same Martin, working with the digital build manual provided by CLC and my modest skills with Adobe Acrobat and Illustrator. Proved to be even more beneficial when I took on the challenge of building the aka + amas package last year.
No worries on getting pics. Without that extra frame I doubt I could replicate them, but seeing what you added might spark an idea of my own.
You ever hear of the line of GoPro cameras made for adventuring? One of those might be a useful adjunct to your expedition kit (curious if you have any idea of what THAT might weigh in total?) so as to make a visual record of important stages as you get about. That's what I've used to capture the videos I've posted, as well as record what's going on that I can't always see when I'm out there, more often than not by my self. I'd be happy to help you get familiar with what one can add to your adventuring experiences.
Offline
#1073 4 Sep 2022 3:43 pm
- MartinC
- Member
- Registered: 3 Apr 2020
- Posts: 348
Re: Waterlust sailing canoe in Norway
Weight:- I haven't weighed everything but I would guess that in the stern, my camping gear weighed about 5Kgs. In the front locker the tent etc is another 5kgs, and the heavier stuff (anchors, galley box, tinned food ect) perhaps another 15kgs. So total about 25kgs plus the waterballast 23kgs and the daggerboard 14.5Kgs.
GoPro:- Thanks for the idea SP. As anyone reading this forum willl know, I am hopeless with tec. but I will investigate the GoPro and if I get stuck I'll take you up on your kind offer.
Offline
#1074 5 Sep 2022 7:45 am
- Bergen_Guy
- Member
- Registered: 6 Feb 2020
- Posts: 353
Re: Waterlust sailing canoe in Norway
Thanks Martin for a super write up, really nice!
Sounds like you have turned Gaia into a proper little Yacht - well done. Thanks also for the tips on what we need to watch out for for getting the boat ready for this type of living aboard. It would have been easier to box in the aft mast step earlier in the process - but never mind.
On the subject of mast steps, I am half considering drilling drain holes through the hull to allow water to drain out. Right now I use my patented 'sponge on a stick' - which is fine, if I don't forget, and if no water gets in under the cover. As I have found out on Bobbe the pram this year, standing water and plywood don't mix, even with a few coats of epoxy.
Offline
#1075 5 Sep 2022 10:01 am
- MartinC
- Member
- Registered: 3 Apr 2020
- Posts: 348
Re: Waterlust sailing canoe in Norway
Thanks Guy.
I agree about the mizzen mast step it is annoying it wasn't built like the main mast as it is going to be a nightmare getting in there to fit a box! I think epoxy is out of the question unless you have full breathing gear. As a winter job, I think I will make a half (or even quarter) height box, bond the 3 sides together outside the boat and then use something like Sikaflex mastic/adhesive to stick it in place. Any significant rain will then run down the mast and into the box rather than into my sleeping bag! My gasket on the mast is only a temporary fix.
Offline
