A forum for discussing wooden boats and boat building
You are not logged in.
- Topics: Active | Unanswered
#951 22 Feb 2022 8:14 am
- MartinC
- Member
- Registered: 3 Apr 2020
- Posts: 353
Re: Waterlust sailing canoe in Norway
Very nice, Guy!
I too have a slightly elevated rear seat position (the front one is an inflatable kayak seat on the floor as far forward as it will go - for pedaling).
The rear raised seat is no good for pedaling, but I find the view is better for the more sedate solo sailing that I do, and it enables me to get the two of us in the cockpit at a pinch!
Offline
#952 22 Feb 2022 12:59 pm
- Bergen_Guy
- Member
- Registered: 6 Feb 2020
- Posts: 353
Re: Waterlust sailing canoe in Norway
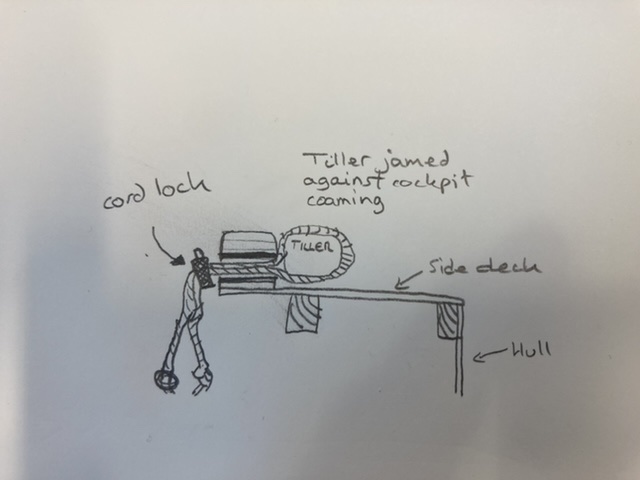
Here is a sketch of my Mk2 tiller restrainer. My plan is to drill/fill/drill a hole in the cockpit coaming. Through this I will lead a relatively light line round the tiller. My intention is to have one of those spring loaded cord lock type thing on the inside. That will be too big to fit through the hole. When I want everything ‘free’ I can have the line loose, and when I want it locked then I will tighten the lines and with any luck the tiller will then jam against the coaming with sufficient force to maintain a heading. Here is the Norwegian tillers version of the famed Huntingford tiller impeder! (Maybe - let’s see how it works in practice)
Offline
#953 22 Feb 2022 4:50 pm
- MartinC
- Member
- Registered: 3 Apr 2020
- Posts: 353
Re: Waterlust sailing canoe in Norway
I like the idea of the 'tether' (to stop it going overboard) and the 'lock' to keep it in the ahead only position being combined in one mechanism. Very neat.
My only worry is that it might not be 'quick release' enough for me. Being forgetful these days, I could see myself sailing off with it in the locked position (or with not enough slack) and not having enough hands to release it at that critical moment when I am casting off, lowering the rudder, pushing the daggerboard down, sheeting in the mainsail!
I think the smooth operation of the springloaded cord lock will be critical. If it is anything like the one on the hood of my Kagool it will get jammed!
Offline
#954 23 Feb 2022 10:27 pm
- Bergen_Guy
- Member
- Registered: 6 Feb 2020
- Posts: 353
Re: Waterlust sailing canoe in Norway
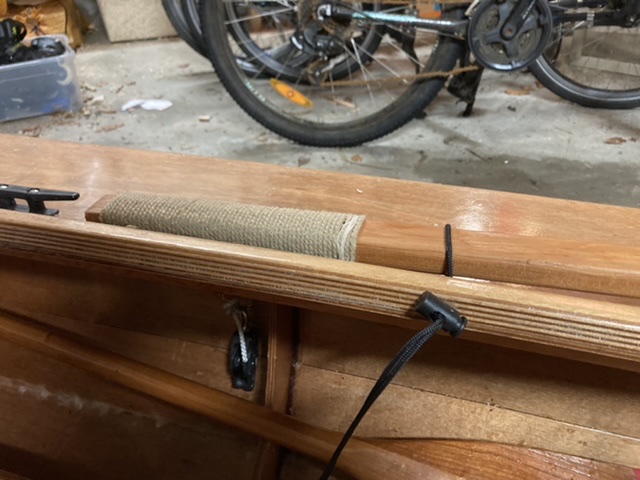
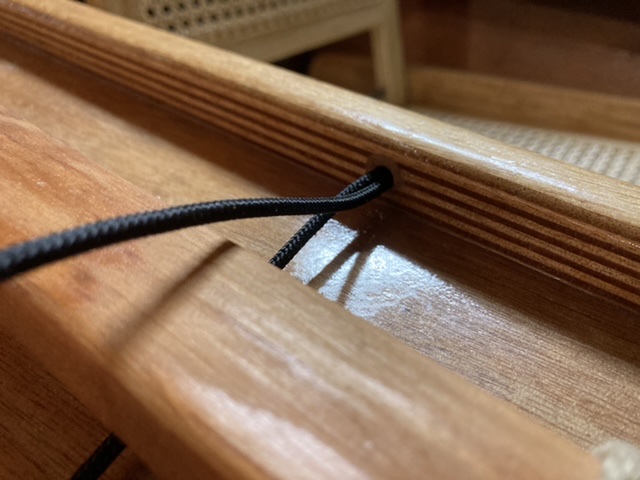
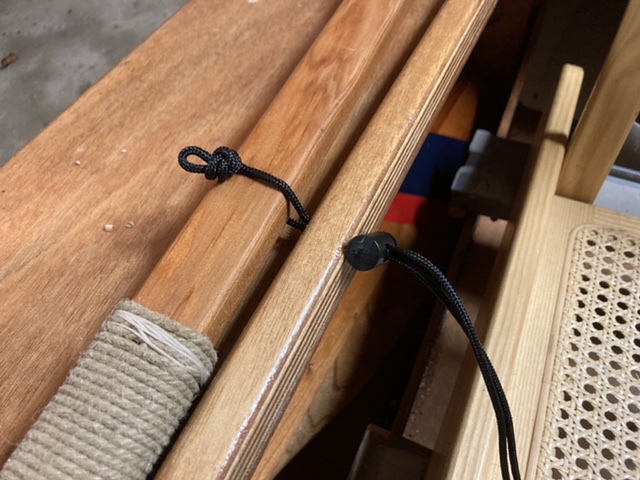
Well - nothing like a tube of quick action epoxy for a bit of drill-fill-drill action. I am pretty happy with how this has turned out so far. At least in theory this looks good. I wonder if in action I will want the light line attached to the tiller rather than simply looped over it as it is now, but the spring loaded toggle thing seems to be pretty strong and the tiller rests snugly in place. I look forward to testing it on the water soon!
Offline
#955 24 Feb 2022 8:43 am
- MartinC
- Member
- Registered: 3 Apr 2020
- Posts: 353
Re: Waterlust sailing canoe in Norway
I think it looks very good, Guy. My guess is that it will work better with the loop rather than being fixed at a fixed point on the tiller as this will give you more flexibiliy of movement. Also the loop arrangement does allow some movement and allays my earlier fears of having a 'locked' tiller in a crisis. Only your sea trials will tell! Let us know how you get on.
Offline
#956 27 Feb 2022 2:15 am
- spclark
- Member
- From: "Driftless" Wisconsin USA
- Registered: 19 Mar 2020
- Posts: 478
Re: Waterlust sailing canoe in Norway
One more step forward, then two back...
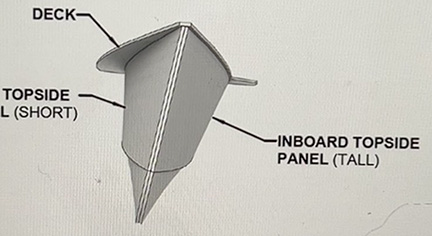
Note to ama builders: the outboard side is the shorter of the two as you proceed with your ama assemblies.
I thought I had it down pat... after a few weeks' hiatus I was overconfident, overlooked manual's p. 7 illustration making this clear.
So after bonding decks to my hulls earlier this week I then came to realize this afternoon I'd got it wrong:
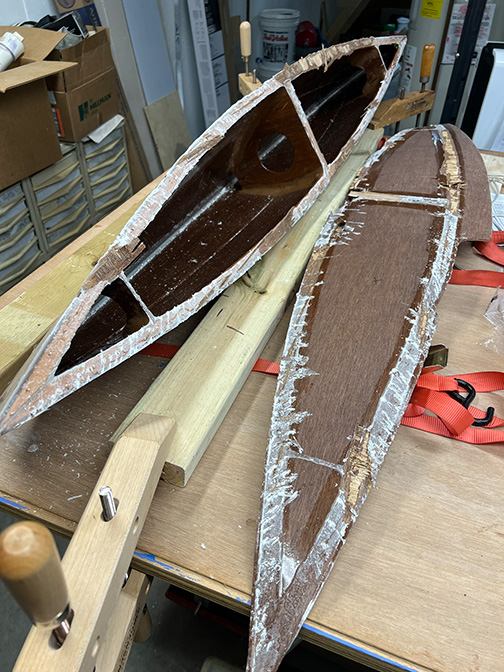
Trusty industrial heat gun and a heavy, short knife got this one separated in about 45 minutes.
This deck piece is junk! I'm glad I have extra material readily at hand that'll serve to get me started on two more deck pieces tomorrow.
(Noting I've filled half my alotted image storage space with this latest post.)
Last edited by spclark (27 Feb 2022 2:17 am)
Offline
#957 27 Feb 2022 7:44 am
- Bergen_Guy
- Member
- Registered: 6 Feb 2020
- Posts: 353
Re: Waterlust sailing canoe in Norway
Oh no! I was so paranoid about getting this wrong - and was still double checking a few days later. Still this also shows one of the ‘strengths’ of ply epoxy construction! There is almost nothing that can’t be rescued! Good luck with the next deck! Double check the deck attachments when you bond them together too - they are ‘handed’ and I ended up making two left hand ones and spent a few days fixing it!! Don’t despair - we’re all done it!
Offline
#958 1 Mar 2022 10:45 am
- MartinC
- Member
- Registered: 3 Apr 2020
- Posts: 353
Re: Waterlust sailing canoe in Norway
Dreaming about my first sailing 'overnighter' when the weather improves, I have been hunting around for a suitable sleeping mat.
Unfortunately I can't get to 'Gaia' at the moment to measure the width the mat needs to be to fit between the longitudinals and through the frame at the aft end of the cockpit. Does anyone have their boat where they could measure this for me?
I am guessing that it is about 2ft and therefore most of the self inflating sleeping mats will be too wide. However, this one has seperately inflated side tubes so I am guessing it would be OK.
https://www.amazon.co.uk/IFORREST-Sleep … s_li_ss_tl
Anyone else thinking along these lines?
Offline
#959 1 Mar 2022 12:48 pm
- spclark
- Member
- From: "Driftless" Wisconsin USA
- Registered: 19 Mar 2020
- Posts: 478
Re: Waterlust sailing canoe in Norway
Books arrived yesterday Martin, thanks so much!
I’ll have time to read mine cover to cover tomorrow but a quick scan last night tells me you missed your calling! Nice work here, easy to read, very informative.
Rehash of ama decks’ll be the w/e. Maybe ‘poxy up a piece of suitable ply tomorrow so Thursday can see me angle-grindering off the sheerclamps of old ‘pox & veneer peelings in garage where the mess can be tolerated.
Nora Jane’s accessible, if by ladder at present. 0.74M = 29+”, be a tight fit! I got 18” between those stringers by carpenter’s rule just now.
Last edited by spclark (1 Mar 2022 2:23 pm)
Offline
#960 1 Mar 2022 4:17 pm
- MartinC
- Member
- Registered: 3 Apr 2020
- Posts: 353
Re: Waterlust sailing canoe in Norway
Thanks SP. (Guy and Chuck:- If your books haven't arrived within a week please let me know).
Thanks also for the dimensions SP. No. It's not going to fit is it! Back to the drawing board!
Good luck with the Amas.
Offline
#961 6 Mar 2022 8:02 am
- Chuck
- Member
- Registered: 24 Nov 2020
- Posts: 141
Re: Waterlust sailing canoe in Norway
Martin -- I just returned home after a week long trip and found your wonderful book waiting in my mailbox. Thank you for putting this together! It has some pointers and photos that I don't remember from this forum, and is a lovely compilation.
It has now gotten warm enough to do good amounts of work in the garage, and I have a mirage drive to install and outriggers to build, not to mention a rope steering system, lazy jacks and a jib, putting new coats of paint and varnish on, etc. I have managed this winter to do some modifications to my trailer beds that should hold a Waterlust better than the stock beds on the Trailex -- thanks, SP, for the photos of your work that gave me inspiration.
However, it is also warm enough to sail, as well! Choices, choices...
I am planning on going to the wooden boat gathering that Hugh Horton and company have in Cedar Key, Florida the first weekend in May, and I need to get building! I'd love to have the outriggers available to take some of the anxiety out of taking a Waterlust onto the Gulf.
Last edited by Chuck (6 Mar 2022 8:10 am)
Offline
#962 6 Mar 2022 3:30 pm
- MartinC
- Member
- Registered: 3 Apr 2020
- Posts: 353
Re: Waterlust sailing canoe in Norway
My pleasure, Chuck. Thanks for your kind words.Good luck with all your mods. Keep us informed of your progress!
Once I hear back from FBK and CLC with their approval, I will make the book publically available.
Offline
#963 6 Mar 2022 4:00 pm
- spclark
- Member
- From: "Driftless" Wisconsin USA
- Registered: 19 Mar 2020
- Posts: 478
Re: Waterlust sailing canoe in Norway
I have managed this winter to do some modifications to my trailer beds that should hold a Waterlust better than the stock beds on the Trailex -- thanks, SP, for the photos of your work that gave me inspiration.
More'n welcome Chuck. I'm anxious to see what effect adding a jib has! I'm more of a mind to be reducing sail area, at least until I get more experience with getting some stability out of the ama kit.
I am planning on going to the wooden boat gathering that Hugh Horton and company have in Cedar Key, Florida the first weekend in May, and I need to get building! I'd love to have the outriggers available to take some of the anxiety out of taking a Waterlust onto the Gulf.
That the Florida 120 maybe? Our Texas builder got his to it last spring, said the amas made a big difference. Pretty well-loaded too with proper gear for the time they'd be out & about, took two of 'em to pull it up onto a beach for an overnight's pause.
CLC's gonna make the renewed Canoecopia next w/e 100 miles east of me in Madison WI. I thought about trying to get Nora Jane ready to haul over but she and I just aren't up for that. Looking forward instead to the opening of our sailing season here, not as close as yours! Forecast 1-3" of snow by AM tomorrow; it touched 49° here yesterday then thunderstorms with the front.
Offline
#964 6 Mar 2022 10:54 pm
- spclark
- Member
- From: "Driftless" Wisconsin USA
- Registered: 19 Mar 2020
- Posts: 478
Re: Waterlust sailing canoe in Norway
Working on removing ply scraps & hardened epoxy from ama sheerclamps this w/e. Tried angle grinder yesterday, fitted with abrasive disc otherwise used to sharpen lawnmower blades & remove rust & scale from metals. Clouds of toxic epoxy dust for my effort (gloves, respirator & eye protection employed!) but for the first ama’s one side done the amount of dust produced made me forget that option. RO & detail sanders, both equipped with vacuum collection, essentially a waste of time.
So I tried the new Shinto rasp I bought last year. My first one bought maybe 50 years ago for my first boat build’s still around but a little dull now, why I bought another. Glad I did too ‘cause it’s The Right Tool for this messy operation! Takes all the hard stuff easily, but a tad short so I had to augment it with this:
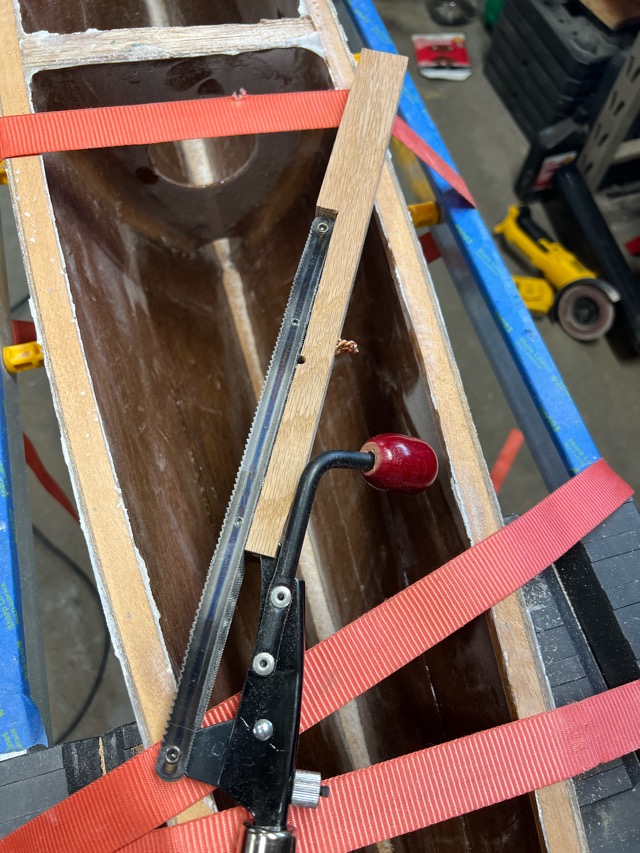
to keep it flat on both sheerclamps across the beamiest part of the first ama. Works a cinch, waste is coarse & doesn’t get airborne, easy to vacuum up.
I recommend one of these be in every builders’ kit for jobs like this & some others where power tools are just not well suited.
Offline
#965 7 Mar 2022 12:39 pm
- Bergen_Guy
- Member
- Registered: 6 Feb 2020
- Posts: 353
Re: Waterlust sailing canoe in Norway
Good tips there SP - I don't have one of those Shinto rasps - it looks like you have done a very nice job with it.
Have fun at that Cedar Key meet Chuck - I have been in touch with Hugh recently as I wanted a set of plans for his lovely Bufflehead canoe. I am interested in trying the latest Bufflehead rig on Svale - light carbon mast and smaller sail - just to see what gives. Right now I am struggling to get a sail maker interested in a small and reasonably complex sail. Do send my greetings if you make it there. I will probably try a hollow wooden mast next.
No new 'new book' here - but I did get a couple of old ones in the post - Canoe and camping adventures by R.C Anderson, and an Inland Voyage by R.L Stevenson. So I am looking forward to those - particularly the first as it's set in my part of the world.
I see some varnish damage on my rubbing strakes - so I think before the season starts there will be a bit of sanding and a few coats of varnish before I put to sea.
Happy fettling, building, sailing and pedalling all!
Offline
#966 12 Mar 2022 12:13 pm
- Bergen_Guy
- Member
- Registered: 6 Feb 2020
- Posts: 353
Re: Waterlust sailing canoe in Norway
I have finally got round to fitting some hull protection. I knew that the skeg was taking quite a beating, and the same under the forefoot. I had purchased some dynel strips from Fyne and got myself some carbon powder. When I turned the boat over I saw what two years of use has done, and could also see that the first chine about at the centre of the hull was also an area with quite a lot of wear. So I sanded off the paint in all these areas and have now put dynel strips set in ‘black’ epoxy for and aft. I didn’t have enough dynel for the mid ships area - so there I mixed in a bit of wood flour and micro fibre and just put a thick layer of that on. I hope this will help to keep things ship shape for a bit longer and maintain the integrity of the hull.
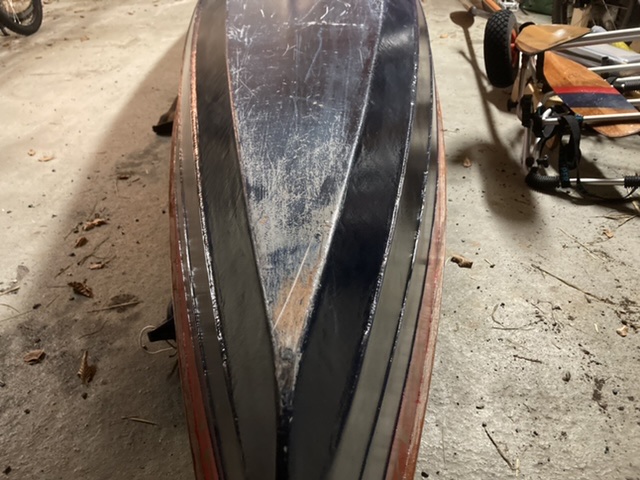
Wear pattern is easily visible!
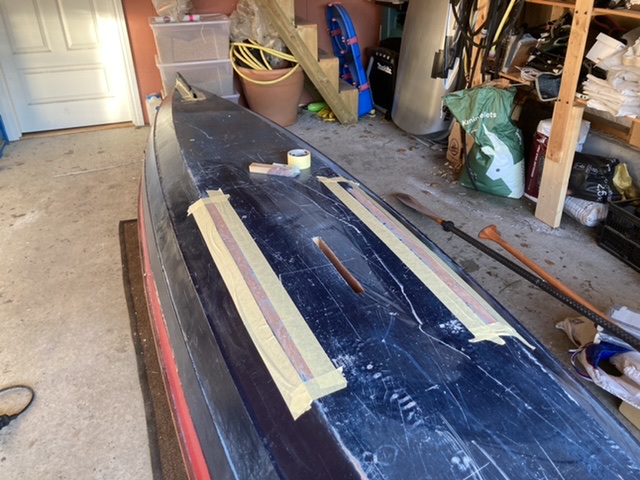
Getting ready for gloop!

Second protective strip in place.
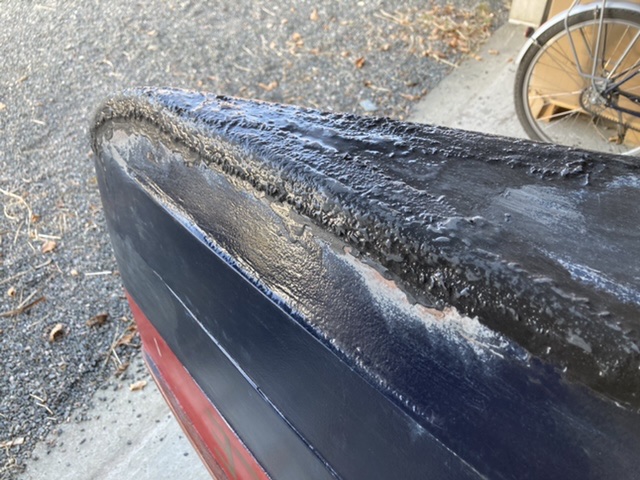
It looks a bit rough, but that’s it’s job! I don’t think it’s worth sanding and filling, as it’s basically sacrificial, and will wear out of its own accord. I don’t baby Svale when we are out and about so I am very pleased to make her a bit more rugged!
I am not sure if I will paint it - probably I will, but as it’s black it won’t show much even as the paint gets scratched away.
Last edited by Bergen_Guy (12 Mar 2022 12:14 pm)
Offline
#967 12 Mar 2022 12:40 pm
- MartinC
- Member
- Registered: 3 Apr 2020
- Posts: 353
Re: Waterlust sailing canoe in Norway
Nice work Guy. I agree. Boats are made to be sailed!
Gaia took a bit of a knocking last season, but I am hoping to delay repairs until after this year's season.
If anyone is interested in camping onboard; after an exhaustive search for an inflatable bed which would fit the Waterlust's narrow and tapered floor, I have bought the Exped Ultra 3R M 'Mummy', and the 'Mummy' shape (wider at the shoulders tapering towards the feet) fits the shape of the hull perfectly. I am probably a bit too old for this sort of thing...but I'll give it a try when the weather improves!
Offline
#968 12 Mar 2022 2:33 pm
- Bergen_Guy
- Member
- Registered: 6 Feb 2020
- Posts: 353
Re: Waterlust sailing canoe in Norway
Details details! I am sure that’s what makes the difference between something kind of ok - and something that’s really enjoyable to use. Thanks for doing the leg work there - good to know. I haven’t yet tried sleeping in Svale but it does seem like a fun idea. Howard Rice I believe sleeps in his Bufflehead quite a bit when cruising in it, and that’s quite a bit smaller than a waterlust.
Offline
#969 13 Mar 2022 3:17 am
- spclark
- Member
- From: "Driftless" Wisconsin USA
- Registered: 19 Mar 2020
- Posts: 478
Re: Waterlust sailing canoe in Norway
Interesting reading what you folks encounter in your Waterlust forays, wear-wise. Only scuffs mine's endured were felt whilst launching or - more often - recovery, where a sudden gust or wake pitched her off-kilter while she was half-on / half off her trailer. Or the (common here) aluminum cladding around docks where I've launched. We have rocks of course but where I've been thus far I've managed to avoid them. And sand... lots of sand.
Second go'round with decking amas went well today. Prep involved cutting deck pieces farther outside pattern borders then double-coating the inner face with epoxy using PeelPly to avoid sanding and minimize weight. Also facilitates getting a good bond on sheer clamps as the resulting surface when the PP's removed leaves behind nicely textured surface that readily bonds with fresh epoxy.
After first decking I anticipated the positioning issues so carefully dry-fitted the new decks. This enabled a more positive approach to getting them on properly when bonding. Three bits of 14 ga. copper wire were used as pins to hold deck in position before the wires were replaced with sheet metal screws once the bonding mix had been applied. Then my 18 ga brad nailer was used to pin the decks to the sheer clamps using non-metallic composite brads (DuckWorks.com) rather than the manual-recommended strapping tape. I have to thank our Texas builder for turning me on to these things!
Removing the ill-fated decking revealed an issue with the mix I used for bonding so I'm looking back on it as a rehearsal experience, a good exercise in technique. I'd used Cellofill-thickened mix but it was too stiff to really bond over 100% of the surfaces. This time I used both wood flour and CelloFill and left it much less stiff. The cleaned sheer clamps, left rougher from the coarse-toothed Shinto rasp than the planed surfaces I stared with, took the unthickend epoxy 'primer' better too.
I'll be moving forward to starting my aka with the advent of our annual "Spring Forward" Daylight Savings Time early tomorrow morning. The ply I'm using is 5mm so I'll be adding a fifth center layer to bring the final thickness up to the 1" the CLC components yield.
And the highs for the next week are all well above freezing too!!
Offline
#970 13 Mar 2022 10:51 am
- Bergen_Guy
- Member
- Registered: 6 Feb 2020
- Posts: 353
Re: Waterlust sailing canoe in Norway
Good progress there SP - interesting what you observed on the epoxy joints. I am pretty sure I read once that your epoxy should have a little additive that still allows you to do the job.
It’s feeling very spring like here, and I got a coat of blue paint on the hull. That’s drying now, and then it will be on to the age old question, to varnish, or go sailing??
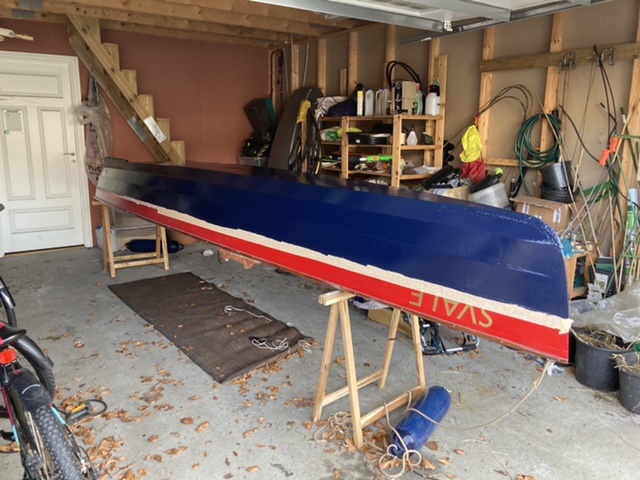
Last edited by Bergen_Guy (13 Mar 2022 10:52 am)
Offline
#971 13 Mar 2022 9:55 pm
- Chuck
- Member
- Registered: 24 Nov 2020
- Posts: 141
Re: Waterlust sailing canoe in Norway
Our false spring has taken a trip out of state and I am back to wearing long underwear and stocking caps in the garage (30F yesterday). But, I think real spring is coming (50F today) and daffodils are coming up.
The modified blue trailer pads can be seen in the picture:

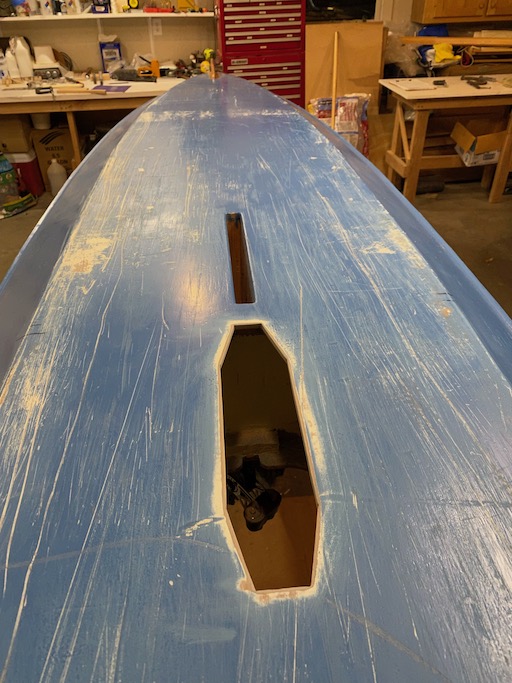
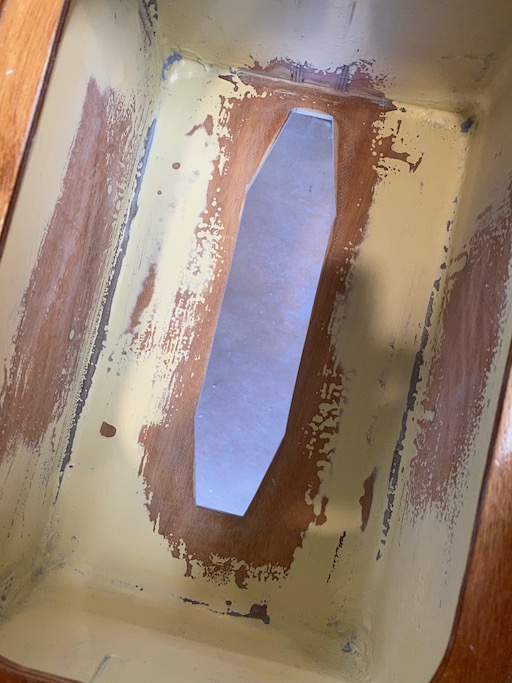
I've cut the hole in the hull for the mirage drive, and did a first sanding of the entire hull. When I saw in the cross section of the wood I cut out for the mirage drive just how thin the epoxy coat was on the bottom, I wanted to strip off all the paint and put another couple of layers of epoxy down for general wear-and-tear purposes. However, over an hour of work with the random orbit sander in finger-numbing below freezing weather convinced me that taking the hull down to bare epoxy would almost require a belt sander, so I am just going to fill in some of the larger divots with epoxy and then put two coats of blue on top. The abrasion on the bottom is almost all from my second launch, which was from a sandy/gravelly beach: I did not not wipe the bottom of the hull clean, and when I pushed it onto the roof rack, the sand and gravel just dug gouges into the hull -- I won't be doing that again! Luckily this isn't really an issue anymore with the trailer instead of cartopping.
Guy, my forefoot looks about like yours did before you put on the Dynel -- I am going to try to take a cue from Martin and put some phosphor bronze strips down on the forefoot and skeg for rub protection.
This picture shows the lead weights I acquired as cast-offs from the X-ray beam line. Each roll is 30 pounds; 120# should be good when I am sailing alone, and when sailing with crew I will probably use 60# in front to hold the bow down.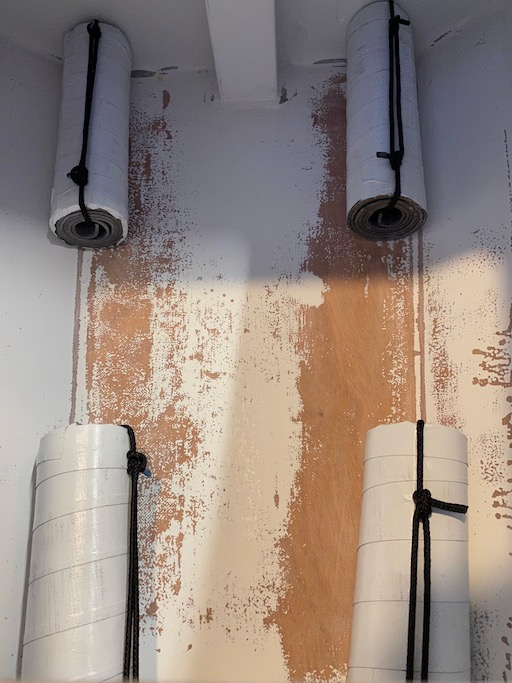
The next step is to figure out how to build boxes around them to keep them in place if the hull rolls.
Last edited by Chuck (13 Mar 2022 10:08 pm)
Offline
#972 13 Mar 2022 10:27 pm
- spclark
- Member
- From: "Driftless" Wisconsin USA
- Registered: 19 Mar 2020
- Posts: 478
Re: Waterlust sailing canoe in Norway
Uh YEAH I'd make sure they're solidly fixed in place Chuck!
Your weather loss is our gain! It's 46 here right now, sunny & mild & MOST welcome for the season! Be above freezing for the high all this week!
Put this next in for those yet to commence ama/aka build -
I'm about to bond the deck doublers in place. But having bought the plans and patterns I'm finding some lack of detail in the explanation about how these doubler part outlines correspond to their mating parts. A kit may have parts that differ a little in some way with regard to their final shapes.
Deck's paper pattern seems to be generous everywhere there won't be a doubler attached. The accompanying manual covers removing deck overlap once decks are bonded to the hulls. But where the aka fasteners are to be placed (inboard tab, outboard 'fin') the doubler patterns seem to have extra material on the inside edges that needs to be removed so their outer, final profiles match those of the corresponding deck shapes to which they'll eventually be bonded:
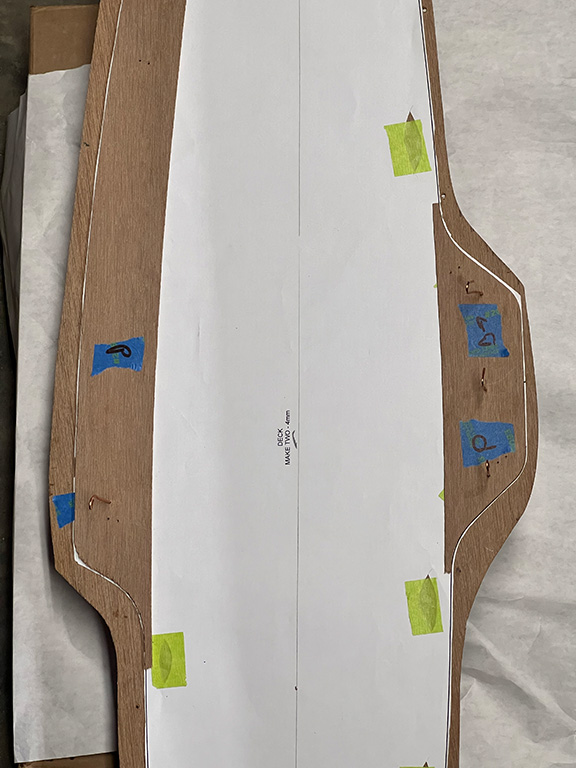
When I cut the new deck pieces I left a generous allowance around the edges that'll be easy enough to trim away with a router. For those extension tabs I plan to trace the perimeter off the paper deck pattern onto the bonded decks before trimming those areas first by pullsaw then block plane.
If the doublers are accurate to intended final shape I can use a pattern router bit for profiling the deck overlap but those doublers must first be trimmed to fit to the paper pattern's outline or they'll be well proud of the designed deck shape once bonded in place.
Tough to describe but this is the best I can do!
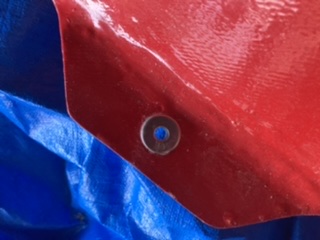
Guy if you're reading this can you take a tape measure to an ama and measure the width across your deck along a line between the two aka bolt holes?
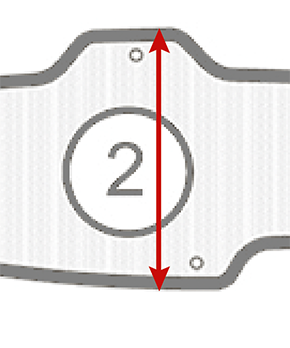
This'll give me a useful number by which I can have confidence I'm on the right course with my next tack!
Offline
#973 15 Mar 2022 9:57 am
- Bergen_Guy
- Member
- Registered: 6 Feb 2020
- Posts: 353
Re: Waterlust sailing canoe in Norway
Hiya - here's the distance across on my decks.
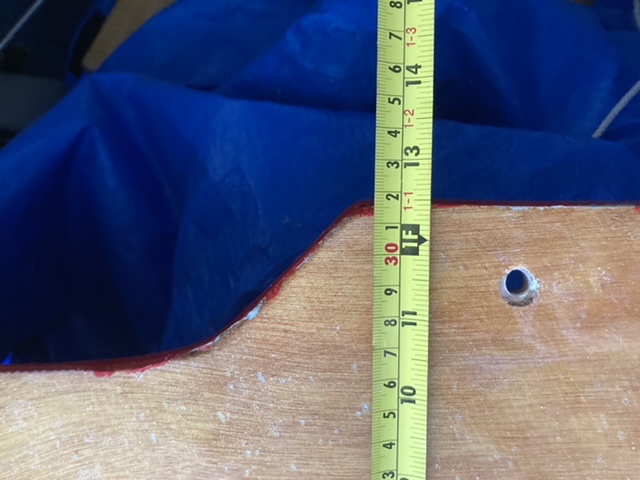
I didn't remember having to shape these parts very much - but I was working from a kit, so maybe the tolerances are different.
One other tip if you are making these outriggers is that I found handling all bolts, wingnuts and two washers a bit of a handful - I have dropped these washers a few times. I have since epoxied the lower washers in place on the underside of the 'deck doubler' on the outrigger body. I will eventually do the same on the cross beam - but I had varnished that with god knows how many coats of varnish, so I need to take that off before bonding the washers in place!
Last edited by Bergen_Guy (15 Mar 2022 9:59 am)
Offline
#974 15 Mar 2022 11:58 am
- spclark
- Member
- From: "Driftless" Wisconsin USA
- Registered: 19 Mar 2020
- Posts: 478
Re: Waterlust sailing canoe in Norway
Thanks Guy! Your tape shows pretty much what our Texas fellow’s did and mine: 12-5/16” to 12-7/16” at that point ought to be close enough. Yes I’m certain a kit’s parts are slightly tighter to design shapes than what paper patterns involve but with the numbers I’m seeing from others like yours I’m confident I can move forward.
Offline
#975 20 Mar 2022 8:06 pm
- spclark
- Member
- From: "Driftless" Wisconsin USA
- Registered: 19 Mar 2020
- Posts: 478
Re: Waterlust sailing canoe in Norway
Weather's warming nicely here now, above freezing for highs with an odd day bringing snow but it melts quick. So having bonded the second pair of decks to my ama hulls & got past the doubler-bonding step, I'm moving on to that aka to tie 'em to the main Waterlust hull.
Working from plans is a different experience than building from a kit for cert, why I chose this route as much for the not-so-minor savings. Plans don't include a how-to on DIY Puzzle joints!
I've worked out a way I can avoid butt-joints in my aka lams, instead opting for scarfing pre-cut radiused sections of the 5mm ply I have to work with. Supplied patterns then will serve for getting out the four lamination pieces that'll make my aka properly stiff yet flexible and strong!
Using some basic maths and Adobe Illustrator I've worked out what the curvature has to be to accommodate getting out a half-length aka lamination pattern:
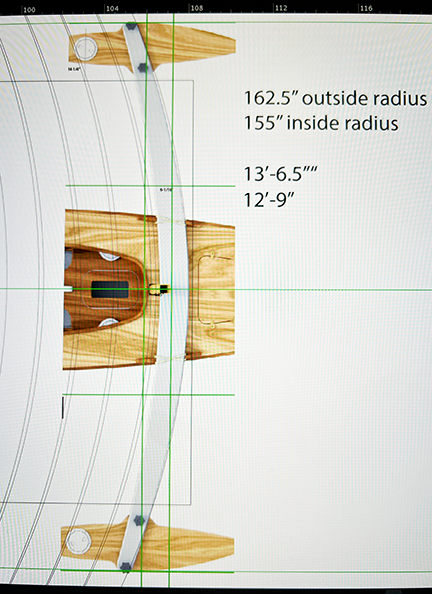
Then it's translating those numbers into a serviceable pattern cut from birch-ply 'door-skin' that'll be used to trace a master outlineout onto a sheet of the 5mm BS1088:
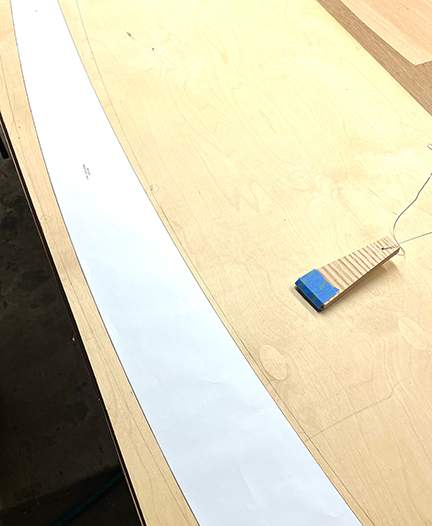
Once I have one cut & smoothed the rest can be cut with a piloted bit in a router toot sweet! Then it's on to fashioning a scarfing jig so the sections can be cut to length then scarfed together. I'll be positioning the scarfs in a fashion similar to the butt-joint locations so as to avoid any tender spots.
Offline