You are not logged in.
- Topics: Active | Unanswered
#776 9 Jul 2021 7:05 am
- Bergen_Guy
- Member
- Registered: 6 Feb 2020
- Posts: 353
Re: Waterlust sailing canoe in Norway
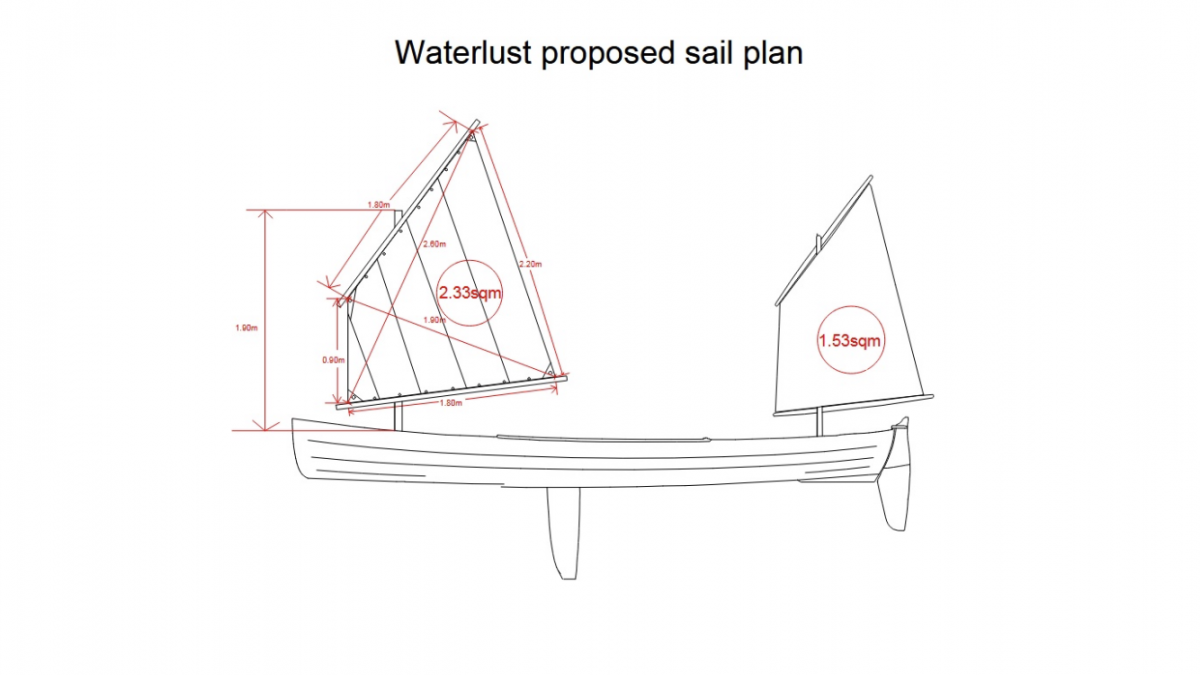
Offline
#777 9 Jul 2021 4:00 pm
- Chuck
- Member
- Registered: 24 Nov 2020
- Posts: 138
Re: Waterlust sailing canoe in Norway
Martin's 2.33 and 1.53 sq m main and mizzen convert to 25 and 16 sq ft
Last edited by Chuck (9 Jul 2021 4:02 pm)
Offline
#778 9 Jul 2021 10:01 pm
- Bergen_Guy
- Member
- Registered: 6 Feb 2020
- Posts: 353
Re: Waterlust sailing canoe in Norway
Chuck - that’s funny to hear we are hunting down similar things in similar places - canoe sailing, I suppose, is a bit of a niche subject! Although all the more fun for it! I think Shelback will be back up and running soon, reading other posts on the web suggest they had COVID issues that impacted printing, so maybe worth trying again in a bit!
I do think that the smaller sail is likely easier to sail with than the double reefed main, unless you have gone to the trouble to make very very light spars. The shorter mast can also be considerably thinner and lighter and the boom and yard also, and I think that will count for quite a lot. I found an article on the Clc site about lug rigs https://www.clcboats.com/life-of-boats- … -rigs.html - where the comment is made that spars should be as light a possible.
Yes SP - I did recognise that method of attaching the yard to the mast when I saw the diagram - some things haven’t changed much!
Thanks Martin for sharing your sail plan, looks like my little main is very close to what you have!
Last edited by Bergen_Guy (9 Jul 2021 10:10 pm)
Offline
#779 9 Jul 2021 11:59 pm
- spclark
- Member
- From: "Driftless" Wisconsin USA
- Registered: 19 Mar 2020
- Posts: 478
Re: Waterlust sailing canoe in Norway
Hmmmm.... spars made as light as possible yet strong enough to stand up to the forces they have to perform under... makes me wonder whether the spars we craft out of wood might serve as a proper core on which a fiberglass / epoxy shell might be built up then split for reassembly once the core'd been removed.
You folks have some means by which you can weigh the spars you're using for comparison amongst us here?
I built my blanks up from Sitka spruce, some of which I'd had laying about for maybe 25 years. They're not hollow either but I have no issues moving them about... in fact I should be out sanding them now rather than keying all this into a post.
Jeff built his from some nice Douglas fir he found locally, built it hollow 'cause fir's denser than spruce.
Be interesting to compare notes on differences we can measure in weight with a nod given to how the weights vary with differences in materials and technical aspects: hollow or solid, any 'glass added anywhere, how many coats of epoxy, painted or varnished, hardware (what kind?) mounted or free of hardware entirely....
I'm gonna go sand now. TTYL!
Last edited by spclark (10 Jul 2021 12:01 am)
Offline
#780 10 Jul 2021 12:23 am
- Chuck
- Member
- Registered: 24 Nov 2020
- Posts: 138
Re: Waterlust sailing canoe in Norway
SP-
Not having a store of sitka spruce around I ended up going with the stock sail kit from CLC (which included spars and sails). The mast was glued up from several pieces of pine (I think), with care taken to how the grain was arranged. After I scarfed the pieces together, I had a mainmast blank that weighted 15 pounds. After shaping and finishing the mast, it came down to its current sailing weight of 11 pounds. I planned for zero hardware on the spars, which has held up except for the main boom which is festooned with cleats and blocks all over (2 reefing line micro cheek blocks, two reefing line jam cleats, and outhaul jam cleat). All other hardware is lashed or tied on.
I was going to hollow the mainmast, and calculated that would cut its weight down to ~5 pounds. I bought some large router bits and worked up a plan for a jig to make a controlled cut with the plunge router, but I was too eager to take the boat out and skipped the hollowing. I think there is a decent chance I may yet hollow it out at some point, but I want to first sail the boat in more wind to get a sense of how much stress there is in the spars.
The main boom and yard weighed 4 pounds each before shaping, but I did not weigh them after. I will eventually unbend my sails to patch up some holes in the spars and put on some more varnish, at which point I will set them on the scale to see what they weigh...
Last edited by Chuck (10 Jul 2021 12:29 am)
Offline
#781 10 Jul 2021 2:12 am
- spclark
- Member
- From: "Driftless" Wisconsin USA
- Registered: 19 Mar 2020
- Posts: 478
Re: Waterlust sailing canoe in Norway
You’re taking a proper approach to this Chuck. I hope to emulate your simplicity.
I’ll be giving my spars an initial sanding before they’re epoxied. I think two coats will be ‘enough’ then two of System Three ‘s satin Marine Spar Varnish.
Prior to their first coating I’ll weigh each, make note of those numbers here. Get an idea of what the finish adds once they’re done.
If I can work out a way to keep hardware minimized and at the same time off the masts’ upper two-thirds and the yards, anything mounted to the booms ought not affect the righting moment any more than it has to for durable, reliable sail trim.
I’m pretty confident my hull’s the heaviest of all those built. Being new to stitch & glue and epoxy as well I didn’t want to err on the light end, valuing durability over performance. But weight aloft is worth keeping to a minimum, particularly in as much as its sail area can be taken as generous.
Offline
#782 10 Jul 2021 6:29 am
- MartinC
- Member
- Registered: 3 Apr 2020
- Posts: 348
Re: Waterlust sailing canoe in Norway
Thanks Guy for re-configuring my amateurish drawing post! (If the site administrator is reading this, please feel free to delete my eary attempt).
Just a contra-thought on spars:-
Mine are now all about 6ft long or shorter, so that they can be stored inside the boat and the masts lifted in and out whilst underway.
I am aware of the importance of the general principle of reducing a boat's weight above its centre of gravity as much as possible, but my own gut feeling is that a marginal increase or decrease in spar diameter or weight is going to make very little difference to the boat's stability in a boat of this size, and with spars of this size, (when you think that the occupant of the vessel weighs more than the vessel!), and that for me anyway, it is more important for them not to be too bendy and to have a bit of weight to carry the heavier sailcloth I have chosen.
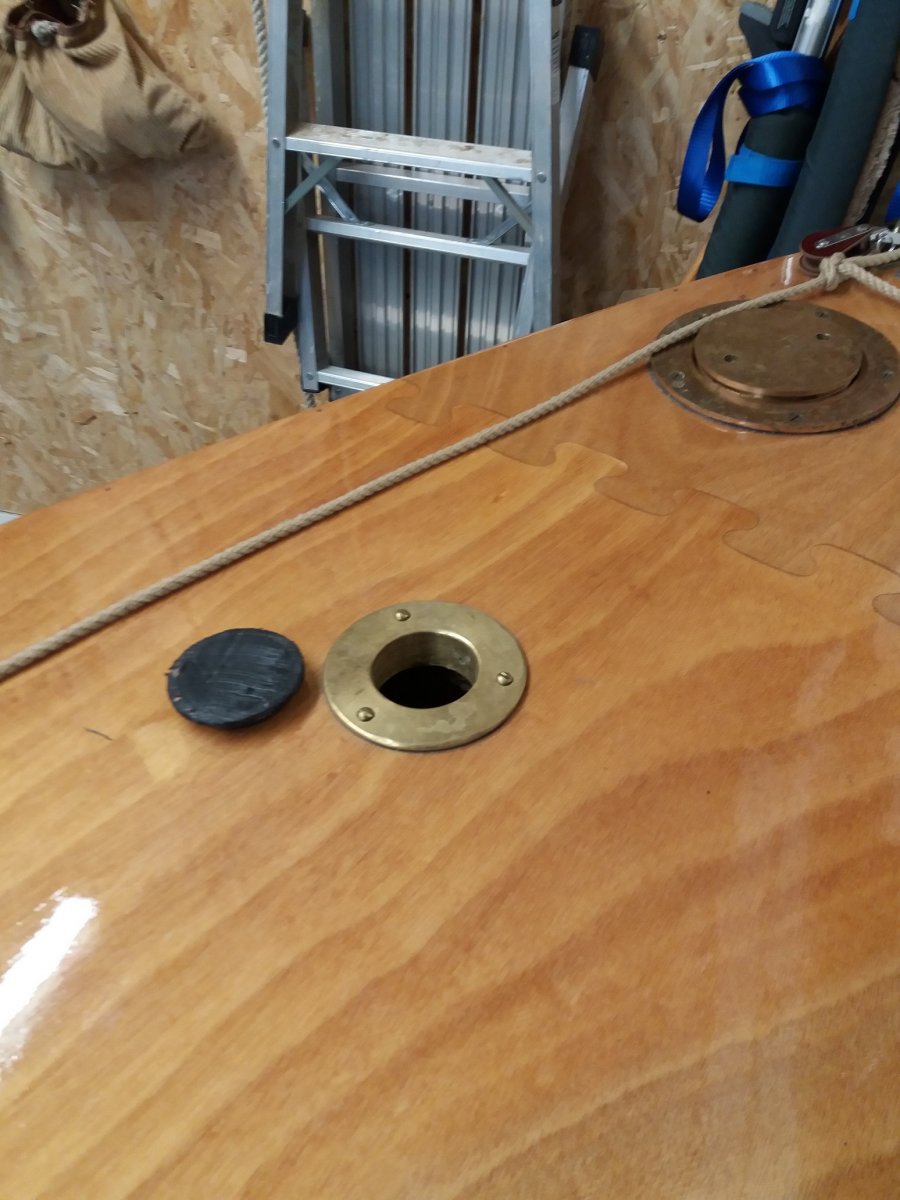
PS I have chosen to have round section masts (tapering all the way from the bottom to the top) so that there aren't any 'corners' for the boom or yard to rub against and I have used brass plumbing fittings as adaptors to change the square holes on the deck to round holes. (The stoppers for storage, are plastic jar lids with Sikaflex inside to prevent rain from getting in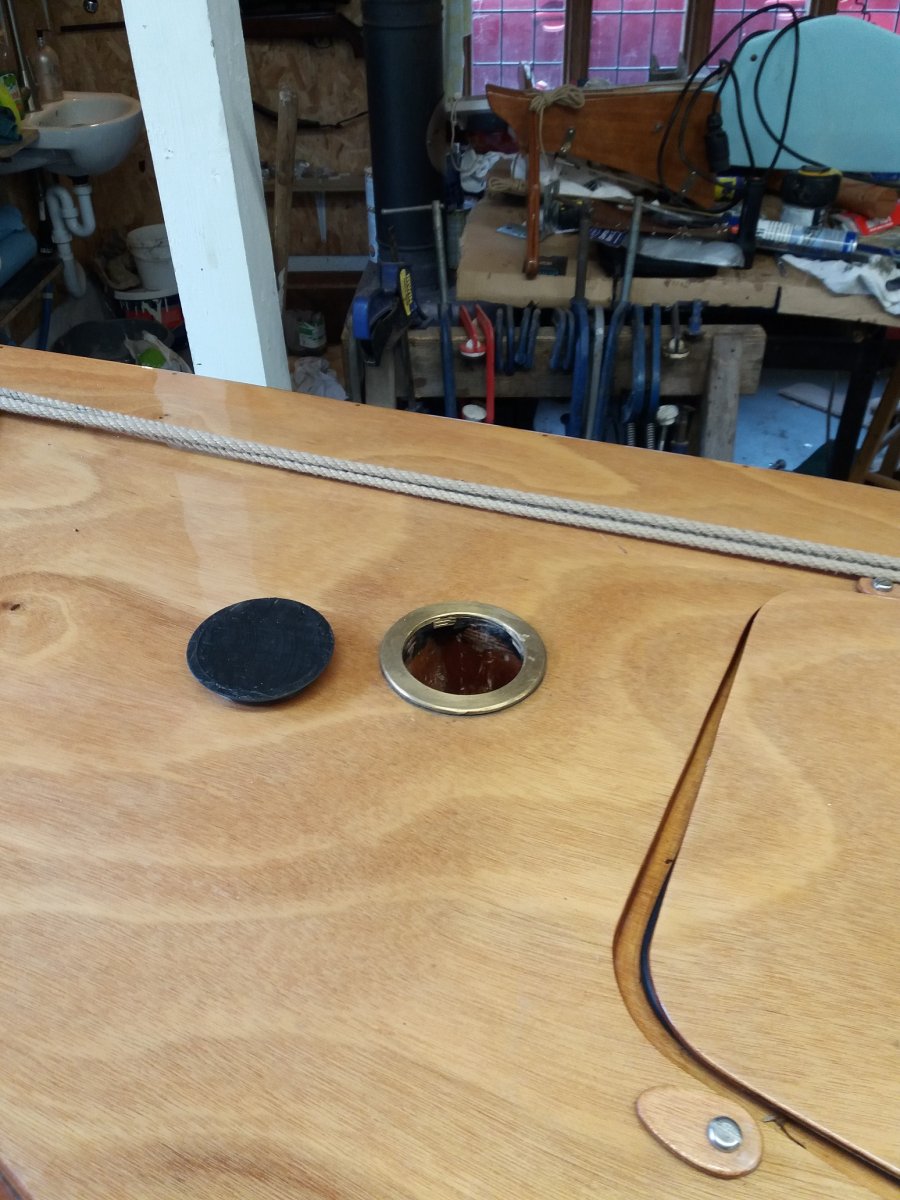 ).
).
Offline
#783 10 Jul 2021 7:23 am
- MartinC
- Member
- Registered: 3 Apr 2020
- Posts: 348
Re: Waterlust sailing canoe in Norway
PS I really liked the lug rig article. It chimed exactly with my thoughts and experiences with the rig. Having experimented extensively with sails on a small boat in the last 30 years, I can't emphasise enough the importance of having a well cut sail.
I have no financial interest in these people, but they have made all my sails over the years and really understand the lug rig. https://www.jameslawrencesailmakers.com/
This was my previous 'Pocket Ship', a much modified Winkle Brig (a foot shorter than the Waterlust and with six sails!).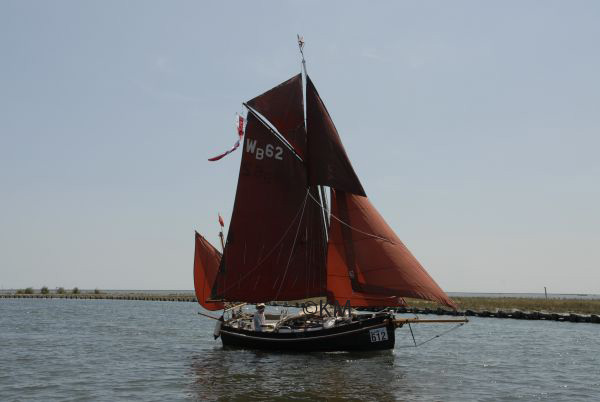
Offline
#784 10 Jul 2021 8:10 am
- Bergen_Guy
- Member
- Registered: 6 Feb 2020
- Posts: 353
Re: Waterlust sailing canoe in Norway
I love your mast steps Martin- that is so neat! You are of course absolutely correct that all the spars need to be stiff enough to do their job properly. I believe that’s the one downside of the lug rig, as the wind pipes up, the sails should be made flatter to reduce the sail camber, but as the mast and spars bed more, the sail then gets fuller, especially if the spars are too flexible.
I did read of various dinghy sailors making their own hollow carbon masts, (Cherub sailors I believe) but those all had standing rigging, I think a free standing mast for a lugger may end up being quite a substantial thing.
Offline
#785 10 Jul 2021 8:12 am
- Bergen_Guy
- Member
- Registered: 6 Feb 2020
- Posts: 353
Re: Waterlust sailing canoe in Norway
Wow! What a boat - plenty of string to play with there :-) I second what you say about James Lawrence - they did a great job on my smaller mainsail - and lots of good advice when making it. North Sea sails also did a lovey job on my ‘big’ set!
Offline
#786 10 Jul 2021 8:49 pm
- Chuck
- Member
- Registered: 24 Nov 2020
- Posts: 138
Re: Waterlust sailing canoe in Norway
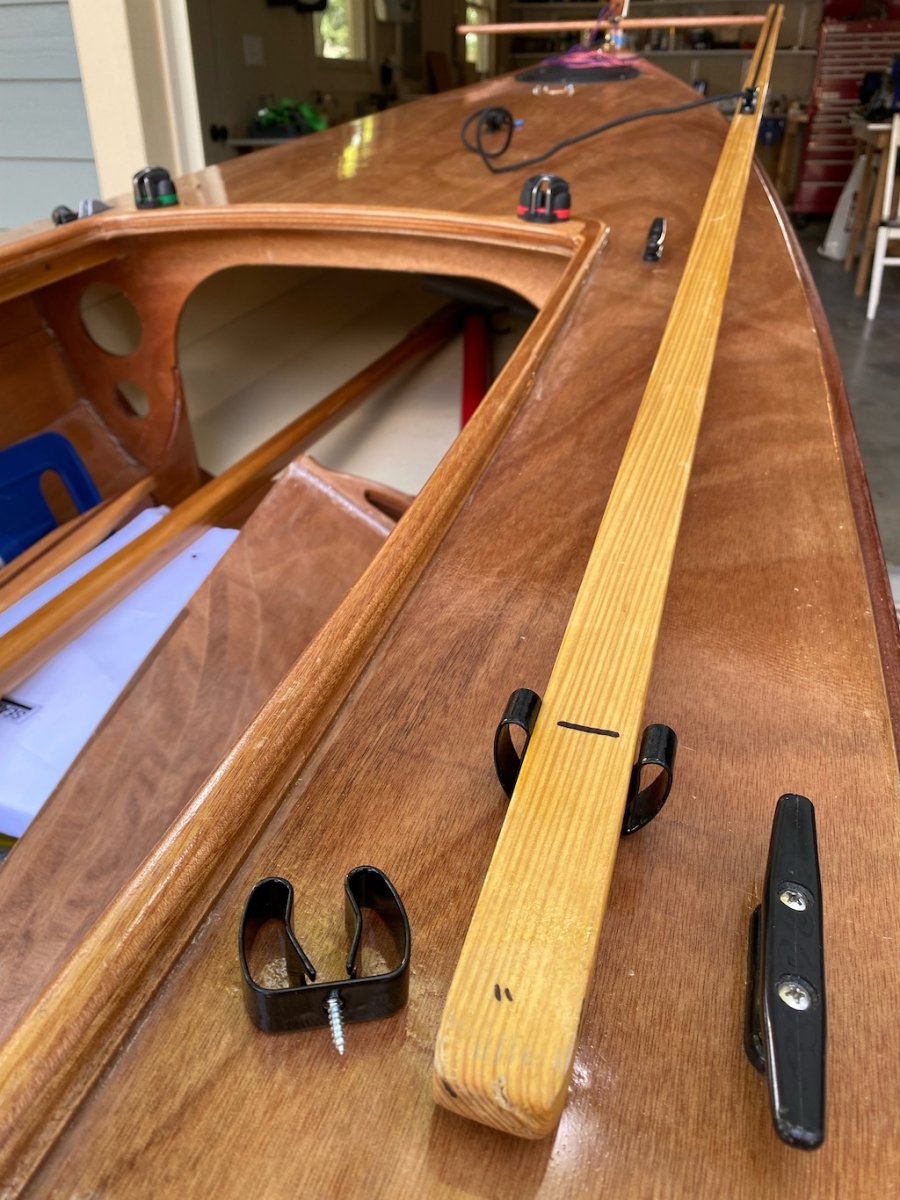
Here is my current tiller arrangement, with McMaster $2 broom clip to hold the rudder amidships. It interested me to observe that when going slowly, large rudder motions were necessary (~6" on the tiller) to cause the boat to turn, but up at higher speeds, only small rudder motions (~1-2") were necessary.
Right now the tiller ties to a horn in the middle of the aft deck (which you can see in the back of the photo), but I will be replacing it with an eye -- unnecessary horns on the boat for me just keep catching lines...
Before I took the boat out, I put some effort into planning everything out (mostly because it was winter and that was the best option at the time), but I found that my thoughts on the rigging, weight aloft, etc, changed a fair amount once I actually took the boat out and saw how it behaved. Eg, I was really concerned with weight everywhere since I wanted to cartop the boat, but now that I have a trailer I actually feel the opposite (!) as I need some ballast to get the boat on her lines when only I am in it. That has also had some influence on my view of weight aloft, since to me it seems that the heeling force of the wind in the sail and my mass on the side decks do far more to heel the boat than the weight of the rig, but I should probably do some calculations to keep from fooling myself...
The idea of bendiness in spars is something I am thinking about, since I have observed the yard bend when I really crank on the downhaul. It sounds like getting the bendiness just right to enable dumping wind in gusts is a Good Thing, but am not quite sure how to do that yet other than just to rely on Dillon's design. I imagine that this might be a little longer term research project...
Last edited by Chuck (10 Jul 2021 8:53 pm)
Offline
#787 18 Jul 2021 12:55 am
- Chuck
- Member
- Registered: 24 Nov 2020
- Posts: 138
Re: Waterlust sailing canoe in Norway
I went out for a short sail Friday evening and ran into a problem with the rudder: the downhaul got trapped in the gudgeon on the rudder cassette and jammed. Needless to say, this was a bit of an issue. Summertime in this area means the possibility of lots of aquatic vegetation, which requires working the rudder up/downhaul to clear off the weeds, so these parts need to be fairly reliable.
SP, I recall that you implemented a fix for something that was perhaps like this; do you have a photo you could share?
On the good news side, placing 40l of bagged water in the main hatch has helped with the bad lee helm I was experiencing before, although there hasn't been enough wind lately to run things through a proper test.
Future work includes rearranging all the supports on the Trailex trailer to fit better with the boat, finding some outdoor carpet to cover some of the trailer bars and to pack the daggerboard case, and adding a hand winch so I can crank the boat out of the water without having to wade in to the aft end of the boat to push it up on to the trailer. (The 40l of water helps with the trim, but not with getting it easily onto the trailer!) Overall the trailer has been a huge plus: rigging time at home has dropped from an hour to about 5 minutes, and at the lake from 45 min+ down to about 15 minutes (no more struggling to get the boat on and off the car or messing with the little wheeled cart!). I've also realized that the mainmast can fit in the cockpit using a cord run between the halyard and downhaul cam cleats to hold the mast in the boat while on the road, so -- no more lashing the mast to the roof rack! These improvements have been huge. The next step will be to cut ~6 inches off the main spars so that they will fit more easily into the cockpit, and then perhaps I can leave the halyards and downhauls reeved and bundle the mast, spars, and sails together in the cockpit, for quick stepping of the masts.
SP, how are things going with your build? Have you managed to get the boat out yet?
Guy, Martin -- I hope you have had some good opportunities to go out on the water!
Offline
#788 18 Jul 2021 10:59 am
- spclark
- Member
- From: "Driftless" Wisconsin USA
- Registered: 19 Mar 2020
- Posts: 478
Re: Waterlust sailing canoe in Norway
Jeff in TX may have alerted me to the rudder downhaul issue, or it was mentioned here about the same time... he sent me this pic to illustrate:
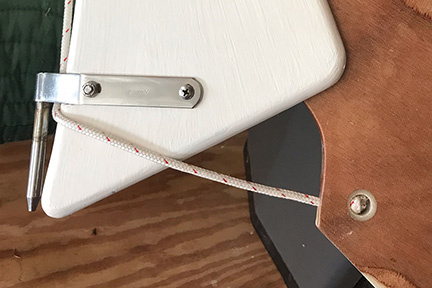
Which inspired me to ponder how to prevent this on my assembly. A few solutions were considered then rejected before I settled on a very simple fix that I think ought to work under most conditions:
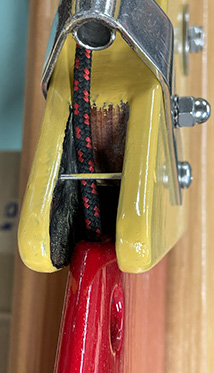
Simply a small stainless steel nail positioned between the cassette's sides to prevent the downhaul's escape if tension is slacked.
I've had a box of these things around for maybe fifteen years -
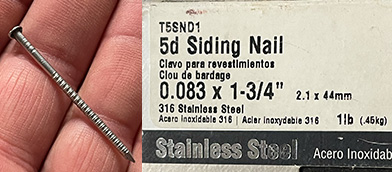
- so taking one to my drill press then filing smooth the ringshank was a simple proposition. Then drill-fill-drill a couple of small holes, press the smoothed nail in, you're done. A small piece of bronze brazing rod would work too, or even a bit of 12 ga. solid copper wire though maybe not the best choice for salt water exposure.
As for the minimal bunks supplied with the Trailex I bought, I assume your's is similar Chuck?
I played with every combination of the parts that came with mine that I could fathom, then discarded the carpet-covered wood bits that had the aluminum bolt-holders fitted in favor of a pair of custom treated wood pieces I made up to nest into the bent aluminum channel bunk mounts. These were fitted with angled stops at each end intended to keep my Waterlust's hull centered on the trailer. A center plank was added next, half-lapped into the wood 'fillers' thru- bolted into the aluminum channels, just above the trailer's center beam. The treated 2x4 I selected for this had a nice bend in it that closely matched the mild rocker of my Waterlusts’s otherwise flattish bottom. This then serves to support the hull's bottom along the length between frames #2 and #5 directly over where those aluminum channels are positioned along the center beam. This way the frames bear the load as well as along the bottom. This entire ‘adapter’ was then covered with some trailer bunk synthetic carpet I sourced from e-trailer.com.
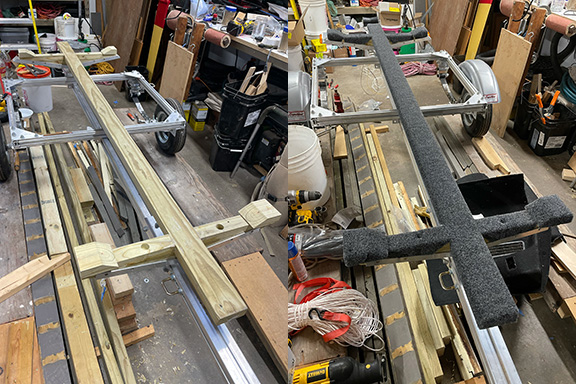
Not easily seen is the roller my trailer came with that I positioned at the very back end of that center beam. My thinking is this may help get the bow up onto the bunks during recovery, perhaps aided by a winch like you've added tensioning a bow-mounted painter.
No I've not yet launched either. Won't be long though, perhaps next weekend. Awaiting arrival of a friend making his annual trek north from his home in Florida. His plans had to be set back a few weeks but I under stand he's on his way now. Meanwhile I'm working to complete my masts and spars so there's that to occupy my hands besides posting stuff here.
Last edited by spclark (18 Jul 2021 5:58 pm)
Offline
#789 18 Jul 2021 12:58 pm
- spclark
- Member
- From: "Driftless" Wisconsin USA
- Registered: 19 Mar 2020
- Posts: 478
Re: Waterlust sailing canoe in Norway
PS - I'd really like to see how you manage to get that main mast into the cockpit Chuck! Everything else ought to fit, eh?
Offline
#790 19 Jul 2021 3:04 am
- Chuck
- Member
- Registered: 24 Nov 2020
- Posts: 138
Re: Waterlust sailing canoe in Norway
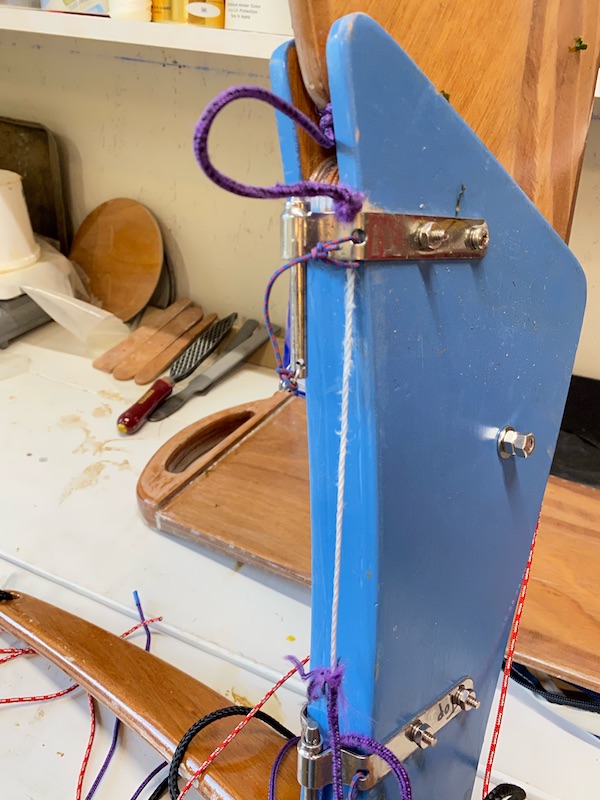
This is what happened to my rudder downhaul -- just as Jeff predicted.
SP, your trailer mods are quite extensive! Many thanks for your inspiration, although unfortunately I think it convinces me that I will have to do a fair bit of work yet to get things into a good place with those trailer bunks. I'm not sure I'll go with the longitudinal bunk yet, but probably will have to custom fit some crosswise bunks that fit the Waterlust hull since the bevel on the stock bunks really doesn't fit well and I find my canoe keeps getting canted on the trailer because it doesn't naturally fit level.
Offline
#791 19 Jul 2021 3:19 am
- spclark
- Member
- From: "Driftless" Wisconsin USA
- Registered: 19 Mar 2020
- Posts: 478
Re: Waterlust sailing canoe in Norway
Yikes!
MAJOR clearance issue there Chuck! What/who’s set of gudgeon & pintle hardware you using? There should be ample clearance between the rudder hardware and the forward face of the cassette so that degree of evident chafe ought never to occur!
Looking again at Jeff’s pic I see I probably have even more clearance than he’s got. Your’s seems minimal as the gudgeon’s mounting tabs look to be almost hard up against the cassette front where ours are at about a 45* angle. I’d think a ‘reasonable’ amount of clearance has to be something like 2-1/2 to 3 times the diameter of the downhaul line being used.
Offline
#792 19 Jul 2021 6:16 am
- Bergen_Guy
- Member
- Registered: 6 Feb 2020
- Posts: 353
Re: Waterlust sailing canoe in Norway
Good luck getting that sorted Chuck - I have loads of space between the fitting and stock on mine which I sourced from Fyne. I am on holiday at the moment without the boat so no updates from here - apart from finding interesting places to bring the boat another time!
Offline
#793 19 Jul 2021 11:57 am
- spclark
- Member
- From: "Driftless" Wisconsin USA
- Registered: 19 Mar 2020
- Posts: 478
Re: Waterlust sailing canoe in Norway
Clearance on mine:
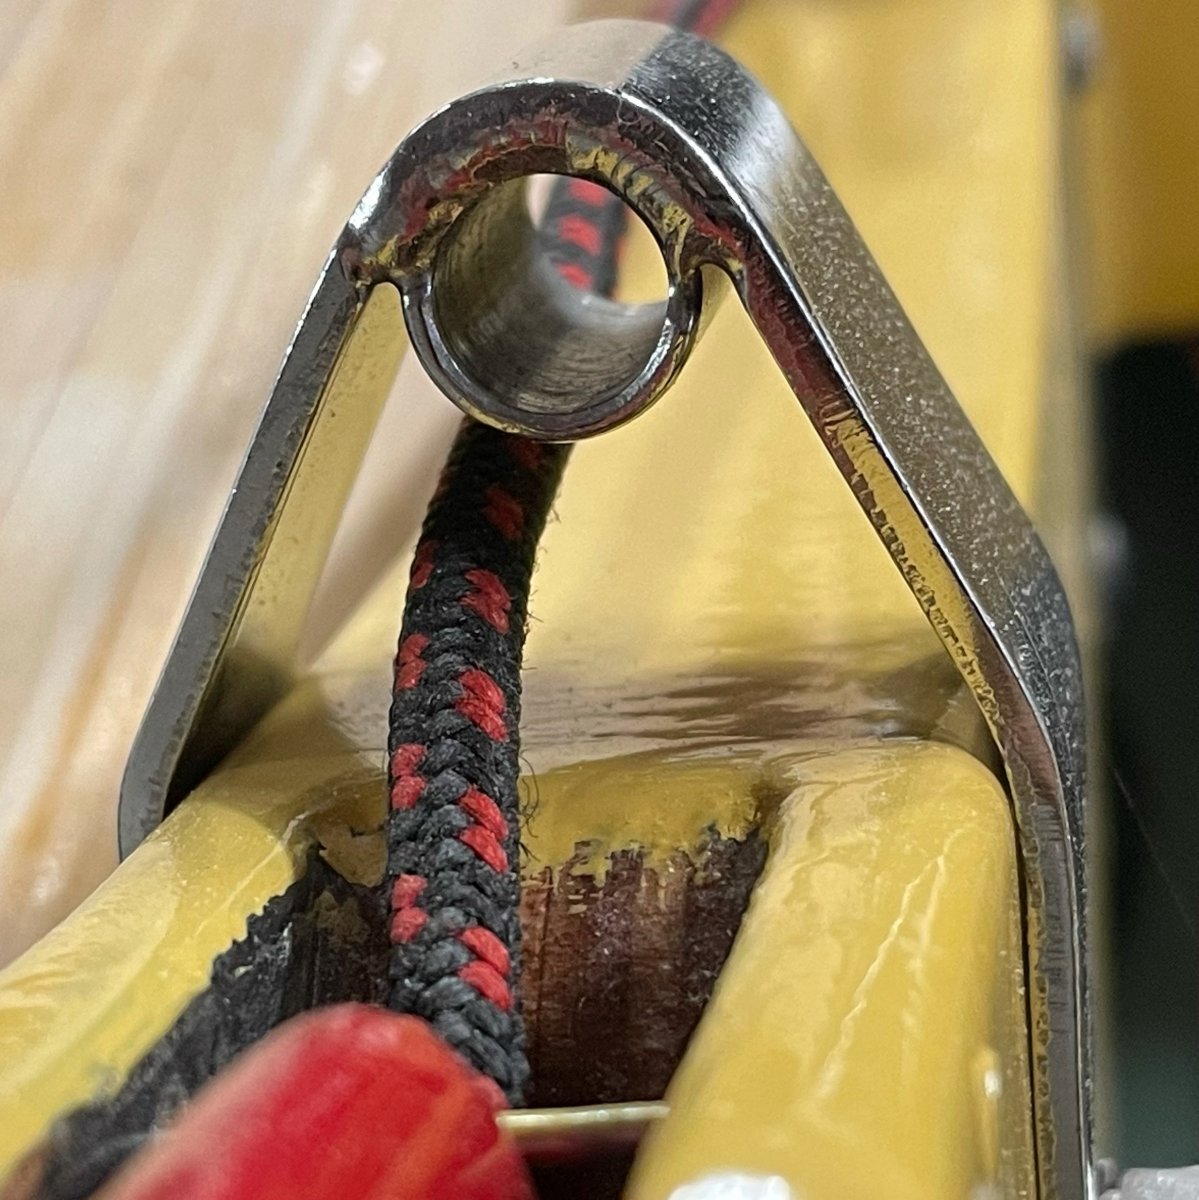
I’ve considered adding a small nylon fairlead under that gudgeon but will wait to see if I have any issues first before going that route.
When mounting rudder hardware I wasn’t successful getting both pintles onto the same axis so getting my rudder fitted takes some effort. Advantage is I doubt it’ll ever float free once launched but it may present a problem if a ramp’s too steep to permit launching with rudder in place even if pulled up all the way. I may have some serious metal mongering to do on the one pintle that needs to be reshaped while also not requiring relocating its mounting hardware positions on my hull should that be necessary. Right now my goal is to get it launched! I’ll sort the little stuff out later….
Offline
#794 20 Jul 2021 2:09 am
- Chuck
- Member
- Registered: 24 Nov 2020
- Posts: 138
Re: Waterlust sailing canoe in Norway
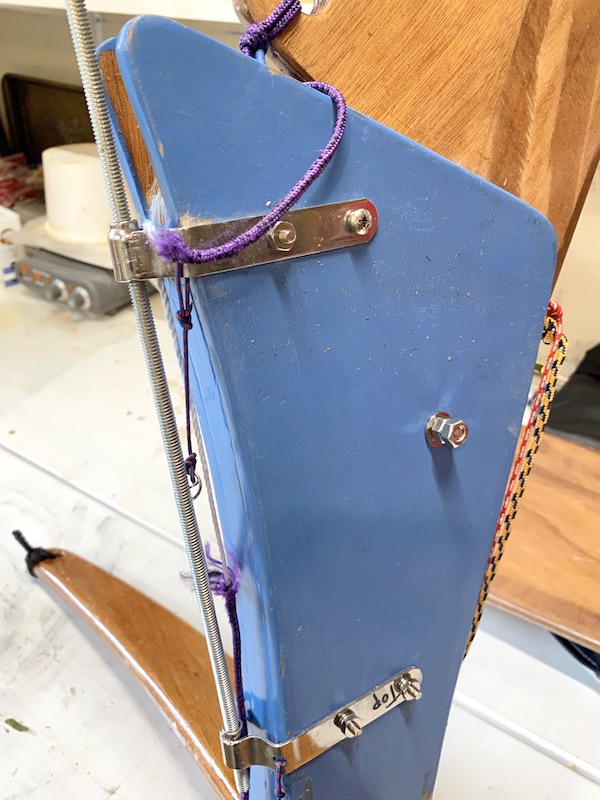
You can see a bit more from this photo (look at the worn blue paint) how the downhaul got caught over the corner of the cassette and jammed. I don't think it was because of the narrow space under the gudgeon straps. At least, I haven't that issue before in the ~5 times I have gone out.
By the way, I got my gudgeons at Duckworks: https://duckworks.com/canoe-kayak-rudder-gudgeons/ , and used the canoe gudgeons for both the stern and the rudder (my 'two-gudgeon' attachment, with a removable pin). I'd go with the standard gundgeons/pintles if I was doing it again. The low clearance under the gudgeon strap on the rudder is a result of how I bent the gudgeon, not how they came from Duckworks (which wouldn't fit on the rudder). Obviously I wouldn't do it again this way given the downhaul clearance issues!
One thing that I found very helpful when aligning everything was to use a 1/4" threaded rod (couldn't find an unthreaded one) fitted through all four gudgeons to align all the axes (as show in this photo [well, two gudgeons in the photo]). This alignment was not easy to do, and resulted in a jammed and bent rod many, many times, but ultimately worked out well after trying all combinations of two gudgeons at a time with the rod, and then all four.
Last edited by Chuck (20 Jul 2021 2:20 am)
Offline
#795 20 Jul 2021 11:24 am
- spclark
- Member
- From: "Driftless" Wisconsin USA
- Registered: 19 Mar 2020
- Posts: 478
Re: Waterlust sailing canoe in Norway
These were the rudder hardware parts I sourced from Duckworks:
https://duckworks.com/weekender-rudder-gudgeon/ https://duckworks.com/racelite-medium-duty-pintles/
- and I too put some significant effort into getting their tangs reshaped to fit nicely. Didn't want to get too enthusiastic over getting a really close fit, why I left the angles to the first bend essentially unmodified. That stainless is tough stuff!
Even at that I did get one gudgeon distorted from round so that a matching pintle wouldn't fit! That took some effort to reverse it did.
Choosing to mount them in what I believe is a European style - lower pintle pointing up, mounted to the canoe's stern, upper pintle mounted to the rudder cassette pointing down - was reinforced by how Racelite's name is stamped into these bits. I assumed they'd meant them to be mounted so the name would read correctly rather than upside-down, but the fitting and alignment was trickier than I'd expected so I settled on how they're mounted now. There's some resistance getting the cassette hung for use but once pintles are engaged the rudder turns freely through ~ 100° arc and there's enough resistance to uplift I don't think it'll be floating out at an inopportune moment.
Spars are coming along nicely, working to get the epoxied now then varnished with ends painted maybe. Add leathers where indicated, hardware, get rigging sorted.
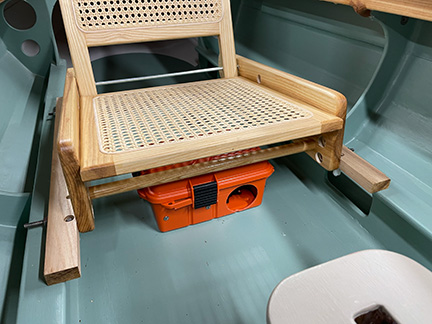
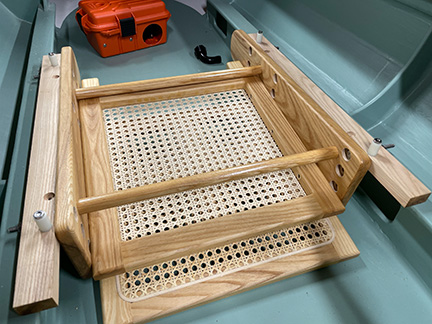
Here's a couple of pics of what I worked out to allow the seat to rest upon those longitudinal frames along either side of the cockpit. Made adjustable-for-height bits from white ash that are thru-bolted to the seat's sides. I'll rig something like what Jeff did to keep the seat positioned when in use as well as secured to the hull in the event of a capsize. Small nylon bushings are bolted to the mounts to keep seat centered.
Offline
#796 20 Jul 2021 3:31 pm
- Chuck
- Member
- Registered: 24 Nov 2020
- Posts: 138
Re: Waterlust sailing canoe in Norway
SP, I like your seat arrangement and have been planning on doing the same thing. Your Kirby blue (#19?) looks really good in the cockpit, too!
But, since having taken the boat out a few times I have decided that what I really need is a deck level seat, and have been thinking about how to fashion one up. Guy, it sounds like you tackled this problem -- do you have any photos you could share?
If/when I eventually get a Mirage drive I will re-evaluate the seat situation, but for now my outings have been primarily sailing and paddling, which for me are mostly deck level activities.
SP, here is an update on line lengths if you haven't cut your running rigging yet:
Originally I had :
Main halyard: 28 feet
Main downhaul: 7 feet
Mizzen halyard: 19 feet
Mizzen downhaul: 8 feet
While this works underway, I have found that they are too short to allow taking down the sail/spars and stowing them in the cockpit while the lines are still running to the masts and blocks.
I am going now to a 36 foot main halyard (and reusing the old main halyard for a longer mizzen halyard).
And, the downhauls are getting repurchased to be 15 feet long now (more than enough!). I like the Marlow excel 4mm spectra from Duckworks, but no one carries red and blue these days (which I have an irrational affection for). I am now going to try out the 4mm stirotex line from Mauripro sailing, which is a lot cheaper, too https://www.mauriprosailing.com/us/prod … 30-04.html .
And, the painters are getting updated from 10 feet to 16 feet on each end.
Last edited by Chuck (20 Jul 2021 4:12 pm)
Offline
#797 20 Jul 2021 4:43 pm
- spclark
- Member
- From: "Driftless" Wisconsin USA
- Registered: 19 Mar 2020
- Posts: 478
Re: Waterlust sailing canoe in Norway
Thanks for those numbers Chuck. I'm sticking with dacron for the time being until I get a better idea of whether tougher (+ $$$) stuff'd be of advantage for what use I'm anticipating.
That cockpit color's Kirby's #1, Green Grey. I chose it for it's neutrality and value, thinking it wouldn't be too hot or glaring out in sunlight. The drive console is #34 Slate Grey, deck's #9 Cream, hull's #24 Red & #29 Colonial Yellow. Nice, bright colors for external visibility & recognition, more subdued & flat finish where I'll be looking at it from on board.
After boring a hole into an end of one of my main spars for the tack lacing I thought perhaps some reinforcement of the thinnish spruce that remained would be A Good Idea. So I routed a shallow relief 6" in from the end and into the end that then received four layers of 6 oz. cloth bonded in epoxy. It cured up fine but a bit shallow so I filled the void with microballoon+cellofilled epoxy then faired to match the wood surroundings (right):
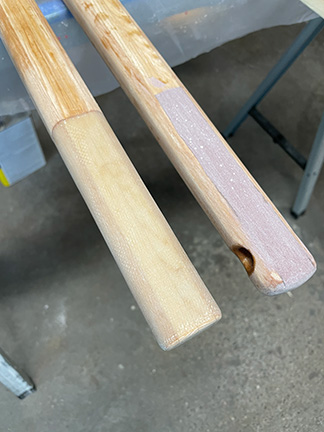
All that was a major project so I changed course for the other (left) spar, chose instead to simply relieve the entire end 6" in that then got wrapped with 6 oz. set in epoxy until flush with the unrelieved surfaces farther from the end. Next I'll bore a hole in that end, then fair the edges. Once the spars have been coated with epoxy once more they'll get varnished and the ends painted maybe red, or yellow.
Probably not really necessary but reassures me they ought not suffer from unanticipated tension during their lifetime.
Weighed spars last night before coating with epoxy. They'd been coated once before being cut to length, and the mast had its bottom wrapped with four layers of 6 oz. cloth up to about 10" above deck height.
Main mast: 8.8 lbs.; mizzen: 2.2 lbs.; main spars: 4.2 lbs. ea. Haven't yet gotten to finishing the mizzen's spars but if they're much over a pound I'd be surprised.
Last edited by spclark (21 Jul 2021 12:12 pm)
Offline
#798 21 Jul 2021 2:16 pm
- Chuck
- Member
- Registered: 24 Nov 2020
- Posts: 138
Re: Waterlust sailing canoe in Norway
SP, did you hollow out your main mast?
It's interesting your mast came in less than mine at 11#, solid and dressed the way the manual suggests. Hard to imagine I have 3 pounds of varnish in two coats...
I just looked at the CLC site which says that their masts are Douglas Fir, which may be heavier than what you used.
Last edited by Chuck (21 Jul 2021 2:19 pm)
Offline
#799 21 Jul 2021 4:15 pm
- spclark
- Member
- From: "Driftless" Wisconsin USA
- Registered: 19 Mar 2020
- Posts: 478
Re: Waterlust sailing canoe in Norway
No, not hollowed although I considered that. It’s newer growth Sitka Spruce I bought from a lumber yard in Madison WI back late in 2018. I had some old-growth Sitka I bought 30+ years ago but not in length long enough to get what I needed without scarfs. Jeff P. used DF & hollowed his but I’d have to ask if he ever weighed it.
I guess there’s a solid reason Sitka’s so sought after for building aircraft as well as sailing spars!
I’ll weigh again tonite, see what adding a solid coat of epoxy’s contributing before sanding…
Offline
#800 22 Jul 2021 12:29 am
- Chuck
- Member
- Registered: 24 Nov 2020
- Posts: 138
Re: Waterlust sailing canoe in Norway
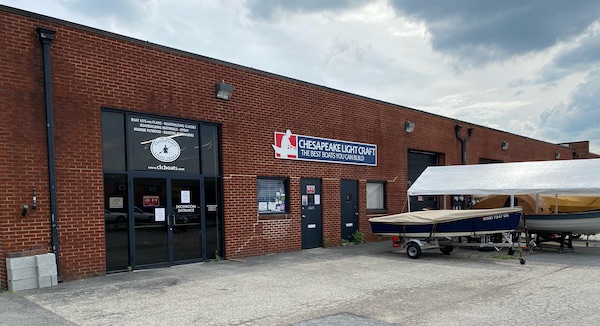
A photo of the Home Office when I went to visit last month right around the time of Whimbrel's maiden voyage in DC.
Coincidentally, I am heading up to the Adirondacks in a month for some hiking with old friends, and thought it would be very nice to drop by the Adirondack Museum to take a look at their collection of old sailing canoes; perhaps I will get some interesting ideas to try implementing on a Waterlust...
Offline
