A forum for discussing wooden boats and boat building
You are not logged in.
- Topics: Active | Unanswered
#351 5 Jul 2020 8:34 am
- Bergen_Guy
- Member
- Registered: 6 Feb 2020
- Posts: 353
Re: Waterlust sailing canoe in Norway
Hiya Gents,
I too would like to keep things a bit Trad. looking, and am erring towards old looking ropes, but have not yet settled on where I will source them. I do also remember from my dinghy sailing days that it’s important to be able to quickly identify which rope you are looking at. So some variations in the rope work are useful. A tan rope shot through a line or two of dark red, black, etc would be really useful. I can also see that getting some mesh bags fitted to the interior of the cockpit to keep the ends of the ropes tidy will be a bonus. Do let us know what you find! Best of luck, Guy
Offline
#352 5 Jul 2020 12:44 pm
- spclark
- Member
- From: "Driftless" Wisconsin USA
- Registered: 19 Mar 2020
- Posts: 478
Re: Waterlust sailing canoe in Norway
Agree on the sheets, why I’m asking for a sample before ordering up a bunch. And same for simplify, particularly where lines all have the same look rather than colors or white with colored traces.
I’ll be looking forward to seeing your hardware configuration (I’m a ways from that portion of my build for cert!) and particularly how you accommodate a crew in such a crowded cockpit! The daggerboard/drive console takes up quite a bit of space, don’t it!
Offline
#353 5 Jul 2020 2:11 pm
- MartinC
- Member
- Registered: 3 Apr 2020
- Posts: 353
Re: Waterlust sailing canoe in Norway
After much head scratching, this is what I am proposing for the rigging and deck hardware and the reasoning behind it. If anyone can see any problems with this do let me know. I am always willing to learn from those with better ideas or more experience than me. Needles to say, I have picked Dillon’s brains!
1. Rudder uphaul/downhaul:- The rudder floats, so I can’t see that you need an uphaul except for the very short time when lifting the boat in and out of the water and before you have taken the whole yoke assembly off. For this purpose I can’t see that a short length of shock cord on the uphaul wouldn’t be adequate, and you could dispense with another length of rope going into the cockpit.
2. Mizzen:- I have learnt over many years of small boat sailing with a very small mizzen (like the Waterlust), that you tend to put it up and leave it up. You don’t need to adjust the downhaul, and once on the water you don’t drop it (as if you do, it drops into the water). You simply let it flap when you don’t need it and if it gets too flappy, you scandalise it. For this a topping lift is essential.
Also for a sail of this size you don’t need many blocks. I am proposing to tie the sheet directly to the boom and take it through a single block on the stern pad eye and back to a jam cleat near the back of the cockpit. I am guessing that the purchase on a single block is quite adequate for a sail of this size.
The mizzen mast is within easy reach of the rear cockpit deck and the deck under here is reinforced with a central spine (unlike the deck behind the main mast), so you can lean on it. Consequently, I am cleating the halyard and topping lift (on the same rope, as when one is up the other is down) on a single pillar (horn) cleat fixed to the starboard side of the mast. The boom is on the port side of both masts so you need to keep this side clear of ironmongery and rope except for the downhaul cleat which is below the boom.
By doing the above, I have reduced the number of ropes coming into the rear of the cockpit from five to two, and I am proposing to cleat these two (rudder downhaul and sheet) centrally (on the central spine) about a foot behind the back edge of the cockpit coaming so they always within easy reach, but not where I will sit on them when sitting on the rear deck amidships.
3. Mainsail:- As per the Mizzen, I feel a topping lift is essential as with the Waterlust you don’t have a suitable deck to drop the spars and sails onto. It is far easier to slacken off the halyard and downhaul and hoist the topping lift to scandalise the sail and bring the boom vertically tight up against the mast. In my view, a topping lift is far preferable to lazyjacks on a boat of this size as the latter require a lot more rope up the mast, all of which gets tangled every time you remove/replace the mast. In addition, it is nice to remove the boom and sail right out of the way when you don’t want it. I have tried both.
Mainsail downhaul fixing:- You will be putting a lot of vertical lift pressure on this and for this reason, in my view, the eyepad holding the lower block is better fixed to the mast than the deck. Screws (holding a substantial pad eye), screwed horizontally into the mast must be better suited to resist the substantial vertical force of the downhaul being tensioned.
Halyard, topping lift and downhaul cleats. I am fitting two 4” pillar cleats on the starboard deck (suitably reinforced underneath) roughly in line with the rear edge of the centreboard casing for the halyard and topping lift, and one 4” pillar cleat for the downhaul on the port deck (corresponding with the ones on the starboard side.
I am using pillar cleats as I am not using fairleads as it is a fairly straight pull to the mast in the forward position (where my mast will always be), and the direction of pull isn’t critical as it is with a cam cleat. The other advantage of using pillar cleats on the decks roughly amidships is that they can be used for fenders or mooring lines.
It seems to me that with the Waterlust layout, with the mast the wrong side of the centreboard, Hobie drive, mainsheet eyepad, and an unreinforced deck, you never want to have to climb forward to the mast to sort anything out, so all your ropes need to be tethered near the cockpit in some way in the event of accidental release. I will tie the ends of the ropes to the hole between the legs of the respective pillar cleats.
Do let me know if anyone feels there are any fundamental flaws with the above. I will post photos once all the ironmongery and rope has arrived.
The idea with the crew is that she will sit in the pedalling position (and provide the power when necessary or when inclined) and I will sit behind her on the rear deck (and sail the boat). To provide a seat for me, I have brought the deck forward by 9" and reinforced it with another frame. It remains to be seen though if this bespoke arrangement will actually work!!
Offline
#354 5 Jul 2020 2:57 pm
- spclark
- Member
- From: "Driftless" Wisconsin USA
- Registered: 19 Mar 2020
- Posts: 478
Re: Waterlust sailing canoe in Norway
Wow... ‘thinking’ in text, it seems! Excellent description of what your plans are! Thanks!
Mine aren’t nearly as well thought out as yet. Seeing as it’s been 4+ decades since I’ve handled sheets & halyards I’ll be fitting the mainmast first, once my Waterlust & I get about via the Mirage drive a time or two. Complexities of two sails - even if one’s rarely if ever altered once underway - I’ll leave for later.
Recalling what Bergen Guy added under his front deck to better support the odd passenger, I may do something similar as my deck’s not yet bonded to hull. The added stiffness may be reward for the extra effort some day!
And for sitting atop that extended deck? Be wary of the higher CG while up there though a crew lower down & farther forward may help offset that.
Might you elaborate on ‘scandalize’ please? I’m guessing it’s bringing boom & yard together then hauling the bunch w/sail against the mast by means of that topping lift? Whereabout’s might one secure a block thru which said lift’d turn towards the deck? That scow I built was Marconi-rigged, no mention of reefs or other complexities like lazyjacks or topping lift was involved.
Offline
#355 5 Jul 2020 4:50 pm
- MartinC
- Member
- Registered: 3 Apr 2020
- Posts: 353
Re: Waterlust sailing canoe in Norway
Hi SP
1. Yes. I think it would be a very good idea to do the fordeck stiffening as per Guy's modification. I wish I had done it.
2. I checked with Dillon before embarking on the two crew idea. It was his solution to bring my weight forward by making the cockpit shorter and he felt that as long as my better half stays put in the bottom of the boat and doesn't move around too much, the centre of gravity won't be a problem. We'll see!
3. Scandalising:- This is something 'gaffers' do alot around here to spill the wind by raising the boom. For the last 20 years sailing a Winkle Brig (a gaff rigged 'pocket' cruiser), I always stowed my sails like this when underway or at anchor. It is very simple. You simply tie a rope to the end of the boom to a block at the top of the mast. Then on a lug rigged boat you release the downhaul and part lower the halyard whilst pulling on the topping lift until the boom and spar rest vertically against the mast. If you want to you can then put a bungee around the whole thing to stop the sail flapping. You don't have to lower the halyard, but the sail sits better against the mast if you do. This has the huge advantage (especially on the Waterlust where the mast is so far away from the cockpit) of taking both the spars and sail away from the cockpit so you can paddle/picnic/fish/sleep in peace!
The only other alternative to having the spars and sail land on your deck when you lower them is to have lazeyjacks. These are two lines either side of the boom which support it and catch the sail and spar when you release the halyard. With this arrangement you end up with the boom/sail and spar flapping about over your head in the cockpit. Also with lines going up either side of the boom and sail there is much to get tangled when rigging and de-rigging.
Offline
#356 5 Jul 2020 4:57 pm
- spclark
- Member
- From: "Driftless" Wisconsin USA
- Registered: 19 Mar 2020
- Posts: 478
Re: Waterlust sailing canoe in Norway
All makes good sense! Thanks for a full yet concise explanation of terms, effects!
Offline
#357 5 Jul 2020 8:14 pm
- Bergen_Guy
- Member
- Registered: 6 Feb 2020
- Posts: 353
Re: Waterlust sailing canoe in Norway
Thanks for the tip on how to scandalise a lug rig neatly. I have used the technique to great effect on Bermudan rigs when wanting to get the power out of a big mainsail with a heavy boom, but did wonder how the gaff would behave on the waterlust as it had no separate peak / throat halyards. I look forward to seeing pictures of your set up. My spars have come along nicely, just the main mast to go. I will probably try to make it round in section at the top. I too had planned to fit as much of the downhaul directly to the mast due to the large forces involved in getting a well setting lug. So I will start square sectioned at the base and then transition to a round section higher up. I want all the main woodwork done on those before I start oiling them as that has to go wet on wet every 20 mins till it stops soaking any up, which apparently takes the best part of a day! I only want to do that once!
Offline
#358 11 Jul 2020 10:34 pm
- spclark
- Member
- From: "Driftless" Wisconsin USA
- Registered: 19 Mar 2020
- Posts: 478
Re: Waterlust sailing canoe in Norway
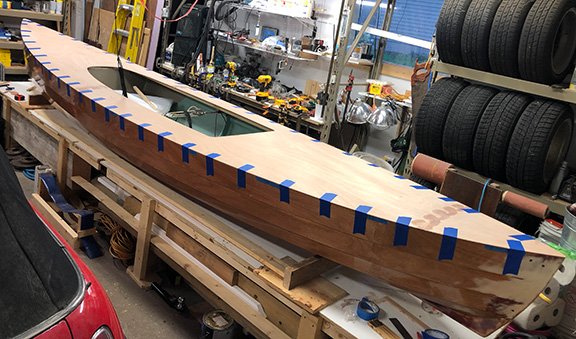
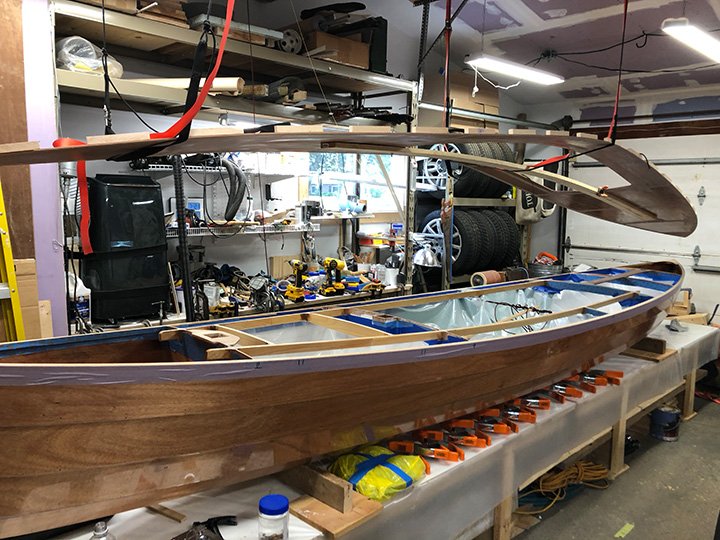
Extending this most extensive thread by yet one more post, I'm hoping to learn from you three others how you approached preparing the hull to receive the deck –
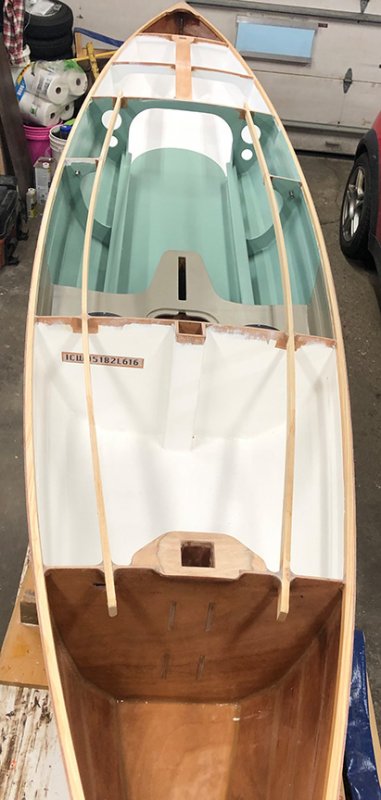
That image above shows where I'm at in my build.
That forward mast pocket reinforcement piece didn't quite glue up in good alignment to the top of frame #1 which is why my planing isn't symmetrical port/starboard! I felt it more important to keep to the top of the frame rather than shape both sides equally. Once I get to dry-fitting the deck I'll see if there's more to be planed off or filled back here to avoid any hard spots in the deck once it gets bonded in place.
This morning I planed and rasped off excess epoxy at the deck stringers / frame joints, frame tops and the breasthooks stem & stern:
Last weekend I added a bit of extra plywood material where the rudder fittings will be secured to the hull:
There's some work left where the bolt holes need to be opened up then filled with epoxy, then re-drilled to accept rudder hardware fasteners. I"m going to do that BEFORE bonding the deck as I expect the free access I have now to that area will be severely reduced once the deck is on despite my plan to add an inspection port on the stern deck.
Did you three do anything to ensure smooth curves amidships when prepping your frames & shear clamps to receive the deck?
I tried to plane the shear clamps according to how I felt the deck angle would best fit once the deck's in place and secured. I'll be dry-fitting it once I have its three pieces glued up & the bottom surface fiberglassed. Same at the forward mast pockets and both breasthooks. You can see where the plywood of the 'hooks reveals a careful approach to shaping those elements the better to match how the deck will be shaped once it's secured around the gunwales.
I'm open to hints about how you approached this step in your builds. Anything you can offer by way of enlightenment or troubles overcome will be most welcome!
Offline
#359 12 Jul 2020 7:40 am
- MartinC
- Member
- Registered: 3 Apr 2020
- Posts: 353
Re: Waterlust sailing canoe in Norway
I have to say SP, yours is a very professional build compared to mine and I hessitate to give you any advice! Lovely job!
I used a thin piece of ply the width of the boat to see if there were any high or low points where the deck would meet the frames or shearclamps, and despite it being a rather an anxious moment lifting the deck onto the hull, it actually went very smoothly. I didn't find it necessary to do anything to ensure smooth curves amidships as the design does this for you. However, I would advise you not to pull in the sides of the cockpit with clamps as this causes the deck to spring up off the frames at the front and back of the cockpit.
I would say you need at least three people (preferably four) to lower the deck on straight. Once on, I put a temporary screw on the centre line into the breast hooks fore and aft to allow my helpers to dissapear and leave me in peace to screw the rest of the deck on.
To ensure complete gluing of every surface, I was very generous with the epoxy and consequently my biggest problem is now getting to the more inaccessible areas to chip off the surplus. I would definitely clean the surplus off the more accessible areas whilst it is still wet. I was so relieved to get the deck on, I didn't do this and it has been a heck of a job to chip/sand it all off.
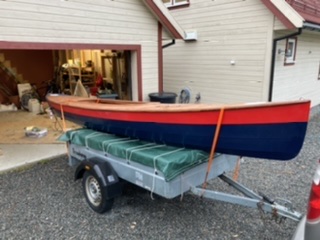
Good luck! (Photo of Gaia launched yesterday. Much rigging still to do but at least she floats!)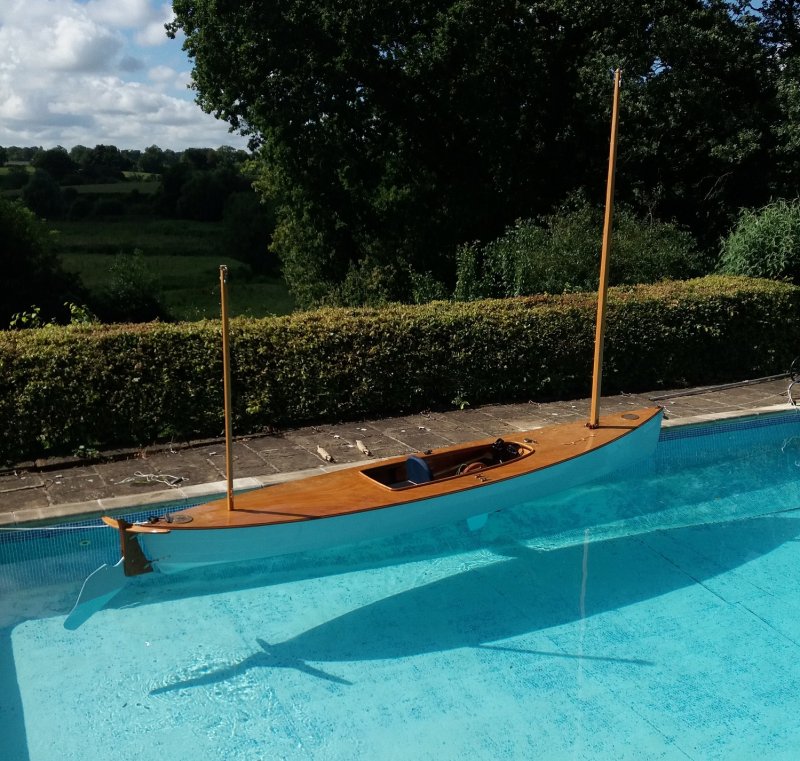
Offline
#360 12 Jul 2020 8:49 am
- Bergen_Guy
- Member
- Registered: 6 Feb 2020
- Posts: 353
Re: Waterlust sailing canoe in Norway
I second the first comment from Martin above! (Although I think his boat is looking great!). I would do things a bit differently if I were to do it again. I would spend more time ensuring the shear clamps were fair with the line (side to side) the the deck would take. I didn’t and spent a day going round filling a small gap with thickened resin. The other thing that’s tricky (or I failed to do right) was to ensure the watertight compartments at either end are properly sealed. The capsize test I did revealed they are not, and I think it’s the deck / frame joint that is epoxy starved. There is enough resin that there is no strength issue, but a bit of water did get into the ends. So, more resin, and maybe some helpers (I fitted my deck singlehanded, and it’s not possible to come ‘down from directly above’ when handling the deck alone. Really nice looking boats gents! Keep it up :-)
Offline
#361 12 Jul 2020 1:30 pm
- MartinC
- Member
- Registered: 3 Apr 2020
- Posts: 353
Re: Waterlust sailing canoe in Norway
Thanks Guy. I think it is astonishing you managed to fit your deck single handed! I have done most of it single handed, but not that.
SP:- I am getting in a muddle with the masthead fittings. Do you have a photo of this in your archive? The rigging is proving more of a challenge than I thought it would be. You had better disregard my previous posts on the subject until I have a working model to photograph and post. The fact that the sail and spars are so light makes it very different from my previous boat. Also, I am moving away from the idea of having the mizzen cleats on the mizzen mast as from my pool test, I discovered that moving even a short distance down the aft deck whilst afloat is quite a wobbly experience!
Offline
#362 12 Jul 2020 1:41 pm
- spclark
- Member
- From: "Driftless" Wisconsin USA
- Registered: 19 Mar 2020
- Posts: 478
Re: Waterlust sailing canoe in Norway
MartinC, congratulations on your launch! Your Waterlust looks exquisite on the water, you've done a commendable job of getting it this far along! (I envy you your access to a pool for her first 'bath'! I'll be trailering to a local pond for mine when the time comes.)
Bergen_Guy I had thoughts not unlike your comment about the shear clamps in mind yesterday when I took to planing them and rasping the epoxy over the edges of everything the deck will bond to. Seems only practical to make those surfaces well-fitted to the deck underside's curves before attempting the final bonding.
Yesterday evening I dry-fitted the deck pieces, both to get an idea where to add some stiffeners in that hatch-access space ahead of frame two as you did (otherwise the hatch sill would interfere when the deck gets bonded; there's little latitude between the forward mast pocket cap and that hatch sill from what my layout tells me!) but also to get an idea of how my hull's shear matches the shape of the deck perimeter.
I found it relatively easy to draw the deck sections down to the fourth plank edges with pieces of blue masking tape. Hopefully this is telling me I won't need to resort to all kinds of contortions to get the deck positioned once the epoxy gets placed. A couple spots leave the deck short of the plank edges, mostly they match quite well.
The fore deck piece has a flat end to it up front so I need to position it with the cockpit cutout 1/8" shy of the 1" the manual indicates. Otherwise I get gaps at the edges where the deck'd be too narrow to fit the shears. Since I'm painting everything this isn't a concern; easy enough to add thickened epoxy as needed to fill gaps that then will be radiused before being 'glass covered then painted.
As for actually bonding the deck?
I cleaned off the building table yesterday afternoon in preparation for laying out the deck pieces prior to bonding the puzzle joints:
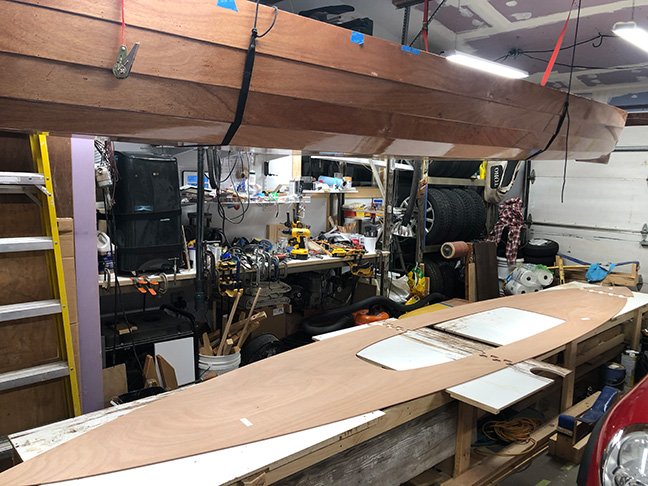
That HarkenHoister has proven invaluable for this build in that my space is somewhat limited to my half of our two-car garage and I'm working mostly alone. I'll know soon enough if my thinking on this works out: the hoister ought to hold the assembled deck piece aloft and out of the way once it's completed. Otherwise it'd be in the way, there's no other place to leave it, why I left that step for near the end rather than taking it by the book and getting that done with on P. 4 of the manual.
In this manner I ought to be able to work starting with one end being bonded down while the opposite is held clear of the hull. I'm apprehensive about getting all the epoxy on then starting to secure the deck only to find I can't work fast enough for a careful job of it before the epoxy begins to set up.
I used to make custom laminated furniture. This kind of approach was pretty standard when dealing with large sheets of laminate plastic covered with contact adhesive. That stuff's more forgiving than epoxy, until the two coated surfaces are brought into contact. If it's not RIGHT at that moment, the job becomes infinitely more frustrating to do properly....
Thanks both of you for your kind comments on my progress. I'm forever grateful this forum has brought us together despite our separation of hundreds of miles!
Offline
#363 12 Jul 2020 3:01 pm
- spclark
- Member
- From: "Driftless" Wisconsin USA
- Registered: 19 Mar 2020
- Posts: 478
Re: Waterlust sailing canoe in Norway
All I could find among what Jeff sent; hope these help!
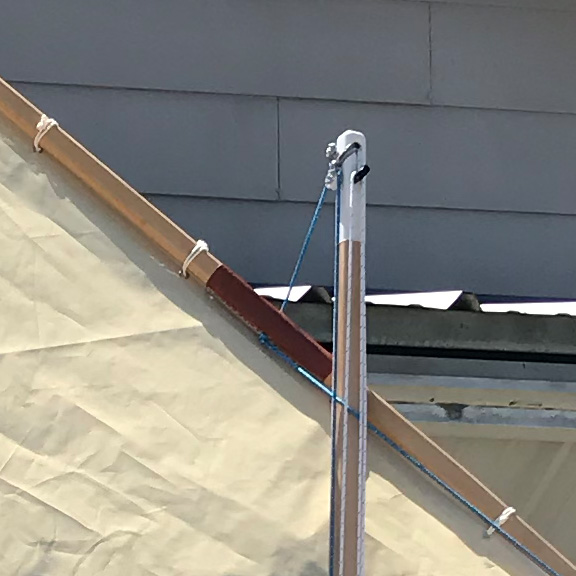
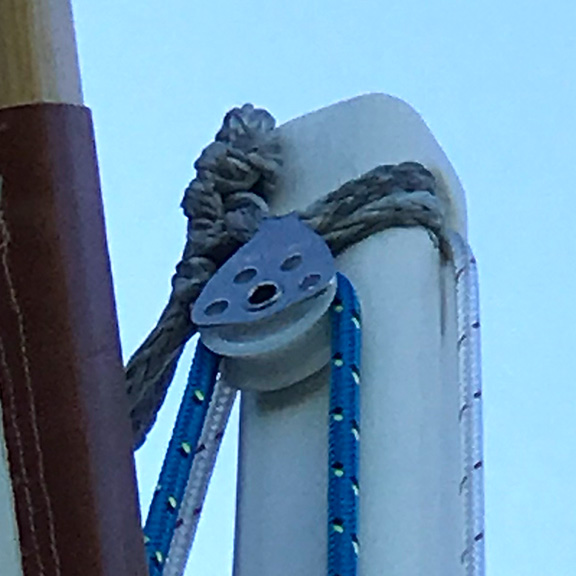
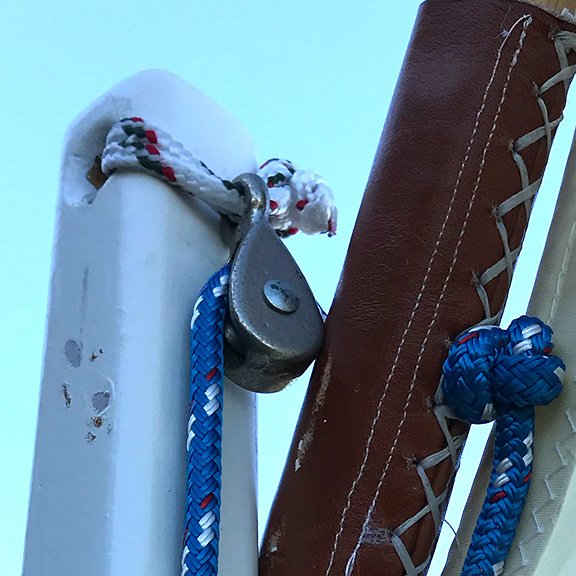
Curiously I noted while looking through other images he's rigged his mizzen to the opposite side of the mast... can't imagine why?
Offline
#364 12 Jul 2020 3:39 pm
- MartinC
- Member
- Registered: 3 Apr 2020
- Posts: 353
Re: Waterlust sailing canoe in Norway
Thanks SP.
Your 'incremental' approach to the bonding of the deck to the hull makes a lot of sense, but do be careful (I am sure you will be) that it stays lined up right to the end. By fixing the two ends first, it can't go out of allignment, although you are right that if you are doing it in one shot, you have to work pretty fast.
Many thanks for the photos. Gret help. Can it be that he has the booms on different sides because that is how Dillon has drawn it in the 'manual'? (Although I suspect it is only drawn this way indicatively to show both sides). I will be having both booms on the port side which seems to be a convention over here.
Keep up the good work!
Offline
#365 16 Jul 2020 1:16 pm
- spclark
- Member
- From: "Driftless" Wisconsin USA
- Registered: 19 Mar 2020
- Posts: 478
Re: Waterlust sailing canoe in Norway
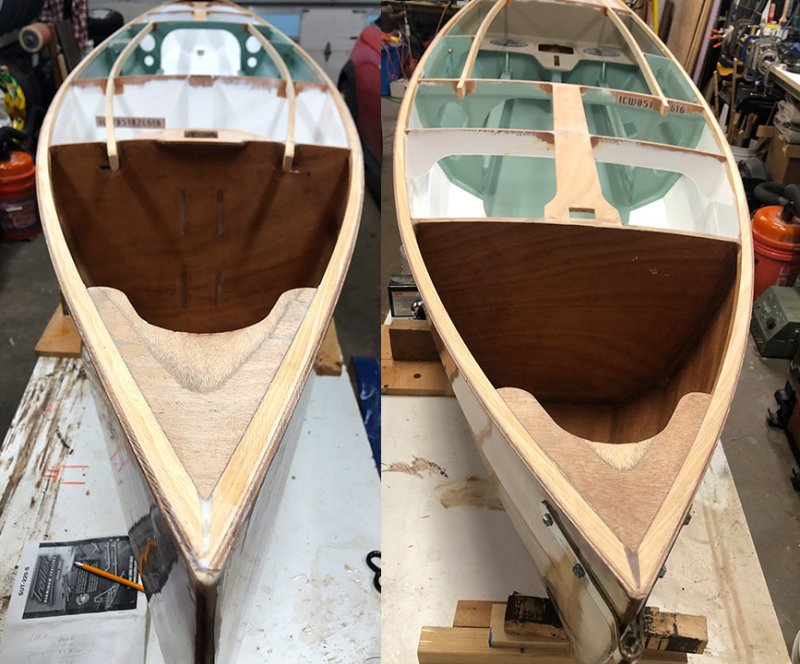
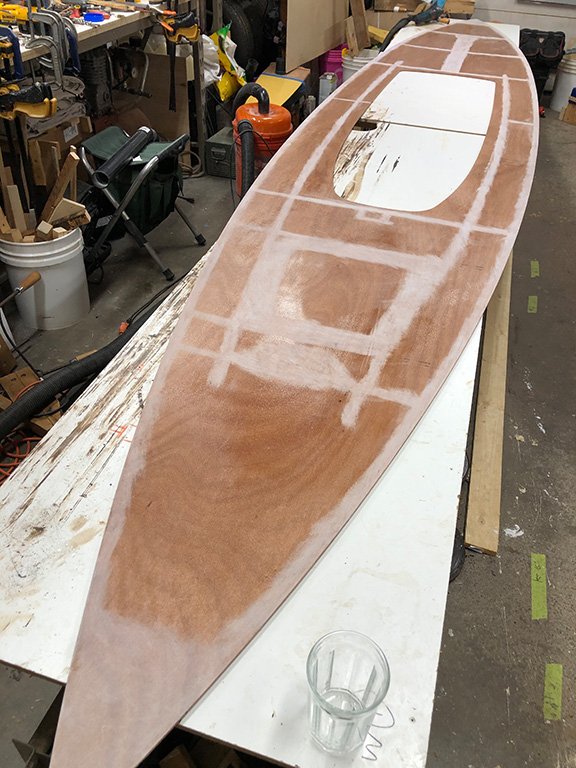
Substantial progress the last few days. Deck's assembled, bottom's been glassed, edges trimmed & filed to remove those pesky sharp edges. Dry-fitting to the hull is giving me all kinds of pleasure to see how nicely it follows the profile of the sheer panels:
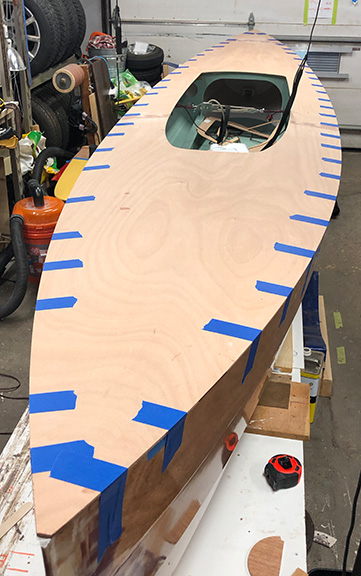
I'll be marking where the frames cross next so I can keep sanding to a minimum when it comes time to bond the deck to the hull; little point I can see in sanding the entire deck's underside when it's necessary just to abrade the areas that will bond to the sheer clamps & frame tops:
I added cross-stringers fore & aft of the location for that forward storage hatch as did Bergen_Guy. Placement's best done with a mind to where the hatch shelf'll eventually get bonded though, there's not a lot of room for error!
A note on weight: at the point I'd finished fairing the sheer clamps & frames I got an idea of weight of the hull late last week. Supporting the stern on the very end of the skeg then lifting the bow while standing on a bathroom scale I noted (after a bit of math) my scale showed 40 lbs (~ 18 kg) for the half I was holding up. Works out to 80 lbs / 36.4kg or pretty close to what CLC suggests it ought to if the all-up is 115 lbs / 52.3kg. Kind of heavyish for car-topping solo at my age but I'd anticipated that earlier on, why I bought one of their aluminum trailers I ought to get started assembling soon.
Offline
#366 17 Jul 2020 7:58 pm
- MartinC
- Member
- Registered: 3 Apr 2020
- Posts: 353
Re: Waterlust sailing canoe in Norway
Great to see your progress SP. Well done!
I just abraided the deck underside areas which were to be glued, and found afterwards that you can flip the boat over and stand/kneel in the cockpit and reach quite a lot of the deck underside with a light, if you want to add a bit more epoxy where you have abraided too large an area or if it's a bit rough.
Are you leaving the deck stringers protruding into the rear locker - I don't see why you shouldn't for added strength- although I trimmed mine off as per the manual.
I am interested in the weight and glad it conforms to the CLC specification, as I have been concerned about car topping which is my preferred option. I have designed a lift which goes on the towbar like the Rhino T Loader https://www.youtube.com/watch?v=MSeHSCfHniQ but haven't tried it yet!
Offline
#367 17 Jul 2020 9:30 pm
- spclark
- Member
- From: "Driftless" Wisconsin USA
- Registered: 19 Mar 2020
- Posts: 478
Re: Waterlust sailing canoe in Norway
Yeah, I’m leaving those aft stringer bits in place. Taking them through a slot routed into the frame doubler gives another pair of surfaces for fillets behind the frame, just like in the front. I can’t help but think not milling the slots in the frame doubler was an oversight during production set-up but I’ve never seen fit to bother D.M. with the question.
I expect to be bonding the deck to hull this w/e. I’m not too concerned with how the operation has to be ordered. With the HarkenHoister keeping the deck aloft while I place the epoxy it ought to go fairly quickly. Only question yet unanswered is whether strapping tape’ll be enough to keep deck to sheer seam minimal or if I need to use screws through cauls to really bring those edges down tight. Just 1-1/2” blue masking tape every 6 - 8” is strong enough to bring the gap to 1/16” or less during dry-fitting. Time’ll tell!
Offline
#368 19 Jul 2020 8:32 am
- MartinC
- Member
- Registered: 3 Apr 2020
- Posts: 353
Re: Waterlust sailing canoe in Norway
Here are a few bits I felt were necessary before venturing onto the water for real. Mast holders are important for me as there are many low bridges on the Norfolk Broads where I plan to sail.
1. Paddle holders.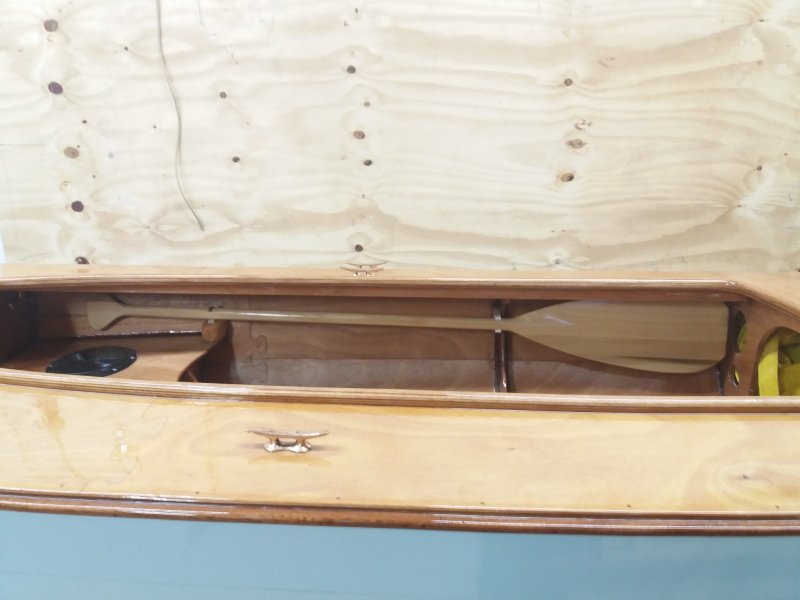
2. Mast holder forward.
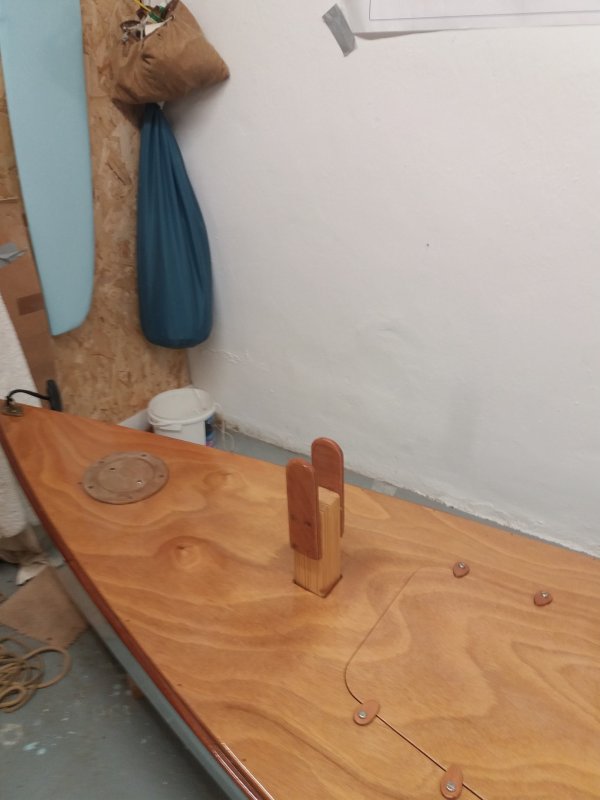
3. Mast holder aft.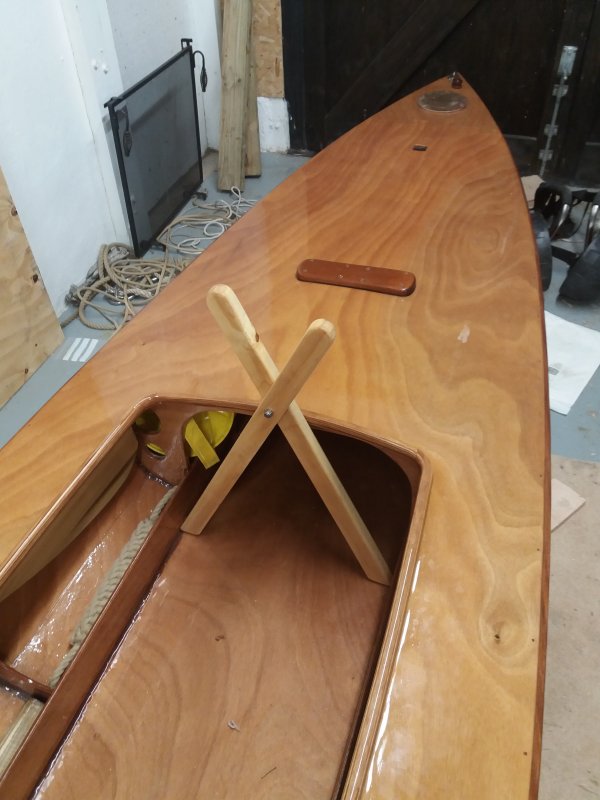
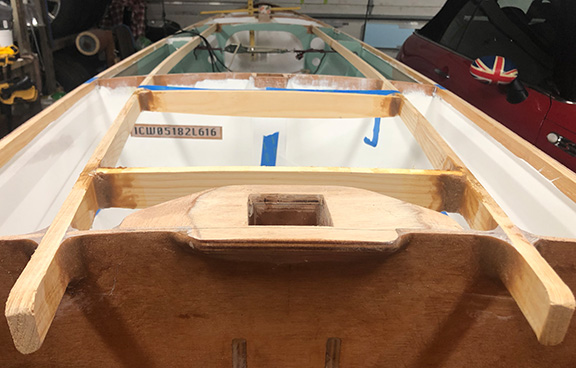
The fore and aft mast holders are made to fit snugly in the side compartments:-
Offline
#369 19 Jul 2020 2:16 pm
- spclark
- Member
- From: "Driftless" Wisconsin USA
- Registered: 19 Mar 2020
- Posts: 478
Re: Waterlust sailing canoe in Norway
Exciting as your launch date grows ever closer with your efforts MartinC! I'm really anxious to see how your Waterlust performs as I'm sure you are too!
Yesterday saw me doing prep for my deck bond operation, applying epoxy to those deck stringers, trying to come up with a method by which I can be assured I'll have no problems mounting the lower rudder pintle when that time comes.
Space is limited back at the stern inside. With the deck yet to bond, there's plenty of space of course. But later on, even with a 6" access hatch just inches above and a bit forward of where I'd need to get fasteners placed and a wrench on them, I'm finding that the rear-most mounting holes on the tangs of the pintles I chose leave very little room for positioning those fasteners for easy access.
I suppose I could have just found a local TIG welder to close those rear holes then drill new ones farther forward....
So I put the question to the folks contributing to the forum.woodenboat.com who offered up some useful suggestions.
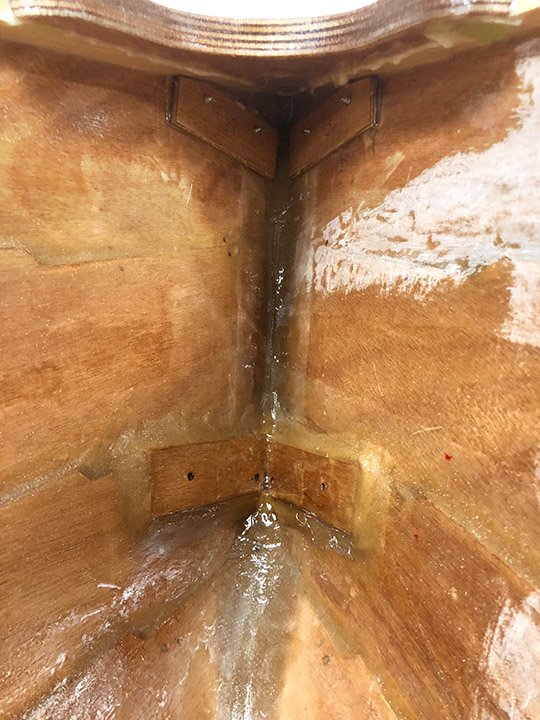
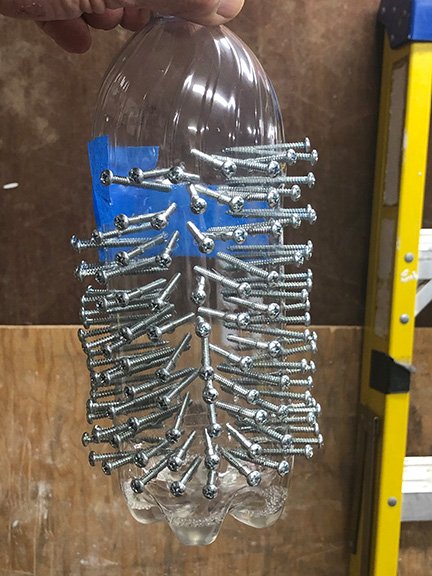
I'm taking one of those to heart, that of casting an epoxy plug in that stern panel juncture, an exaggerated fillet of you will:
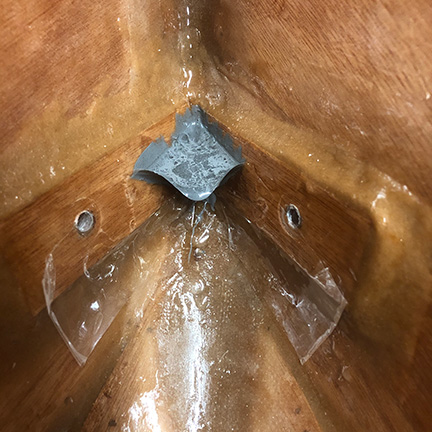
This then will serve as a base for additional epoxy-filled 'pillars' cast into 14mm bores drilled thru the hull panels, then to be drilled on-axis for the fasteners then tapped for the machine screws as used elsewhere. The epoxy is augmented with powdered aluminum to increase its withdrawal resistance in a manner recommended by the experts at Gougeon Bros.
I was going to use stainless T-nuts embedded in epoxy -
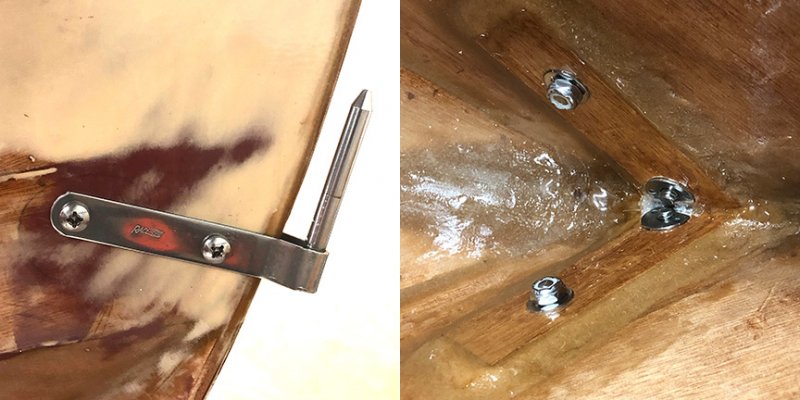
- but a question arose whether stainless steel, embedded in epoxy and thus kept away from oxygen, may be subject to corrosion should water find its inevitable way in. This pillar-bedding method avoids that potential.
Offline
#370 20 Jul 2020 3:32 pm
- Bergen_Guy
- Member
- Registered: 6 Feb 2020
- Posts: 353
Re: Waterlust sailing canoe in Norway
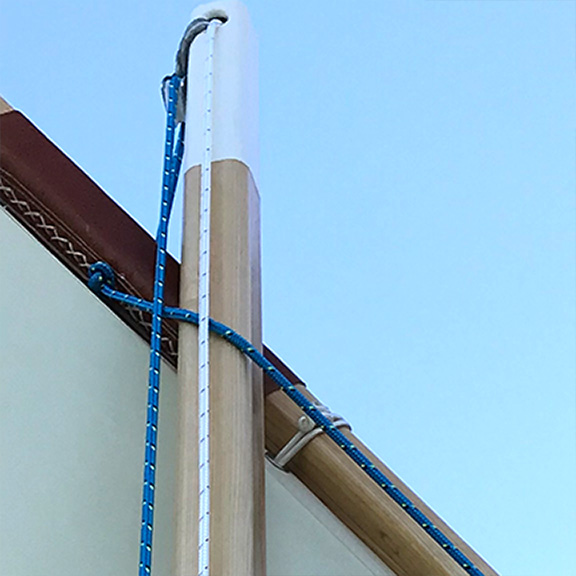
Good luck with getting the deck on SP! I am crossing my fingers from my holidays here in Norway. We have the boat with us - will write up more eventually- but on the progress front I finally got round to putting the vinyl name stickers on. My sails have also been made. I need to finish the main mast, and fit the rudder and then it will be on to rigging, so I am watching how you guys are getting on carefully!
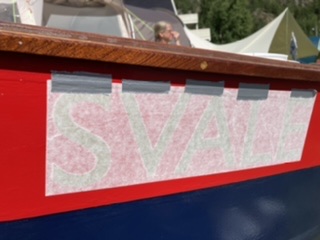
Thankfully there was a good link to a video on how best to approach attaching the lettering, and it went on no problem
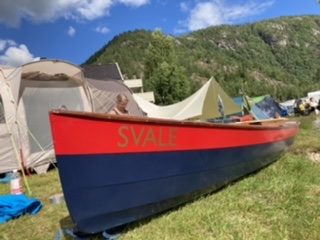
Job done, and Sonja in the background knitting!
Offline
#371 20 Jul 2020 3:42 pm
- Bergen_Guy
- Member
- Registered: 6 Feb 2020
- Posts: 353
Re: Waterlust sailing canoe in Norway
Martin, I love your mods for mast and paddle holders, they look really neat and very useful. I can see that in the end it’s those small modifications that will make the boats easy (and therefore fun) to use. I think it was in a Lyn and Larry Pardey book I read many years ago where they said that it was the details that made the difference between a comfortable and enjoyable boat and one that wasn’t so much fun and therefore got less use. So although details they are really important to do and get right. So far ‘ease of use’ has already been great for me. For this holiday we hired a trailer (normal box type trailer) and put Svale on that. It’s been so good we are thinking of getting one.
That meant no singlehanded roof work. I did a bit of research there and saw some nice ways of using ladder like contraptions to ‘walk’ the boat up onto the roof if you don’t have a host.
I look forward to seeing Gaia afloat!
Offline
#372 21 Jul 2020 3:49 pm
- MartinC
- Member
- Registered: 3 Apr 2020
- Posts: 353
Re: Waterlust sailing canoe in Norway
Thanks Guy.
Excellent use of small trailer. I have an old one like this but hadn't thought to use it for Gaia. I'll give it a try as it has to be easier than lifting her onto the roof. Thanks for the idea!
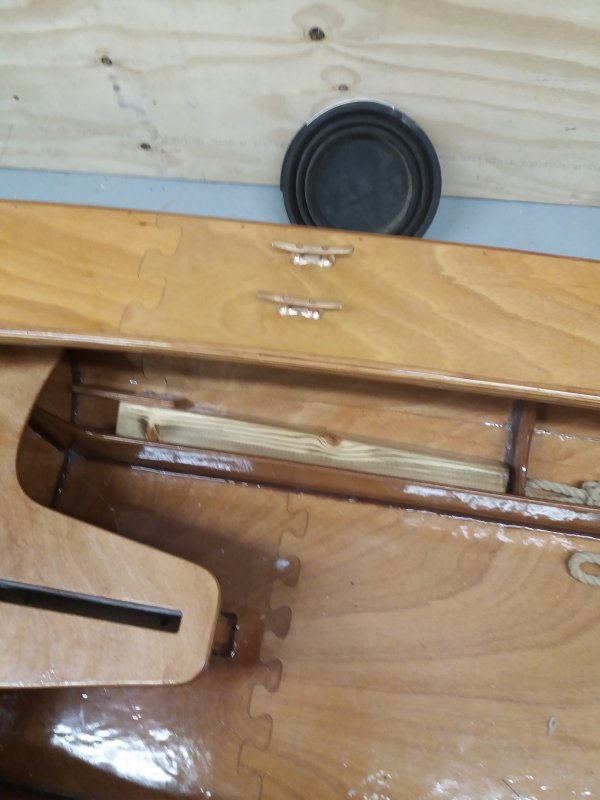
I have finally worked out the rear end controls. I have ended up with the halyard on the mast but everything else brought forward onto a block on the aft deck with cam cleats. My thinking is that you would never want to lower the mizzen whilst underway as it would simply drop into the water, so you don't need to reach the halyard. The other controls are topping lift, downhaul, sheet and rudder uphaul and downhaul all of which you need within reach in order to scandalise the sail.
I changed my mind about not having a rudder uphaul, as when I experimented I found that the force required to stretch an uphaul bungee was too much for the fairlead (which you are pulling against). This picture shows the final array of cam cleats - the two end ones are for the rudder. Not very pretty I am afraid .... but practical!

I decided to use detachable carrying handles fixed to the two end eyepads, and the rear one holds the block for the sheet as well.
It is important for me to be able to handle the boat on land single handed so I am using these wheels. As there is nothing to stop the straps (and therefore the wheels) slipping off the back of the boat so I am using a stubb 'mast' which fits into the mast housing and seems to do the trick.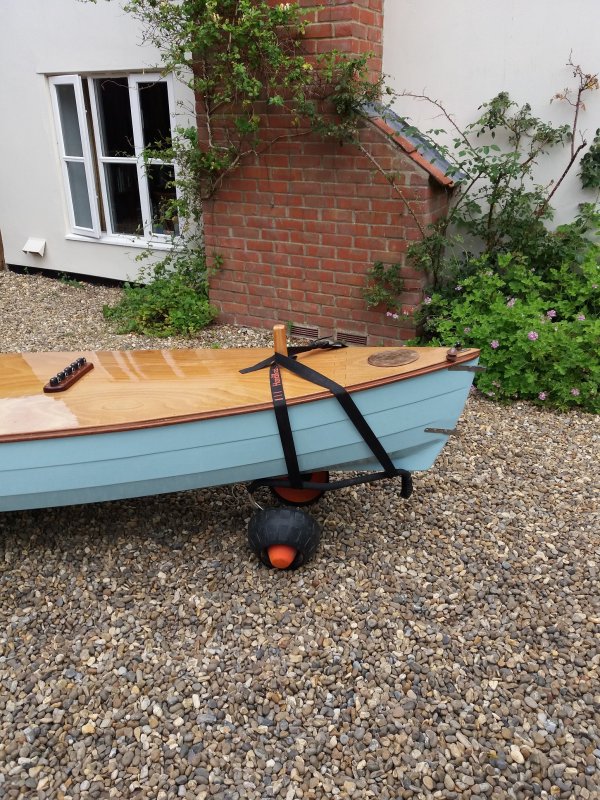
Not much more to do now until the big day!
Offline
#373 21 Jul 2020 4:07 pm
- spclark
- Member
- From: "Driftless" Wisconsin USA
- Registered: 19 Mar 2020
- Posts: 478
Re: Waterlust sailing canoe in Norway
Awesome progress MartinC! Thanks for keeping us up on your timeline! I'll be reviewing your ideas for control lines aft once I'm done with wrestling today's goal: Get the DECK Bonded in place!
To that end here's a few pics of recent progress:
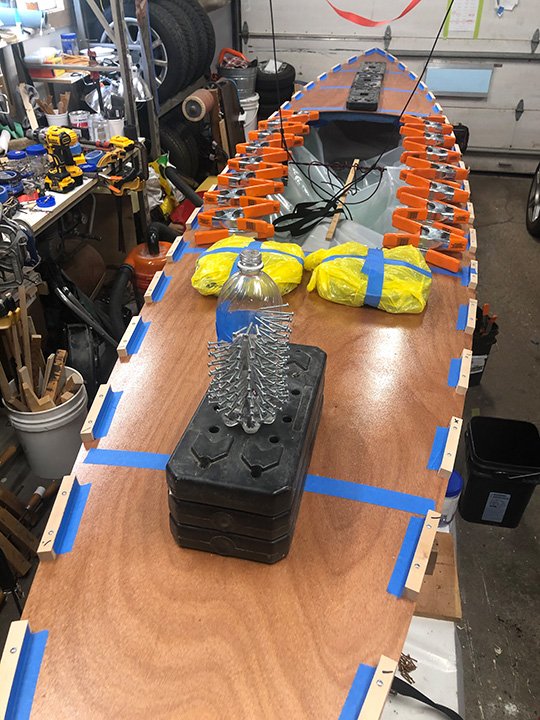
- and the State of Things as I Left Them a few moments ago:
An idea I put into action to lube ends of screws that'll be used to secure deck perimeter; a bit of garage door track lube sprayed in then sloshed around... while all the time keeping a can of paste wax handy when the time comes:
Offline
#374 21 Jul 2020 5:11 pm
- MartinC
- Member
- Registered: 3 Apr 2020
- Posts: 353
Re: Waterlust sailing canoe in Norway
Excellent SP. I really like the screw sculpture!
(Don't worry too much about the screws, I had no difficulty removing mine after the epoxy had set. Might you find it difficult filling the holes with epoxy if there is any wax or track lube residue in the hole?)
Offline
#375 21 Jul 2020 6:12 pm
- spclark
- Member
- From: "Driftless" Wisconsin USA
- Registered: 19 Mar 2020
- Posts: 478
Re: Waterlust sailing canoe in Norway
My thinking on that MartinC Is that the screws have been coated just on their lower 1/3rd and the threads they’ve cut into the shearclamps will hold any thickened epoxy in nicely. I opened the holes drilled into the deck too so the deck material doesn’t actually touch the screws so that should help. And having pre-coated the deck’s upper surface prior to bonding it to the hull should minimize any contamination as I’ll be well-sanding the deck before laying down its ‘glass layer. I sure hope my thinking on this is on track! Got a lot of work in it so far!!
Offline