You are not logged in.
- Topics: Active | Unanswered
#301 20 May 2020 11:23 am
- spclark
- Member
- From: "Driftless" Wisconsin USA
- Registered: 19 Mar 2020
- Posts: 478
Re: Waterlust sailing canoe in Norway
...I decided to experiment with the underside of the hatch cover and cleaned it thoroughly with acetone before applying the epoxy. Perfect result!
I hope this will help anyone else with this issue. Thanks to SP for pointing me in the right direction.
You're most welcome MartinC! Glad I could get you over your frustration!
Now it seems I need to 'take some of my own medicine' as it were -
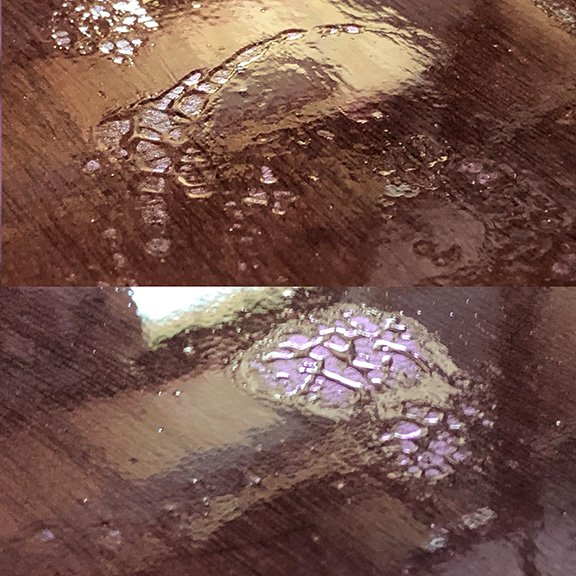
While I'm planning to paint pretty much everything on my Waterlust, I'm dismayed at how easily a little inattention (and I thought I was doing everything right!) can lead to that frustration I spoke of!
These are a couple of smallish areas on my daggerboard I coated for (what I had hoped to be) the last time yesterday. Just goes to show we're none of us immune to a less-than-perfect result. I certainly believed I'd done everything necessary to produce a better result: thorough sanding first, the vacuuming off dust, then wipe with new microfiber cloth dampened in plain water, then wiped again with denatured alcohol (carefully decanted into a clean container from the bulk can first) just prior to mixing up the batch that would get rollered on.
Curiously I haven't seen this elsewhere so far save for the drive shelves I'd made up. I've got a quart (a bit more than a liter) of acetone around someplace but may go buy a gallon if this is any warning of what I yet may face otherwise.
Offline
#302 20 May 2020 6:46 pm
- MartinC
- Member
- Registered: 3 Apr 2020
- Posts: 348
Re: Waterlust sailing canoe in Norway
Sorry to hear you have the same issue SP. It is infuriating, as when it goes on it looks fine then a few minutes later it goes like this. Exactly the same as mine.
I really can't put my finger on why it works sometimes and not others. It can't be the natural oils in the wood, as mine happened on the second coat, when presumably the wood was sealed. Acetone seems to be the answer, but does anyone out there know why this is happening, seemingly in such a random way?
Offline
#303 20 May 2020 8:26 pm
- Bergen_Guy
- Member
- Registered: 6 Feb 2020
- Posts: 353
Re: Waterlust sailing canoe in Norway
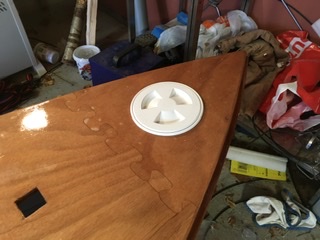
Tomorrow we are off to Hardangerfjord for the maiden voyage of Svale, in canoe form. So, still work to do, but the boys have been so excited I can’t put it off! So I quickly put the hatch dogs on, and fitted the inspection hatch. These will all come off later, as I do want to get one more coat of varnish on the deck.
Testing, testing...
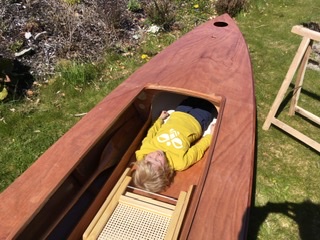
Plenty of space for me!
Various small parts!
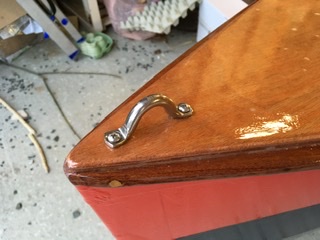
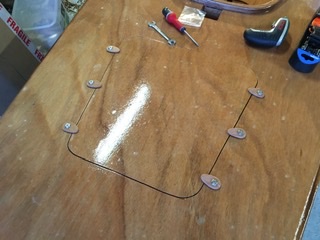
Hatch dogs will eventually be blue.
Last edited by Bergen_Guy (20 May 2020 8:27 pm)
Offline
#304 21 May 2020 2:54 am
- spclark
- Member
- From: "Driftless" Wisconsin USA
- Registered: 19 Mar 2020
- Posts: 478
Re: Waterlust sailing canoe in Norway
It can't be the natural oils in the wood, as mine happened on the second coat, when presumably the wood was sealed. Acetone seems to be the answer, but does anyone out there know why this is happening, seemingly in such a random way?
I’m certain it’s contamination of one kind or another, it’s just too random & spotty to be anything else.
Those pics I took of my daggerboard after coating? I watched the surface as it self-leveled ‘cause there was one spot that just didn’t look like the rest of that side.
Sure enough that’s where the defect presented itself once the cure began. It was quite evident once what was left over in that mixing cup’d begun to get stiff while still sticky & stretchable.
I’m reluctant to think of acetone as a ‘must have’ to do good epoxy work, it’s just too flammable to use with careless abandon. Besides it’s toxicity’s pretty high when inhaled or absorbed through the skin:
http://sds.chemtel.net/webclients/safar … cetone.pdf
- so be sure to use adequate PPE as well as good ventilation once you’ve opened a can of it.
The only other fairly common and available solvent that’s even worse is Methyl Ethyl Ketone - MEK for short - otherwise often referred to as ‘cancer in a can’ but that may not even be available outside the US retail
market. It has its uses but again needs to be handled with extreme care.
Offline
#305 21 May 2020 7:57 am
- MartinG
- Member
- Registered: 29 Mar 2020
- Posts: 6
Re: Waterlust sailing canoe in Norway
The Gougeon Brothers (who came up with West System Epoxy) recommend alcohol as a solvent, applied with white paper towels to remove the chance of contamination. I would therefore suggest isopropyl alcohol (denatured alcohol) as a safer alternative to acetone. Edit: sorry - this should read "rubbing alcohol", not denatured alcohol.)
Their book - The Gougeon Brothers on Boat Construction - is available as a free download on the net if you fancy a 400 page read!
Cheers
Martin
Last edited by MartinG (22 May 2020 1:45 pm)
Offline
#306 21 May 2020 11:53 am
- spclark
- Member
- From: "Driftless" Wisconsin USA
- Registered: 19 Mar 2020
- Posts: 478
Re: Waterlust sailing canoe in Norway
The Gougeon Brothers (who came up with West System Epoxy) recommend alcohol as a solvent, applied with white paper towels to remove the chance of contamination. I would therefore suggest isopropyl alcohol (denatured alcohol) as a safer alternative to acetone.
Their book - The Gougeon Brothers on Boat Construction - is available as a free download on the net if you fancy a 400 page read!
Thanks MartinG, I remember buying a copy of that when they first brought it out back in the '70's! WEST was the first brand of epoxy I ever messed about with.
Here in the US what's commonly sold as 'denatured alcohol' is typically a blend of ethyl alcohol with a bit of methyl added to render it toxic to avoid being taxation as liquor. Denatured alcohol is mostly what I've always used for epoxy prep and for making up shellac from flakes for furniture finishing.
Isopropyl is readily available but in smaller quantities, for a higher per-volume price, in two dilutions with water: 70% and 91%. From specialty suppliers it's available in larger volumes at 99% for a considerably higher price - denatured ethanol's roughly US $17/gallon (4.2 liter) where 99% isopropyl's closer to $60/gallon plus shipping.
From what I've read on various forums, ethyl alcohol blends aren't often found elsewhere. Methyl - sold under various labels - is? Maybe isopropyl is too but it's not mentioned often. One thing I discovered recently is that in the state of California, denatured ethyl alcohol was banned for retail sales last year while it remains available as E85 vehicle fuel blended with gasoline (petrol elsewhere) but that's NOT to be recommended for cleaning anything owing to the dangers associated with gasoline!
I've tried using plain white, unprinted paper towels of several brands over time. Problem I've encountered pretty much universally is the lint these tend to leave behind, particularly when working with raw, uncoated materials that have any degree of roughness. There's a brand of blue-colored paper shop towels here where I live that's both reasonably priced and seems to be lint-free (and washable!) that I've tried that seems to work well. When I've used it I haven't noted any issues like what I just experienced with the microfiber cloths I'd hoped would be superior. Those towels were brand new yet something went awry along the way.
I've just run a few of those microfiber towels thru the laundry, want to see if they're any better now than when new. Won't be used on anything 'mission-critical' of course, but hoping that after a wash'n'dry they're less likely to be suspected if I see evidence of the same issue elsewhere.
Offline
#307 21 May 2020 5:05 pm
- Bergen_Guy
- Member
- Registered: 6 Feb 2020
- Posts: 353
Re: Waterlust sailing canoe in Norway
Well, getting it on the roof was not so easy alone, but with a neighbour to help it went fine. Upright and tied down if was solid and no problems. We christened the boat and made a sacrifice of local apple juice (we are in the heart of Norwegian apple country here) and have taken our maiden voyages, paddling about by the campsite we are staying at. Initial impressions are that she has a good turn of speed, but is considerably tippier than the Klepper we are used to. All had fun, and the boys even ventured a few little tours on their own, so the main aim has been achieved! Although I wouldn’t recommend it, you can fit five people in it!!
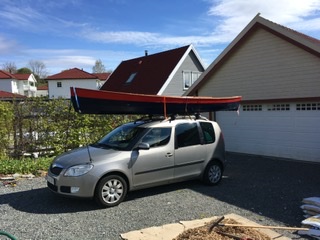
On the roof
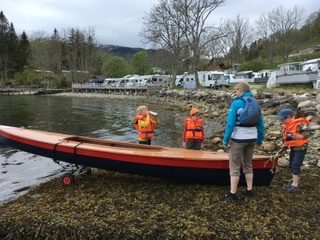
Sharing the apple juice around after the christening
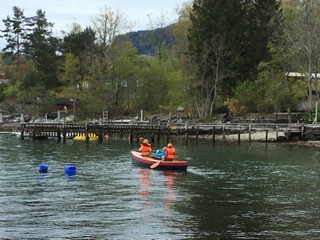
The maiden voyage!
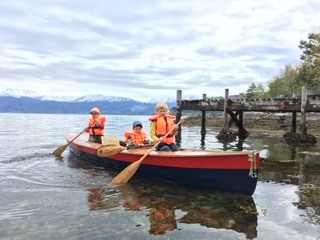
The boys return
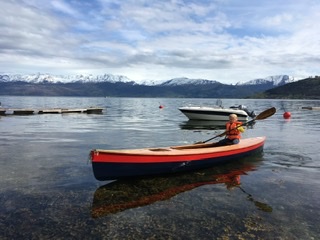
The eldest has a go on his own
Our preferred propulsion is the single canoe paddles, or the double paddle, but always from sitting on the deck. That high sitting position may explain the relative sensitivity of the boat compared to the Klepper where the centre of gravity is much lower.
Much fun had by all!
Offline
#308 22 May 2020 4:54 am
- MartinC
- Member
- Registered: 3 Apr 2020
- Posts: 348
Re: Waterlust sailing canoe in Norway
Well done Guy! Very interested in your early observations.
I am glad it fits on a car roof top as I was doubtful about the length. There must be quite an overhang at the back!
I am going to be launching /recovering single handed so I was thinking about one of these https://www.tbruk.com/t-load-197-c.asp
I was also interested in you paddling positions. I guessed it might be a bit tippy when sitting on the deck!
Offline
#309 22 May 2020 12:35 pm
- spclark
- Member
- From: "Driftless" Wisconsin USA
- Registered: 19 Mar 2020
- Posts: 478
Re: Waterlust sailing canoe in Norway
I’m certain apparent stability’s affected by where users are putting their bodies! Higher up will drastically increase rolling moment, make a hull like Waterlust’s seem more ‘tippy’ than if ‘ballast’ is lower down!
Good seeing pics of this new launch on the water! Gives me a better idea of where waterline ends up when in use! Can’t wait to see more once spars & rigging’s been added!
I’m trailering mine; decided not long ago that at ~ 80 lbs. & 75% done it’s not something I’d look forward to car-toppng at my age. Too the roof racks on my MINI Clubman are really close together so overhang’d be pretty extreme on such a shortish vehicle! I’m a ways off from launch date so don’t expect pics anytime soon, but they’ll come along in good time! Stay safe everyone, stay healthy!
Offline
#310 25 May 2020 11:57 am
- spclark
- Member
- From: "Driftless" Wisconsin USA
- Registered: 19 Mar 2020
- Posts: 478
Re: Waterlust sailing canoe in Norway
...but does anyone out there know why this is happening, seemingly in such a random way?
I posted those images to the forum at Woodenboat.com a couple of days ago. Just received a comment that may be what you and I both have been fretting over.
That thread’s here:
http://forum.woodenboat.com/showthread. … ble-Gloves
- and makes for good reading anyway.
The post I’m thankful for:
“ That pic looks like amine blush contamination to me. If you're not recoating while the pox is still tacky, you should remove the blush first before sanding. Plain old water and a thorough scouring with a scotch brite pad will completely remove the blush. Sanding amine blush can drive the amines back into the epoxy, to later bedevil you. There is no need to use anything but water for cleaning epoxy prior to recoating.”
Makes sense if blush is there at all and not removed before sanding. It’s easy enough to wipe cured coats down with plain water and a ScotchBrite pad, which is what I’m now going to do going forward. Once that’s done the washed and scuffed epoxy can be sanded if need be, then operations continued.
I’m currently final-coating my cockpit; fortunately haven’t experienced any more of what I showed happening in those pics. But knowing that amine blush is still likely, I’m willing to modify my approach to surface prep to mitigate any further appearances!
Last edited by spclark (25 May 2020 12:01 pm)
Offline
#311 25 May 2020 3:23 pm
- Bergen_Guy
- Member
- Registered: 6 Feb 2020
- Posts: 353
Re: Waterlust sailing canoe in Norway
Now then back to work, I seem to remember someone posting something about a clever method of keeping the internal rudder blade control run clean - was it as simple as using some clear plastic tube in the guide slot while the epoxy cures and the pulling said tube out later?
Offline
#312 25 May 2020 4:49 pm
- spclark
- Member
- From: "Driftless" Wisconsin USA
- Registered: 19 Mar 2020
- Posts: 478
Re: Waterlust sailing canoe in Norway
Yep, t’was m’self I believe, one of the only posts on CLC’S forum I was successful getting images to show up in! Notable if for no other reason!
https://www.clcboats.com/forum/clcforum … 45519.html
I just bonded my rudder trunk’s sides to the inner spacer yesterday, so here’s an updated image if it helps you:
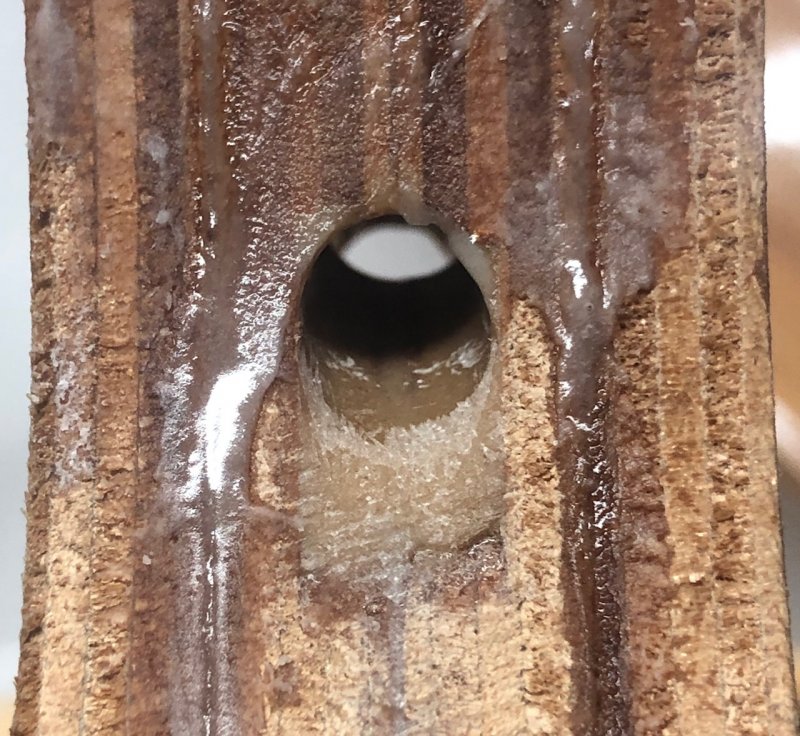
Once the epoxy’s cured a bit more I’ll be finishing those raw edges quite a bit, adding the tiller arm & epoxifying everything that so far’s still raw. Maybe tomorrow, still a day off before going back to work!
Last edited by spclark (25 May 2020 4:54 pm)
Offline
#313 25 May 2020 6:07 pm
- Bergen_Guy
- Member
- Registered: 6 Feb 2020
- Posts: 353
Re: Waterlust sailing canoe in Norway
Thanks SP - much appreciated :-)
Offline
#314 28 May 2020 8:16 am
- Bergen_Guy
- Member
- Registered: 6 Feb 2020
- Posts: 353
Re: Waterlust sailing canoe in Norway
Just a quick note on rudder trunk progress. I followed the advice from SP on using a thin plastic tube, it worked a treat for me. I applied a little oil to the outside of the plastic before setting it in the thickened epoxy. Once dried I had a few heart stopping moments when it wouldn't budge, but once I got some pliers on it and gave it a good tug, out it slid, no problem at all, and the internal finish looks great. So thanks for the tip! I have just bonded the rest of that unit together, and the rudder is now in one piece and I have filled the rabbet on the leading and trailing edges most of the way round. I will fill the rest when I have another batch of resin on the go.
Offline
#315 28 May 2020 11:24 am
- spclark
- Member
- From: "Driftless" Wisconsin USA
- Registered: 19 Mar 2020
- Posts: 478
Re: Waterlust sailing canoe in Norway
Yah I had that same heart-stopper BG, but pliers & a quick twist was my salvation also! (Having survived a ‘mild’ heart attack 14 years ago, I’ve come away knowing that one needs to push through those moments!)
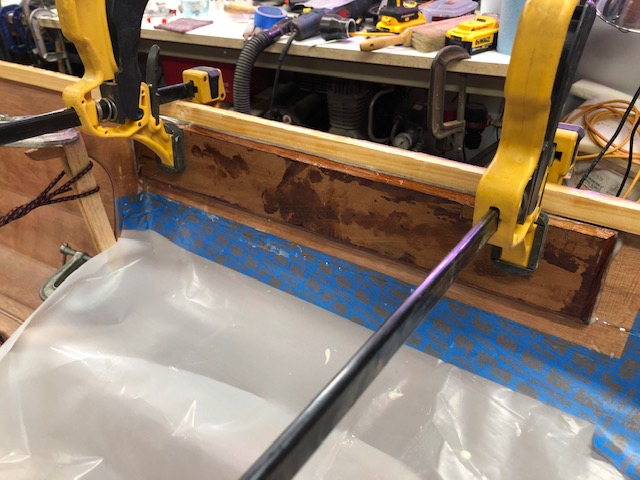
I just pre-coated two pieces of solid mahogany that will act as reinforcements to the top strakes, just aft of frame #3 eventually to take oarlock fasteners mounted at the gunwales should I decide a pair of oars would be useful. Having breakfast now then mixing a batch of thicked pox with which the backers’ll be bonded in place:
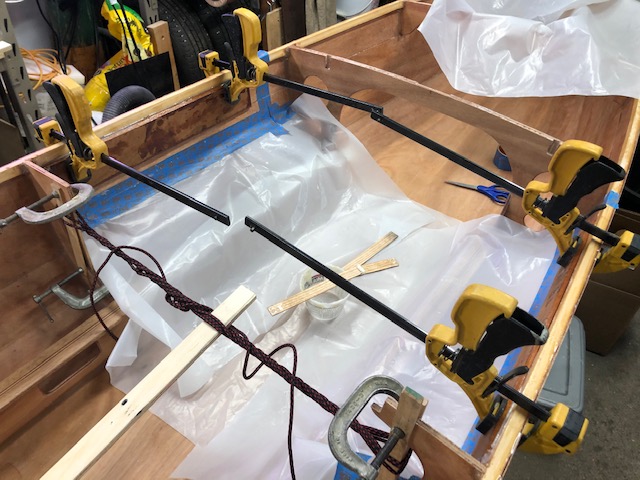
Last edited by spclark (28 May 2020 12:41 pm)
Offline
#316 2 Jun 2020 6:33 am
- Bergen_Guy
- Member
- Registered: 6 Feb 2020
- Posts: 353
Re: Waterlust sailing canoe in Norway
Those re-enforcements look the job SP!
Over the weekend we continued sea trials of the 'canoe' hull. Including capsize and recovery and getting people on board from the water. This was interesting. The inverted hull floats high in the water and pretty stable like that. My eldest son was able to right the hull on his own from in the water. Once the hull gets a lot of water in it though it becomes rather unstable (note no mast or centre board at the moment). The eldest was able to get into the boat though and start baling. I could climb in from the water ok, and then we were able to pull one of the twins into the boat once we had bailed for maybe 1 minute with a big bucket. All in all a worthwhile test and good to have done. I did find out though that my sealing of the bouyancy tanks is not good enough. Both tanks got water in. I suspect it is from around the deck / shear clamp / frame joint. Anyway, I am going to have to put an inspection hatch in the front compartment as it still has some water in which needs to come out, and will need to work on finding and filling any holes I can.
I am also going a bit off piste with the rig, I sources some Scots pine from a local saw mill and now have timber in the garage for making spars. This should keep me occupied for a while!
Offline
#317 2 Jun 2020 1:22 pm
- MartinC
- Member
- Registered: 3 Apr 2020
- Posts: 348
Re: Waterlust sailing canoe in Norway
Very interested in your sea trials Guy. Thanks for 'blazing the trail' once again!
I think it is almost inevitable that we are going to get some water in the fore and aft compartments - but with an inspection hatch in each it shouldn't matter too much. I have been toying with posting boyancy bags through the inspection hatches....... if I am brave enough to take her to sea off Southwold here on the North Sea coast. I won't bother though for Norfolk Broads sailing as you can almost walk to the bank in a crisis.
Just fitted the cockpit coaming and rubrails, so all the heavy gluing is now over. Time to flip her over and start sanding the bottom in preparation for paint.
PS I screwed the rubrails in place with epoxy and removed the screws. Prior to filling the holes with epoxy I was wondering if I should put permanent stainless screws through the same holes for an additional mechanical fixing? I would rather not for appearances sake, but has anyone any views on whether the epoxy is good enough on its own - given that it will be a temptation to try and lift the boat by the rubrails.
Offline
#318 2 Jun 2020 1:32 pm
- Bergen_Guy
- Member
- Registered: 6 Feb 2020
- Posts: 353
Re: Waterlust sailing canoe in Norway
The epoxy is quite strong enough I think. As I am finding out the structure of these vessels is remarkably solid. Yes, Svale has already fallen off its trolley, been bashed into a rocky beach by the kids, landed on a concrete slipway, been held alongside a pontoon with waves causing everything to rub and bash together. So far, only a few paint scratches to show for the abuse. I will just wait till the end of the season, clean and rub down and touch up the affected areas. So, I wouldn't stress too much. I took my temporary screws out and filled in the holes with wood filler. I drilled out the hole in the fore deck to accept the front inspection hatch and there can't have been more than a pint of water in there. That was capsizing with the front storage hatch cover off, as we use that as a sitting place while paddling. I imagine if that hatch is in place its going to be pretty close to watertight anyway, so the chance of getting much water in there is small. (especially if you did a good job of attaching your deck!)
Last edited by Bergen_Guy (2 Jun 2020 1:33 pm)
Offline
#319 8 Jun 2020 4:32 pm
- Bergen_Guy
- Member
- Registered: 6 Feb 2020
- Posts: 353
Re: Waterlust sailing canoe in Norway
Now much to show of late, but a few updates. The bow now has an inspection hatch. Probably a good idea to add one if you haven’t already planned for it. I have also been working on the rudder assembly. That is basically ready for glassing / epoxy coating now.
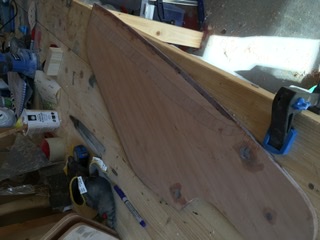
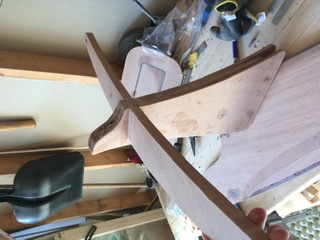
I ended up doing a second filling round as some of the rabbet on the rudder blade wasn’t quite filled, but that was easy enough to get sorted. I did most of the shaping of the blade with a spokeshave followed up with the sander. I have enough glass to sheath the rudder blade with two pieces. I am just debating if I should do it one side at a time or try to hold the blade ‘on its edge’ and do both sides in one go...
Offline
#320 8 Jun 2020 4:59 pm
- spclark
- Member
- From: "Driftless" Wisconsin USA
- Registered: 19 Mar 2020
- Posts: 478
Re: Waterlust sailing canoe in Norway
Tricky business doing it ‘on edge’ unless you have a good, solid means to hold rudder steady and at the same time have lots of freedom of movement on both sides & the unsupported end. I did mine that way with the cassette end held firmly in a bench vise on my woodworking bench. Lots of plastic sheet underneath too, keep the unavoidable epoxy drippage off my basement floor.
Still I ended up doing some nip’n’tuck to get the largest piece to conform to the rudder’s shapes, then went back with a second piece to do the cassette end once the bottom‘s ‘glassing had set hard enough to handle.
Daggerboard I ‘glassed the same way, limiting my ‘glassing to the bottom 3/4’s with the first layer. It’s an easier shape to cover than the rudder, as the surfaces don’t change shape quite as drastically.
I’m still muddling through making certain my cockpit’s 100% ready for priming.... Did a few small touch-up epoxy areas this AM, and gave the assembled rudder cassette its first full coat of epoxy since being assembled. Hopefully I can apply the cockpit’s first primer coat later today, once I’ve dulled that fresh epoxy with ScotchBrite & water.
Offline
#321 9 Jun 2020 11:44 am
- spclark
- Member
- From: "Driftless" Wisconsin USA
- Registered: 19 Mar 2020
- Posts: 478
Re: Waterlust sailing canoe in Norway
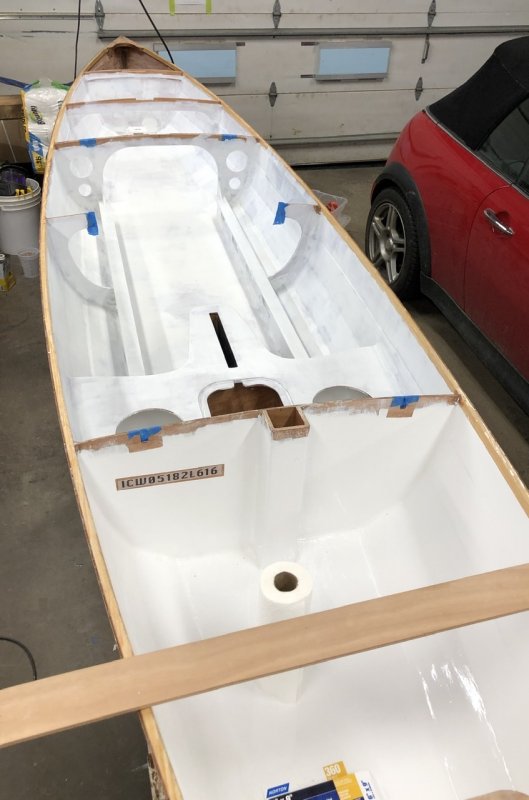
Got cockpit primed yesterday afternoon. Small dia. 3” foam roller did 95% with a brush to get to corners roller couldn’t reach. Using Kirby’s primer, wondering now when it’ll be dry & hard enough to wet-sand before re-coating. Temps here yesterday touched 32°C, in garage it was 25°C down to 21° overnight. If it still seems on the soft side later today I may just flip hull upside down & start scuffing prior to putting primer on bottom & first three panels, leave the top panel until
after deck & rub rails have been added.
Did storage compartment weeks ago with Interlux Brightsides over a less costly oil-based primer widely available here. Kirby’s stock paint colors appealed to me much more than the polyurethanes so I’ll be using their finish alkyds for cockpit & hull, felt their primer’d be the better choice to use underneath. It’s not nearly as pricey as what Interlux recommends under their stuff on epoxy. Probably doesn’t matter much for durability in that my Waterlust isn’t destined to be stored outside when not in use, or left on the water either between ‘expeditions’.
Offline
#322 9 Jun 2020 11:51 am
- Bergen_Guy
- Member
- Registered: 6 Feb 2020
- Posts: 353
Re: Waterlust sailing canoe in Norway
That's looking good SP! can't wait to see it with some top coats on - it's going to come out one fine looking ship!
Offline
#323 9 Jun 2020 7:27 pm
- Bergen_Guy
- Member
- Registered: 6 Feb 2020
- Posts: 353
Re: Waterlust sailing canoe in Norway
Today I got ready for glassing the rudder blade. I need to get myself another squeegee before I set to work. Instead I used my time to make myself a farelead out of some offcuts I had lying about. It should probably be made of ash, but this will have to do! Not even sure what it is, I think it was off one of the deck support beams! I made a small recess into the face of the tiller yoke to help keep it in place. It will be epoxied tomorrow.
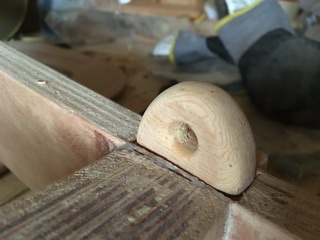
Rudder downhaul fairelead.
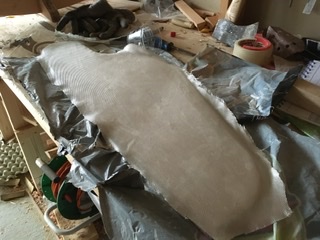
I decided to glass the blade one side at a time, I think it’s more likely to go nicely!
Last edited by Bergen_Guy (9 Jun 2020 7:35 pm)
Offline
#324 10 Jun 2020 12:18 am
- spclark
- Member
- From: "Driftless" Wisconsin USA
- Registered: 19 Mar 2020
- Posts: 478
Re: Waterlust sailing canoe in Norway
I think those deck beams are cypress. Rub rails may be too though mine look distinctly different; deck beams are light tan, rubrails more a light brown. Ash'd be good too I'm sure! I love the smell of it when I've worked with it before, and the grain finished bright once it's done!
Offline
#325 10 Jun 2020 7:11 am
- MartinC
- Member
- Registered: 3 Apr 2020
- Posts: 348
Re: Waterlust sailing canoe in Norway
I really like your fairlead Guy. I shall be copying this on the basis that imitation is the sincerest form of flattery!
As I am now approaching the (for me) unchartered waters of painting/varnishing, I have posted a plea for advice on the 'help' section of the forum, so if either you or SP want to contribute I would welcome your advice. SP's advice on 'tipping' and washing off the 'bloom' for the epoxy has been invaluable.
Offline
