A forum for discussing wooden boats and boat building
You are not logged in.
- Topics: Active | Unanswered
#251 9 May 2020 2:07 am
- spclark
- Member
- From: "Driftless" Wisconsin USA
- Registered: 19 Mar 2020
- Posts: 478
Re: Waterlust sailing canoe in Norway
That Texas Waterlust builder I’ve mentioned just got ‘outed’ on CLC’S website today:
Offline
#252 9 May 2020 7:52 pm
- Bergen_Guy
- Member
- Registered: 6 Feb 2020
- Posts: 353
Re: Waterlust sailing canoe in Norway
Good spot SP! I can't imagine a boat is that much of a challenge after building a few planes... Not so much to report today; I sanded down the first coat of undercoat with 120 grit, and put a second coat on. That is now waiting till tomorrow at the earliest for sanding. I also got my dark blue gloss for the under part of the hull. Sadly the local hardware store couldn't make my first choice color, but the one they did have was so close I don't think I will notice.
Offline
#253 9 May 2020 8:42 pm
- MartinC
- Member
- Registered: 3 Apr 2020
- Posts: 353
Re: Waterlust sailing canoe in Norway
Still haven't put the deck on, but fitted the bungs (between end compartments), circular lids to console top and the Hobie Drive all of which I thought would be easier without a deck.
I think Guy mentioned that he is not fitting the Hobie Drive, so this is a tip for you SP:- When you dry fit the Hobie drive use the spacers provided (the aft one needs to be trimmed down slightly) and note that the spindle through the middle of the drive protrudes different lengths each side. This means that in order to get the drive in the centre of the hole in the floor one of your 'click and go' brackets is nearer the edge of the shelf than the other. This caught me out and I had to epoxy fill one set of holes and re-drill.
Offline
#254 9 May 2020 11:37 pm
- spclark
- Member
- From: "Driftless" Wisconsin USA
- Registered: 19 Mar 2020
- Posts: 478
Re: Waterlust sailing canoe in Norway
Prior to bonding my drive console cap on earlier this week I was working to make sure my Mirage drive brackets would position the drive properly once everything else was in place.
That I didn't receive pre-made drive shelves in my CLC kit (or any spacers!) caused me to go it on my own when I needed to come up with something, so I used some 6mm marine ply I've had for decades to fashion a couple of 1" x 2-3/4" x 7" shelves... that promptly shown signs of delaminating after I apparently used a bit too much force getting the brackets to lock onto the drive during dry-fitting.
Oddly, despite my home made shelves being same size port to starboard and the drive brackets positioned the same on each, my drive did show about 1/8" offset to one side of the hull aperture, so you may be on to something MartinC! I was thinking it was something I'd overlooked! Thanks!
I have a block of 1"x6"x8" acetyl (Delrin) on order from which I'll be fashioning a couple of new shelves shortly... will pay close attention to how the brackets are fitted after reading your post!
Edit: Checked drive’s mount pins last night with a ruler. Those stainless steel pins appear both to be of equal length, as measured from the web of each pedal’s base assembly. Perhaps there are differences between drive models? I bought mine used but New In Box, it’s not the newest ‘reversing’ design.
Last edited by spclark (10 May 2020 4:07 pm)
Offline
#255 11 May 2020 12:46 pm
- spclark
- Member
- From: "Driftless" Wisconsin USA
- Registered: 19 Mar 2020
- Posts: 478
Re: Waterlust sailing canoe in Norway
Courtesy of a sailing canoe thread post over on the Woodenboat.com forum:
Offline
#256 11 May 2020 1:56 pm
- Bergen_Guy
- Member
- Registered: 6 Feb 2020
- Posts: 353
Re: Waterlust sailing canoe in Norway
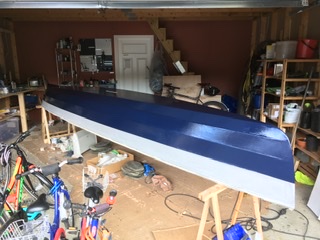
We are not alone! Today I put the second coat of dark blue gloss on the hull, and managed to get hold of what appears to the only tin of one pack red gloss in Bergen! (at the fourth store). Work has slowed on the other parts, partly due to the arrival of a greenhouse which has needed my attention.
Offline
#257 11 May 2020 4:57 pm
- MartinC
- Member
- Registered: 3 Apr 2020
- Posts: 353
Re: Waterlust sailing canoe in Norway
Re The Hobie Drive. Very odd! My pins are 15mm one side and 20mm the other! However, after a lot of adjusting it is all fitted now. (Mine isn't the reversing model either). Yours should be easier.
Re. The deck. Thanks to the pioneering work done by Guy, I decided to take a lot of time preparing the deck. Unlike the Texan builder, I don't think it is necessary to screw the deck every 4 or 5" or so. I think the secret is to plane the shear clamps so the top surface is almost hoirizontal everywhere (as Guy found), then to dry screw the deck in place with two screws - one screw in each of the breasthooks (I screwed mine underneath where I will be putting the pad eyes).
When it is thus held in place, trim the overhanging edges. This means that no downward pressure is put on the overhangs, causing the top to deflect upwards when you put the straps on. Finally, and probably most importantly, by experimenting with the ratchet straps (thanks Guy for the tip on quantities required), I found that if they are used over the cockpit area they cause the front and back deck to bow upwards from the frames which then means you then need a great deal of weight (or screws) to push the deck back down again. By simply clamping the deck to the stringers all around the copcpit edge, the sides need very little encouragement to sit flat on the shear clamps.
Offline
#258 11 May 2020 5:55 pm
- Bergen_Guy
- Member
- Registered: 6 Feb 2020
- Posts: 353
Re: Waterlust sailing canoe in Norway
Martin, that’s great to hear that you seem to have cracked that nut! Thanks for the report!
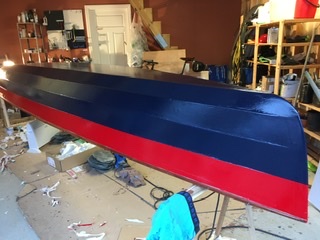
I got coat 2 of blue on, which now starts to look pretty nice. It’s not going to be a show finish, but it’s going to look ok I think. There are one or two places it went on a bit thin, I will probably touch those up with a brush later.
Offline
#259 11 May 2020 7:53 pm
- MartinC
- Member
- Registered: 3 Apr 2020
- Posts: 353
Re: Waterlust sailing canoe in Norway
I really like colour scheme. Making me think twice about my ideas on colour! The white top plank looks really effective.
Offline
#260 11 May 2020 7:58 pm
- Bergen_Guy
- Member
- Registered: 6 Feb 2020
- Posts: 353
Re: Waterlust sailing canoe in Norway
Ah - that top plank will soon be bright red :-). But I was almost swayed by a cream top strake.
Last edited by Bergen_Guy (12 May 2020 7:04 am)
Offline
#261 12 May 2020 7:34 pm
- Bergen_Guy
- Member
- Registered: 6 Feb 2020
- Posts: 353
Re: Waterlust sailing canoe in Norway
So, a bit more painting today. If you want a quick result, don’t paint more than one colour... although the red is brighter than I wanted, it’s all I could find in town, and I wanted to keep things moving.
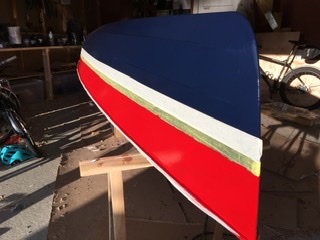
Right now it’s looking a lot like a Norwegian flag, I hope it looks less like that once I have the masking tape off!
Offline
#262 13 May 2020 7:37 am
- MartinC
- Member
- Registered: 3 Apr 2020
- Posts: 353
Re: Waterlust sailing canoe in Norway
I quite like the Norwegian flag look - but I agree two tone is probably better than three!
In the end I opted for an easy life and screwed the deck down at 150mm centres. With an electric drill it was so much faster than messing around with clamps and weights and as it took a remarkable amound of epoxy mixing you do need to move quite fast. I definitely found that trimming the edges before gluing was beneficial as you can line up the screw holes more accurately and more easily see the amount of pressure to apply to the join. Cleaning up is easier too.
Can anyone tell me if there is a good reason why the mast cutouts are done before the glass is added? It seems to me that if it was done afterwrds you wouldn't risk getting epoxy drips down the mast step openings.
Offline
#263 13 May 2020 7:49 am
- Bergen_Guy
- Member
- Registered: 6 Feb 2020
- Posts: 353
Re: Waterlust sailing canoe in Norway
Hi Martin,
sounds like you will have a good solid deck join with the screws, even if it means a little more filling work! No idea why the mast steps are cut before glass is applied. Iwas grateful, I suspect it was a bit easier as I did it by hand. I can't say if it would make any difference if you are cutting it out with a router. It might be that it's easier to see the tiny pilot holes that are drilled in the deck without glass?
Offline
#264 13 May 2020 12:24 pm
- spclark
- Member
- From: "Driftless" Wisconsin USA
- Registered: 19 Mar 2020
- Posts: 478
Re: Waterlust sailing canoe in Norway
Colorful hull there B’G! I just had my gallon of primer ‘shook up’ at work yesterday, I might just get far enough along on finishing epoxyifying my cockpit this weekend to begin priming.
As for cut-outs? I use a router for mine, fitted with a 1/4” dia. piloted bit. Makes easy work of it. And I can’t think of any practical reason why they need doing before ‘glass is applied either. This epoxy stuff is runny when unthicked, I do everything I can to keep it where it belongs before application. Did my drive and daggerboard apertures that way & from that expect also to approach the mast sockets the same.
If the small guide holes are worrisome, no reason not to make them a bit larger, or even add new ones, maybe even slightly larger & inside the pre-drilled ones the kit parts come with. This is a ‘Pro’ kit after all, there’s lots of opportunity to fill in the blanks where the manual lacks step-by-step instructions!
Offline
#265 13 May 2020 2:22 pm
- Bergen_Guy
- Member
- Registered: 6 Feb 2020
- Posts: 353
Re: Waterlust sailing canoe in Norway
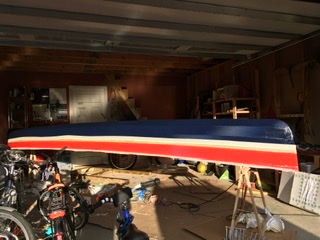
Even more colourful today - I got one more coat of red on. The red paint from a different supplier than the blue. The blue was from Jotunn, and that covered very well, the red is from SeaJet and does not seem to cover quite as well as the blue did. I don't know if that's as much to do with the colour as it is the paint type. I may put a third coat of red on before taking the masking tape off.
I have now used three different types of roller. The first was supposedly for boats / metal surfaces - this was the largest roller I tried, 10 cm long / 4/5 cm diameter, with a short 'hair' on it. This left quite a lot of texture in the paint. The second was a very 'thin' roller, maybe 2.5 cm diameter supposedely for painting interior woodwork, I didn't think much of it when I bought it, but used it as I had not managed to clean the larger roller well enough to use again for the gloss coats. This was good and left very little texture in the paint even though it looked comically small on the roller handle. Today I tried using the same type of foam roller as I had used for applying epoxy, and that appears to give the best finish of all the rollers I have used so far. So - if you haven't started getting painting stuff yet, I would recommend getting a stash of small (10 cm long) foam rollers. If you can't get foam, make sure the rollers you get are as smooth, with as short hairs as you can find.
Offline
#266 13 May 2020 2:49 pm
- spclark
- Member
- From: "Driftless" Wisconsin USA
- Registered: 19 Mar 2020
- Posts: 478
Re: Waterlust sailing canoe in Norway
“Tipping” off fresh paint (or epoxy for that matter) once it’s been applied is suggested by many sources as a Best Practice for a fine finish. What 99.9% recommend using for this are the inexpensive, grey foam brushes usually supplied with a wooden handle.
I’ve been doing this with my final, rolled-on epoxy coats and with the Interlux Brightsides paint I used on the interior stowage bin between frames 1 & 2. Seems to work very well, will be doing this also on hull & deck coatings.
Offline
#267 13 May 2020 4:38 pm
- MartinC
- Member
- Registered: 3 Apr 2020
- Posts: 353
Re: Waterlust sailing canoe in Norway
Sorry SP excuse a basic question from a novice:- . What is 'tipping off' please?
Offline
#268 13 May 2020 7:31 pm
- spclark
- Member
- From: "Driftless" Wisconsin USA
- Registered: 19 Mar 2020
- Posts: 478
Re: Waterlust sailing canoe in Norway
You use a foam brush to work over the surface of the freshly-placed finish so it’s more even and to break any air bubbles that might have developed that, if left in place, might form a defect. Just drag the brush across the surface with barely any force applied:
https://thecraftsmanblog.com/my-grandfa … paint-job/
https://www.youtube.com/watch?v=QSGpkyBmRWA
Works for paint & epoxy both but not recommended for traditional, oil-based varnish!
(And no apology necessary! In my world the only really stupid questions are those you already know the answers to.)
Last edited by spclark (14 May 2020 1:28 am)
Offline
#269 14 May 2020 7:18 am
- MartinC
- Member
- Registered: 3 Apr 2020
- Posts: 353
Re: Waterlust sailing canoe in Norway
Thanks SP. I really liked the youtube video.
Offline
#270 14 May 2020 3:42 pm
- Bergen_Guy
- Member
- Registered: 6 Feb 2020
- Posts: 353
Re: Waterlust sailing canoe in Norway
Not much to show yet, I put a third coat of red on, with a brush this time. This took longer but does seem to result in a nicer finish. I made sure to tip it off as described in the video :-) I will take the masking tape off before it’s completely dried, so we might get a first glimpse of what the colour scheme really looks like later!
Offline
#271 14 May 2020 8:54 pm
- Bergen_Guy
- Member
- Registered: 6 Feb 2020
- Posts: 353
Re: Waterlust sailing canoe in Norway
Ok - today’s lesson is; don’t buy cheap masking tape! I got good stuff for the join between red and blue, but over the rubbing strake I used whatever was lying about at home, and I just took the best part of half an hour to get it off. It kept tearing into tiny pieces, argh. Anyway, that’s done and I think she is looking pretty nice.
Last edited by Bergen_Guy (14 May 2020 8:55 pm)
Offline
#272 15 May 2020 12:39 am
- spclark
- Member
- From: "Driftless" Wisconsin USA
- Registered: 19 Mar 2020
- Posts: 478
Re: Waterlust sailing canoe in Norway
Sweet, thanks for posting those picks B'G!
The appearance of warmer weather here's distracted me from my Waterlust project a bit; things like moving some ground cover that's growing well now to areas that need to be protected from further erosion, mowing the lawn (so I don't lose Sadie our Cairn terrier in the long grass), forking up the beds that will see some vegetable seeds sown soon for this summer's eating... then there's work of course, at least three days each week.
But I did get my hardware items delivered Monday, so I need to get on with re-shaping the gudgeons to fit my W'lust's stern, and get the rudder trunk glued up so I can get the pintles fitted.
Offline
#273 15 May 2020 10:30 am
- Bergen_Guy
- Member
- Registered: 6 Feb 2020
- Posts: 353
Re: Waterlust sailing canoe in Norway
SP, that sounds a bit similar to what is also going on here - as things warm up the garden takes more time. On the boat front, so far today I have touched up the areas where the masking wasn't spot on, mostly around the junction between the red panel and the rubbing strake. That wasn't so easy to mask accurately. I would recommend using the tape that goes round corners rather than the straight stuff if you can find it. I also filled the screw holes on the rubbing strake with 'normal' wood filler, rather than epoxy. Mostly to preserve the epoxy I have left, and because it's a bit quicker. I hope to turn the boat this evening and start prep for varnish on the deck and interior.
Offline
#274 15 May 2020 3:02 pm
- Bergen_Guy
- Member
- Registered: 6 Feb 2020
- Posts: 353
Re: Waterlust sailing canoe in Norway
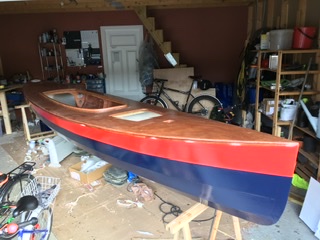
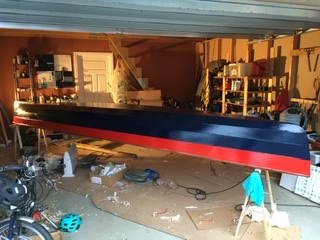
I am beginning to see where this is going. Although blue is somewhat darker than it appears on the photo, I would have been happier with a shade darker.
Now onto varnish application and sourcing some canoe style paddles, which I think will be easier for the kids to handle from the ‘sitting on the deck’ paddling positions.
Last edited by Bergen_Guy (15 May 2020 3:04 pm)
Offline
#275 15 May 2020 5:10 pm
- MartinC
- Member
- Registered: 3 Apr 2020
- Posts: 353
Re: Waterlust sailing canoe in Norway
Excellent progress Guy. Well done. I will be interested in your paddle selection as I plan to have a pair as an auxilliary to the Hobie Drive. I guess they will have to be slightly longer than normal owing to the higher than normal freeboard?
With much trepidation, but armed with all the helpful advice I received from this forum about avoiding bubbles I glassed the deck today. I think where I was going wrong previously was:- a) Mixing too violently. b) Spreading the epoxy too thickly. c) Not paying enough attention to ensuring the wood and epoxy was warm to start with and then cooled once applied.
I had a perfect day's weather today so I warmed the deck by putting it out in the sun; warmed the epoxy on the Aga and spread the epoxy firmly but thinly just as the weather was turning cooler. The only glitch was the first batch of epoxy suddenly went very hot in the mixing pot and a small patch on the boat went hard very quickly without adhering. Not quite sure why this happened but I was able to cut out the patch (which fortunately was on the hull rather than the deck) quite easily. We will see if bubbles have appeared tomorrow!
Offline