You are not logged in.
- Topics: Active | Unanswered
#126 13 Apr 2020 10:06 pm
- spclark
- Member
- From: "Driftless" Wisconsin USA
- Registered: 19 Mar 2020
- Posts: 478
Re: Waterlust sailing canoe in Norway
Looks good!
(Is your name really Guy and are you from Bergen? Or is that just a tag you chose for this forum?)
There's lots of Norwegian and Danish settlers' descendents here in Vernon County, Wisconsin. UNfortunately there isn't nearly as much open water here as there appears to be around Bergen, Norway!
So I ordered up a small trailer from CLC today so that once my Waterlust is ready to launch I don't have to struggle to car-top it to the most convenient water. Be awhile before that happens though, I have a LOT to do yet - you'll be enjoying yours sooner I'm certain! Keep up the good work and posting progress reports here please!
Offline
#127 14 Apr 2020 6:13 am
- MartinC
- Member
- Registered: 3 Apr 2020
- Posts: 348
Re: Waterlust sailing canoe in Norway
Hi.
Have just fitted the main mast 'boxes' and wondered what happens to water trapped in there!
I think I will drill a decent sized drainage hole near the bottom of each 'box'. What do you guys think?
Also, there doesn't seem to be any access into the bow 'locker'. Is this right? If so, I am tempted to cut a hole/hatch through from the forward locker for drainage/inspection purposes.
I would be interested to see a picture of the trailer SP as (a bit prematurely) I have been wondering about transportation.
Offline
#128 14 Apr 2020 6:58 am
- Bergen_Guy
- Member
- Registered: 6 Feb 2020
- Posts: 353
Re: Waterlust sailing canoe in Norway
Morning folks! Yes, SP I am called Guy and I live in Bergen, nothing clever in my forum name! And what does SP stand for?
Martin, I think that's correct, the forward flotation tank has no access if built as designed. I had planned simply to make sure it was very well sealed and leave it at that. I guess access via the main storage compartment could be a bit tricky to use, but would at least avoid making a new hole in the deck! I imagine one could fill the flotation tanks with closed cell foam or polystyrene or something too if one wanted to reduce the internal volume available to any water, but that would probably make later maintenance a proper pain if opening it up and performing remedial work were ever required.
Good point about the mast steps, I guess the trade off is risk of rotting wood in the mast box, vs keeping the forward storage tank weather proof. Only time will tell! Tell you what, you drill holes, I won't and we can compare notes after a year!!
Last edited by Bergen_Guy (14 Apr 2020 8:38 am)
Offline
#129 14 Apr 2020 9:56 am
- Bergen_Guy
- Member
- Registered: 6 Feb 2020
- Posts: 353
Re: Waterlust sailing canoe in Norway
I Just managed to get the second coat of epoxy on the hull. The weave of the glass isn't completely filled. I don't think I will use more neat epoxy on that right now, but will probably see what I have left once I have done the glass work on the deck. I might just use an epoxy finishing filler on the bottom of the hull that will presumably fill in what remains of the weave. I am more likely to be fussy about how well finished the deck is as I hope to leave that bright, so the weave needs to be properly filled there.
Offline
#130 14 Apr 2020 11:29 am
- spclark
- Member
- From: "Driftless" Wisconsin USA
- Registered: 19 Mar 2020
- Posts: 478
Re: Waterlust sailing canoe in Norway
Morning folks! Yes, SP I am called Guy and I live in Bergen, nothing clever in my forum name! And what does SP stand for?
Nothing more than my initials Guy!
Many (many!) years ago I worked as a brakeman for the Chicago & North Western railroad. Started out on the 'extra board', the roster dispatcher worked from when calling up crews to take trains across Illinois. Format was first two initials then last name. So 'SP Clark' just stuck with me forever after.
First name's Stephen, middle's Porter after a great grandfather who was a conductor back in the 19th century on another great American railroad, the Rock Island Line. That one's still in business but the C&NW was long ago absorbed by what's now the Union Pacific.
Offline
#131 14 Apr 2020 11:46 am
- spclark
- Member
- From: "Driftless" Wisconsin USA
- Registered: 19 Mar 2020
- Posts: 478
Re: Waterlust sailing canoe in Norway
Have just fitted the main mast 'boxes' and wondered what happens to water trapped in there!
I think I will drill a decent sized drainage hole near the bottom of each 'box'. What do you guys think?Also, there doesn't seem to be any access into the bow 'locker'. Is this right? If so, I am tempted to cut a hole/hatch through from the forward locker for drainage/inspection purposes.
I would be interested to see a picture of the trailer SP as (a bit prematurely) I have been wondering about transportation.
I had the same question about the mast pockets so I asked Dillon. He allowed that yes there's no provision for drains, but that as most Waterlusts typically would be stored upside-down, any accumulated water would drain away. Careful attention to giving the interiors a solid coat of epoxy should prevent any water from harming the underlying plywood. I'd rather preserve the integrity of the storage area by not adding a drain into that space anyway myself.
As for that forward compartment? Plans show an inspection port aft:

- and as adding any kind of hardware like a pad eye or horn cleat up forward would be pretty much impossible without access to the inside of that compartment I'm adding another inspection port there also, just aft of the breasthook.
That trailer is available from CLC but I have no idea whether similar might not be available in your respective countries.
I'd shudder to think what shipping and VAT would end up costing were you to have one imported! That web page I linked to at CLC clearly states they don't ship overseas so you'd have to make your own arrangements....
Last edited by spclark (14 Apr 2020 11:49 am)
Offline
#132 14 Apr 2020 2:25 pm
- MartinC
- Member
- Registered: 3 Apr 2020
- Posts: 348
Re: Waterlust sailing canoe in Norway
Thanks both.
I am not sure what I will do about inspection hatches yet. It seems a bit inconsistent to have an inspection hatch at the back, but to seal up the front locker. I rather like your idea SP of having one at both ends - but if it means prolonging the launch, I might make a template of the back one, and put it away for now as a job for the future.
On balance, I think you are probably both right about the mast pockets. I forget how easy it is to turn this boat upside down!
Offline
#133 15 Apr 2020 1:27 pm
- Bergen_Guy
- Member
- Registered: 6 Feb 2020
- Posts: 353
Re: Waterlust sailing canoe in Norway
Right now I am making sure the epoxy on the hull is properly cured before turning the boat over to start finishing work inside. I got a picture or two that shows how filled the weave is on the fibreglass. I might do one more coat if I have resin left at the end.
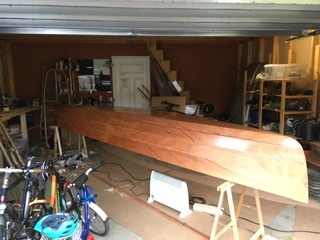
The hull after its second coat, must remember to fill a few of the stitch holes that are not yet filled. Might do that later today.
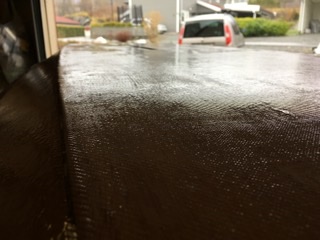
Here you can see there remains some texture to the glass. Don’t know if this is ‘good enough’ to take a primer, or if I should do one more coat of resin.
Offline
#134 15 Apr 2020 3:22 pm
- spclark
- Member
- From: "Driftless" Wisconsin USA
- Registered: 19 Mar 2020
- Posts: 478
Re: Waterlust sailing canoe in Norway
‘Glass doesn’t have to be 100% filled if you plan on first using a proper filler-type primer under your paint. Primer takes care of minor imperfections once you’ve wet-sanded it. That’s how I’m approaching my project on the advice of another who’s done more of this than I can claim.
Offline
#135 15 Apr 2020 3:48 pm
- Bergen_Guy
- Member
- Registered: 6 Feb 2020
- Posts: 353
Re: Waterlust sailing canoe in Norway
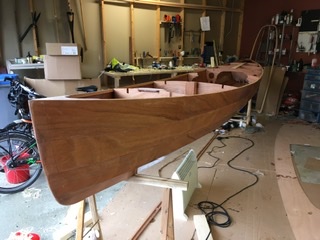
Turned the boat with my eldest son.
Offline
#136 15 Apr 2020 8:15 pm
- Bergen_Guy
- Member
- Registered: 6 Feb 2020
- Posts: 353
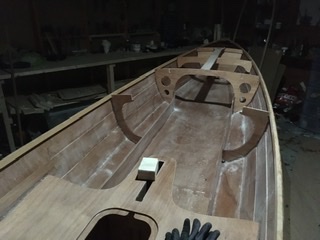
Re: Waterlust sailing canoe in Norway
And after a bit of sanding it now looks rather less pretty and is covered in dust! I also just laid the deck over the hull, partly for fun and partly to see what parts of the interior would be easy to see. This was interesting as the middle part of the boat is currently wider than the deck. I understand the deck is cut oversized, but the hull must be between one and two centimetres wider than the deck in the middle part where there is a ‘split’ frame. I am not quite sure what the best option is here. To pull the hull into shape when I glue the deck down, or just leave it as it is, and fill the little ledge where the deck and shear clamp don’t quite match in shape. Something to think about.
Offline
#137 15 Apr 2020 9:18 pm
- spclark
- Member
- From: "Driftless" Wisconsin USA
- Registered: 19 Mar 2020
- Posts: 478
Re: Waterlust sailing canoe in Norway
Hmmm... interesting that your hull’s wider than your deck! I was worried some time back mine might have been too long but it checked out OK, at least after measuring deck pieces laid out on my basement’s floor.
Just measured mine: deck's max. width 37-3/16" / 94.45mm (by calculation as I can't find my metric tape measure ;-| ) where hull's max. width - about a foot (30cm) ahead of frames #3 is 37-3/4" (95.88cm) so wider like yours and by about the same amount: 9/16" / 1.43 cm.
Right now hull's suspended above my building platform in the HarkenHoister. I'll bring it down onto the platform hull supports later, see if that changes anything.
1.5 cm’s a bit more than 1/2” but not quite 3/4”, I’d think it’d be fairly easy to bring hull width down while deck’s being attached? What effect such a pre-tensioning’d have on the hull’s integrity over time I shouldn't think ought to be much at all though.
Friend's Waterlust after adding deck:
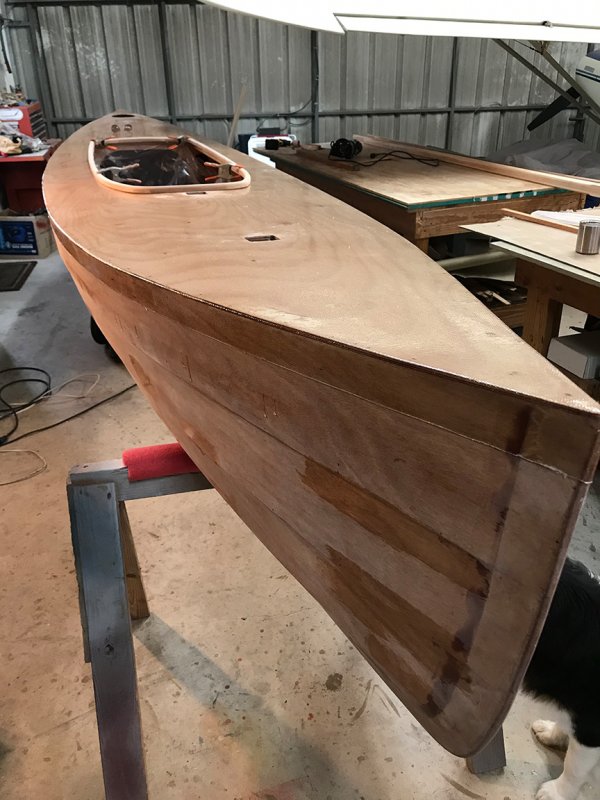
He tells me he saw the same as we're seeing, simply radiused the joint w/o having done anything to hull to reduce what gap he saw. From my numbers I'd expect a bit beyond 1/4" on each side which ought to be cleaned up by a careful plane job before adding rub rails.
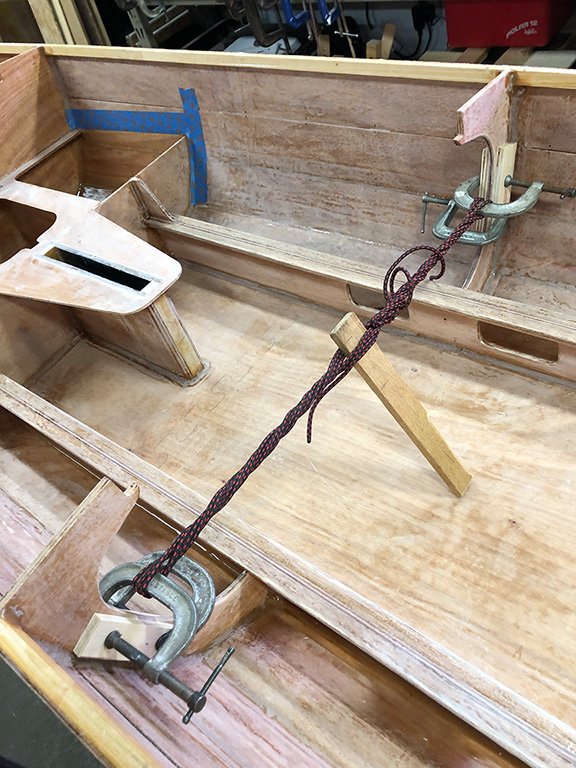
It's really a trivial operation getting the extra width pulled back into what the deck will then properly fit, or even overlap if you're so inclined! I added some ply scraps under two c-clamps on those frame 3 sections then pulled some cordage between them. A stick used to apply some twist quickly brought the shears in well over what I'd need to match deck width:
This is the kind of challenge I enjoy working with projects like this one, and what makes a forum like this here so important! You've alerted me to something I haven't encountered yet but when I come up against it, I have a solution already in hand to move forward!
Last edited by spclark (15 Apr 2020 11:21 pm)
Offline
#138 16 Apr 2020 5:02 am
- Bergen_Guy
- Member
- Registered: 6 Feb 2020
- Posts: 353
Re: Waterlust sailing canoe in Norway
Good thinking SP! I wonder though if the hull will last longer without being put in tensions before the deck is added. But maybe that’s nothing compared with what is already ‘built in’ to the hull at the stems! Indeed - the forum is a great place to share these little challenges! I might send a mail to Dillon and see what he has to say. Will report back!
Offline
#139 16 Apr 2020 11:21 am
- MartinC
- Member
- Registered: 3 Apr 2020
- Posts: 348
Re: Waterlust sailing canoe in Norway
That is really ingenious SP. Well done, and thank you for giving me a solution which would otherwise have caused me some grief!
I have just got to the stage of epoxying the inside. I think it is probably too late for you two (and I seem to remember that neither of you is fitting the Hobie drive anyway), but for anyone following me, the following might be helpful:-
It seemed sensible to fit the 'shelves' onto which the Hobie drive brackets are fixed, before closing the central console in with the console cap, as after you have fitted the cap you only have the 6" diameter holes in the cap to access the bolts holding the shelves. It would not be impossible to access the bolts afterwards, but much easier to do before, especially if there is any bolt hole adjustment necessary. Just to be on the safe side, I cleared this procedure with Dillon before going ahead!
Offline
#140 16 Apr 2020 12:40 pm
- spclark
- Member
- From: "Driftless" Wisconsin USA
- Registered: 19 Mar 2020
- Posts: 478
Re: Waterlust sailing canoe in Norway
Good thinking SP! I wonder though if the hull will last longer without being put in tensions before the deck is added. <snip> I might send a mail to Dillon and see what he has to say. Will report back!
I think whatever stresses are imposed on the hull by pulling the sides in less than a centimeter are pretty low, but as you've indicated I too put the question to Dillon after putting up my last post.
Offline
#141 16 Apr 2020 12:58 pm
- spclark
- Member
- From: "Driftless" Wisconsin USA
- Registered: 19 Mar 2020
- Posts: 478
Re: Waterlust sailing canoe in Norway
That is really ingenious SP. Well done, and thank you for giving me a solution which would otherwise have caused me some grief!
I have just got to the stage of epoxying the inside. I think it is probably too late for you two (and I seem to remember that neither of you is fitting the Hobie drive anyway), but for anyone following me, the following might be helpful:-
It seemed sensible to fit the 'shelves' onto which the Hobie drive brackets are fixed, before closing the central console in with the console cap, as after you have fitted the cap you only have the 6" diameter holes in the cap to access the bolts holding the shelves. It would not be impossible to access the bolts afterwards, but much easier to do before, especially if there is any bolt hole adjustment necessary. Just to be on the safe side, I cleared this procedure with Dillon before going ahead!
Pretty much how I'm approaching the shelf fit too, yes. I am fitting a Mirage drive, that was one of the design elements that pushed me over the edge when I first learned CLC was making this available as a kit.
I came up with a more elaborate means to add the bolts however, so it's practical to fit the shelves with the console cap still a separate piece. Once it's in place and the access hatches installed, a simple ratchet wrench is all that'll be needed to remove the bolts should that ever be necessary. And while Dillon indicates the shelf / drive well joint be well sealed with silicone, part of my idea is to incorporate neoprene o-rings that will flatten when the shelf bolts are tightened, sealing off potential leaks but still leaving the shelves able to be removed if necessary:
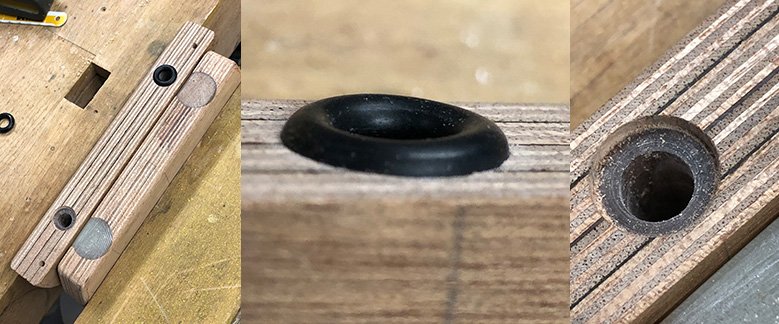
The bolts thread into Nylok nuts set in counterbores in the shelves, then the nuts and the holes are filled with thickened epoxy so they should neither be a source of leakage nor turn when the mounting bolts are snugged up. I can check for proper positioning of the shelves, the drive bases and the Mirage drive itself before the console cap is bonded in place.
Have to wait a bit to know whether the effort is worth it, be awhile yet before I get my Waterlust out onto the water.
Offline
#142 16 Apr 2020 6:36 pm
- Bergen_Guy
- Member
- Registered: 6 Feb 2020
- Posts: 353
Re: Waterlust sailing canoe in Norway
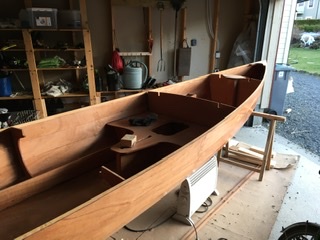
Just got a mail from Dillon saying that SP’ Spanish windlass is the way to go, and that the extra tension in the hull is no problem, may even be a benefit as it should increase the hulls stiffness. Well done SP: You have saved a lot of leg work and head scratching for us all, thank you :-)
Today I filled the stitch holes, so the hull looks much like it did this morning only subtly less like a sieve.
Offline
#143 16 Apr 2020 10:18 pm
- spclark
- Member
- From: "Driftless" Wisconsin USA
- Registered: 19 Mar 2020
- Posts: 478
Re: Waterlust sailing canoe in Norway
Well done SP: You have saved a lot of leg work and head scratching for us all, thank you :-)
You're most welcome Guy but remember it was you who alerted us here to the disparity! I simply came up with a solution that I felt wouldn't adversely affect the integrity of our projects.
I too received a reply from Dillon indicating that this minor dimensional 'correction' is a suitable fix for what he'd not yet been made aware of.
That three of us now have noted the differences in parts width leads me to think perhaps it's the amount of rocker induced into the hull when panels are being stitched up that may be causing the hull to widen a bit? Less rocker ought to bring the midship's shear panels in a little... but it's certainly no big deal pulling those split panel ends in a bit. I'm going to do just that before I add the two deck stringers, otherwise they'd tend to resist the force needed to bring the hull's shear panels in a centimeter or so.
Last edited by spclark (16 Apr 2020 10:21 pm)
Offline
#144 17 Apr 2020 4:01 pm
- Bergen_Guy
- Member
- Registered: 6 Feb 2020
- Posts: 353
Re: Waterlust sailing canoe in Norway
Today I did the second primer coat in the forward locker, and in the area under the rear deck. These will be off white inside to make it easy to find stuff in the dimly lit corners.
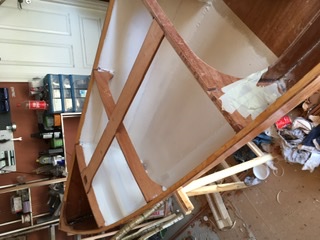
Aft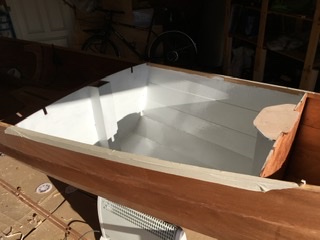
Forward
Putting primer on is a funny business- the first coat looks awful, and I was wondering if it was the right choice, I think things looks more promising now. Once dry I will sand this back before starting with the gloss.
Last edited by Bergen_Guy (17 Apr 2020 4:01 pm)
Offline
#145 18 Apr 2020 12:12 am
- spclark
- Member
- From: "Driftless" Wisconsin USA
- Registered: 19 Mar 2020
- Posts: 478
Re: Waterlust sailing canoe in Norway
Nice!
I was hoping to get t the same point on mine this week. Higher demand (than I'd anticipated) for time at work kept me away from my project. I'll be back on regular schedule next week, which has me working Wed - Fri so this w/e I ought to be close to catching you!
Bought a quart of Interlux Brightsides white some months ago before I learned about Kirby's products. I failed to order a quart of Interlux's primer at the same time. Brightsides, being a polyurethane, I don't think it'd be appropriate to use the oil-base Kirby's primer first. I may just take a chance and paint the storage / buoyancy compartments anyway.... The cockpit will get Kirby's primer then finish coats in a nice, eye-comfortable color.
Offline
#146 18 Apr 2020 11:00 am
- MartinC
- Member
- Registered: 3 Apr 2020
- Posts: 348
Re: Waterlust sailing canoe in Norway
That looks really nice Guy! I am afraid I am just going to leave the insides of my lockers as epoxy which won't look half as good, but being out of direct sunlight shouldn't come to any harm.
One point that may be of interest:- I spoke to a local dinghy builder who said he has seen boats where the ply has bowed inwards around the sealed buoyancy areas. This was apparantly due to differential air temperatures inside and out. He strongly advised drilling an internal hole between any sealed areas and fitting a bung which can easily be reached and removed when the boat is stored for any length of time.
Offline
#147 18 Apr 2020 12:18 pm
- Bergen_Guy
- Member
- Registered: 6 Feb 2020
- Posts: 353
Re: Waterlust sailing canoe in Norway
Hi Martin! A good tip, might take a look at that. If it’s for air, it could be high up too. I just found my nearest chandler and got myself the rest inspection hatch, so one less thing on the list.
Offline
#148 18 Apr 2020 6:57 pm
- spclark
- Member
- From: "Driftless" Wisconsin USA
- Registered: 19 Mar 2020
- Posts: 478
Re: Waterlust sailing canoe in Norway
That air pressure thing’s one more reason I decided to add an inspection port to that forward compartment in my build. Aside from easing how a bow eye is to be attached, having a sealable but openable access point just seemed to be a good idea.
The other four compartments either have a designed-in hatch cover (storage between frames 1 & 2) or an inspection port as part of the design. Easy enough to leave their covers loose or off during storage, then secure them prior to setting out.
If no Mirage drive is to be employed the two compartments on either side of the drive well would have vents available through the drive shelf mounting bolt holes unless those are sealed or not drilled at all. In that instance it’d probably be a good idea to fit some kind of plug, maybe something like the lever

- or screw-openable

- bilge plugs used to close bilge drains?
The access ports I sourced from Duckworks aren't the screw-in kind. I'd had troubles with those getting stuck closed before, opted instead for this lever-operated style. Black for the Mirage drive compartments, white for on-deck where they won't get too warm under our summer sun:

Last edited by spclark (18 Apr 2020 7:23 pm)
Offline
#149 18 Apr 2020 7:02 pm
- Bergen_Guy
- Member
- Registered: 6 Feb 2020
- Posts: 353
Re: Waterlust sailing canoe in Norway
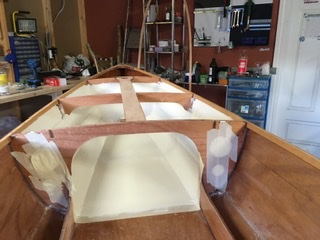
One more coat on the locker areas. I have been thinking about re-enforcing the area around the front hatch so that the hatch cover could be removed and a child could sit on the deck with their feet in the locker. Obviously not while sailing, but would give another paddling spot. The fore and aft support is sorted by the deck beams that will go in soon, but I am thinking of putting some lateral beam in too, wonder what that should look like. Maybe two pieces glued between the fore and aft beams?
Here’s today’s progress
Offline
#150 18 Apr 2020 7:28 pm
- spclark
- Member
- From: "Driftless" Wisconsin USA
- Registered: 19 Mar 2020
- Posts: 478
Re: Waterlust sailing canoe in Norway
I see no reason some extra stiffeners couldn't be fitted Guy. Just make sure they're arched to fit the curve the deck has to take once it's secured in position. That other builder in Texas did something like that on his storage hatch cover so it'd conform to the curve better & seal more effectively. I intended to do that myself once that comes along on my project's time line....
Last edited by spclark (18 Apr 2020 7:29 pm)
Offline
