A forum for discussing wooden boats and boat building
You are not logged in.
- Topics: Active | Unanswered
#51 1 Apr 2020 8:11 pm
- Bergen_Guy
- Member
- Registered: 6 Feb 2020
- Posts: 353
Re: Waterlust sailing canoe in Norway
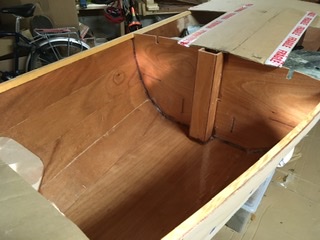
Filets went in today - looks much like yesterday- just with fillets!
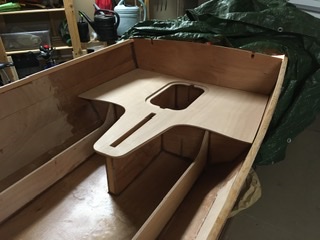
I have also dry fitted the console cap, not too much to do there, a bit of rounding on the forward outboard corners, and a bit underneath the leading edge.
Last edited by Bergen_Guy (1 Apr 2020 8:32 pm)
Offline
#52 1 Apr 2020 8:35 pm
- Bergen_Guy
- Member
- Registered: 6 Feb 2020
- Posts: 353
Re: Waterlust sailing canoe in Norway
I have also started thinking about what colour to paint this thing. Lots of sketches - current top of the list is black with a blue shear strake, bright inside and deck, cream sails, but still thinking... what colour are you going for SP?
Last edited by Bergen_Guy (1 Apr 2020 8:36 pm)
Offline
#53 2 Apr 2020 1:35 pm
- Bergen_Guy
- Member
- Registered: 6 Feb 2020
- Posts: 353
Re: Waterlust sailing canoe in Norway
This is what I am thinking of at the moment in terms of colours.
So far today all I have done is put little bits of masking tape over the stitch holes so that I don't get runs of un-thickened epoxy all down the hull when I start that big job!
Offline
#54 2 Apr 2020 9:15 pm
- Bergen_Guy
- Member
- Registered: 6 Feb 2020
- Posts: 353
Re: Waterlust sailing canoe in Norway
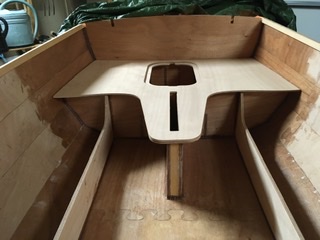
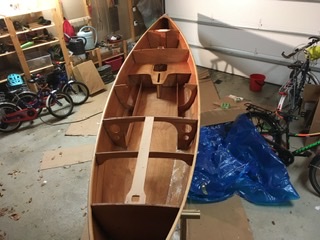
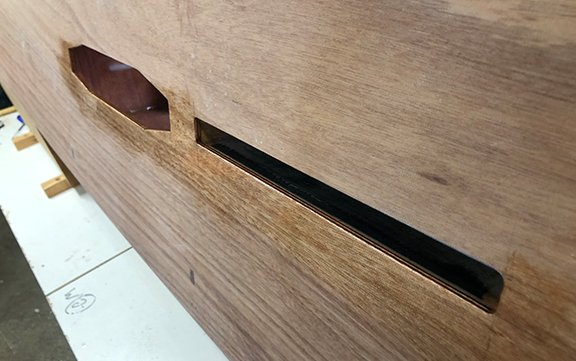
I made a start on getting the inside coated with epoxy. I used some sponge rollers that I picked up after reading advice on the CLC website that said this was a good idea. I agree - much easier than brushing it on. I also fitted the console cap after covering both mating surfaces first with un thickened epoxy and then thickened epoxy. That’s sitting under my usual pile of slates and clamps. I didn’t manage to get the entire inside done, but I made a good start. Tomorrow I will have to be more careful as I will be working in parts of the hull that will be visible once the deck is on.

Offline
#55 3 Apr 2020 9:21 pm
- Bergen_Guy
- Member
- Registered: 6 Feb 2020
- Posts: 353
Re: Waterlust sailing canoe in Norway
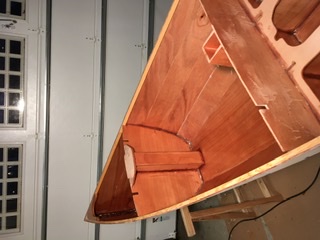
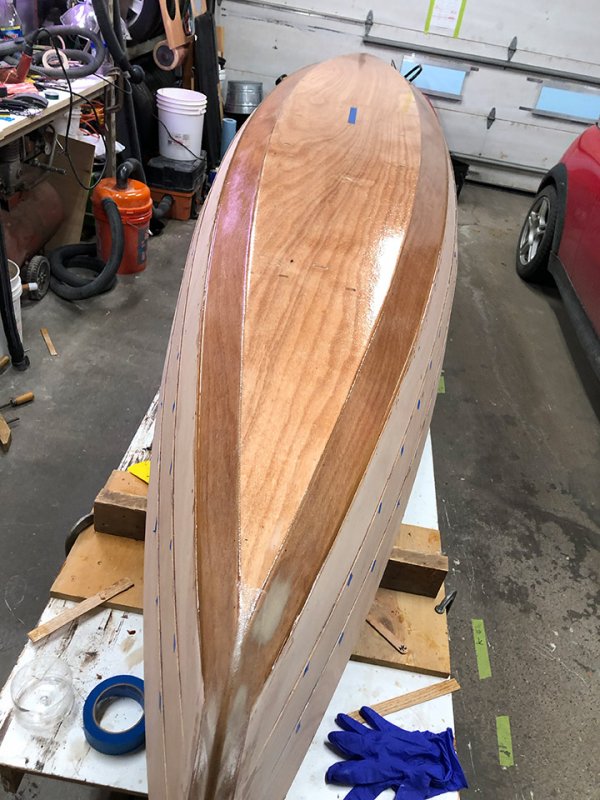
Lots more rolling on epoxy. I found I can get about 5 pumps of unthickened epoxy on then boat before it starts getting too cold, though by the end I had moved things round a bit to have the hot air blower keeping the resin warm, and that helped a lot. Two coats are on now so I guess the sanding begins in a few days. I still have one filet to put in around the console cap, and the deck stringers. That should keep me occupied tomorrow!
The hull is looking a bit like this at the moment, although right now it’s got a tarp over it and a hot air blower at one end! A couple of hours like that seems to get things off to a good start, but I don’t dare go to bed with that set up running!
Offline
#56 3 Apr 2020 9:49 pm
- spclark
- Member
- From: "Driftless" Wisconsin USA
- Registered: 19 Mar 2020
- Posts: 478
Re: Waterlust sailing canoe in Norway
Saw your color scheme, thought you’d ‘recolorized’ mine! I’d put that file up on CLC’s forum but few have been able to see it for whatever reason.... I’m struck by your choosing to do the 4th panel in a contrasting color as I have!
(You must have some pixel-wrangling experience too to be able to come up with that simulation. I made a nice living for 15 years with Photoshop, Illustrator & Acrobat before the ‘08 Recession killed my former employer’s business. That was my last full-time job....)
Last edited by spclark (3 Apr 2020 9:53 pm)
Offline
#57 4 Apr 2020 5:05 pm
- Bergen_Guy
- Member
- Registered: 6 Feb 2020
- Posts: 353
Re: Waterlust sailing canoe in Norway
Oh that’s nice! Where do I find your thread on CLC? I was messing in power point - so nothing very clever sadly. I am still not settled on a colour scheme, but I do like the idea of a contrasting shear panel. One of my other sketches is based on the colours in the Norwegian flag, dark blue hull, read shear panel, and a white dividing line. Not sure if that’s a bit over the top though. I hope I will do a nice enough job on the deck to keep that bright! Do you have a source of paint where you can choose any colour you want? It was a family time day for me so far today, so although I have had the warm tent set up and running most of the day (it snowed again last night!) I have not done much by the way of building today. Might try and get the deck support stringer in later if the kids get to bed on time!
Offline
#58 4 Apr 2020 6:18 pm
- spclark
- Member
- From: "Driftless" Wisconsin USA
- Registered: 19 Mar 2020
- Posts: 478
Re: Waterlust sailing canoe in Norway
Thread on CLC had to do with posting image files:
https://www.clcboats.com/forum/clcforum … 46434.html
Longish, venting frustrations over trying to navigate uncertainties over uploading then ‘sharing’ or copying URL links that can be ‘pasted’ into the proper windows for the fairly antiquated forum-hosting program they use. I’m sure it’s a costs issue, not wanting to host largish image files on their server but they do that for another non boat-related forum they provide. That product’s customer base is newer & maybe wider too....
I started another thread back in Nov.:
https://www.clcboats.com/forum/clcforum … 45519.html
- overdue for an update post. Seeing as how tomorrow it’ll have been four months since I began putting my kit together, maybe it’s time??9
Anyway, I chose my paint supplier after seeing real paint color chips provided free by https://kirbypaint.com/
I really liked what I saw in their ‘traditional’ color samples. Not having to believe what I saw in an on-screen simulation, to say nothing about the range of wonderfully subtle colors, confirmed my choice of brand. If they don’t have a color you like they’ll mix one for you too!
Right now this virus scourge is limiting everything we used to take for granted so if you like what you see on their website I’d shoot ‘em an e-mail, see if they can export. Or check with FyneBoats! They might be a dealer over in the UK wherr you hot your kit from!
Last edited by spclark (4 Apr 2020 6:23 pm)
Offline
#59 5 Apr 2020 9:06 am
- MartinC
- Member
- Registered: 3 Apr 2020
- Posts: 353
Re: Waterlust sailing canoe in Norway
Hi.
As you guys are further ahead than me, and I am at a stage of ordering more resin can you please advise me how much resin you have used to date, so that I can order approximately the right amount.
Many thanks. (Great progress logs and build tips by the way!).
Offline
#60 5 Apr 2020 9:48 am
- Bergen_Guy
- Member
- Registered: 6 Feb 2020
- Posts: 353
Re: Waterlust sailing canoe in Norway
Hi Martin! I was sent 8kg of resin (and 4 of hardener) and have used half of it so far! That’s after the two coats on the inside. I imagine the 8kg is going to be about right. Fingers crossed!
Offline
#61 5 Apr 2020 2:33 pm
- spclark
- Member
- From: "Driftless" Wisconsin USA
- Registered: 19 Mar 2020
- Posts: 478
Re: Waterlust sailing canoe in Norway
In addition to the 2 gallons of resin and 1 of slow hardener CLC includes with the other kit components I've so far bought another 1 gallon of resin, a half gallon of FAST hardener (early December last year), then another half gallon of FAST hardener early last month.
Admitting that I tend to *over-engineer things I build, I'm still trying to be conservative when I mix batches so I waste as little of this expensive chemistry as I possibly can.
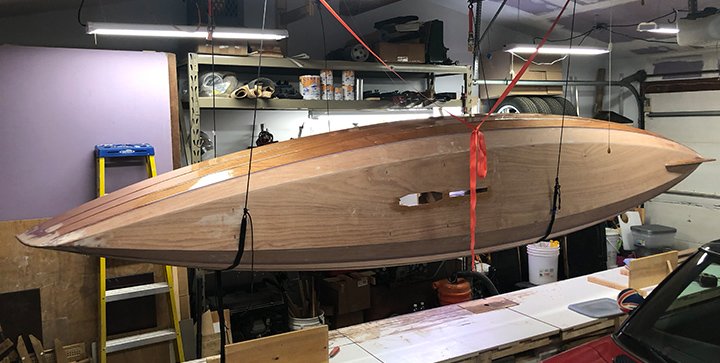
As of today - exactly five months into assembling my kit - my hull is ~ 90% complete. Inside's been glassed where manual indicates, planks 2-4 have received a first coat of epoxy. Outside pretty much the same. Right now I'm sanding that outer first coat in preparation of adding another coat to the entire hull.
Rudder, rudder console, and daggerboard have been laminated, shaped, glassed as indicated, now await final coats then assembly. Spars have been milled, laminated with main mast shaped but not yet coated, mizzen mast blank glued up but not yet shaped, yards & booms roughed out but no further.
*I've put more glass cloth on the insides than manual suggests. Other stitch & glue instructions have builders applying fiberglass and epoxy over seam fillets placed on the insides, and I've done this also; running bottom glass up over bulkhead fillets, adding bias-cut 4 oz cloth strips over fillets placed inside seams above panel #1 except the seam at panel 3 > 4. Wrapped glass around mast pockets too, added glass strips where pockets join bulkheads. Probably went overboard on fillets also, so that accounts for the heavier-than-expected epoxy consumption.
I've yet to suss out exactly what volume of resin / hardeners I have remaining but as I work towards getting this project completed I'm sensing proximity to a point where I'll need to take a leap of faith: either press on with what's remaining or put in an order for more stuff, just to be on the safe side.
Here's an image of current status for your review and comment:
- and as I progress further I'll be adding more. If any viewers have questions about areas not well-depicted let me know. Adding pics is so much easier here than on the CLC forum I'm using links for posts here to add to threads ongoing there.
Offline
#62 5 Apr 2020 4:36 pm
- MartinC
- Member
- Registered: 3 Apr 2020
- Posts: 353
Re: Waterlust sailing canoe in Norway
Many thanks both. I think I'll need another 4kgs of resin as I have been a bit over generous!
A question on 'tack welding' of the frames please:- Do you 'tack weld' both sides of each frame, and how fat a strip of thickened epoxy do you use for each tack. Toothpaste or spagetti ?
Offline
#63 5 Apr 2020 5:31 pm
- spclark
- Member
- From: "Driftless" Wisconsin USA
- Registered: 19 Mar 2020
- Posts: 478
Re: Waterlust sailing canoe in Norway
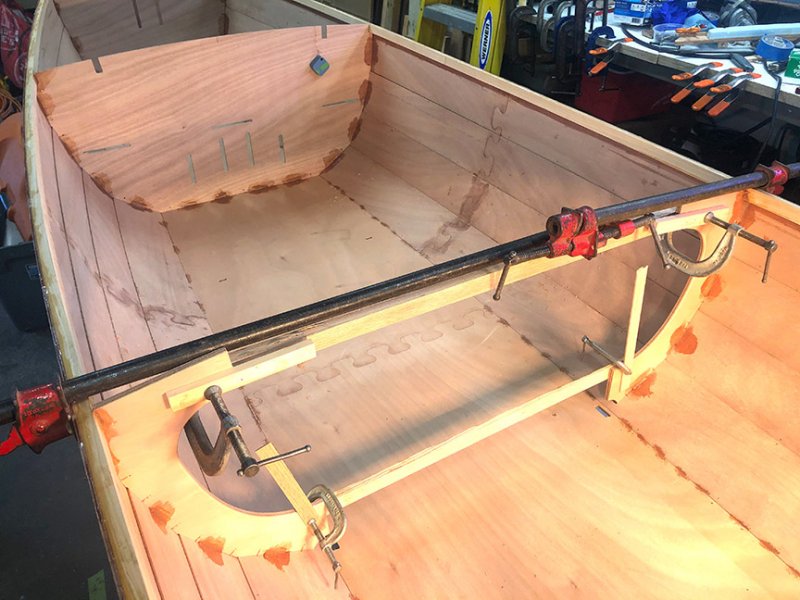
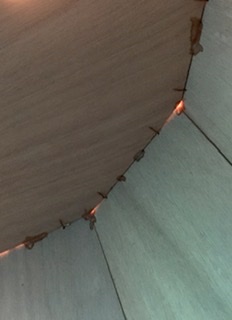
Yes I 'tacked' both sides of each frame at several locations on each. Roughly 4 to 6" apart (8 - 12cm, depending on how curved the edge of the frame was; aimed for at least one point of contact for each panel) with initial tacks about 1" (2cm) long & using not much thickened epoxy for any. Remember you will be going back later to add more substantial, smoothed fillets along each frame/panel junction anyway so the initial tacks are just to hold things together until then -
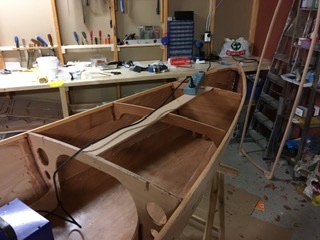
A couple of frames tacked to hull panels and bottom:
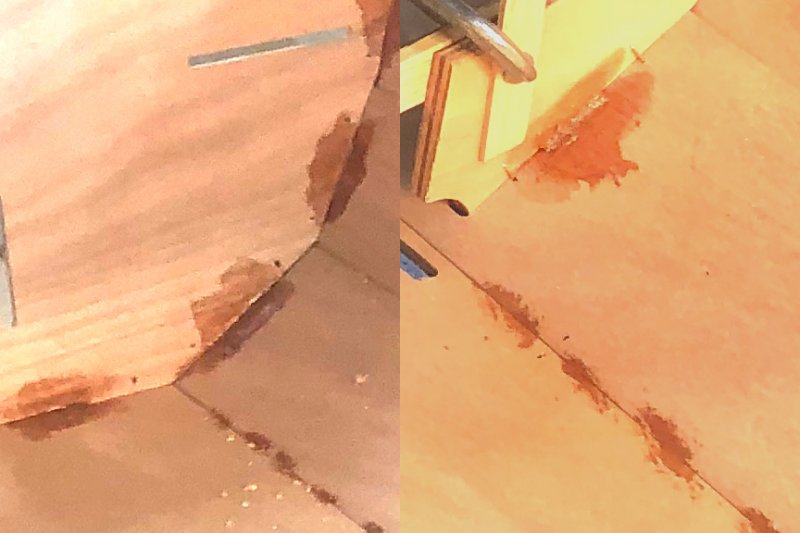
Close-up look at a couple of selected areas:
I forgot to add in my last post that I got an idea of what my hull weighs as of a few days ago. Came up with just shy of 75 lbs (34kg) before adding first epoxy coat to outer hull panels above #1 so maybe 77lbs (35kg) now. Dillon indicated in an e-mail that that's pretty good considering I've been generous with the 'glass/epoxy where it's not indicated in the manual.
Earlier on he also allowed that tacks and fillets in general are best done by putting down first a coat of unthickend epoxy then following that with thickened epoxy fillets sometime afterwards but before the unthickened 'prime coat' layer's cured too far. The idea is the prime coat fills the wood grain so that when you put the thickened epoxy on the wood doesn't suck epoxy out which can lead to a starved bond. That's why in these images you'll see a lot larger area covered with epoxy than just the fillet material.
I'd have to check but I don't believe that's in the manual... which is why they recommend this kit, with its minimal build manual - is intended for those who've built S&G kits before.
I wasn't too fussy over these initial tacking fillets either, they're rough. You can go back with the alcohol-wetted, gloved finger & smooth them over before they cure solid, or if you're equipped with suitable tools like a Dremel rotary tool you can drumsand them into shape as I do before you go back over with more substantial, structural fillets later on.
Some forty years ago I worked for a fellow doing reproduction duck, goose and swan decoys - "collectable" art if you will. He gifted me one Christmas with a nice Foredom tool set as I was responsible for setting up his prototype patterns to work on a 24-place spindle lathe a fellow he had cutting out the rough blanks we'd then finish up by hand.
Last edited by spclark (5 Apr 2020 6:04 pm)
Offline
#64 5 Apr 2020 9:28 pm
- Bergen_Guy
- Member
- Registered: 6 Feb 2020
- Posts: 353
Re: Waterlust sailing canoe in Norway
I tacked often with small dots, in as many places as i could access easily! So yes, both sides of all frames. I used a slightly less thick epoxy mix than I had used for other jobs so it would go nicely into the small gaps. Seems to have worked ok!
Offline
#65 5 Apr 2020 9:41 pm
- Bergen_Guy
- Member
- Registered: 6 Feb 2020
- Posts: 353
Re: Waterlust sailing canoe in Norway
SP - do I see correctly that you have not opened up the hobie mirage drive slot in the hull? Does that mean you will be sailing / paddling by preference? I won’t fit a mirage drive to start with - I hope to get by ok with my kayak paddles, though might also try canoe paddles if there is more than one person onboard.
It sounds from your description that your build has been very thorough and thought through - even glassing the mast steps in! I look forward to seeing more of the build as it progresses! ( thanks for the link to your thread on the CLC forum!!)
Offline
#66 5 Apr 2020 9:55 pm
- spclark
- Member
- From: "Driftless" Wisconsin USA
- Registered: 19 Mar 2020
- Posts: 478
Re: Waterlust sailing canoe in Norway
I waited to open the daggerboard slot and the Hobie drive opening until after I had the bottom 'glassed with a second fill coat of epoxy applied.
For the daggerboard slot I was leery of seeing epoxy run thru the bottom 'glass down onto the daggerboard housing's sides, which I'd carefully coated with graphite powder-thickened epoxy (two coats on top of a coat of unthickened epoxy and 6 oz 'glass fabric)... which would have been very tedious to remove once cured.
For the drive slot I figured why bother doing the operations twice when they both could be done at the same time?
I'd carefully drilled two holes at either ends of where the drive slot would end up before I bedded in the drive console. Being able to thread pipe clamps through the drive well made short work of ensuring the drive console was fully seated. Those holes got taped over before I put the 'glass onto the bottom. Then once everything'd cured up I carefully opened the drive slot with a piloted 1/2" carbide router bit.
The drive opening I freehanded using my trusty Bosch laminate trimmer and a 1/4" down-spiral carbide bit. I've done custom cabinetry before so having the tools left over from that experience came in handy for this latest endeavor!
Then each opening's edge profile at the bottom was rounded using a 1/16" radius round-over piloted router bit.
I just finished applying a second coat of epoxy to the port-side hull panels #2-4 with the hull suspended port-side-up to minimize drippage. I'll post a pic of the resulting surfaces once it's cured sufficiently to roll over so I can do the starboard side tomorrow, OK?
And I used FAST hardener for this coat. My workspace (garage) is at 70°F (21°C) right now, it's 57°F (14°C) outside.
Offline
#67 5 Apr 2020 10:00 pm
- spclark
- Member
- From: "Driftless" Wisconsin USA
- Registered: 19 Mar 2020
- Posts: 478
Re: Waterlust sailing canoe in Norway
I tacked often with small dots, in as many places as i could access easily! So yes, both sides of all frames. I used a slightly less thick epoxy mix than I had used for other jobs so it would go nicely into the small gaps. Seems to have worked ok!
I see naught wrong in this approach as long as thickened mix is stiff enough to resist 'slumping' or running off to where it's of little or no value.
With Dillon's reinforcing what I'd seen on OCH videos about putting unthickened epoxy down first where fillets - or tack welds - were to be placed, I initially found that sometimes the thickened filleting or bonding mixture would tend to slide off if the underlying pre-coat hadn't begun to 'click' by the time I added the fillets or tacks. This is something that's acquired through doing the operations frequently: adjusting the amount of thickener added for the task to be accomplished.
Offline
#68 6 Apr 2020 1:15 am
- spclark
- Member
- From: "Driftless" Wisconsin USA
- Registered: 19 Mar 2020
- Posts: 478
Re: Waterlust sailing canoe in Norway
Images of what the last few days' efforts have wrought:
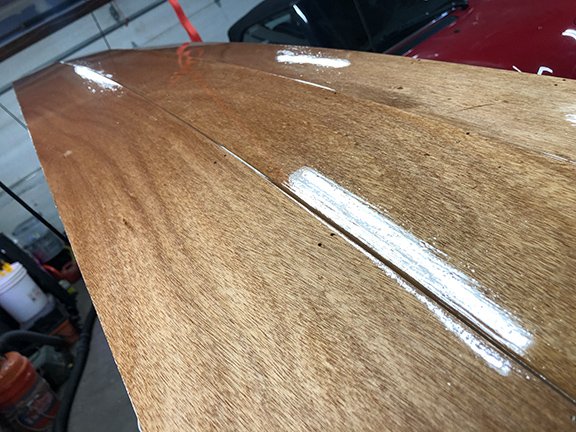
This shows the finish once the second coat of unthickened epoxy had set up hard enough to still take a fingernail dent but firm.
These panels don't have 'glass cloth on 'em, just two coats of epoxy with robust sanding (120 grit orbital or multi-tool) in between.
I was careful to 'break' the exposed edge of the lapped panels so the epoxy wouldn't end up too thin at that point. As I'm planning to paint the entire hull (inside & out) these surfaces will get sanded again before being primed later on.
Offline
#69 6 Apr 2020 1:23 am
- spclark
- Member
- From: "Driftless" Wisconsin USA
- Registered: 19 Mar 2020
- Posts: 478
Re: Waterlust sailing canoe in Norway
Here's a couple of images of the hull's bottom where I waited to cut out the daggerboard and Mirage Drive openings until after I'd put down the indicated 6 oz. fiberglass and two coats of unthickened epoxy:
This next image shows what the daggerboard slot looked like after I brushed on some unthickened epoxy I had left over after roller-coating the hull panels above. That highlighted edge will be easily removed with my multi-tool sanding head once I'm ready to turn her over to complete everything topsides. I waited to open these slots so as to avoid any epoxy drippage down onto the graphite-filled epoxy I finished the insides of the daggerboard trunk with before assembly. Two coats of that atop the one coat of 6 oz. 'glass + unthickened epoxy.
I'll probably add a second coat of epoxy to the plywood edges you see here, just to be on the safe side. I expect these surfaces will see some significant wear & tear from the daggerboard being extended and raised.

Offline
#70 6 Apr 2020 1:29 am
- spclark
- Member
- From: "Driftless" Wisconsin USA
- Registered: 19 Mar 2020
- Posts: 478
Re: Waterlust sailing canoe in Norway
Lastly this image shows my "boat house" in use. I bought into using a HarkenHoist early in the planning for this build, in that I both have to be able to turn the work upside down single-handed as well as be prepared later on to store my Waterlust safe and out of our winter weather here in Wisconsin.
Careful attention to garage dimensions will allow the completed canoe to be hoisted aloft in my garage, yet also allow me to pull my MINI Clubman in underneath, and still leave room for the garage door to open fully!
You can see a corner of my wife's MINI Cabriolet S in this pic. It's her baby, an '06 model she "bought off the boat" sigh unseen.
(The orange straps are from "safety' slings - ratchet tie-down straps - that go underneath the hull once the HarkenHoist has brought it up close to the ceiling. That hoist is easy enough to use but with 100+ lbs (50+kg) of epoxy-hardened okoume suspended overhead the Harken folks suggest an additional means of securing the load be in place is highly recommended, just in case....)
And I see I'm up to 5% of my storage allocation here. Room enough for LOTS more pics to come!
(I tried getting the URL to work as a link on the text for Harken Hoist above but somehow several attempts failed. Here's the full URL copied from CLC's web store:
https://www.clcboats.com/modules/catalo … boat-hoist
Which works!!)
Last edited by spclark (6 Apr 2020 1:51 am)
Offline
#71 6 Apr 2020 6:46 am
- MartinC
- Member
- Registered: 3 Apr 2020
- Posts: 353
Re: Waterlust sailing canoe in Norway
Thank you very much for such comprehensive replies ...and keep up the really useful photos.Being a complete epoxy novice, this is invaluable for me.
Offline
#72 6 Apr 2020 7:55 am
- Bergen_Guy
- Member
- Registered: 6 Feb 2020
- Posts: 353
Re: Waterlust sailing canoe in Norway
My tacks look like this:
:
I suspect if you work like SP, you will have a beautiful boat. This is the first time I have done this too - so am a novice too. But the structure in the garage is stating to look and feel like something solid that night one day float.
Last edited by Bergen_Guy (6 Apr 2020 7:56 am)
Offline
#73 6 Apr 2020 8:22 am
- MartinC
- Member
- Registered: 3 Apr 2020
- Posts: 353
Re: Waterlust sailing canoe in Norway
Thanks very much for the encouragement! I am afraid I cannot match your and SP's superb workmanship....but hopefully she will float in a straight line at the end of the day!
One more question please (sorry):- Did you both 'tack weld' the stems before filleting and glassing them (so that you could remove the wires) or did you find it easier/better to leave the wires in and fillet and glass straight away without tack welding? Presumably the breast hooks go in after the ends have been filleted and glassed?
Offline
#74 6 Apr 2020 8:36 am
- MartinC
- Member
- Registered: 3 Apr 2020
- Posts: 353
Re: Waterlust sailing canoe in Norway
Sorry one further question! At the bow where the floor doesn't quite meet the two sides there is a small triangular hole. Do you fill this with anything at this stage or just cover with the fillet and glass, perhaps holding the former in with tape on the outside?
Offline
#75 6 Apr 2020 8:38 am
- Bergen_Guy
- Member
- Registered: 6 Feb 2020
- Posts: 353
Re: Waterlust sailing canoe in Norway
I didn't tack weld the stems before putting the fillets in. Once the filets were in and cured, I then either heated the stitches up with a soldering iron to get them 'unstuck' from the fillet, or those i couldn't get out, I cut and filed flush with the hull using a metal file.
Offline