A forum for discussing wooden boats and boat building
You are not logged in.
- Topics: Active | Unanswered
#26 13 Nov 2012 12:23 pm
- Paul
- Employee

- From: Gatebeck Cumbria
- Registered: 4 Aug 2011
- Posts: 134
Re: Guillemot build
Rainbow, she really is a thing of beauty.
I recommend switching to finer paper soon.
Offline
#27 14 Nov 2012 7:12 pm
- Rainbow
- Member
- From: East Devon
- Registered: 29 Sep 2012
- Posts: 75
Re: Guillemot build
Thanks Paul. I switched to 80 then 120 grit using an orbital sander straight after the first pass using the belt sander. The belt sander did handle the delicate white wood much better than the plane. I'm finding even masking tape with pretty low tack is tearing out wood.
Offline
#28 15 Nov 2012 1:32 pm
- Rainbow
- Member
- From: East Devon
- Registered: 29 Sep 2012
- Posts: 75
Re: Guillemot build
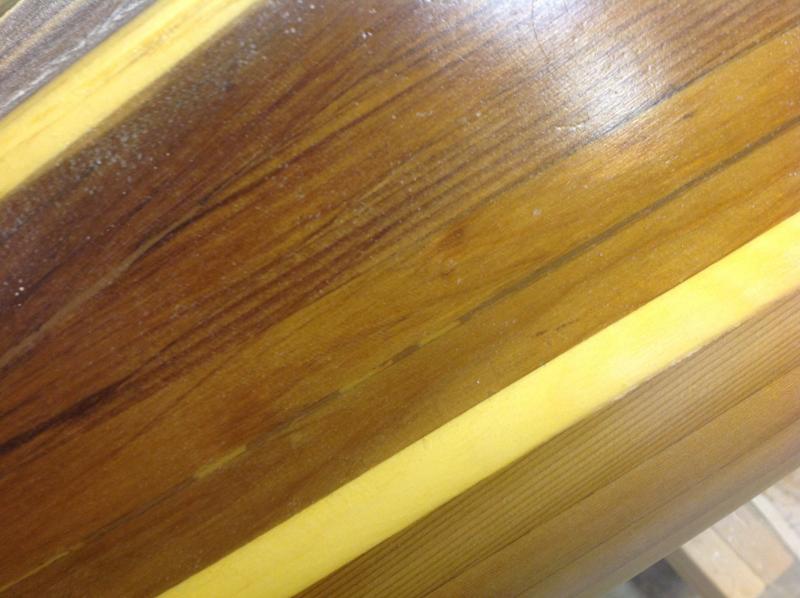
Foolishly I had omitted to release the hull before stripping the deck so everything was pretty locked down with the hot glue and releasing the deck from the frames proved a challenge. All done successfully now though. Nearly finished the sanding of the deck. I've washed the boat down to raise the grain before a final sand with 120 grit. The photos show the wet wood and closer to how the deck will likely look after fibreglassing and varnishing. I'm quite pleased with how things are looking though there is one strip of wood that is looking a little light and I may try to darken it using stain.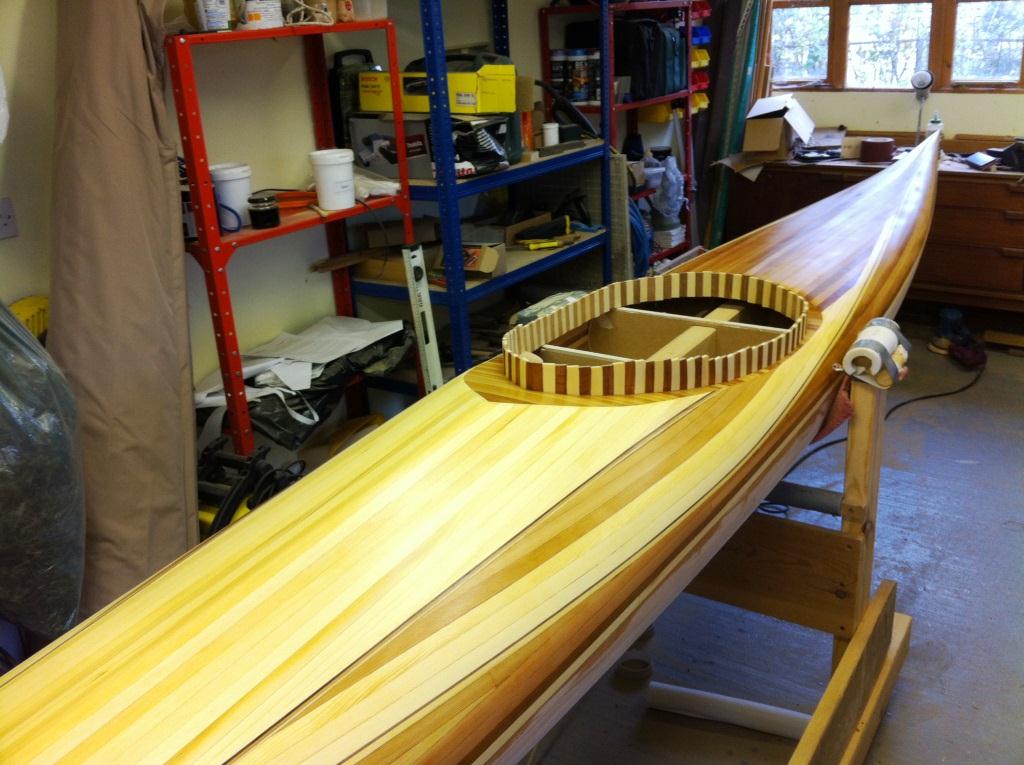
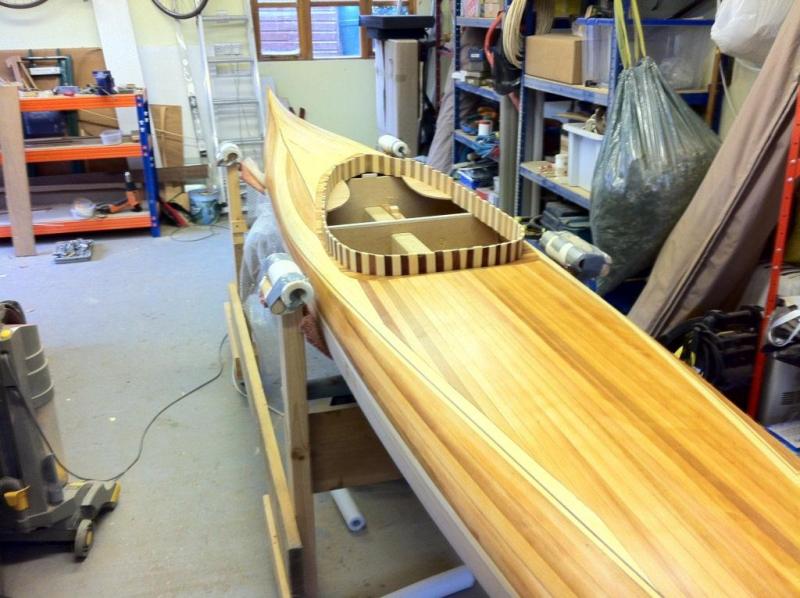

Last edited by Rainbow (16 Nov 2012 9:25 am)
Offline
#29 15 Nov 2012 11:06 pm
- beaker
- Member
- Registered: 9 Oct 2011
- Posts: 81
Re: Guillemot build
It's really coming to life there. I'd leave that strip unstained - it's a natural highlight.
Offline
#30 16 Nov 2012 10:34 am
- Rainbow
- Member
- From: East Devon
- Registered: 29 Sep 2012
- Posts: 75
Re: Guillemot build
Yes Beaker, it is amazing what a little bit of water will do to the look of wood! I take your point about the strip it, probably is just a case of getting used to it. In the dry state it doesn't look that different to the surrounding strips but water and also camera snaps of the dry wood seem to enhance the contrast. I did try a staining a piece of the off-cut strips from the cockpit but that showed its not possible to control the bleed of the stain into the surrounding wood sufficiently.
Offline
#31 6 Jan 2013 11:42 pm
- Rainbow
- Member
- From: East Devon
- Registered: 29 Sep 2012
- Posts: 75
Re: Guillemot build
Now fibreglassing the hull. The first layer of glass went on with no problems. As did the second layer. However the filler coat suffered orange peeling. Everything seemed very smooth after applying by roller and tipping out with a foam brush then left overnight. The following morning, the epoxy was not smooth. The temperature was low - no idea if that had anything to so with it. The epoxy was well warmed before mixing.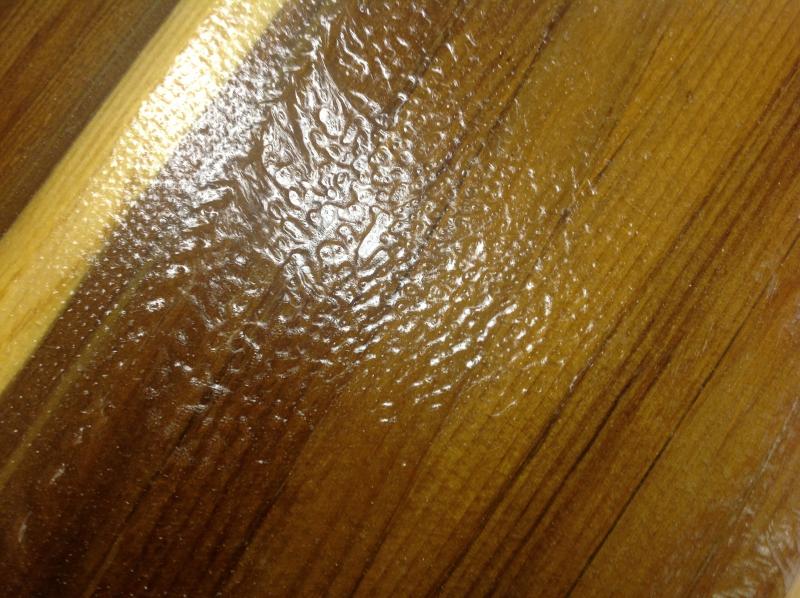
So lots of sanding. Starting to feather the edges of the second layer of glass.
Surface is looking reasonable after sanding. Will need another filler coat. I'm hoping that that will not orange peel.
Offline
#32 7 Jan 2013 10:06 am
- Paul
- Employee
- From: Gatebeck Cumbria
- Registered: 4 Aug 2011
- Posts: 134
Re: Guillemot build
This is a shame but do not worry the only problem you have is that you need to do a little more sanding than usual.
The epoxy has been applied a little thicker than it should be. This can be due to a low temperature but I have found that the amount applied is not easy to control with a foam roller and so I always apply the second coat with a squeegee (an old credit card will do). After some experimenting I found that it is something to do with the patchy way that the foam takes up the epoxy. Using a squeegee you can get a very thin coat.
Offline
#33 7 Jan 2013 11:43 pm
- Rainbow
- Member
- From: East Devon
- Registered: 29 Sep 2012
- Posts: 75
Re: Guillemot build
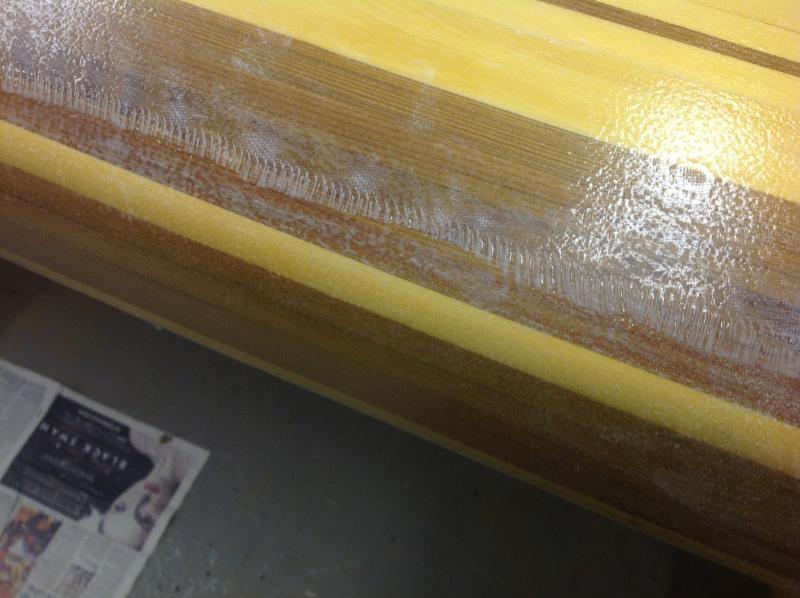
As you say Paul, it is not a problem other than having to sand more. The surface scrubs up quite nicely as seen in the last photo above. I used the squeegee for the wetting out of the glass and that was a success so I'll definitely use the squeegee in future for the filler coats. One question I do have relates to air bubbles. I had a couple of bubbles around 5mm diameter which appeared white after the epoxy cured. I've sanded those out now. Will it be best to put a small piece of glass fabric in this hole or is it just as satisfactory to let straight epoxy to fill the hole? The holes are only in the top abrasion resistance layer.
Offline
#34 8 Jan 2013 4:17 pm
- Paul
- Employee
- From: Gatebeck Cumbria
- Registered: 4 Aug 2011
- Posts: 134
Re: Guillemot build
Rainbow, 5mm bubbles are large and you have done exactly the right thing when you cut out the white bits. For this size you only need to fill the hole with epoxy: for larger holes it would be worth patching with fabric. I have found that it helps to avoid a mess if you make a dam from tape around the hole.
Offline
#35 10 Aug 2013 7:58 am
- Rainbow
- Member
- From: East Devon
- Registered: 29 Sep 2012
- Posts: 75
Re: Guillemot build
A bit of a pause in the build due to other life demands and to ponder the solution to a situation created by my own poor practices. Essentially I have glassed the outside of the hull and have left it off the frame while sanding the inside over several weeks. The wood has dried out and the hull has curled inwards. A bit of a shock when I was not able to put the frame back into the hull. Of course the warnings not to do this are in the book! So, some time spent pondering the solution. Forcing the boat back onto the frame was not an option, there was some ominous creaking when I tried. This may all be completely wrong but I figured the problem was caused by drying of the wood and that was overcoming the power of the epoxy/glass to hold the shape. Assuming the epoxy/glass would want to pull the wood back into position I have attempted to allow the wood to re-absorb moisture and make it more flexible. A combination of filling the hull with water for 30 mins, followed by wet towels along the rim and gentle pressure from spacers seems to have got the hull pretty much back into shape.
The deck has been sealer coated but has been kept on the frames. That is showing evidence of spreading outwards. Lesson learned the hard way - try and do the glassing of both sides within a short timeframe.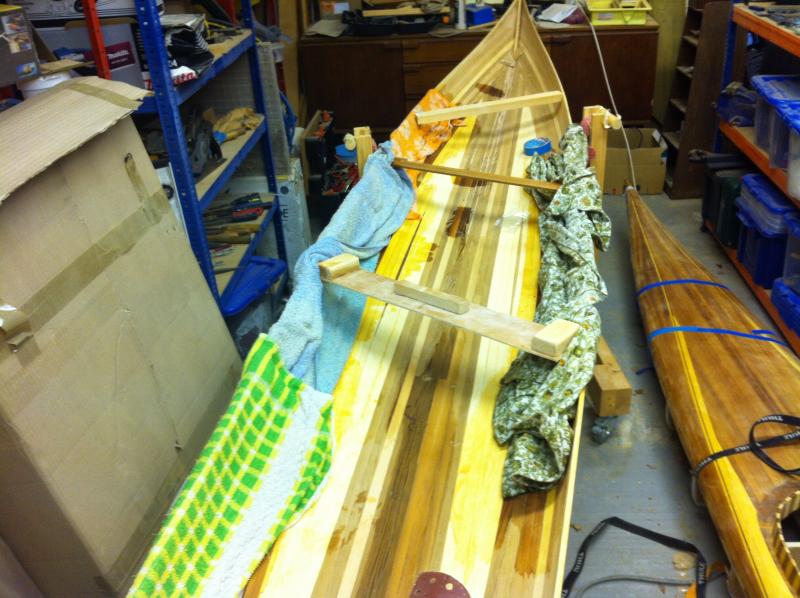
Offline
#36 10 Aug 2013 8:22 am
- Rainbow
- Member
- From: East Devon
- Registered: 29 Sep 2012
- Posts: 75
Re: Guillemot build
The deck has now been glassed inside and out, with a filler coat applied on the outside only. I found the inside a much more challenging job than the outside.
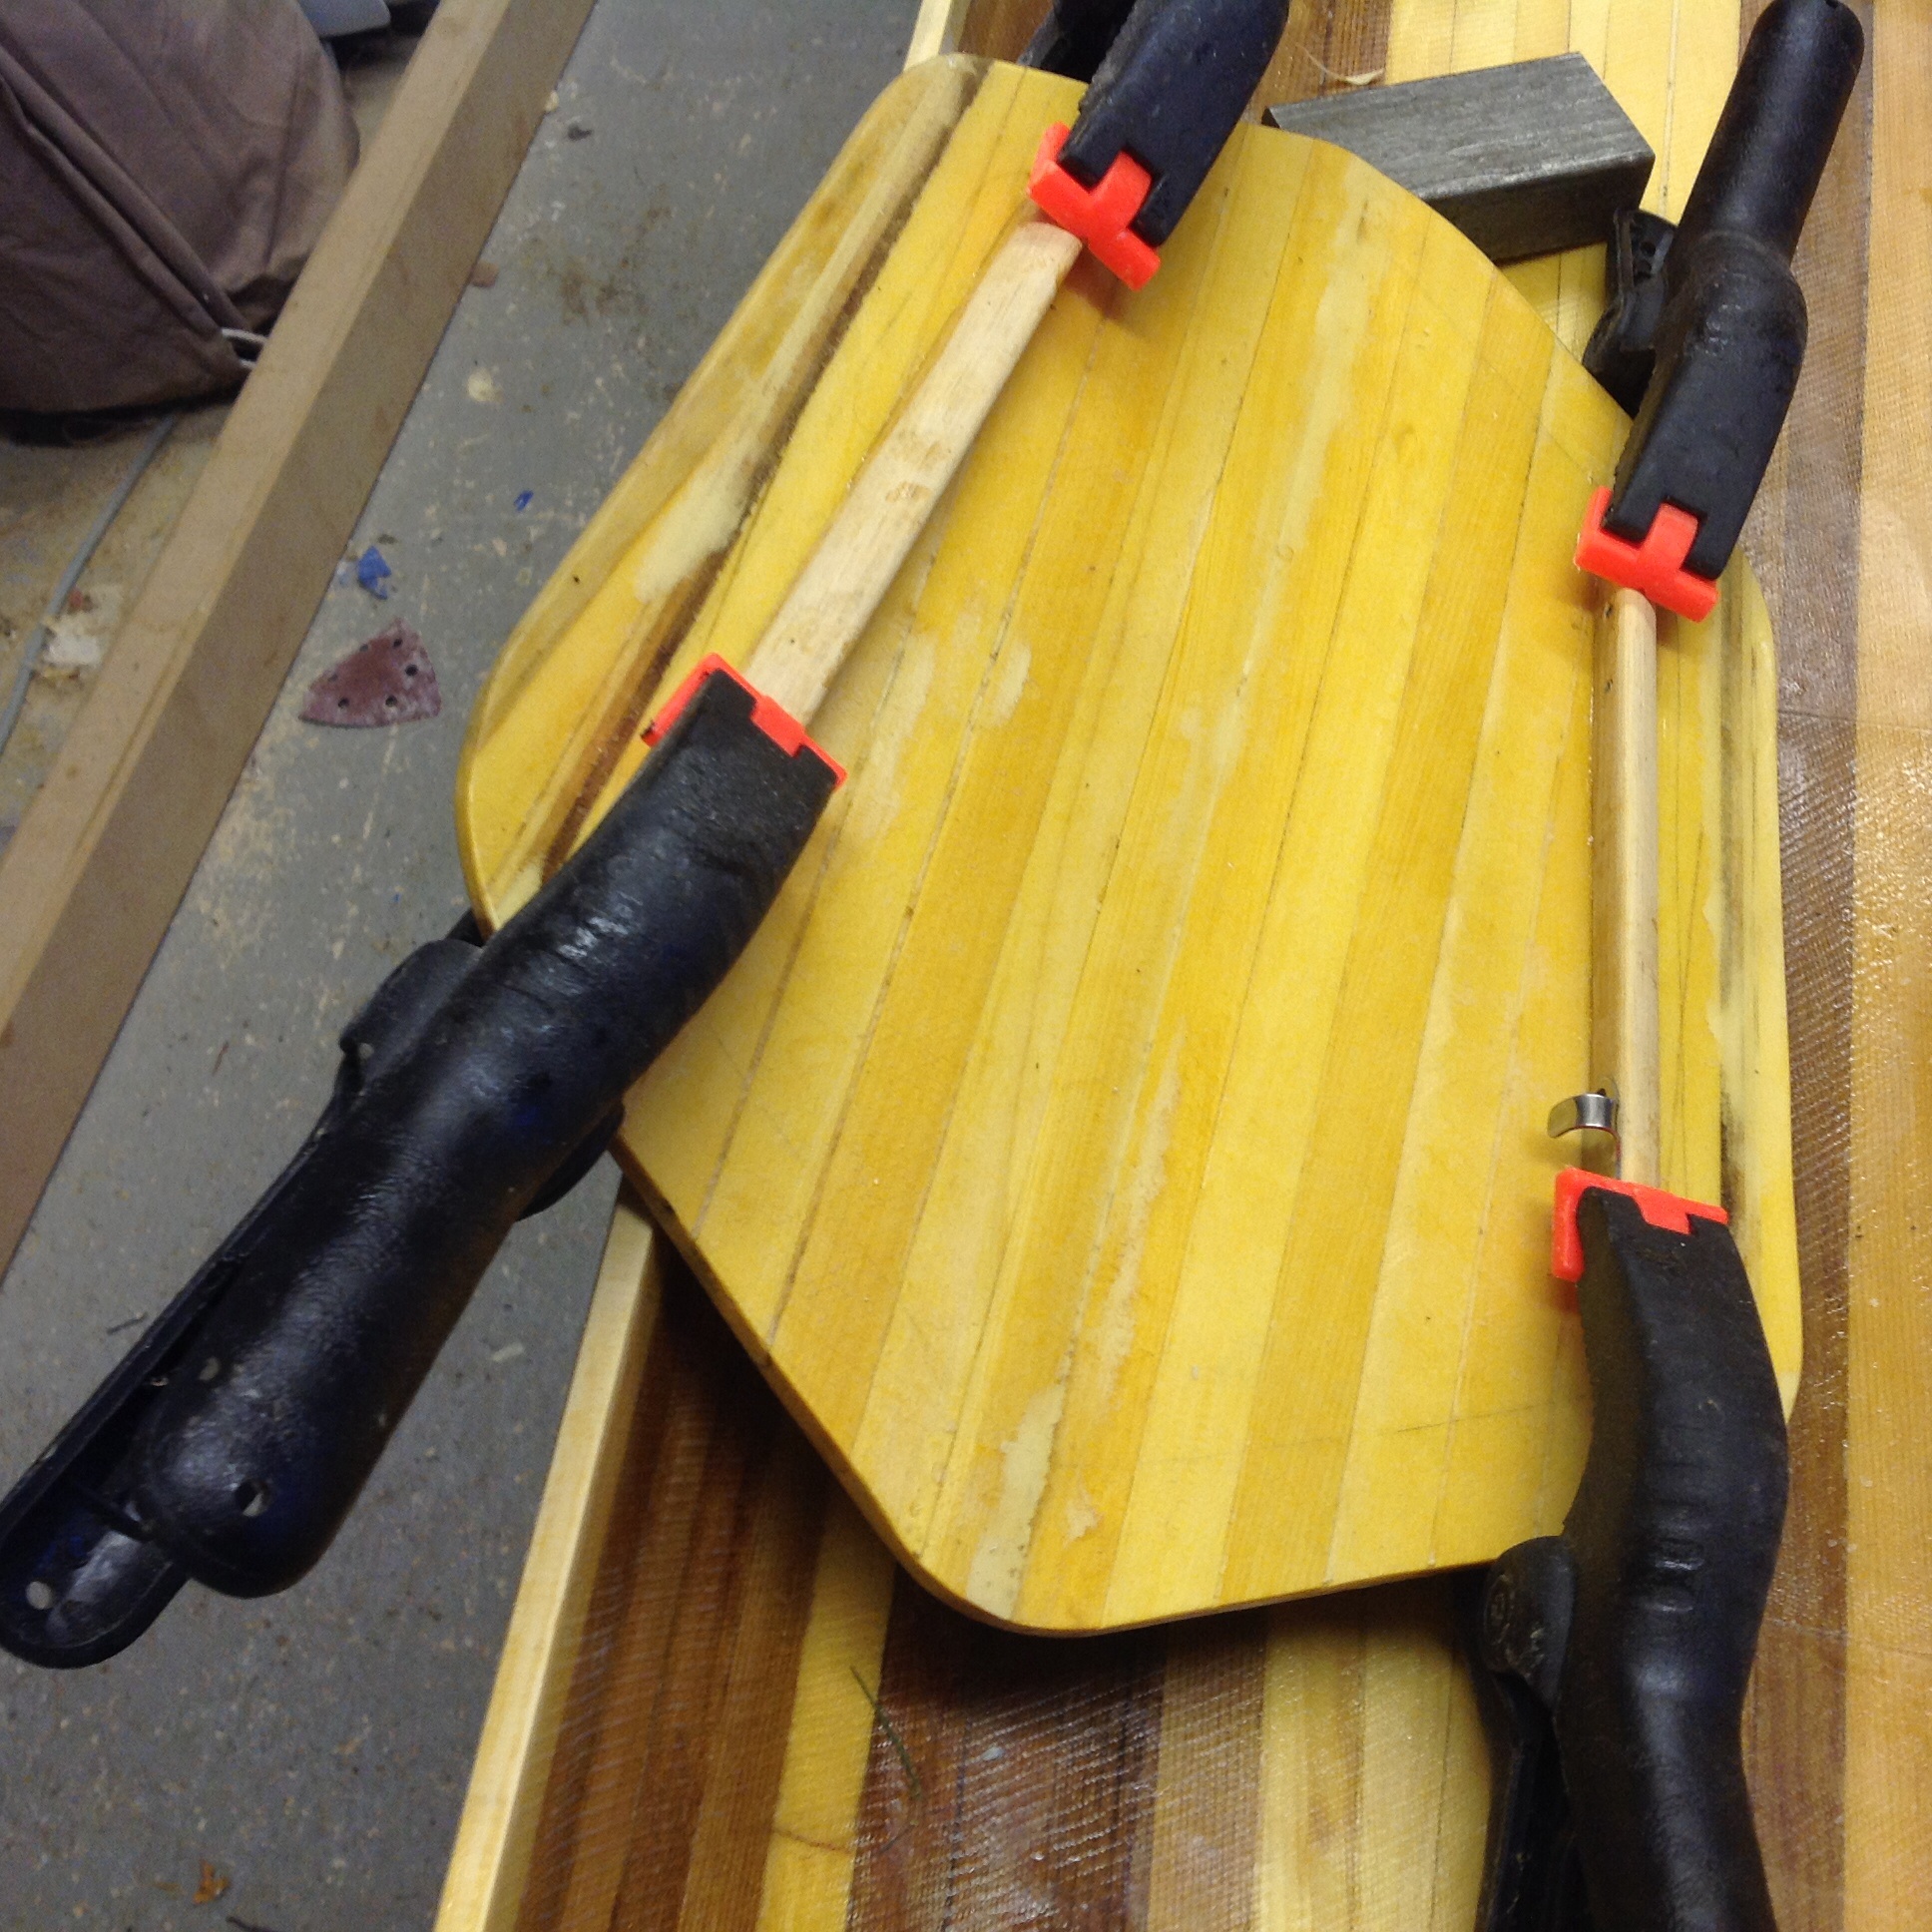
Currently I'm working on the coaming lip. I've cut Ash, American Cherry and Walnut strips and laminated each strip around the coaming uprights. The front will be trimmed at a tangent and I plan to laminate American Cherry strips across.
I cut the strips by hand so there is some variation in depth. I should have cut the strips much wider to cope with the unevenness of my cutting and allow planing down to an even surface. As a consequence I had one strip which needed raising up. A task made easier as the offending strip was made of Ash, which is much more flexible than the Cherry and Walnut, allowing it to be laid in place around the curves without too much problem.
I've masked off the coaming uprights so I can use them as a form. I can then take the glued lip off for planing and sanding. Much easier than trying to do this in situ.
Last edited by Rainbow (10 Aug 2013 9:12 pm)
Offline
#37 4 Sep 2013 1:46 am
- Rainbow
- Member
- From: East Devon
- Registered: 29 Sep 2012
- Posts: 75
Re: Guillemot build
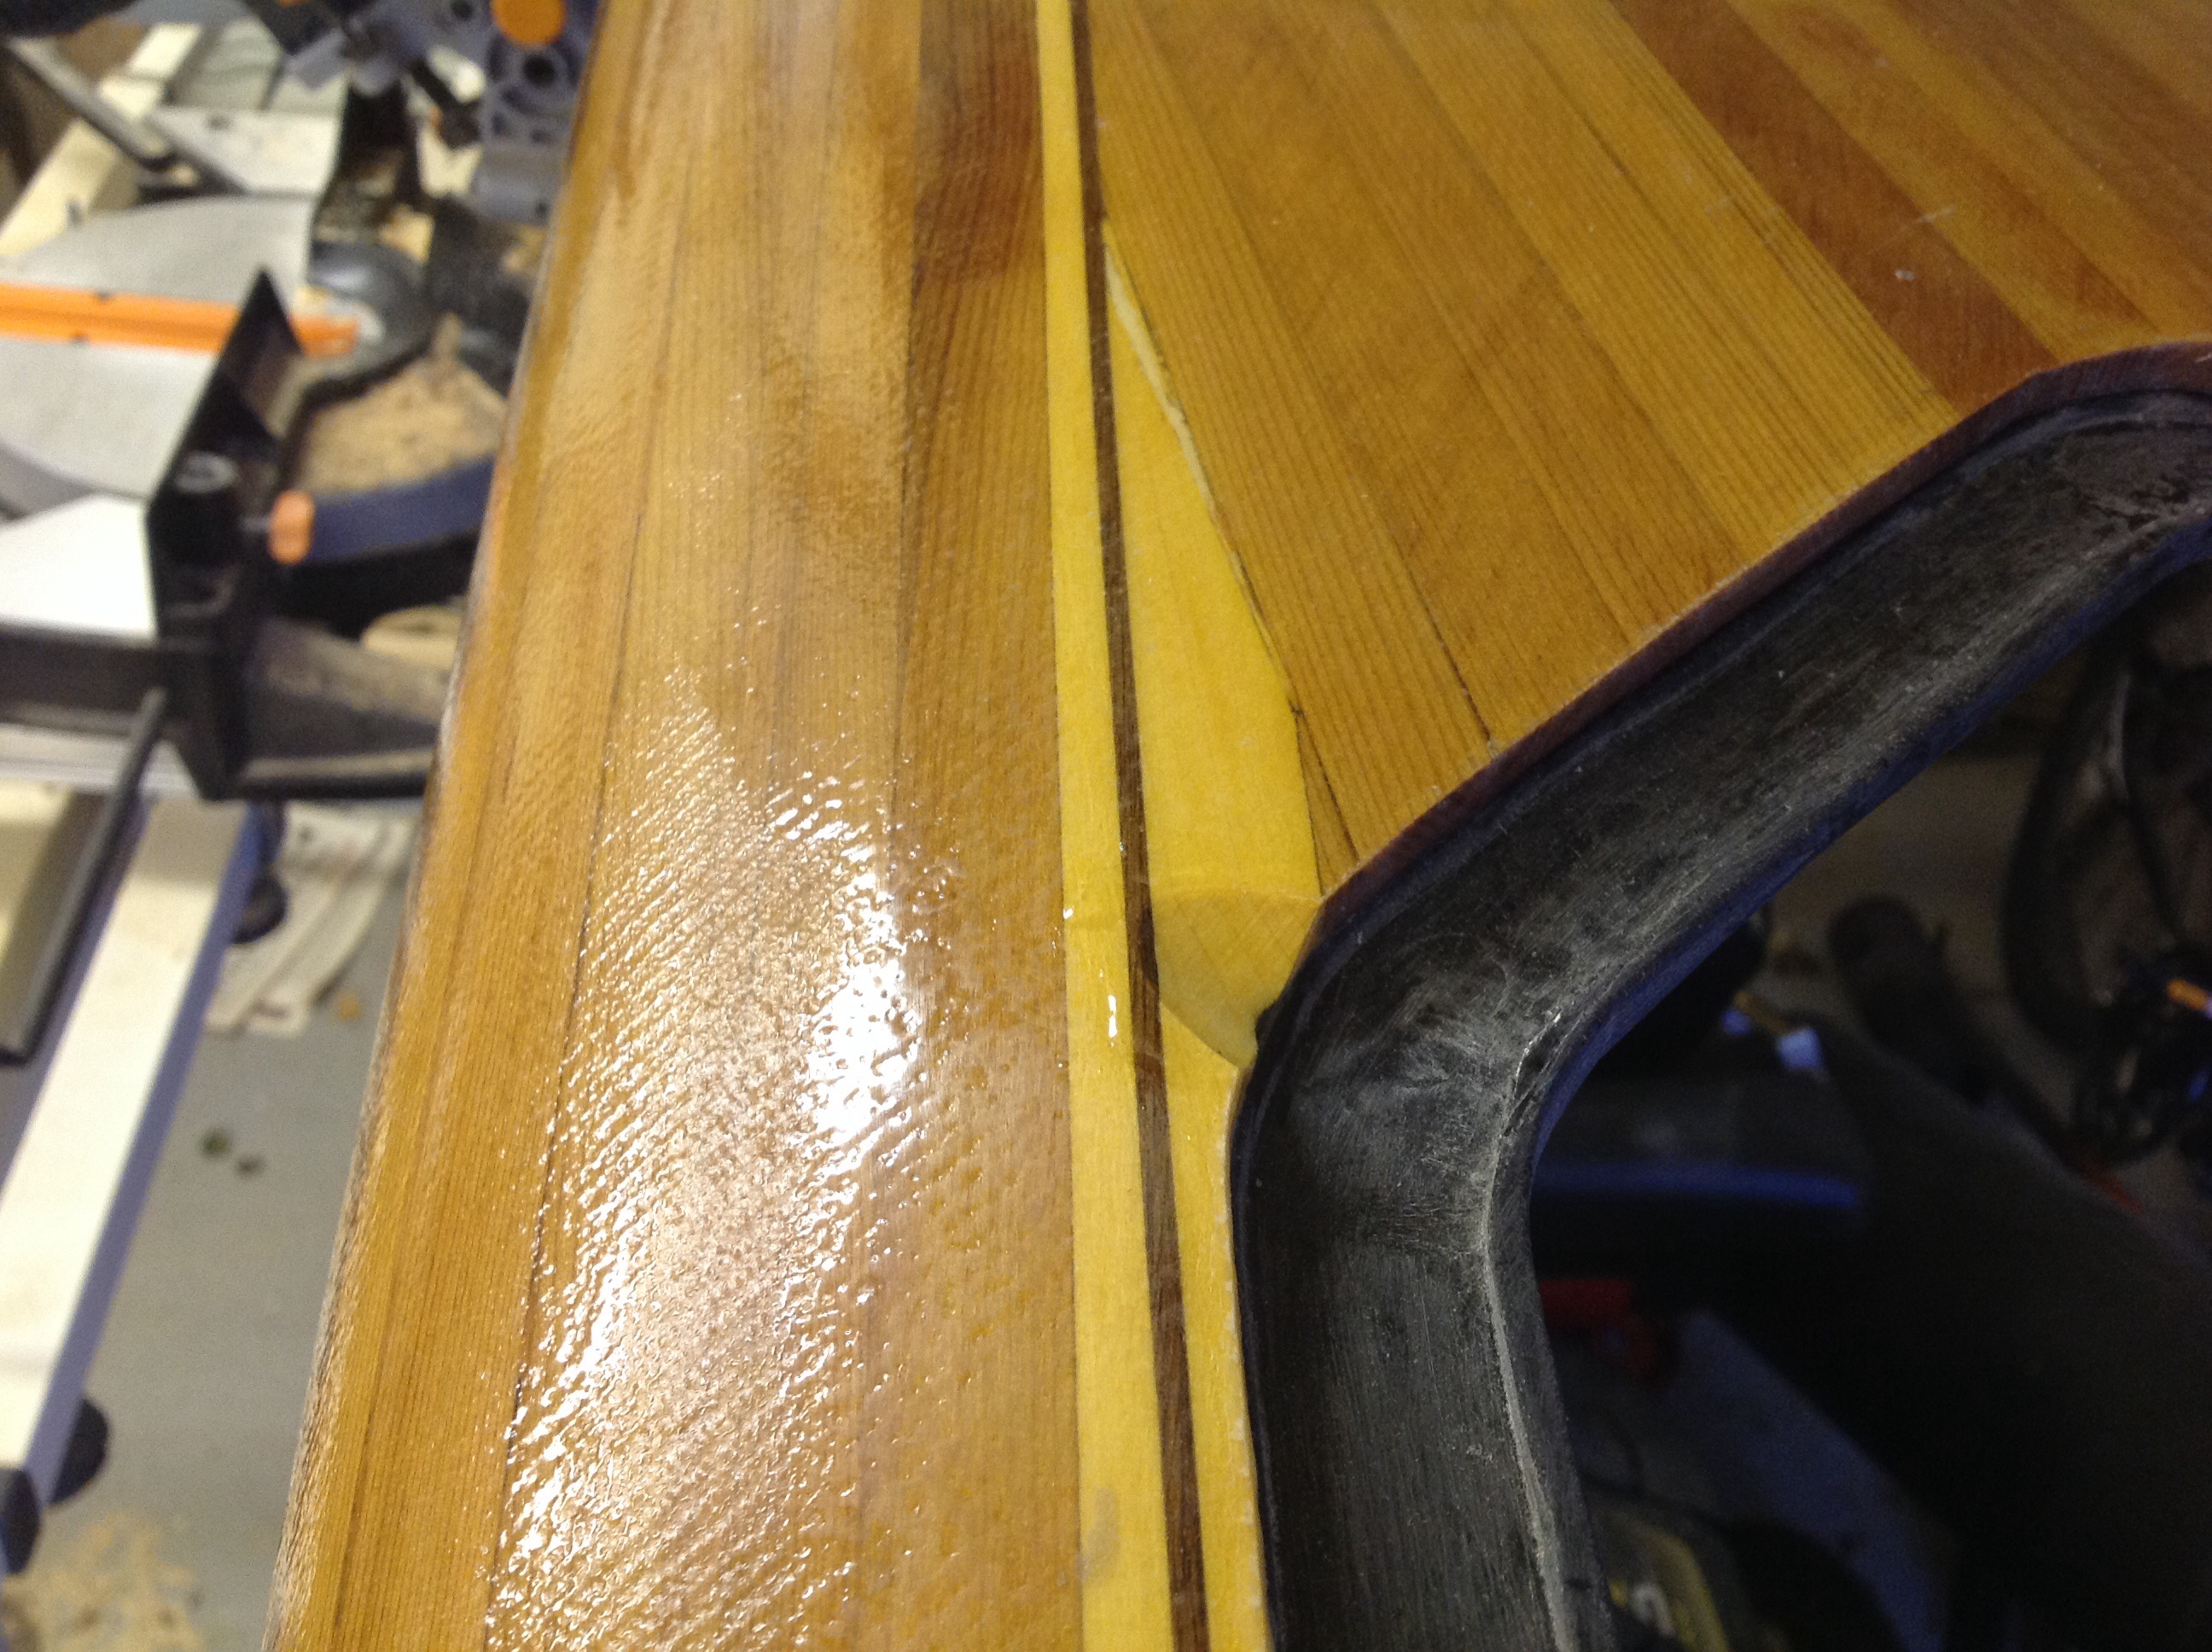
The coaming lip has had the American Cherry laminations added to the front which gets around the severe bend. After everything was glued together, the lip was taken off, planed, sanded and finally glued onto the uprights.
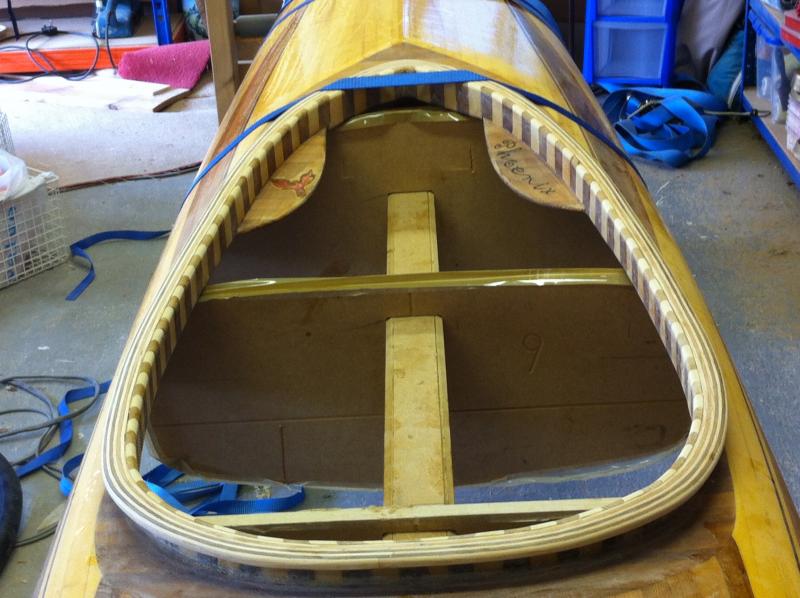
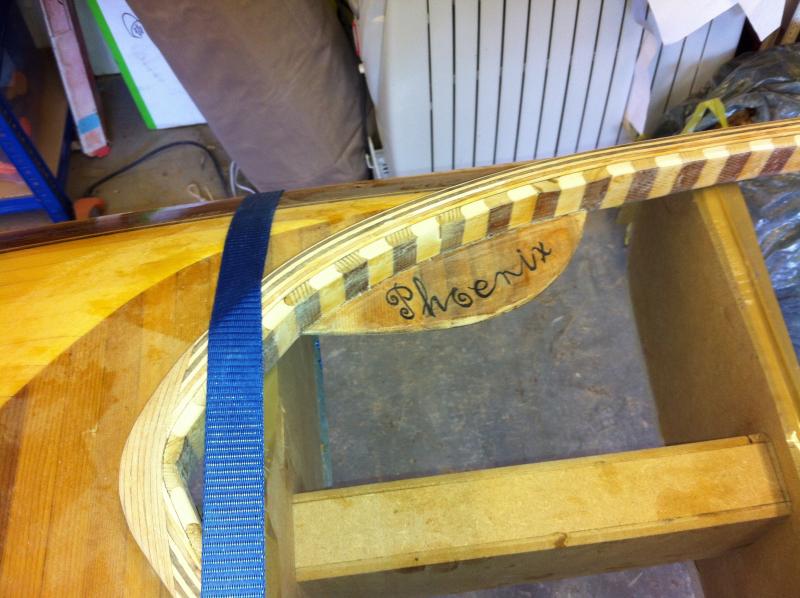
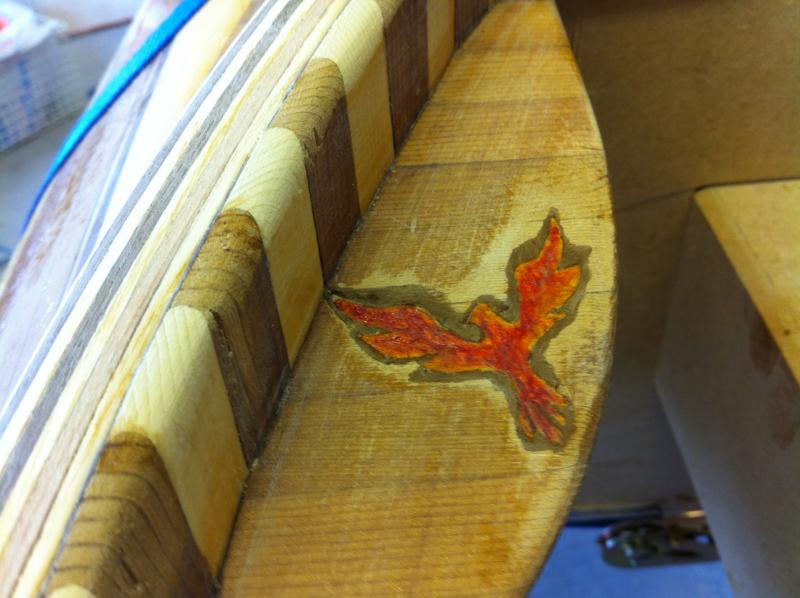
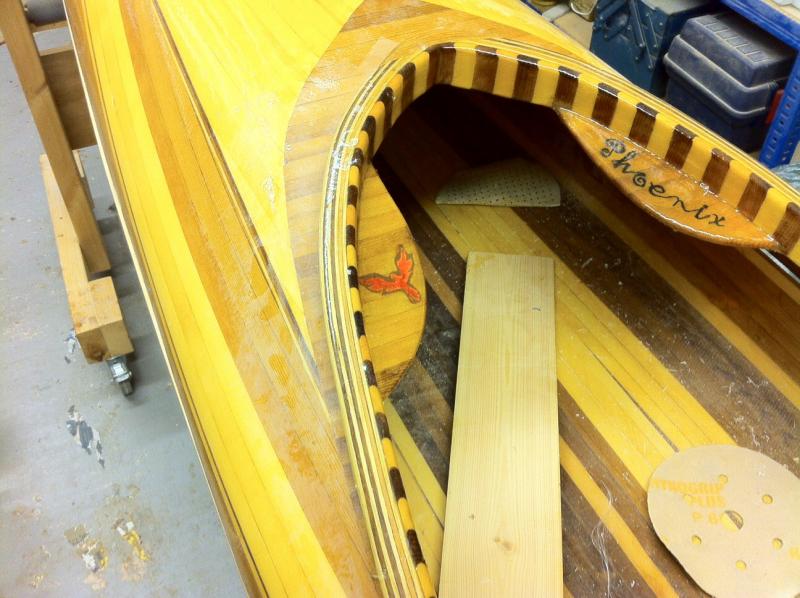
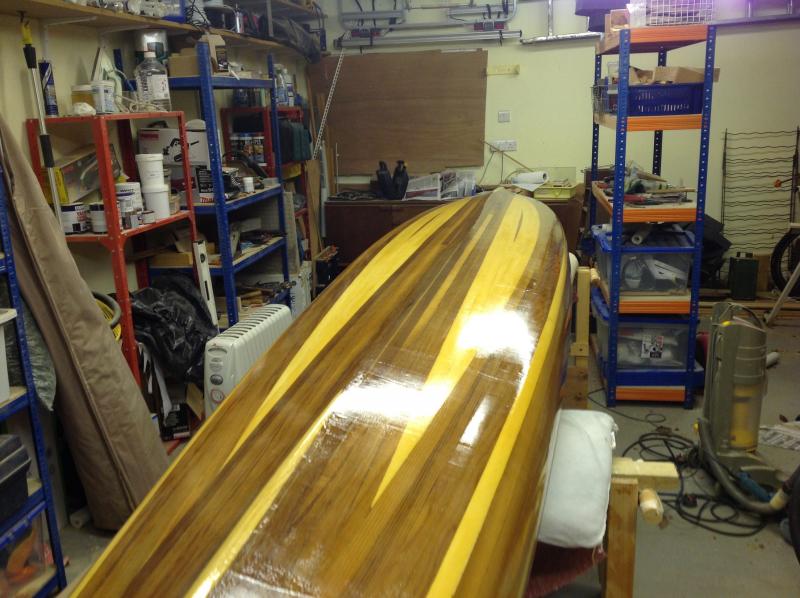
I had a try at seeing how the hull and deck would fit together. There was a pretty big gap - around 3/4 inch. I might have been able to compress with ratchet straps but the deck was very stiff and I wasn't comfortable with trusting the seams would be safe under that much tension. There was still a lot of flex when only the external glassing had been completed so I had figured it wouldn't be an issue. However, the inside glass makes the deck very rigid. So, after much procrastination, I finally decided to sand off some of the fibreglass from the inside of the deck. Not a nice or quick job! I've re-fibreglassed and I have used ratchet straps to pull the deck back onto the forms while the resin is still sticky. I covered the forms with shiny parcel tape, hopefully there will be no problems releasing. I'll leave it a week to allow the resin to fully cure. Hopefully the shape will be retained and allow an easier join of deck and hull. The sanding was such a tedious job that I needed to do something creative. So she now has a name and I've embedded a motif which I've painted. For this I tried ordinary thin veneer but I found it impossible to stop it splitting. In the end I resorted to some very thin ply wood I had available. The ply laminations made it easier to cut and keep the narrow tail feathers without splitting. I used a "write on anything" pen to scribe the lettering. Several paints in differing shades of red were used of the glass enamel type which gives a level of translucence.
Last edited by Rainbow (9 Jan 2014 1:19 am)
Offline
#38 3 Oct 2013 2:58 pm
- Rainbow
- Member
- From: East Devon
- Registered: 29 Sep 2012
- Posts: 75
Re: Guillemot build
The remedial work to get the deck back to the correct profile has been successful. The fibreglassing of the coaming is now complete. I have a few bubbles which I will need to sort out but on the whole I'm glad with how it has gone. I had experimented with lettering before hand on some scrap to see how the ink would fare under the epoxy. I knew I had to seal the wood to prevent the ink migrating along the grain. I also knew there would be some level of what I can only describe as blooming and a softening of the letter outlines. I liked that effect as it looked like the lettering had been burnt into the wood with lingering smoky surround. I'm pleased with the final effect.
Next job is cutting out the hatches - when I pluck up the courage to take a saw to the deck.
Last edited by Rainbow (3 Oct 2013 11:26 pm)
Offline
#39 6 Oct 2013 9:58 am
- Rainbow
- Member
- From: East Devon
- Registered: 29 Sep 2012
- Posts: 75
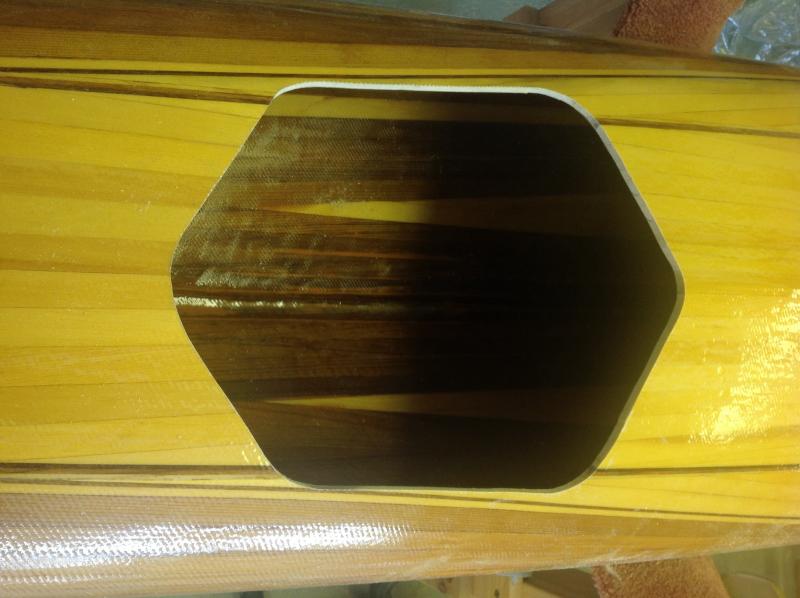
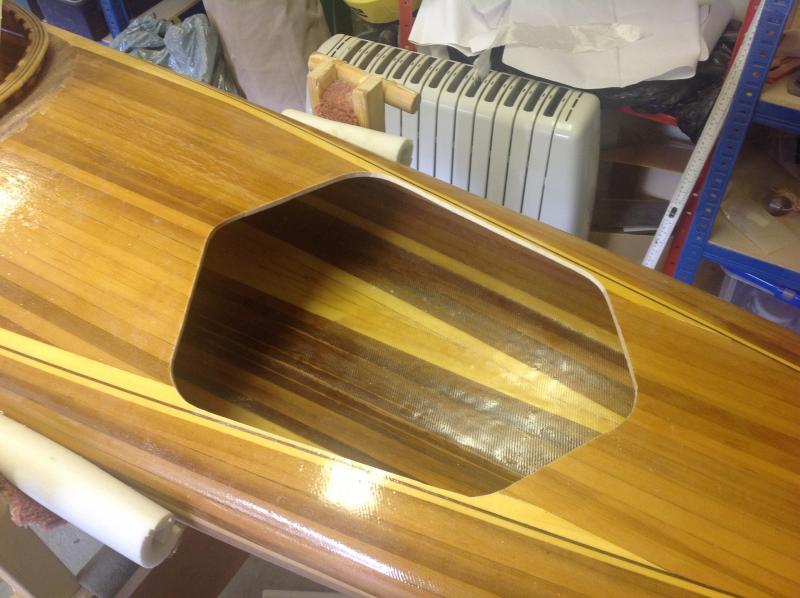
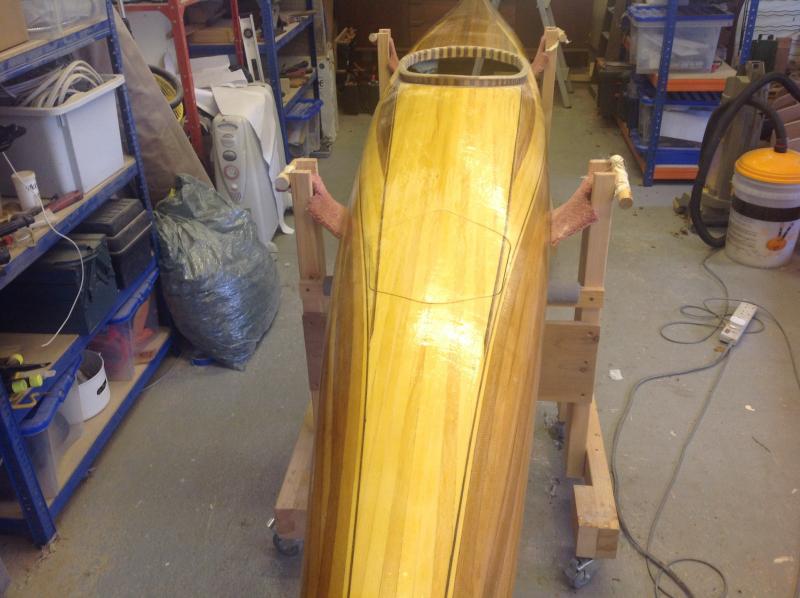
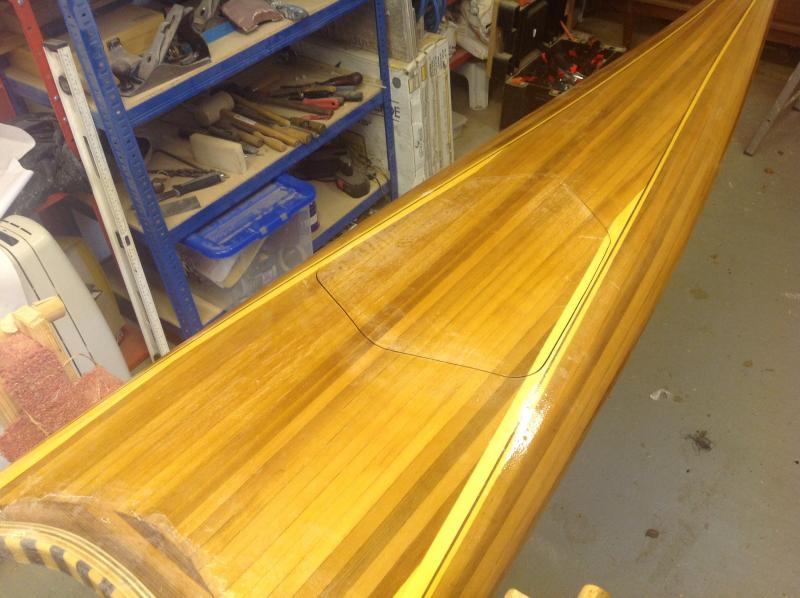
Re: Guillemot build
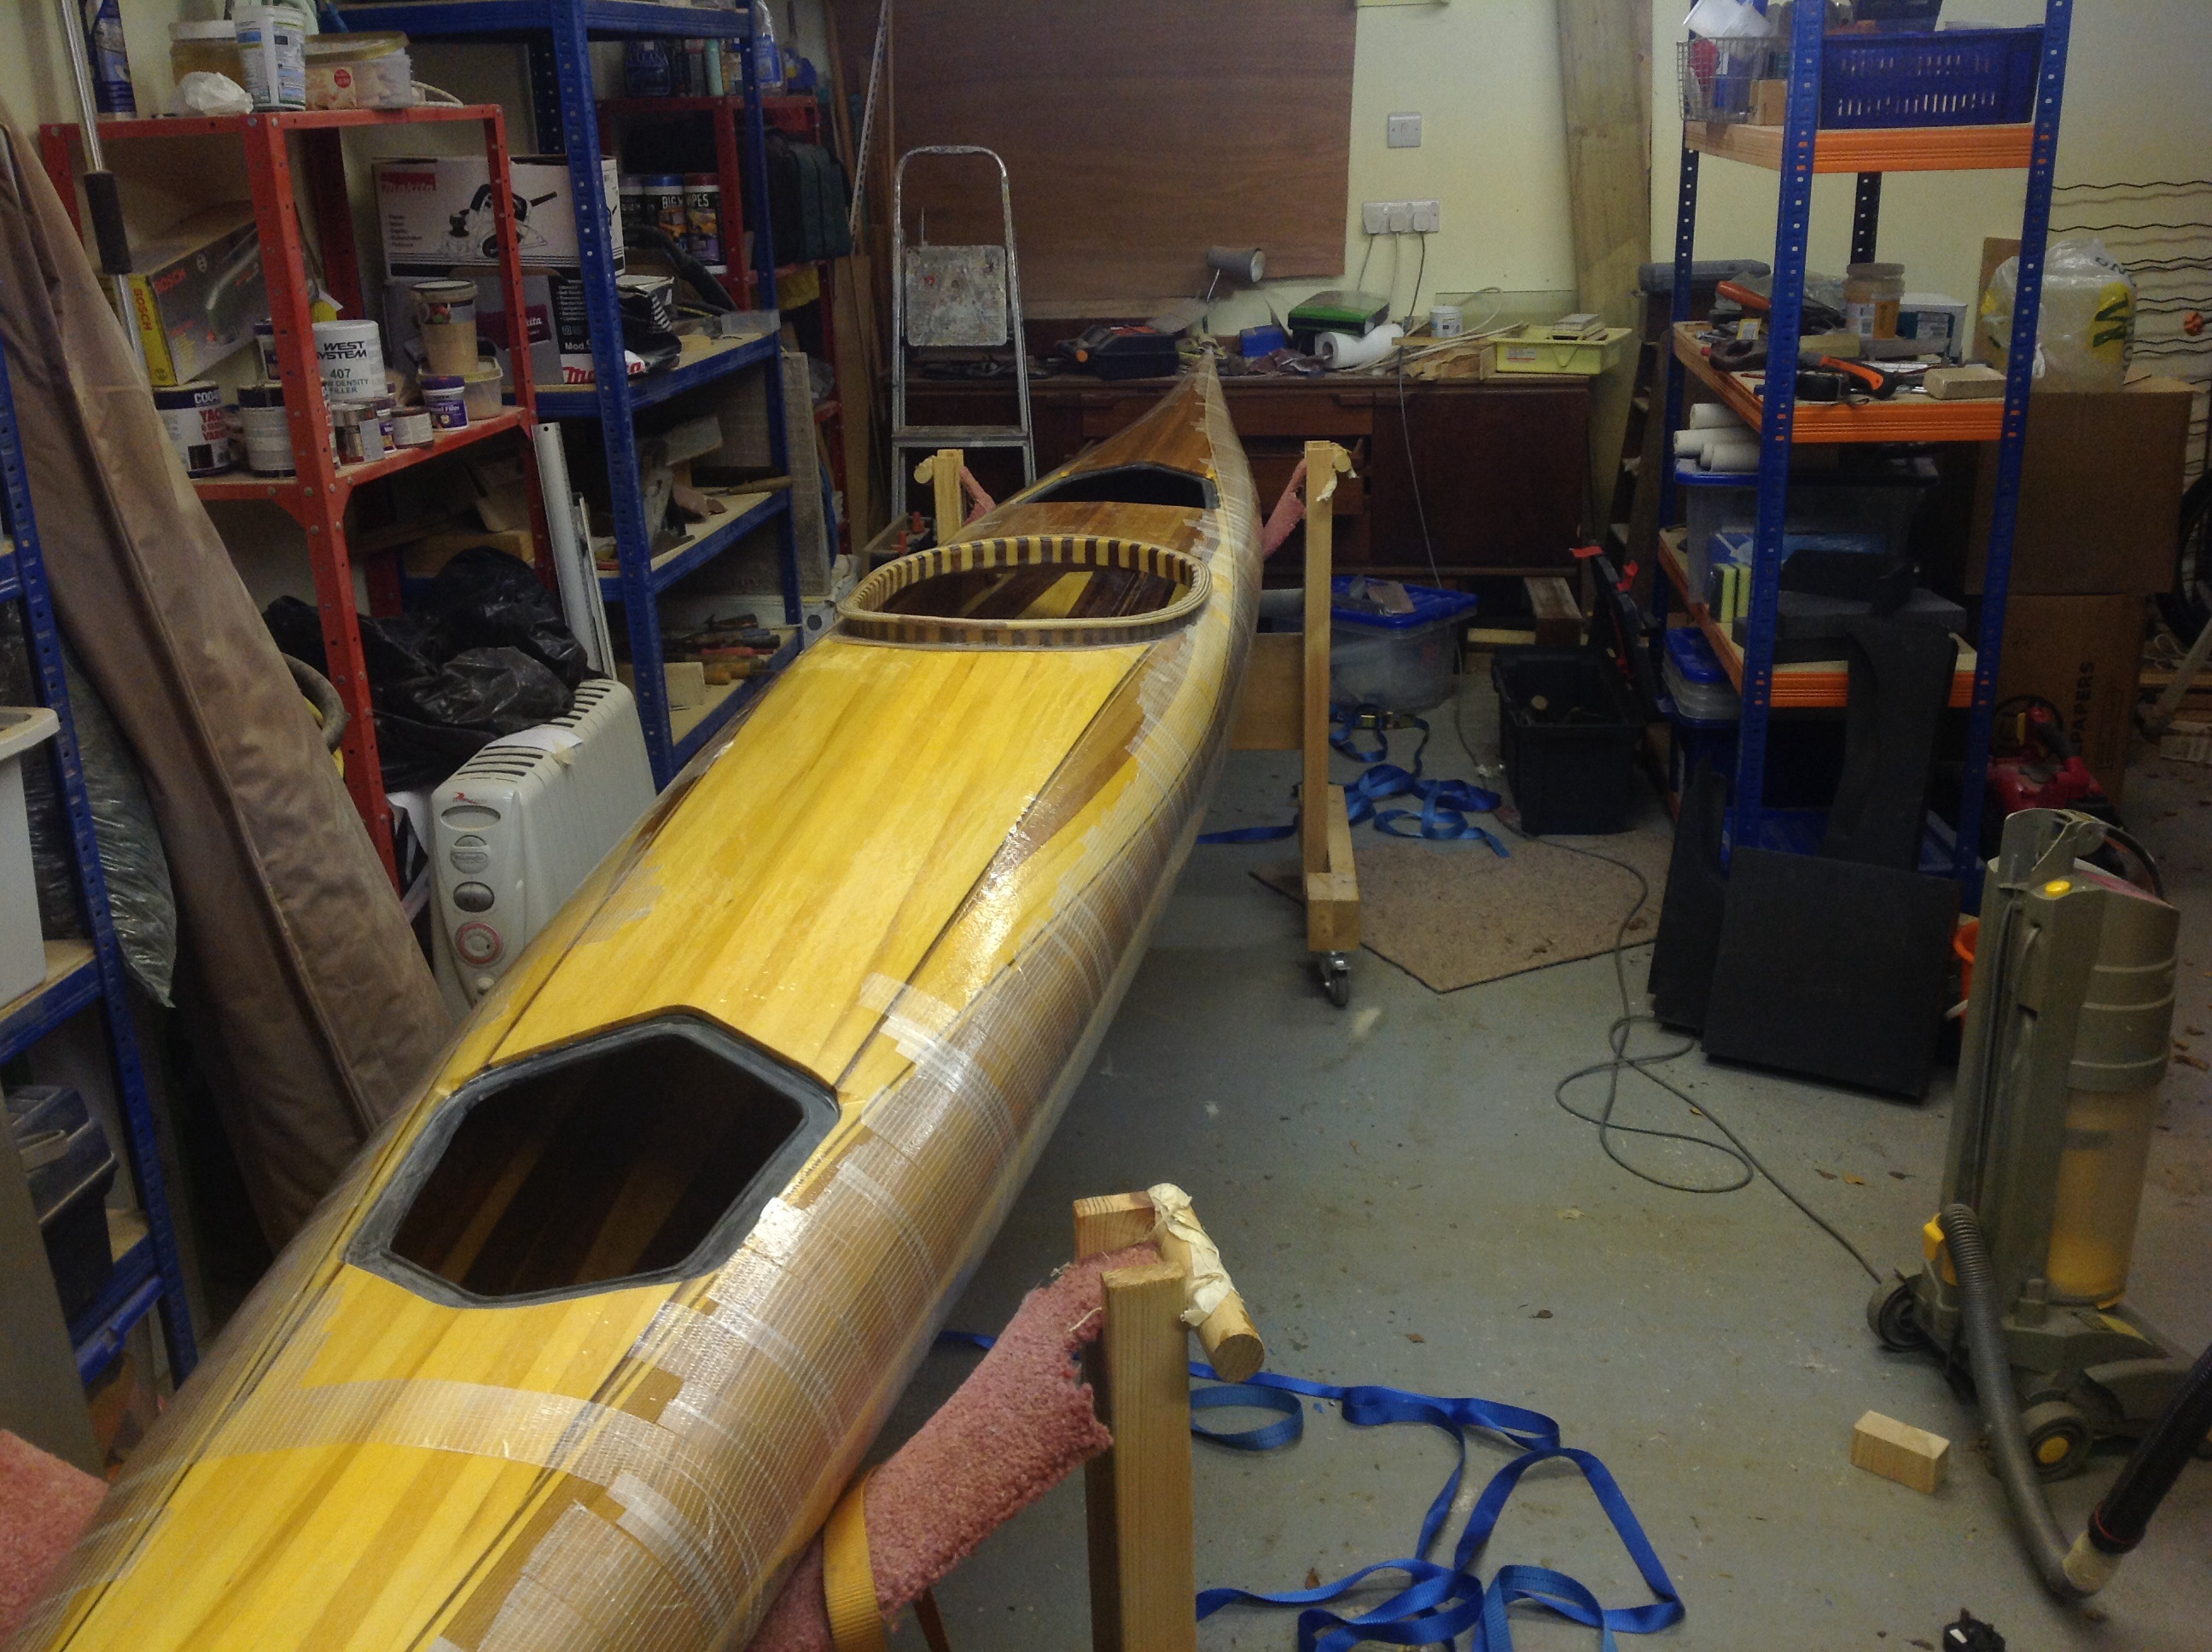
Cutting of the deck hatches has proceeded well. A big relief. I started with paper templates based on the measurements in Nick Schades book and modified the outline to fit with my stripping pattern. The outline was then transferred to masking tape. Having a very defined line does help when dust and sawdust is conspiring to obscure the view. It was very helpful to have my son providing an extra pair of hands and keeping the Hoover nozzle close to the jigsaw blade to clear the dust. I tried starting the cut with the jig saw by lowering carefully down until the deck was pierced, as suggested by Nick, but this was too uncontrolled and abandoned this. In the end I used the jigsaw blade by hand to make the initial hole. To stop the hatch splintering as it dropped through, it was taped up for support after the cut was around three quarters of the way around.
I've also started constructing the cheek plates with off cuts of strips.
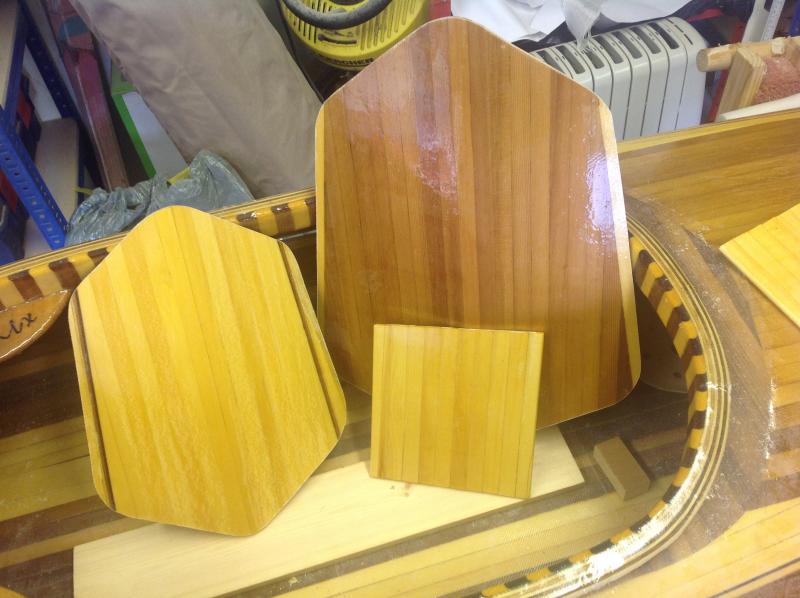
Next step is to make the hatch seals and fibreglass the cheek plates.
Last edited by Rainbow (7 Oct 2013 10:54 pm)
Offline
#40 20 Oct 2013 2:10 pm
- Rainbow
- Member
- From: East Devon
- Registered: 29 Sep 2012
- Posts: 75
Re: Guillemot build
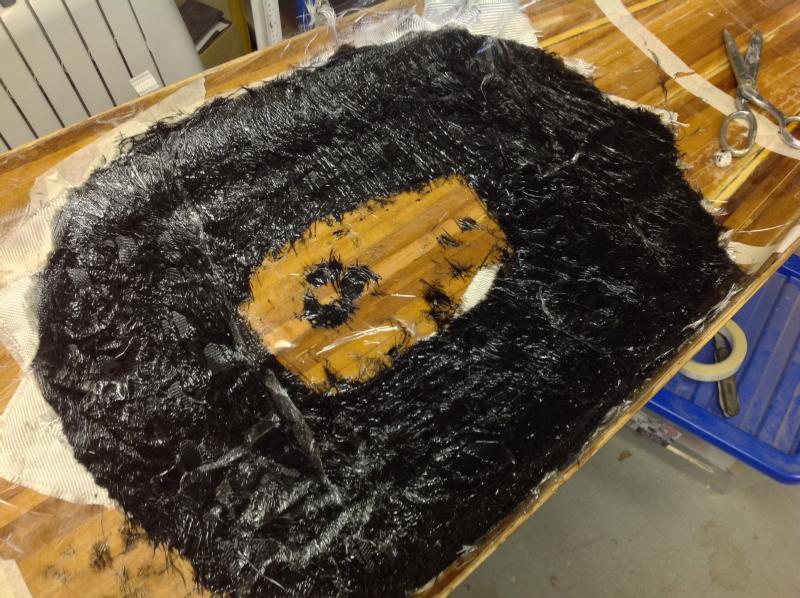
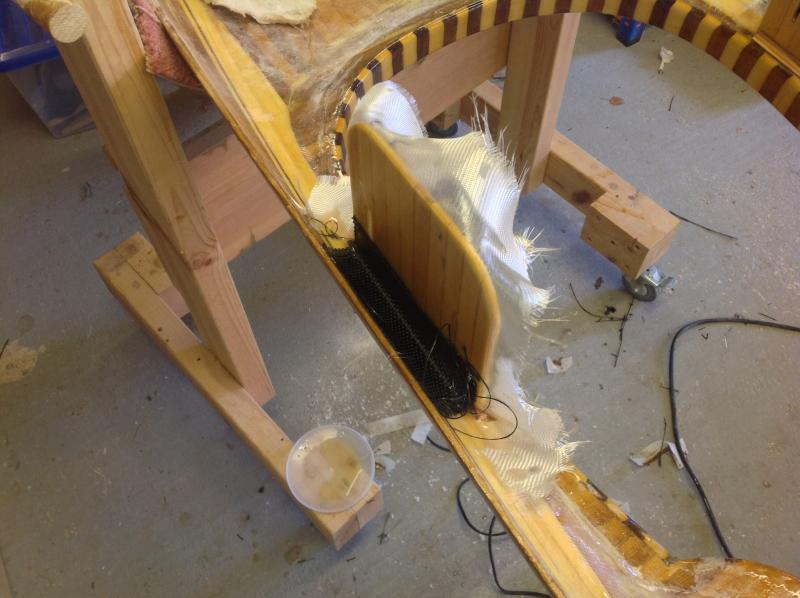
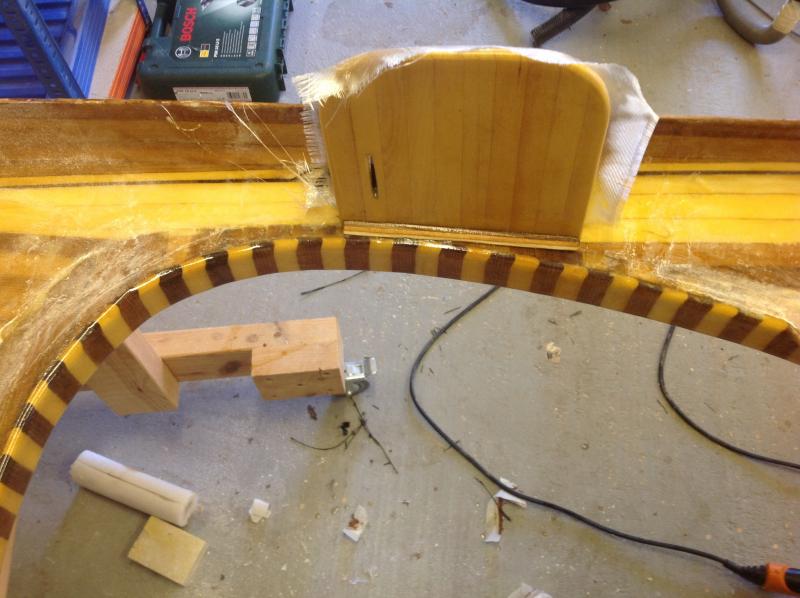
I'm building the hatch sealing rims according to a method that enables the hatches to remain flush, as detailed in Vaclav Stejskal's book. The hatch has been taped in place and I've used offcuts of cedar strip to support the hatch in line with the deck when the deck is turned over.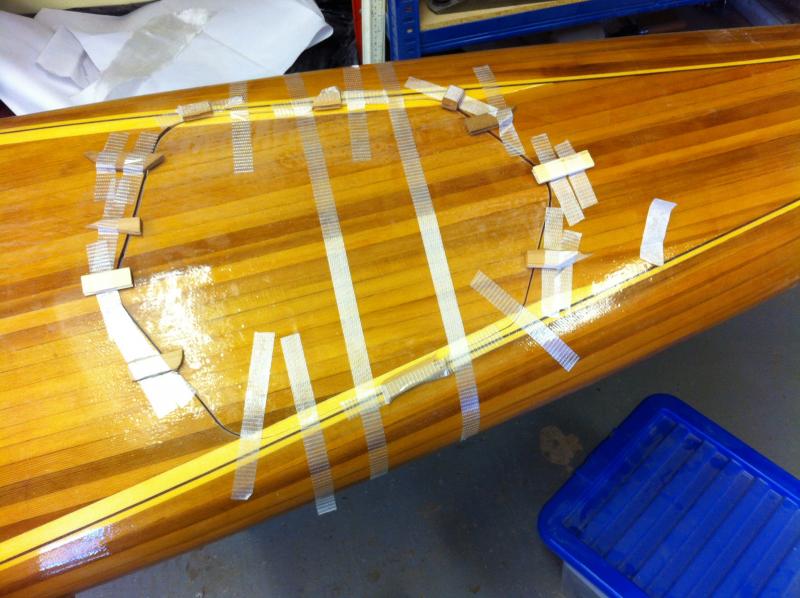
Several layers of fibreglass are layered over a mould that will create a channel to contain the neoprene hatch sealing tape supplied with the kit. The resin has been tinted black with polyester paste. It was recommended to cover the saturated glass with cling film and weigh down with damp sand so it conforms closely to the deck, I used damp towels instead which seems to have worked. Here is the result after the resin has been cured overnight and the cling film removed. Not a pretty sight at the moment however, once the resin has fully cured it will be removed, trimmed to size and glued back to the deck.
Last edited by Rainbow (2 May 2014 11:56 pm)
Offline
#41 27 Oct 2013 3:18 pm
- Rainbow
- Member
- From: East Devon
- Registered: 29 Sep 2012
- Posts: 75
Re: Guillemot build
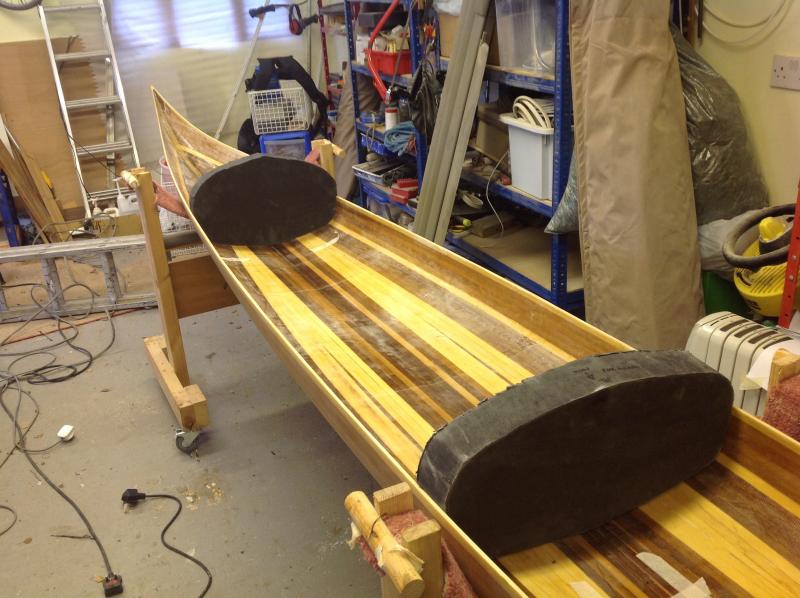
Here is the partially completed bow hatch rim. The inner shiny portion has been roughly tidied up, it will be trimmed back to 1/8" to form a small lip. I figure this will be easier to do once the rim has been glued in place.
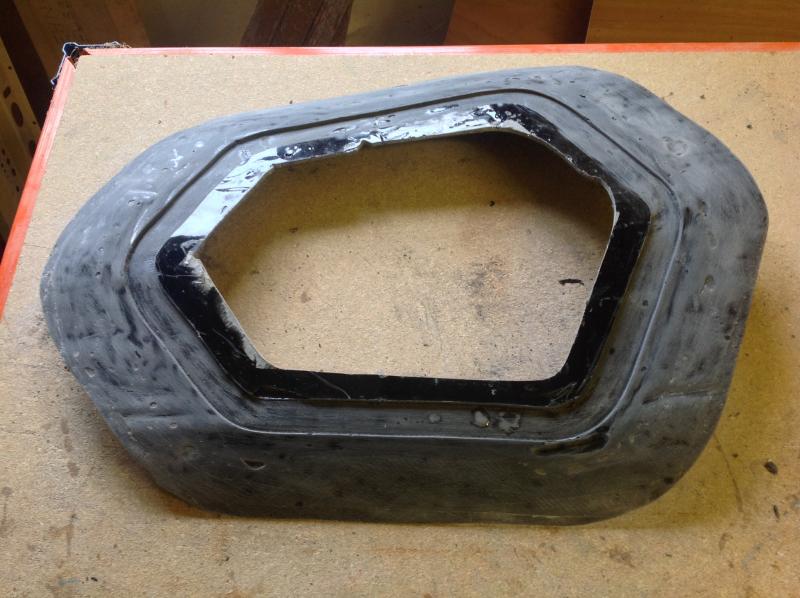
The stern hatch glued and clamped in position.

The sealing strip supplied with the kit will be placed in the recessed channel after the final varnishing has been completed. This will stand higher than the small lip and be compressed by bungee cords pulling the hatch down from inside. The lip will limit the compression and should keep the hatch cover flush with the deck. I'm pondering what option I use to allow the hatch to be lifted, either a small grab loop or a finger recess on the deck.
Last edited by Rainbow (28 Oct 2013 7:21 pm)
Offline
#42 3 Nov 2013 10:36 am
- Rainbow
- Member
- From: East Devon
- Registered: 29 Sep 2012
- Posts: 75
Re: Guillemot build
Hatch seals are now trimmed. One or two places to touch up when I have some spare resin. The hatches do sit flush with no sealing strip in place so I'll know where the problem lies if they don't after this is done.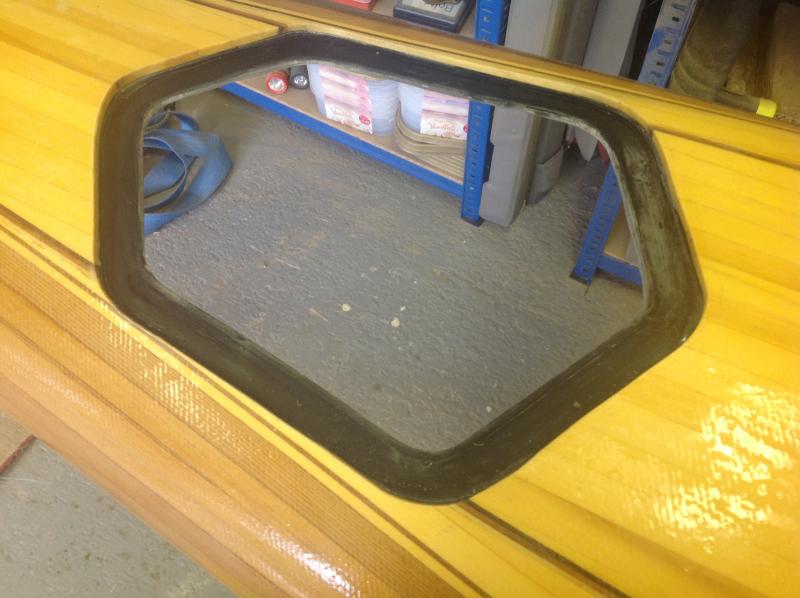
Offline
#43 14 Nov 2013 12:57 am
- Rainbow
- Member
- From: East Devon
- Registered: 29 Sep 2012
- Posts: 75
Re: Guillemot build
Installing the cheek plates with a fillet of of epoxy reinforced by several layers of carbon fibre tape on the concealed side. On the visible side an off cut of the laminated veneers used earlier in the stripping of the deck has been sanded down to a triangle profile and glued in place. This will be covered later with a layer of fibreglass.
Offline
#44 17 Nov 2013 7:10 pm
- Rainbow
- Member
- From: East Devon
- Registered: 29 Sep 2012
- Posts: 75
Re: Guillemot build
Bulkheads cut out from 3" minicell foam and in the hull for a test fit. I used the nearest form as a template and added or subtracted a few millimetres to compensate for the exact positioning of the bulkhead. These will be removed and installed after the deck and the hull are joined.
Last edited by Rainbow (16 Dec 2013 10:05 pm)
Offline
#45 16 Dec 2013 10:09 pm
- Rainbow
- Member
- From: East Devon
- Registered: 29 Sep 2012
- Posts: 75
Re: Guillemot build
One of two hardwood blocks glued in place ready to take the screws from the backband attachment.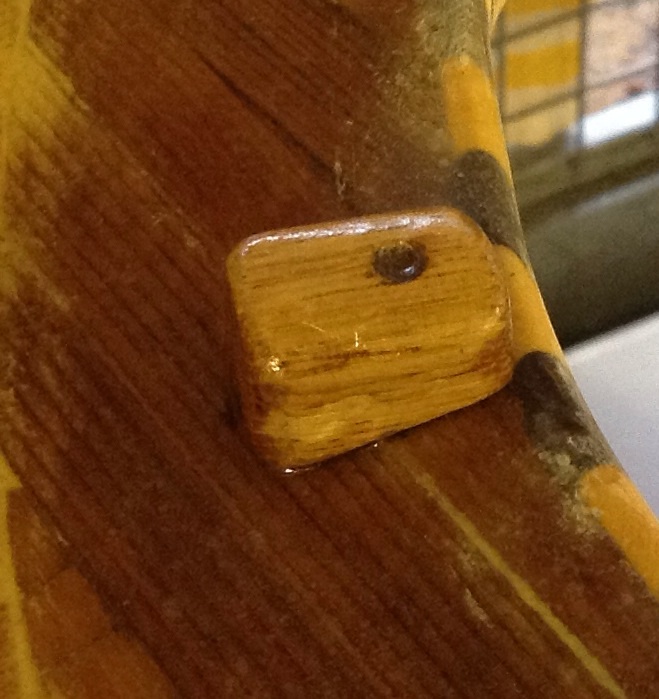
Last edited by Rainbow (31 Dec 2013 11:13 am)
Offline
#46 16 Dec 2013 10:24 pm
- Rainbow
- Member
- From: East Devon
- Registered: 29 Sep 2012
- Posts: 75
Re: Guillemot build
Some small bits of work on the hatches. First the components of the hatch hold down mechanism. Blocks glued in place in the hull for the attachment of a loop of bungee cord.
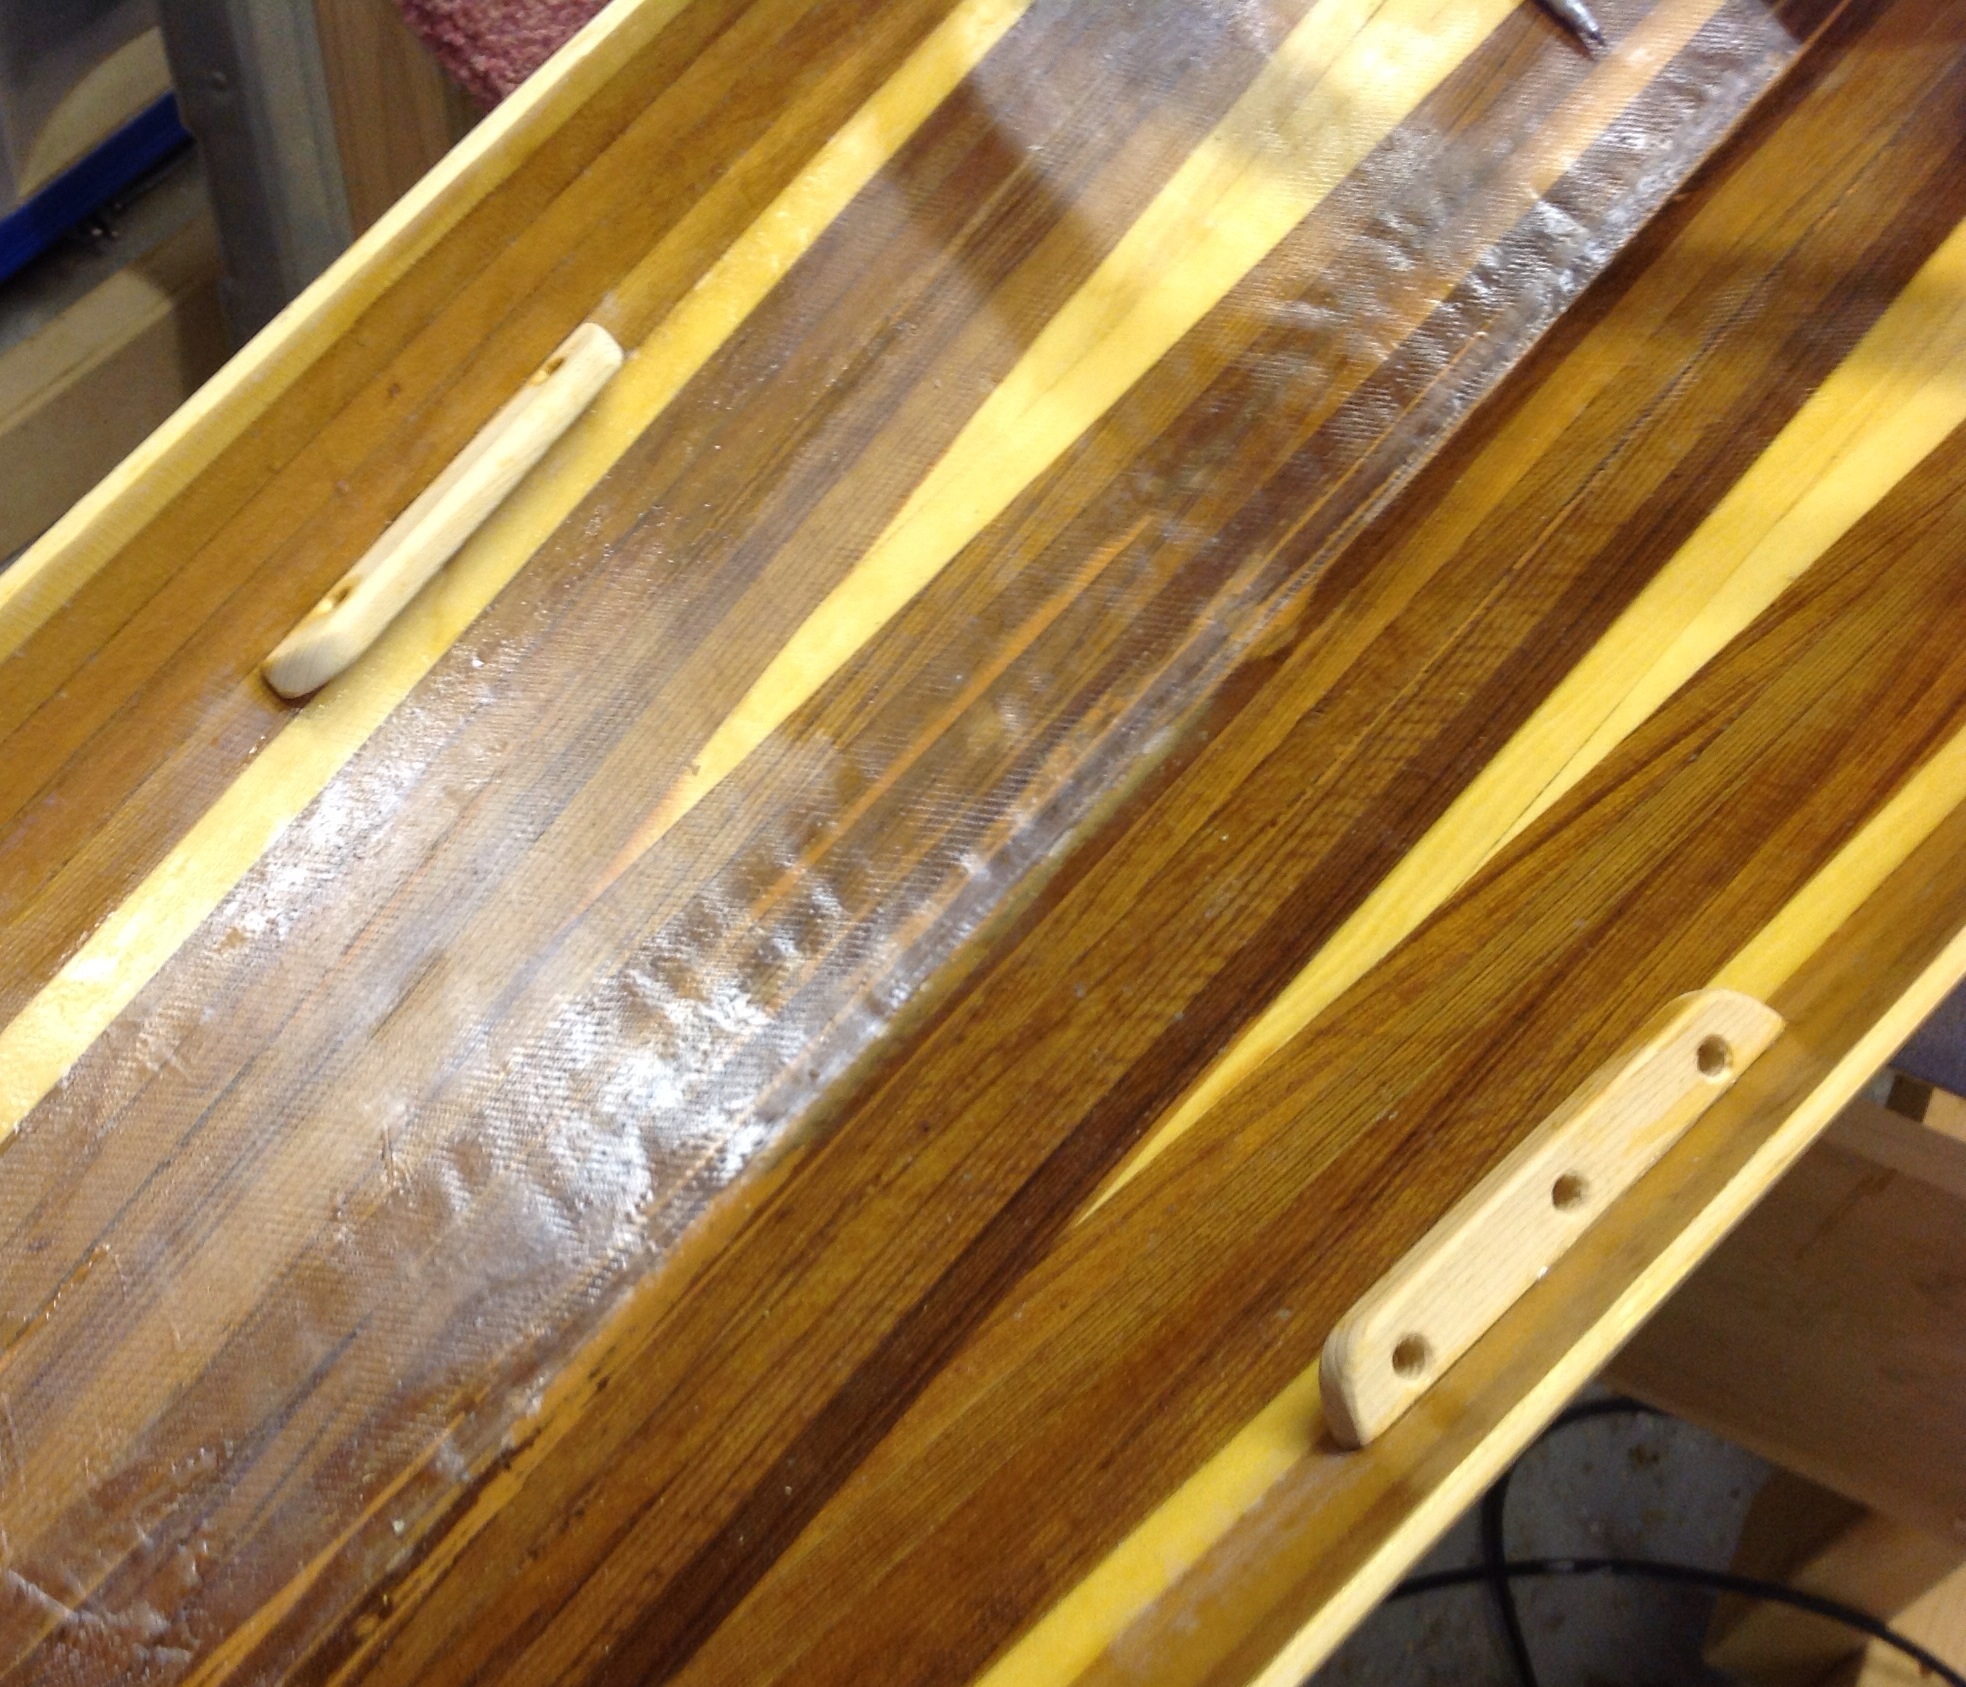
And complimentary pieces being glued in place on the underside of the hatch. Two stainless steel hooks will be screwed to each of the pieces, one of these is shown in position. The bungee loop will be stretched over these hooks.
To allow the hatch to be lifted, finger slots have been created with a rotary sander.
Last edited by Rainbow (16 Dec 2013 10:26 pm)
Offline
#47 21 Dec 2013 10:34 pm
- Rainbow
- Member
- From: East Devon
- Registered: 29 Sep 2012
- Posts: 75
Re: Guillemot build
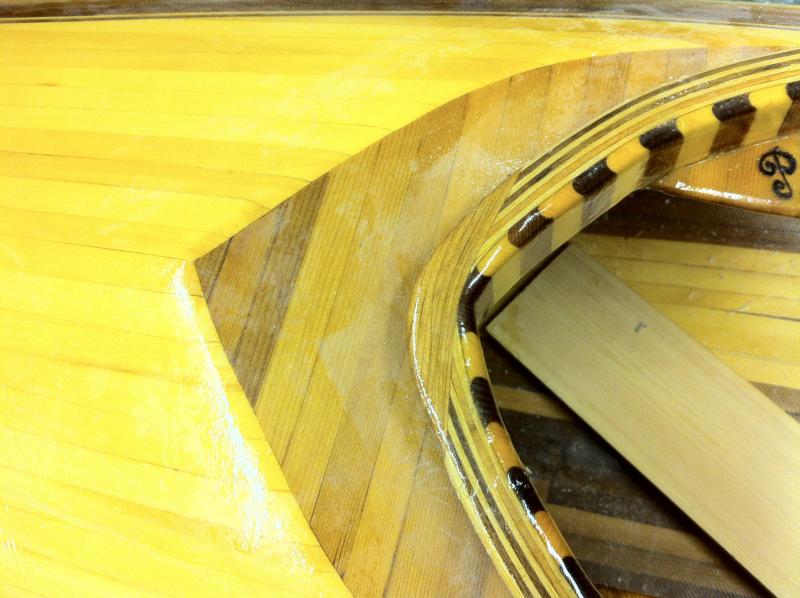
Preparing to join the deck and the hull. I am using ratchet straps to hold the deck tightly against the hull. Any slight adjustments needed can then be made to the fit before taping with fibreglass reinforced tape. In places the hull has needed a small amount of spreading and I've used lengths of wood to hold the shape until the deck is taped down. Taping tightly while the deck is clamped down has provided enough friction to keep the hull in place when the wood bracing is removed.
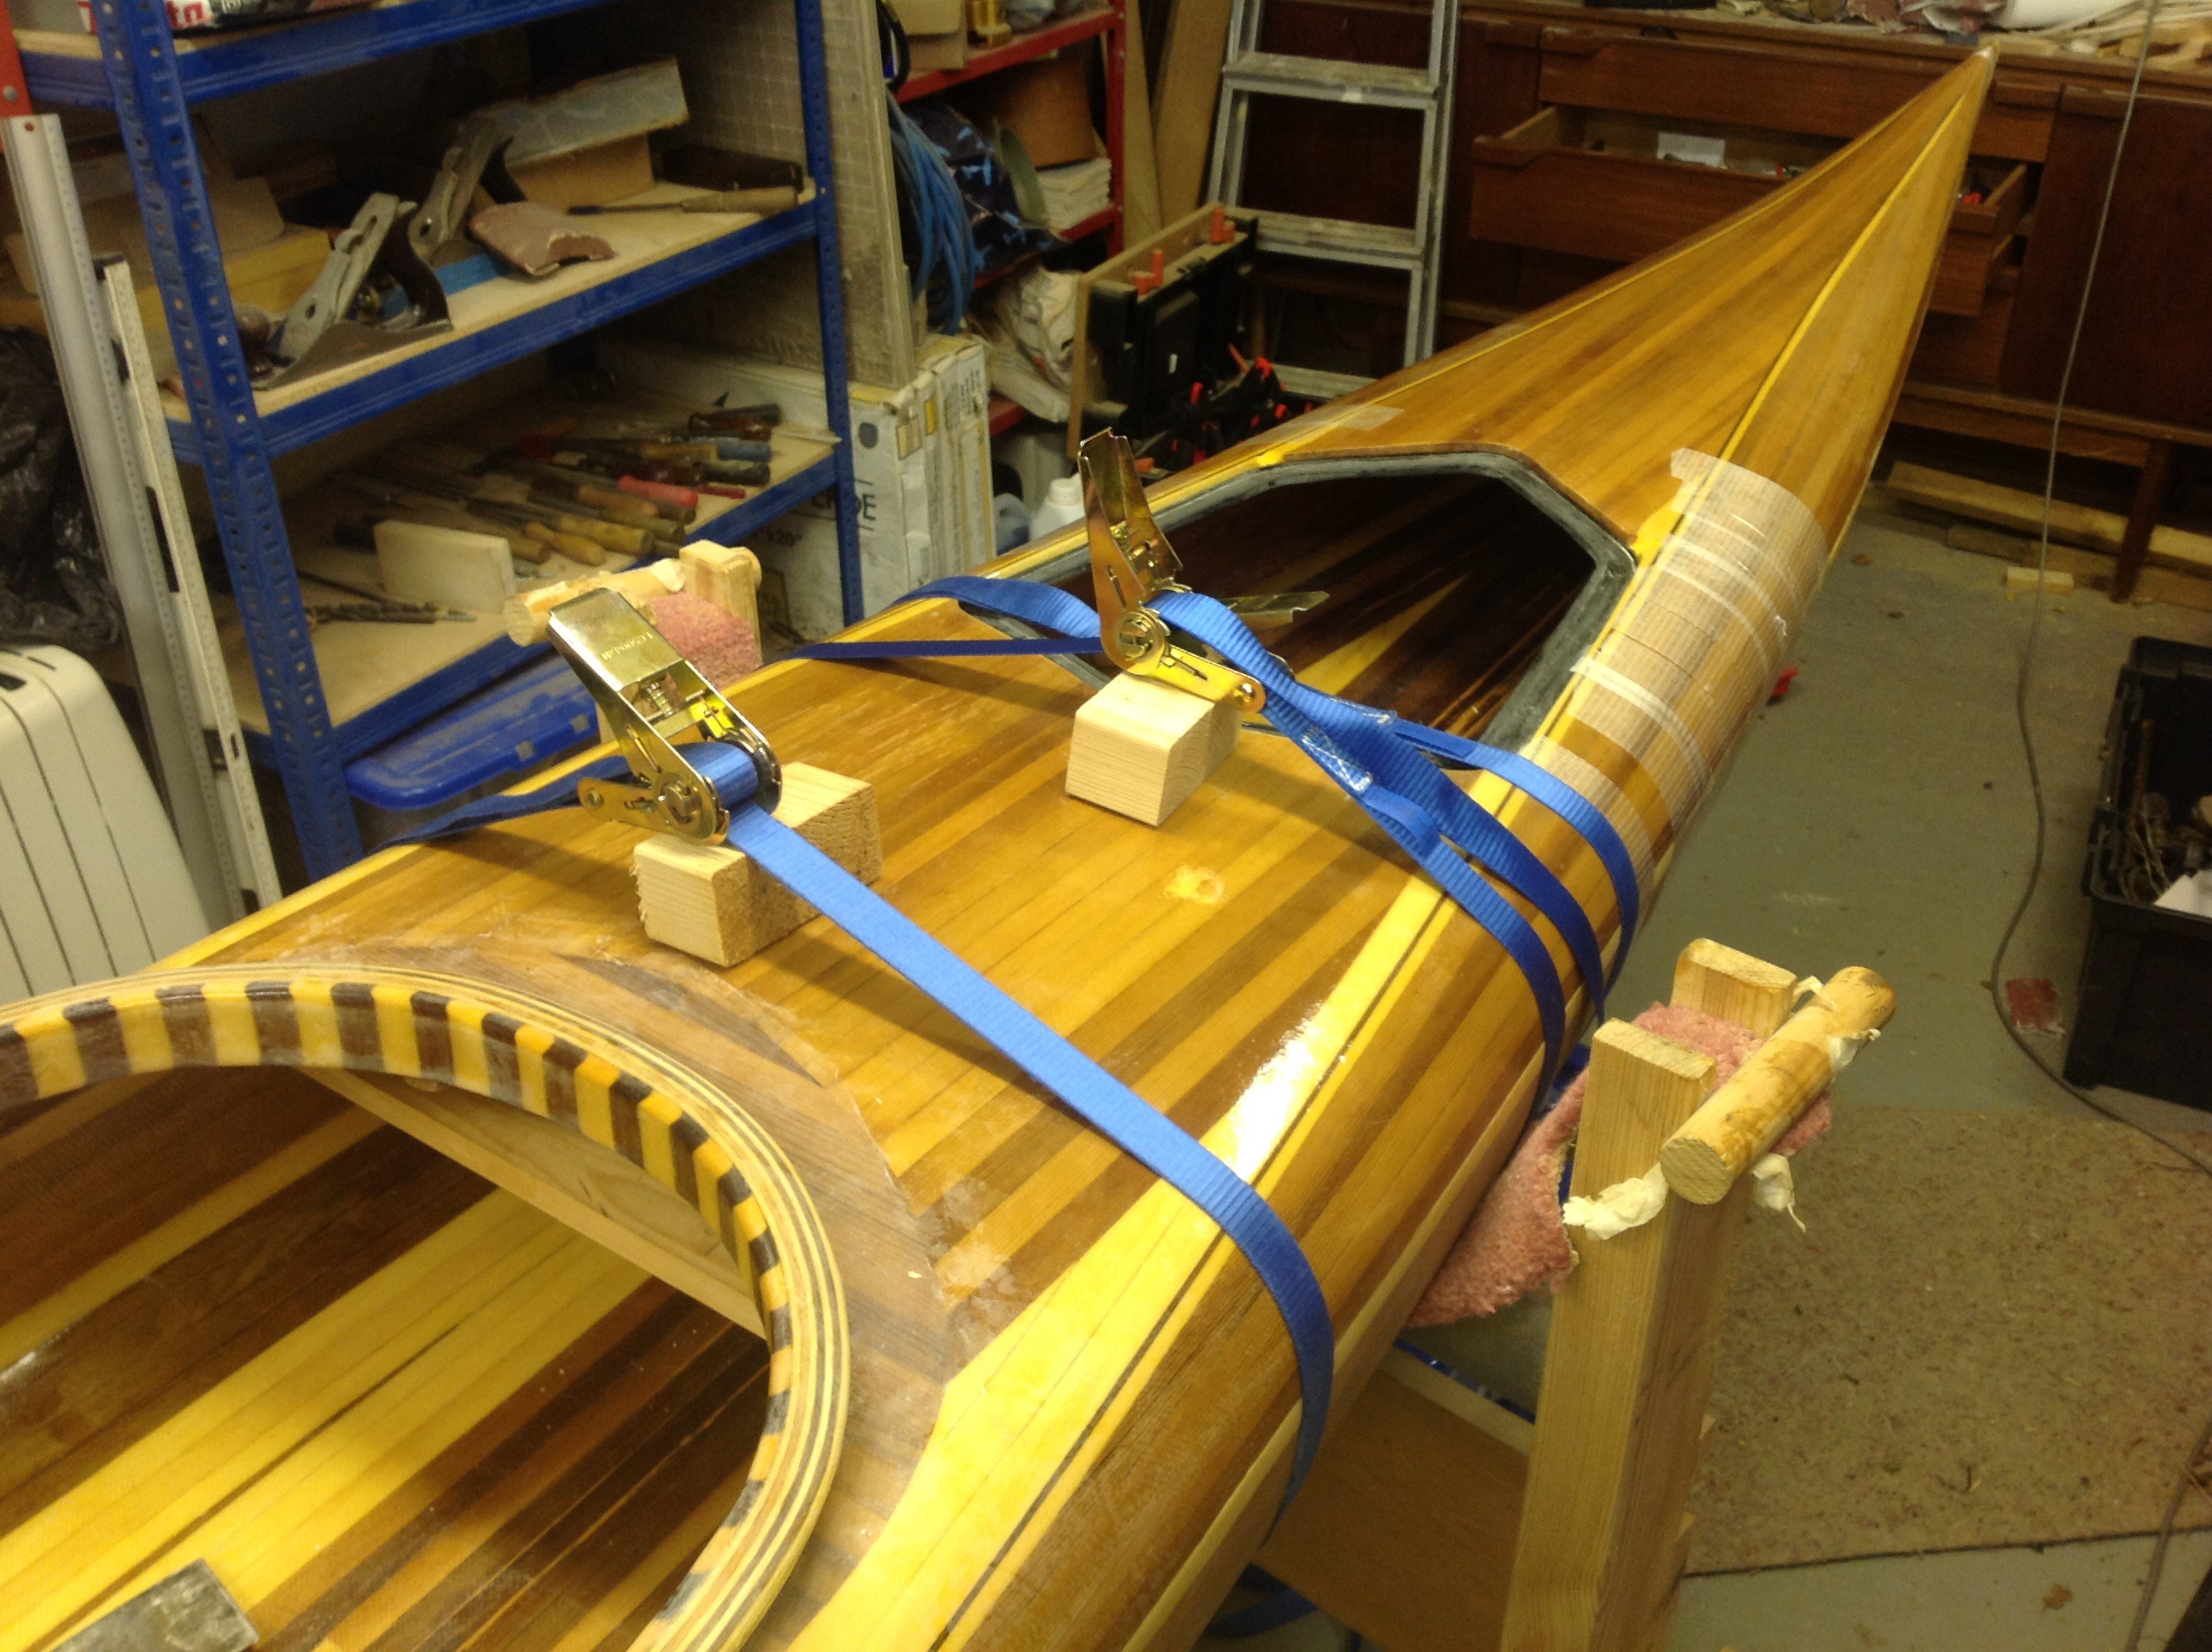
All taped up, ready for epoxying the inside join. Probably more tape than necessary but I wanted to make sure the deck and the hull were held together as tightly as possible to maintain the alignment.
Last edited by Rainbow (7 Jan 2014 2:52 am)
Offline
#48 12 Jan 2014 1:34 pm
- Rainbow
- Member
- From: East Devon
- Registered: 29 Sep 2012
- Posts: 75
Re: Guillemot build
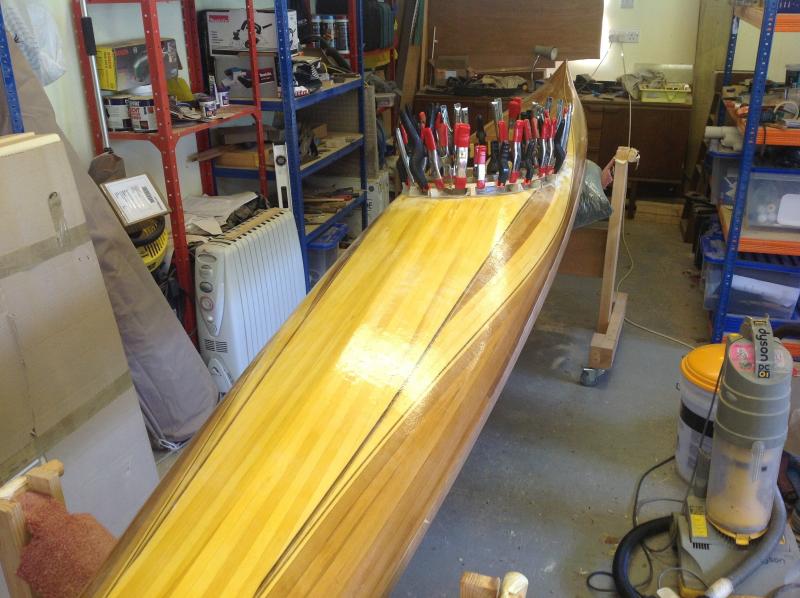
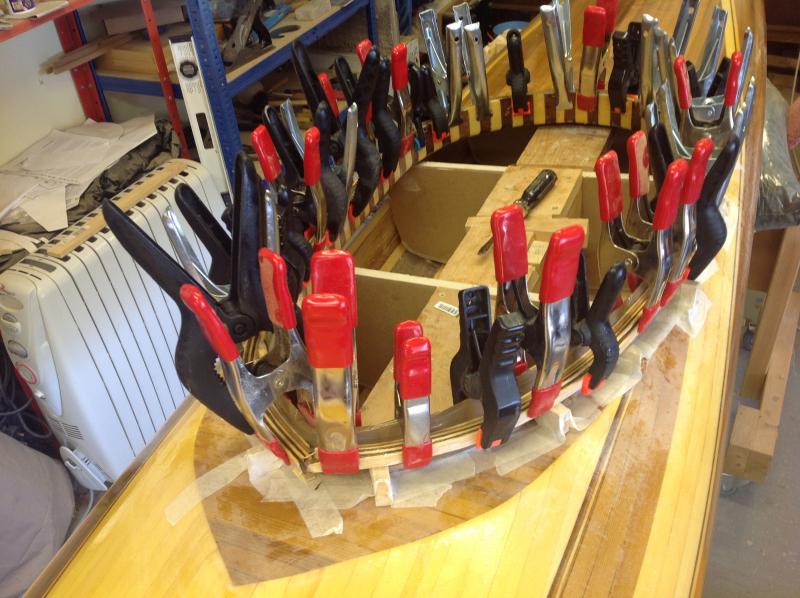
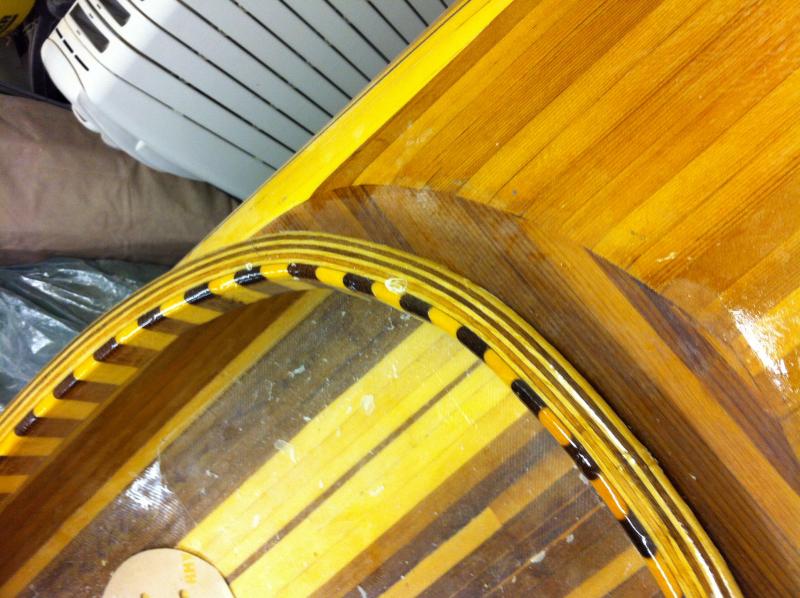
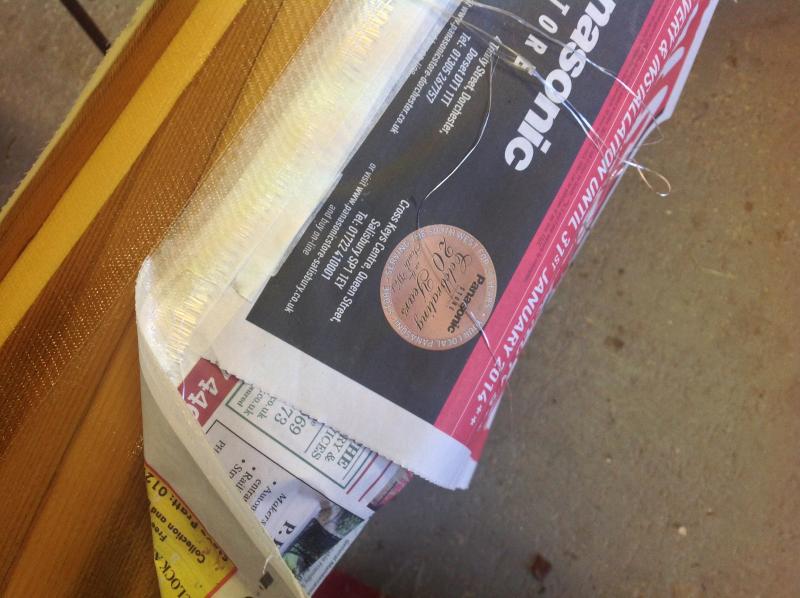
Both of the inside seams have now had two layers fibreglass tape applied, 2" followed by 1". The tape was applied in half lengths with the seam being hidden behind the hip braces. There are various methods of applying the tape documented in books and on the Internet, in the end I used the method of attaching a small paint brush to the end of a long stick. This was first used to paint the seam with resin while the rolled up tape was soaking in resin. Once saturated, the rolled up tape was gradually unrolled onto the seam. At first this can be done by hand but eventually the stick has to be used to push the roll until it is fully unwound. The picture shows the taping of the outside seam with a layer of 2" tape, with a filler coat having just been applied. I've used masking tape to keep the edges neat, trimming the fibreglass with a sharp knife before peeling back the masking tape. This is the second lot of masking tape by the way. I had already trimmed the fibreglass while the resin was still soft, peeled away to get a neat edge, then masked again before applying the filler coat. This will also need to be peeled away while the resin is soft. Leaving the tape on until the resin is hard leads to a world of pain.

Offline
#49 19 Jan 2014 5:43 pm
- Rainbow
- Member
- From: East Devon
- Registered: 29 Sep 2012
- Posts: 75
Re: Guillemot build
The remaining outside seam at the stage of peeling off the masking.
Offline
#50 13 Feb 2014 1:17 am
- Rainbow
- Member
- From: East Devon
- Registered: 29 Sep 2012
- Posts: 75
Re: Guillemot build
Not much to see but this is a progress log and progress has been made. The deck and the hull have been sanded down and have had a coat of epoxy. After my last experience of the epoxy orange peeling, I took extra special care to scrub the surface with a dishwashing scrubber and a degreasing solution and rinsed well with a hose. I even heated the garage and warmed the epoxy gently for several hours. I used a spreader rather than a roller to apply the epoxy. The result was much better. There was still the odd patch of orange peel which interestingly was worst on both of the hatch covers. No idea why.
Offline