A forum for discussing wooden boats and boat building
You are not logged in.
- Topics: Active | Unanswered
Pages: 1
#1 17 Jul 2011 10:58 pm
- Ed
- Member
- Registered: 15 Jul 2011
- Posts: 10
Canadian Canoe by Ed
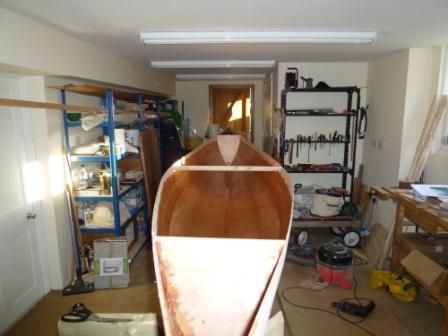
I'm in the middle of wiring the planks together to make my canoe. I got the kit in June and start and stop depending on the time I have.
HINT: watch the video before starting. I made understanding the everything I've done so far easy.
HINT: be scrupulous about using plastic to protect the wood and everything else from epoxy. A little leaked out and when separating the planks I caused a small crater. Luckily it was not big and I filled it with epoxy and sawdust.
Here are a few pictures.
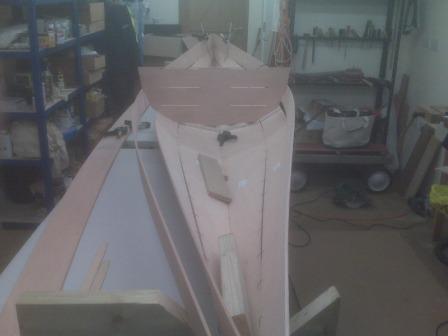
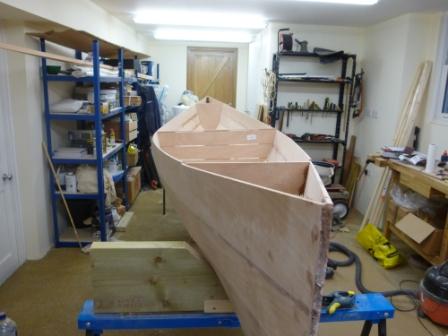
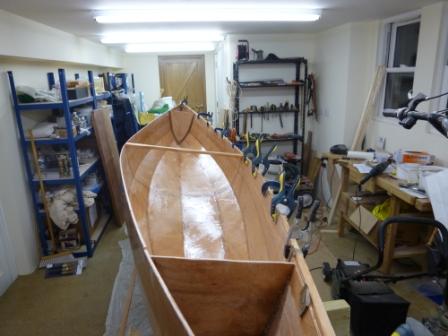
I made a V-brace from some 50x300 joist scraps that do a good job of holding the boat while I wire it. By having the boat on some tables (IMPORTANT: do not tell my wife I am using these tables to build a boat) it is a comfortable height to work.
Not far to go now to finish the wiring step.
Offline
#2 18 Jul 2011 10:28 pm
- Ed
- Member
- Registered: 15 Jul 2011
- Posts: 10
Re: Canadian Canoe by Ed
Just finished wiring all the planks and did one bulkhead before running out of wire. I'll call Fyne tomorrow to get some wire so I can get back on the saddle and ride!
Offline
#3 19 Jul 2011 7:17 am
- Fyne Boat Kits
- Administrator

- From: Cumbria, UK
- Registered: 22 May 2011
- Posts: 156
- Website
Re: Canadian Canoe by Ed
Thanks for the feed back. We shall increase the amount of wire included in the kit.
Offline
#4 20 Jul 2011 8:41 am
- Richard
- Member
- From: East Sussex
- Registered: 7 Jun 2011
- Posts: 75
Re: Canadian Canoe by Ed
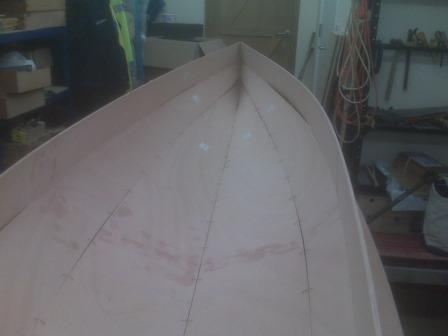
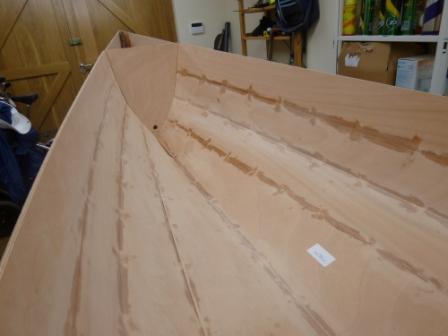
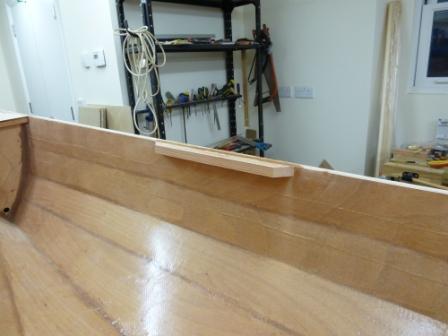
Its a great looking boat and seems to be going well but what are those slots in the bulkhead for?
Canoe & Kayak Owner
Offline
#5 26 Jul 2011 8:19 am
- Richard
- Member
- From: East Sussex
- Registered: 7 Jun 2011
- Posts: 75
Re: Canadian Canoe by Ed
Its a great looking boat and seems to be going well but what are those slots in the bulkhead for?
Anybody?
Canoe & Kayak Owner
Offline
#6 26 Jul 2011 7:56 pm
- Ed
- Member
- Registered: 15 Jul 2011
- Posts: 10
Re: Canadian Canoe by Ed
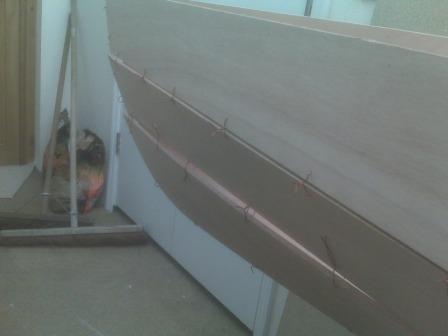
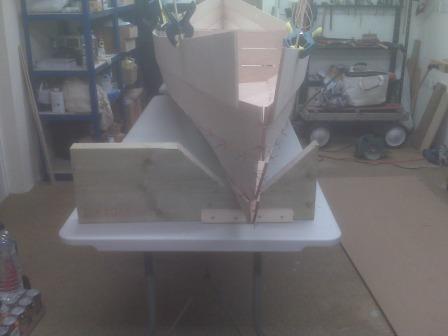
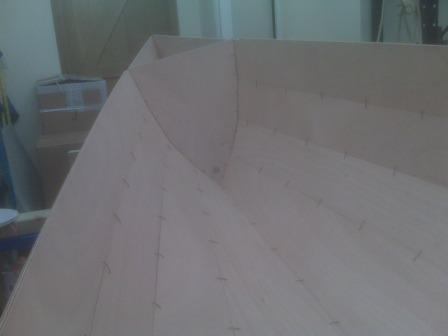
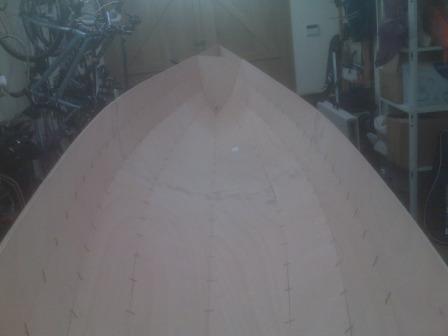
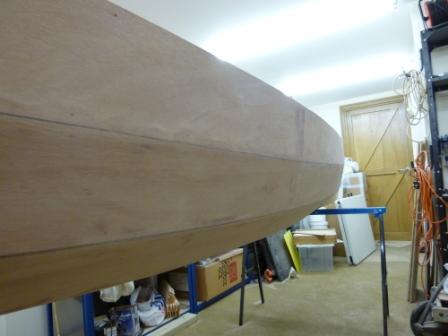
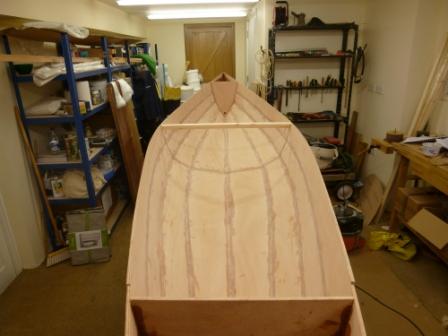
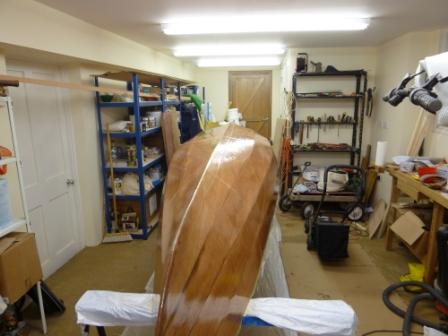
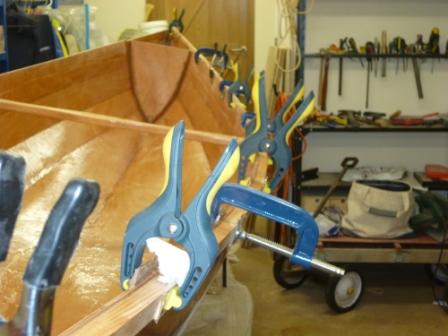
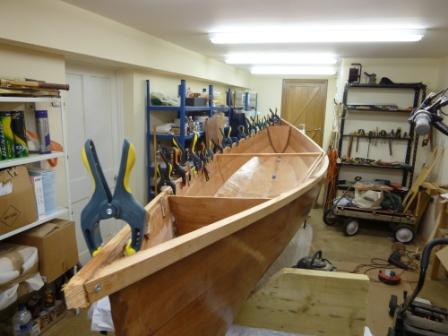
Back in the saddle! I got the wire and finished wiring the boat. I then tightened up all the wires by adjusting all the planks and going around and around tweaking the wires. So far so good, I think. Pictures below. The next step is to align the boat. It will have to wait a while because I'm off on holiday for a bit.
Regarding the previous question - I'm not sure what the slots in the bulkhead are for. It is a temporary bulkhead so it may just be made of scrap wood.
Offline
#7 27 Jul 2011 5:36 pm
- Fyne Boat Kits
- Administrator
- From: Cumbria, UK
- Registered: 22 May 2011
- Posts: 156
- Website
Re: Canadian Canoe by Ed
The slots are marks for the kneeling thwarts. The temporary bulkhead is needed to build the boat but we have also scored and half cut out panels on it that can be used to make two kneeling thwarts. The kit also contains the solid wood stiffeners to make the thwarts. Not everyone wants the thwarts but we have included them if the customer wants to have them. The solid wood parts can also be used as the basis for seats for those who want them.
Below are some pictures of seats made by customers.
Click on the pictures for a larger photograph.

Offline
#8 28 Jul 2011 7:40 am
- Richard
- Member
- From: East Sussex
- Registered: 7 Jun 2011
- Posts: 75
Re: Canadian Canoe by Ed
Ah clever!
Thanks.
Canoe & Kayak Owner
Offline
#9 20 Aug 2011 6:39 am
- Richard
- Member
- From: East Sussex
- Registered: 7 Jun 2011
- Posts: 75
Re: Canadian Canoe by Ed
How are you doingEd? Hope that you have gone quiet because you are on holiday rather than that the boat sank without trace
Canoe & Kayak Owner
Offline
#10 16 Oct 2011 9:20 pm
- Ed
- Member
- Registered: 15 Jul 2011
- Posts: 10
Re: Canadian Canoe by Ed
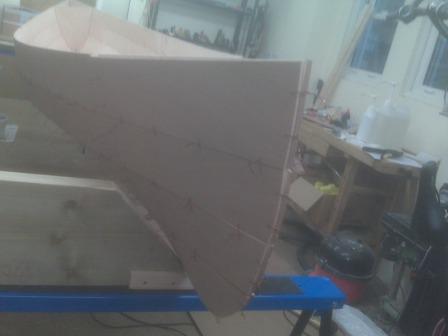
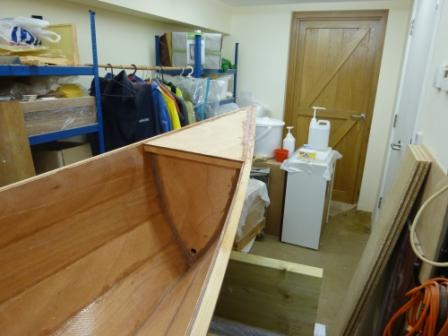
Yep, all went quiet because I was out of town a lot during the summer and had other duties (travel, golf, golf and harvesting honey from my beehive). The bees are sorted for the winter so I'm back on the boat and made lots of mistakes. Which I'm paying for by sanding and sanding and sanding and sanding.
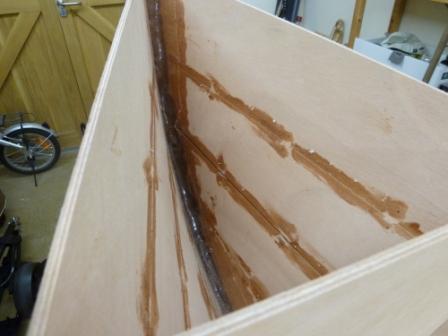
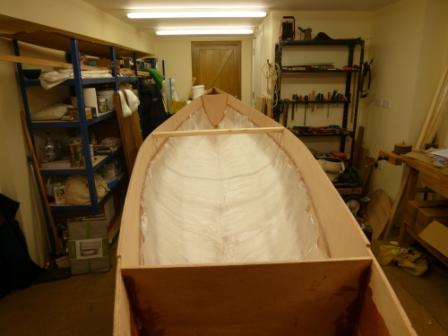
After wiring the boat, tightening the wires and aligning it I started to epoxy the seams between the wires from the inside. Stupidly, I did not use masking tape so there was epoxy allover the place. I also put on some epoxy on the outside before snipping the wires. I did about half the boat before realising I should use masking tape.
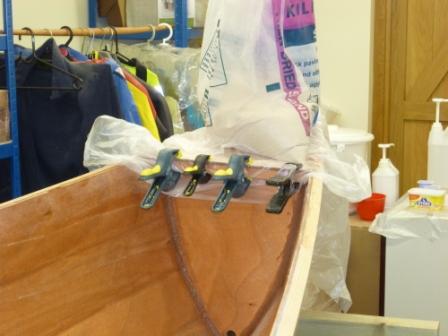
I also put fillets of epoxy in the bow and stern in the air tanks and put on the glass fibre ribbon. That part all went well.
After this, I snipped the wires, flipped the boat, and put epoxy along the whole seam (with masking tape this time). Then, to get rid of all this extra expoxy I sanded and sanded and sanded some more until my fingers are raw and my arms weak.
I'm almost there. Next step, I think, is to coat the outside with unthickened epoxy and then put glass fibre in the inside. I'll get there.
HINT: Use masking tape!!! See the pix.
Offline
#11 18 Oct 2011 7:22 am
- Richard
- Member
- From: East Sussex
- Registered: 7 Jun 2011
- Posts: 75
Re: Canadian Canoe by Ed
Good to see you back, Ed. It is easy to forget that boat building is not the only thing in life. Thanks for the hint. Are you putting the fabric on the outside?
Spelling corrected - I need to go back to school
Last edited by Richard (18 Oct 2011 7:24 am)
Canoe & Kayak Owner
Offline
#12 8 Jan 2012 5:47 pm
- Ed
- Member
- Registered: 15 Jul 2011
- Posts: 10
Re: Canadian Canoe by Ed
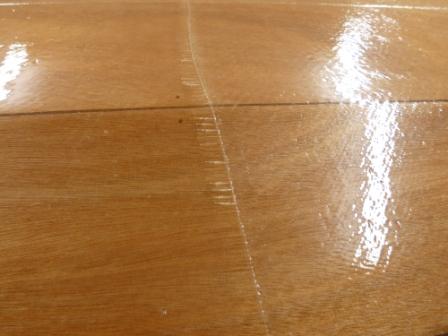
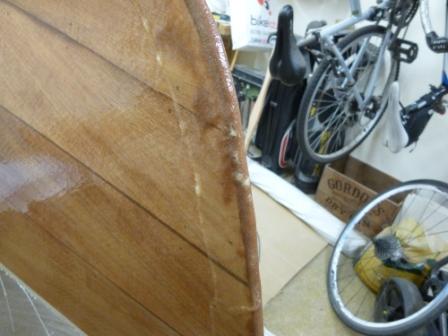
After a few months of doing a little on the boat now and then, I made some good progress. I grew the skin back on my fingers after all the sanding and did the preparation so I could epoxy the inside and outside with the glass fabric. See the pictures for the inside of the canoe by stages and then the outside after I put on the epoxy and fabrac and five hours later more epoxy to fill in the mesh
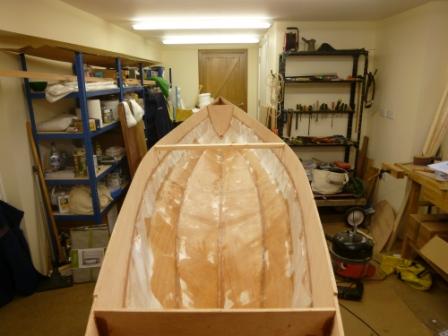
I have a question if anyone is reading this. Some of the fibres are sticking out:
- where I butted the pieces of fabric together, and
- at the end of the canoe.
See the last pictures.
What should I do about this? Sand it down and re-epoxy? With or without fabric?
Offline
#13 10 Jan 2012 1:05 pm
- Paul
- Employee

- From: Gatebeck Cumbria
- Registered: 4 Aug 2011
- Posts: 134
Re: Canadian Canoe by Ed
The fibres at the joint should be sanded off and the surface sanded smooth.
At the bow the bubbles should be sanded smooth if they are filled with epoxy or, if they are empty, the top should be cut off and the hole left filled with slightly thickened epoxy.
Also at the bow the few rucks on the edge of the tape should be cut off and the area sanded.
It is unlikely that you will need to recoat the areas. However, if you do cut through to the white fabric coat it with a very thin coat of unthickened epoxy.
The canoe is looking good.
Offline
#14 10 Jan 2012 5:42 pm
- gooseneck
- Member
- From: UK
- Registered: 20 Aug 2011
- Posts: 23
Re: Canadian Canoe by Ed
Thanks for answering that Paul. It is exactly what I did but I did not llike to say so incase I was wrong. My mind has been put at rest also.
Offline
#15 17 Jan 2012 7:44 am
- Ed
- Member
- Registered: 15 Jul 2011
- Posts: 10
Re: Canadian Canoe by Ed
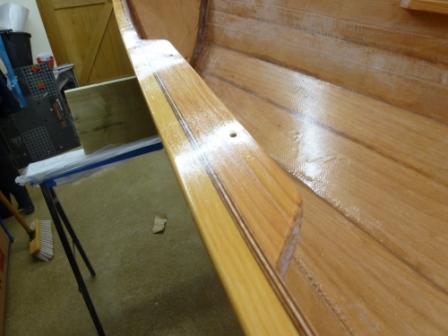
Thanks for the input. I sanded the bubbles and the fibres of the fabric whre they stuck up at the butt joints. I then applied another thin layer of epoxy.
After cutting off the excess fabric where it hung down and sanded it, I then:
- dry fitted the tank covers.
- installed the thwart (after giving it a coat of epoxy because I had some extra but not on the ends).
- installed one railing.
Installing the railing went smoother than I thought it would. I followed the instructions and it worked! I even got my wife to help hold the railing (another person is key). Tonight I will take off the clamps and see if it worked. I will be getting a few more clamps before doing the other railing and I suggest that you get lots and lots of clamps to do this.
Offline
#16 17 Jan 2012 8:32 am
- Richard
- Member
- From: East Sussex
- Registered: 7 Jun 2011
- Posts: 75
Re: Canadian Canoe by Ed
It alll looks fantastic but if itis as cold where you are as it was here when I came home from work I recommend that you do not hurry to remove the clamps on the rail. The cold slows cure up
Canoe & Kayak Owner
Offline
#17 17 Jan 2012 9:54 am
- Paul
- Employee
- From: Gatebeck Cumbria
- Registered: 4 Aug 2011
- Posts: 134
Re: Canadian Canoe by Ed
An assistant is one of the most useful tools in a workshop and the one that we are most often asked for but, at the moment, you will not see wife advertised under 'other products' on our website.
Richard is right, unless you are in a desperate hurry, do not remove the clamps for at least 24 hours – it is minus 4 degrees here and the epoxy will not cure quickly. If you are in a hurry test the epoxy by trying to dig your nail into it before removing the clamps.
It is a good idea when you have finished gluing to leave the pot containing the dregs (there should not be much unless you are a shareholder in Fyne Boat Kits) next to the wood. When you return you should examine the dregs for cure before moving the wood or sanding it.
Offline
#18 22 Jan 2012 6:22 pm
- Ed
- Member
- Registered: 15 Jul 2011
- Posts: 10
Re: Canadian Canoe by Ed
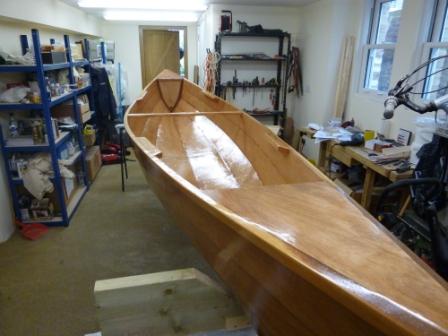
Lots done in the past few days. I have some good momentum now and want it to keep going. Here is my progress report
Both rails are now on thanks to an cooperative wife helping to hold the rail while I clamped. I got some more clamps as you can see.
I then put on the tank covers and weighted them down with whatever I could find including sand, tire chains, a litre of wood oil and a case of Tango.
24 hours later I took off the weights and plasic sheet. The bow turned out OK. Unfortunately the rail at the stern is not quite high enough so after I am building it up with thickened epoxy.
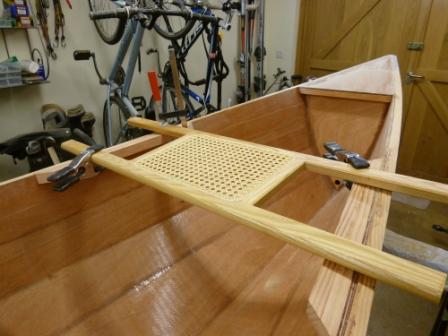
I will install cane seats provided by Fyne and expoxied on "doublers" to make a hanging support for the seats. Here is the before (clamped) and after (corners trimmed).

Next steps are to finish the doublers, tidy everything up with sanding and more expoxy, then install the seats.
Offline
#19 12 Feb 2012 9:55 pm
- Ed
- Member
- Registered: 15 Jul 2011
- Posts: 10
Re: Canadian Canoe by Ed
OK, got the doublers finished and sanded. Roughly fit the seats and epoxied everything that was bare - twice. I then fit the seats more closely which involved cutting down the spacers. After a final check for epoxy and lightly sanding to provide a key, I will varnish the boat and then fit the seats.
Offline
#20 26 Feb 2012 10:36 pm
- Ed
- Member
- Registered: 15 Jul 2011
- Posts: 10
Re: Canadian Canoe by Ed
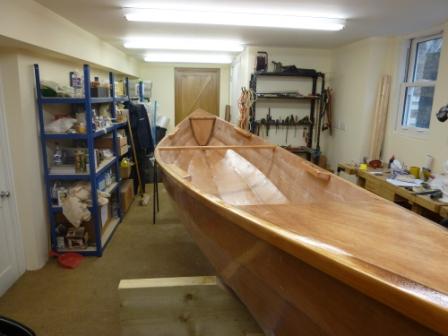
Almost done. I just put three coats of varnish on the canoe. After it dries I fit the seats. I hope to get it on the water next weekend.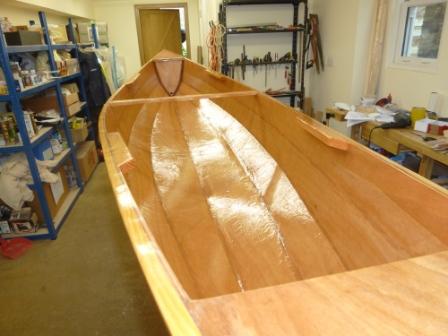
Offline
#21 26 Feb 2012 10:49 pm
- beaker
- Member
- Registered: 9 Oct 2011
- Posts: 81
Re: Canadian Canoe by Ed
Nice lines there - looking forward to seeing it on the water.
Offline
#22 18 Mar 2012 7:13 pm
- Ed
- Member
- Registered: 15 Jul 2011
- Posts: 10
Re: Canadian Canoe by Ed
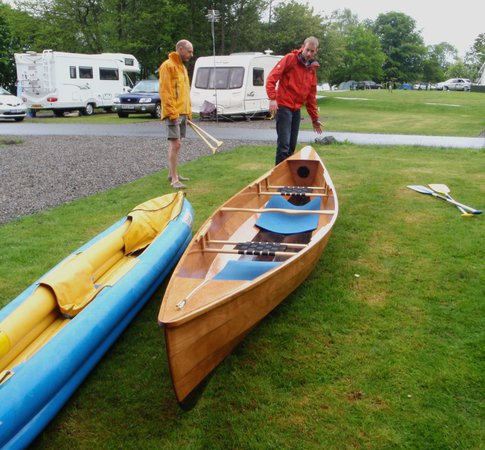
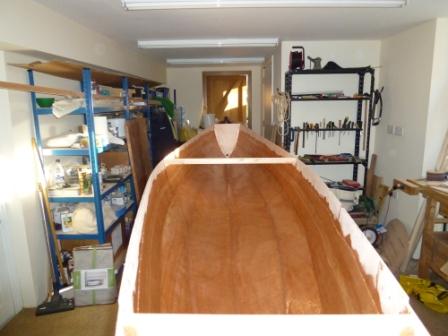
FINALLY DONE!
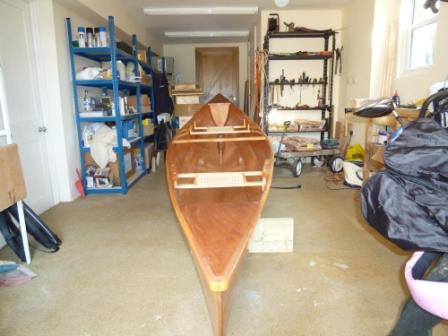
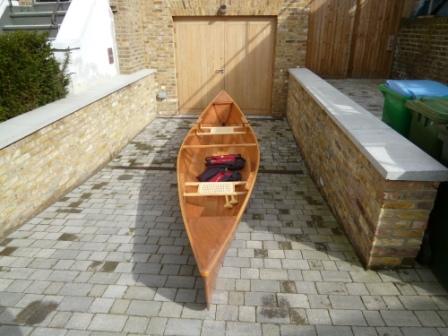
Despite a few delays during the past few weeks, I finally finished. While installing the seats I bent one fo the machine screws and had to find another which I did from marine supply shop. Fitted that and then we were done! Due to travel committments weather I had to wait a few more weeks before I could get in on the water. I bought a kayak trolley and walked it 200 yeards to the Thames, walked it down to the water, launched it, got in and started paddling.
The first picture is the final one in my garage.
The second picture is the canoe secured to a trolley.
The third picture is the canoe on the Thames near Richmond Lock.
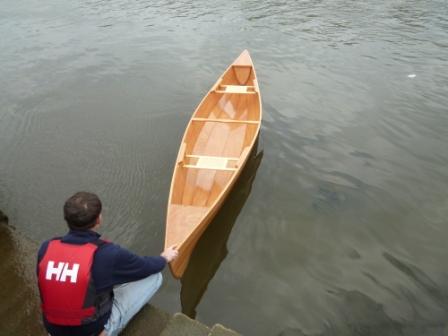
Thank you Fyne Boat Kits!!!
Offline
#23 19 Mar 2012 8:26 am
- Phil
- Employee

- Registered: 8 Jun 2011
- Posts: 74
Re: Canadian Canoe by Ed
Hey Ed - well done! I hope you're pleased with how she handles? You've done a great job - it looks very regal and I bet you get many admiring comments which should make you feel proud.
Phil
Offline
Pages: 1