A forum for discussing wooden boats and boat building
You are not logged in.
- Topics: Active | Unanswered
#26 7 Dec 2011 11:59 pm
- pam5
- Member
- Registered: 16 Jun 2011
- Posts: 92
Re: 20 ft sea going rowing boat
When I had all three strips cut to size, I fitted the first one and then added a good amount of resin silica mix with flour to give the same colour as the wood to the inside face of the bend, then very carefully I jammed the second bit up against the bulkhead and started to bend the second laminate bit by bit. It was quite messy as I came to the full bend as it would start meeting the first laminate and moving the resin around, also each laminate had to be a bit shorter as it sat inside the first curve. The point where the laminates met the bulkhead was a bit messy but I knew it could be tidied up once the resin had gone off.

Offline
#27 8 Dec 2011 12:01 am
- pam5
- Member
- Registered: 16 Jun 2011
- Posts: 92
Re: 20 ft sea going rowing boat
to make the whole thing rigid and locked into the frame I added a lump of resin to the deck framework, nothing more than a big splodge that I smoothed flat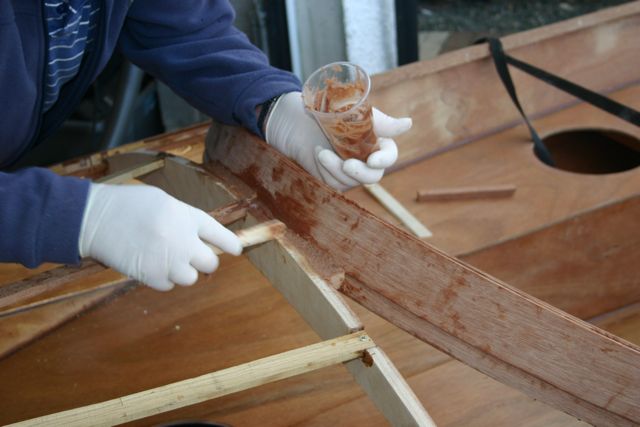
Offline
#28 8 Dec 2011 12:22 am
- pam5
- Member
- Registered: 16 Jun 2011
- Posts: 92
Re: 20 ft sea going rowing boat
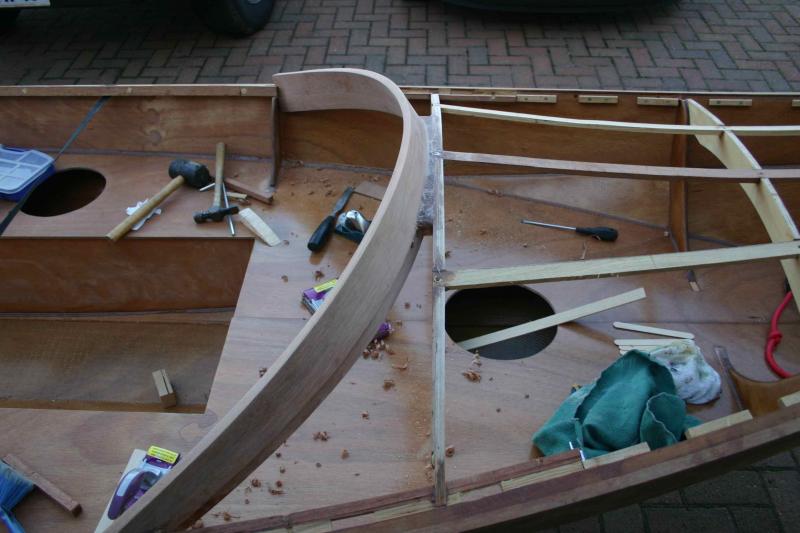
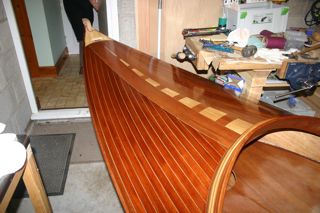
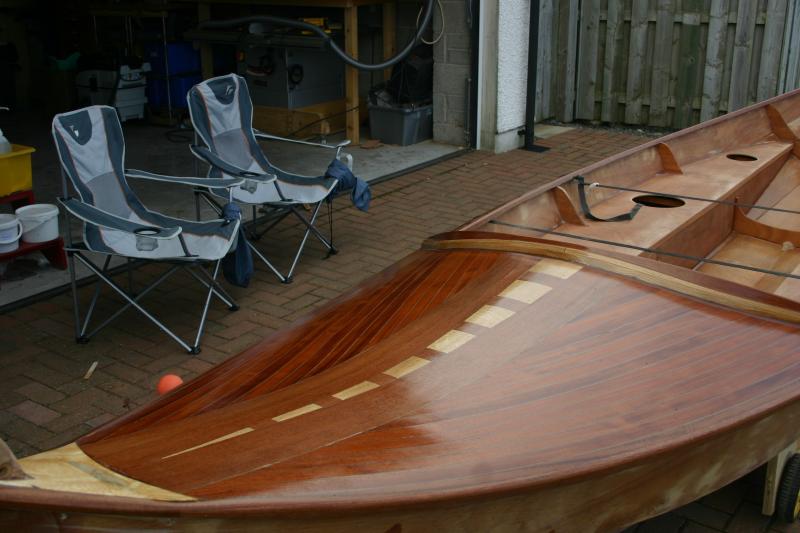
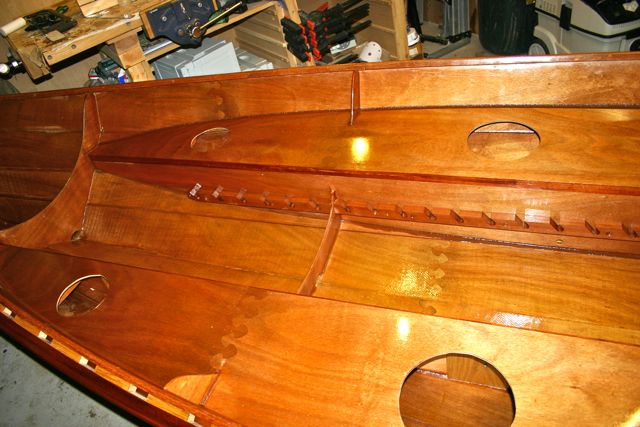
Back to the strip deck. Once the plywood was on and screwed down to the frame the compound shape came to life. I removed the screws and gave it a quick sand to knock of the edge where the two bits met in the middle. Next came the design of the deck. As you will see in my photos at the beginning of the log, it looks like a quite fancy affair, well sorry to shatter any illusions, the only reason I had the broader strips in the middle was that I didn’t have enough smaller strips to do the whole deck so I compromised, put some broad strips in the middle to reduce the surface area so I would have just to enough to cover the deck. 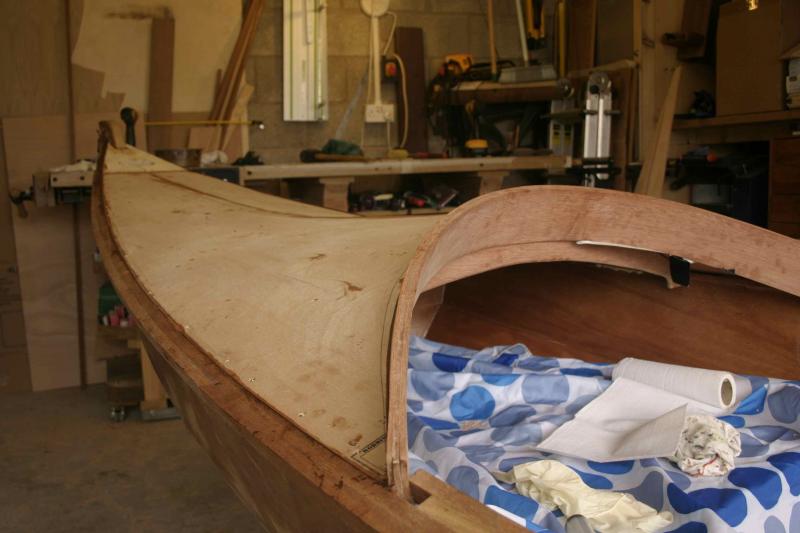
Offline
#29 8 Dec 2011 12:26 am
- pam5
- Member
- Registered: 16 Jun 2011
- Posts: 92
Re: 20 ft sea going rowing boat
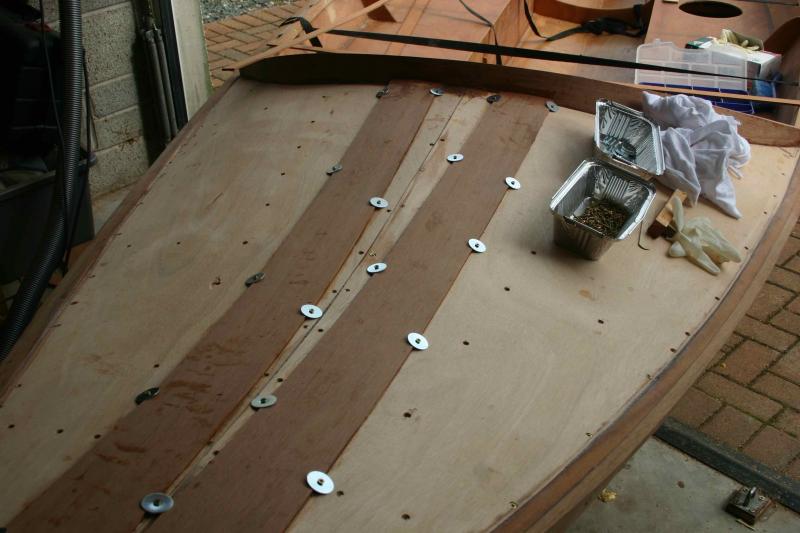
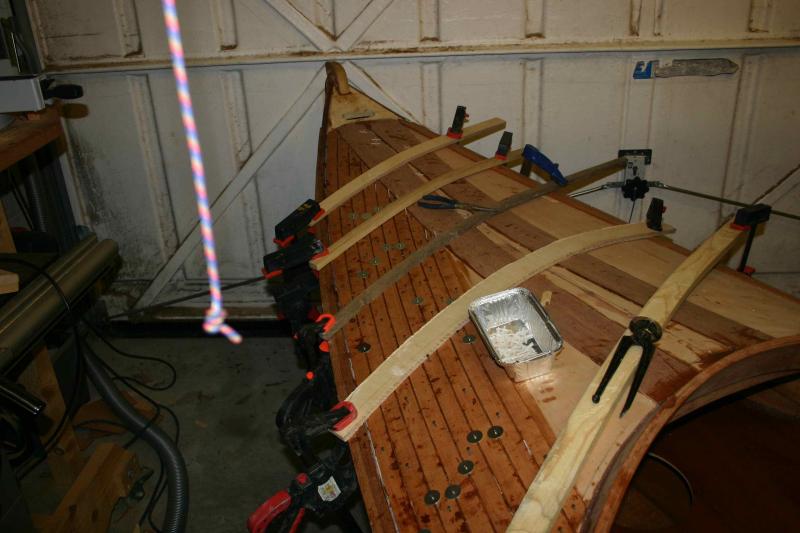
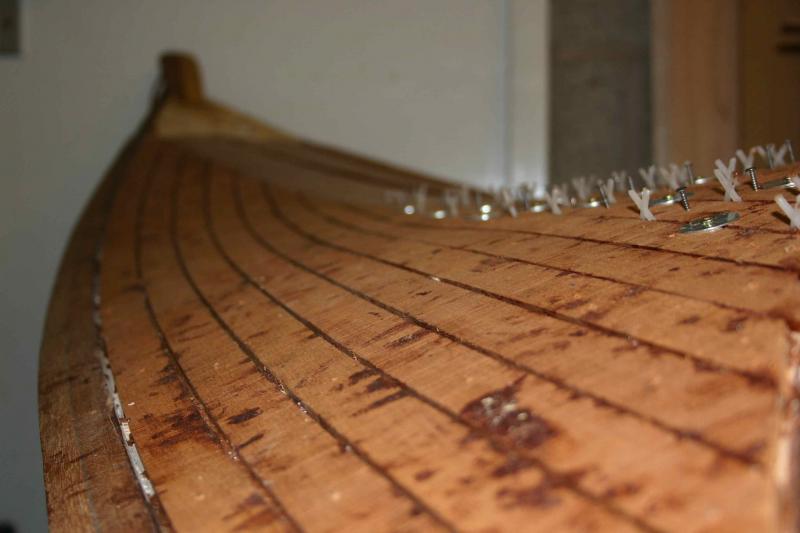
I was a bit nervous placing the strips as I had no spare. I started on the outside edge and worked towards the centre as the outside edge had the biggest amount of bending. I applied resin to the deck a strip at a time. My strips were only 5 mm thick but the amount of lateral bend to follow the edge of the boat and the compound curve put these pieces under considerable stress, this lead to a problem. I mentioned earlier that I was aiming to hold them down with 3 mm screws and fat washers until the resin set. In effect I would screw into the ply deck. well as the wooden strips were under so much stress the screws were not butch enough and pulled out I lashed resin and silica mix onto the plywood. The only way around this was to drill a series of very small holes in the strips and nail the thing to the deck until the resin had gone off, then I would remove the nails. even the nails pulled out, so I bought some small serrated nails that worked fine. I am if I was doing it again, I would not apply the ply wood, in stead I would just nail the strips directly onto the frame. To keep the spacing between the strips equal I used tile spacers, and [ulled the strips onto the shape of the deck with a combination of screws and washers and clamped bits of wood. 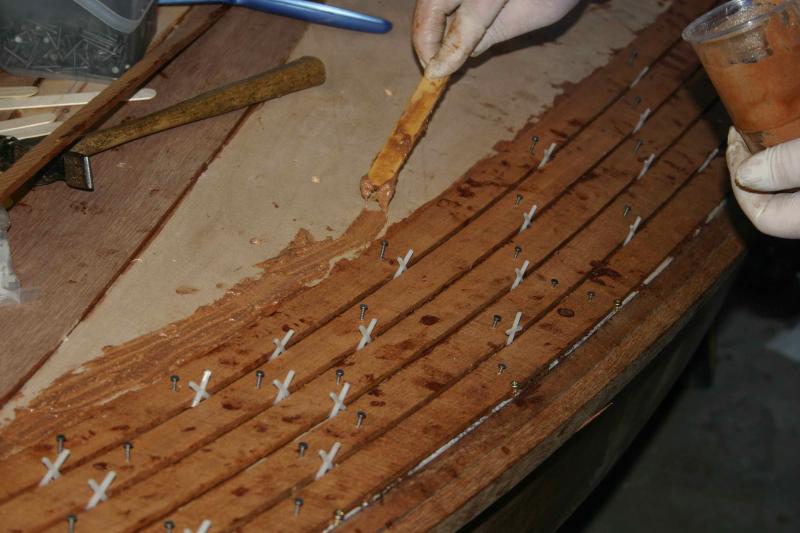
Offline
#30 8 Dec 2011 10:05 pm
- pam5
- Member
- Registered: 16 Jun 2011
- Posts: 92
Re: 20 ft sea going rowing boat
I must have been getting tired last night, so that is the excuse for the bad spellllling and disjointed sentences form yesterdays blog, sorry about that.
I continued with the deck. with respect to cutting the mitre joints at the point the strip joined the centre strip, it turned out to be quite easy, I nailed it down almost right up to the joint , struck a line with a pencil and small ruler just by eye, then in while in position, cut it with a small fine tooth handsaw. every one worked out ok. I made sure that the gap between the strip and the central strip was also 3 mm. I continued and completed both sides of the deck. An important point was not to add too much resin that it squeezed out of the 3mm gaps between the strips as these were to be back filled with a slightly lighter coloured resin mix and any of the holding down resin squeezing through, would affect the look.
I completed the bit in the middle by messing about with a couple of strips of wood (one dark wood one oak) a pencil, ruler and a bit of patients, I was able to make up this chequered effect by cutting and fettling bits, fitting them and trimming up as necessary, my intension was to try and replicate the design on the gunnels so I cut them the same length as the gunnels blocks. finally I grouted the whole deck with a resin silica mix with only a very small amount of wood flour to make the 'between strip resin' lighter that the colour of the strips. It looked like a dogs breakfast until..... it was converted by a quick sand of the orbital sander. 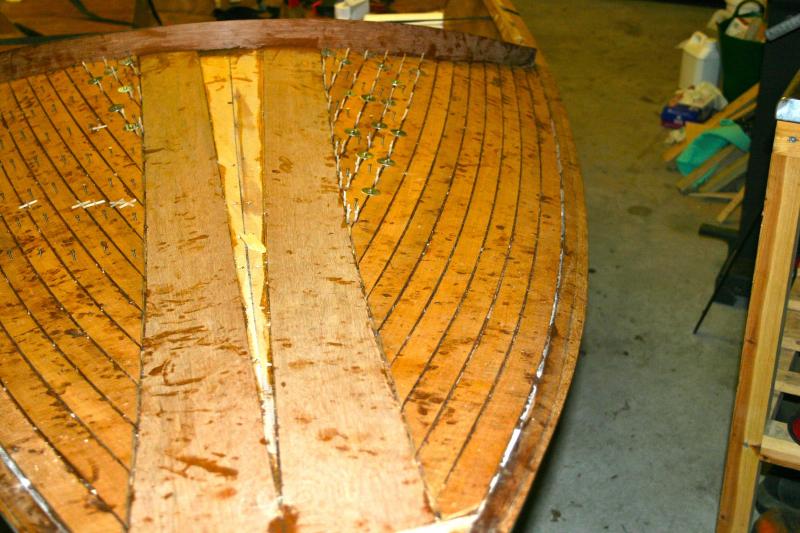

Offline
#31 8 Dec 2011 10:14 pm
- pam5
- Member
- Registered: 16 Jun 2011
- Posts: 92
Re: 20 ft sea going rowing boat
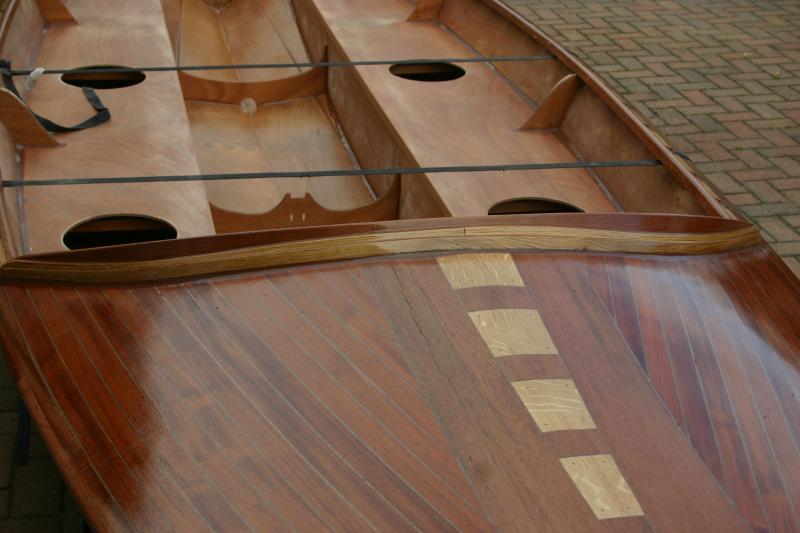
I wanted to set a nice covering strip against the dodger to get rid of the gaps and to nicely lead into the curved bit of wood, I made it with oak, but it quite thin so it would bend and used resin and clamps to secure it to the curved bit of wood, here is a photo showing it with a bit of resin on. As you can see, some of the recovered wood has started to settle and split a bit, this was sorted by applying a bit of resin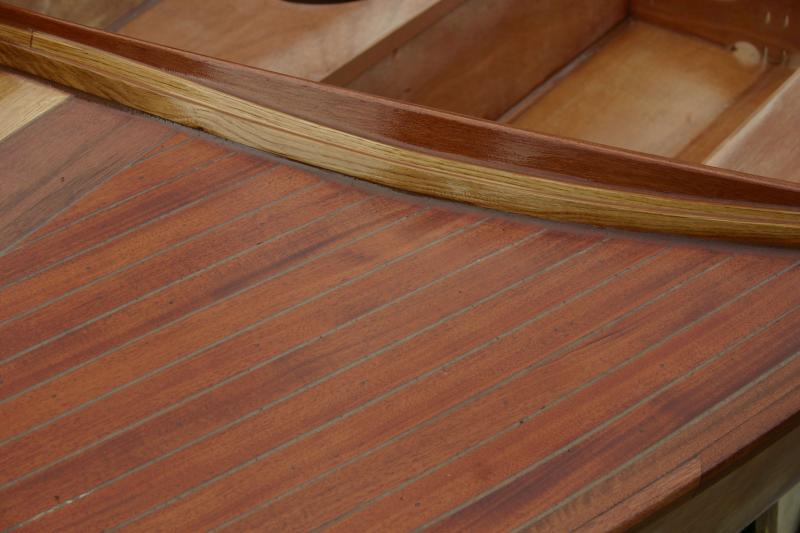
Offline
#32 8 Dec 2011 10:24 pm
- pam5
- Member
- Registered: 16 Jun 2011
- Posts: 92
Re: 20 ft sea going rowing boat
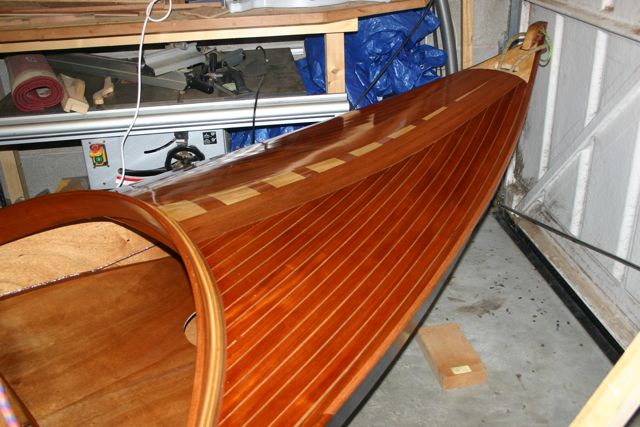
The next stage was to get the boat over on its top and fairing up the hull, this was quite difficult and time consuming, it was hard to see what you were doing due to the contrast of the wood and the resin. I spent a few night filling the weave of the matting with a silica resin mix, put it on, sand it down put it on sand it down etc. I took time to sort out the tapers on gunnels, I did this with a little block plane I bought from wilkinsons for £1.00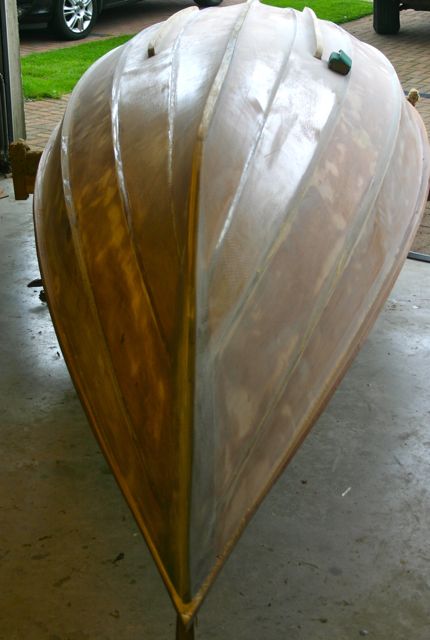
Offline
#33 8 Dec 2011 11:32 pm
- pam5
- Member
- Registered: 16 Jun 2011
- Posts: 92
Re: 20 ft sea going rowing boat
While the boat was upside down I decided to give it a few more sessions of sanding, gradually reducing the grit to 240 grit before adding the undercoat. I made sure the whole surface had been hoovered down. I applied the paint with a small roller, making sure I didn’t over apply. Fyne had told me that the first coat is normally sanded off as all of the imperfections in the surface make them self known. apparently paint is not very forgiving with surface blemishes, showing them up, yet varnish on surfaces is very forgiving, with the varnish evening out all of the tones and not highlighting the imperfections. As you can see from the photos I had some imperfection. I spent more time removing them but it seemed a never-ending job. I got to a point after two evenings of work coming to the conclusion that I could spend my life chasing them all out, or I could get to a point that would be fine for most boat people but probably not satisfactory for a boat competition, it was a practical approach. I added two more undercoats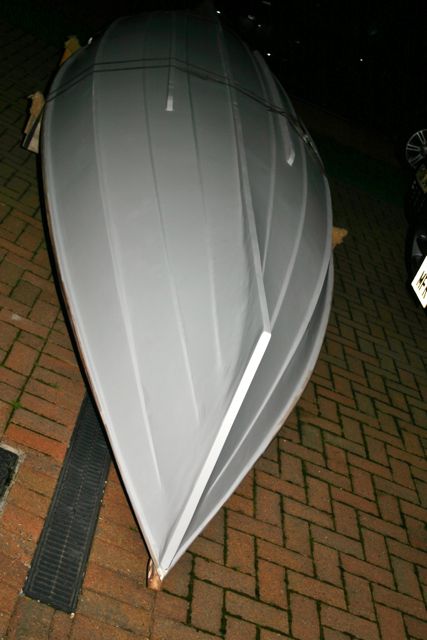
Offline
#34 8 Dec 2011 11:48 pm
- pam5
- Member
- Registered: 16 Jun 2011
- Posts: 92
Re: 20 ft sea going rowing boat
I sanded the internal, and added another resin coat to the floor area of the boat. I sanded again and brought the surfaces down to 320 grit. Cleaned everything off and applied the first coat of varnish. I was so shocked to see the effect, it looked fantastic, all of the tone differences had gone and it was beaming. these photos are from one coat only. I applied the varnish with a small foam roller, not overworking/over rolling the varnish, I did it in sections starting from the centre and working towards the gunnels. once I had completed the roll of a section, I brushed a dry brush across the surface in the direction of the grain, this took out the little air bubbles and slight roller marks. I repeated this process for the three coats but had a very small amount of sanding in between coats with 320 g paper. as with the paint, I don’t thing I would win any competitions compared to these mirror finish boats, but I have to be practical, the first time you throw your camping kit in it with oars dogs and passengers tramping all over it....the mirror finish will be lost.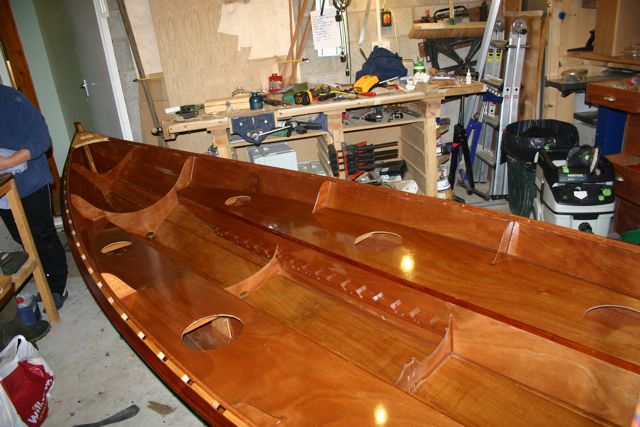
Offline
#35 9 Dec 2011 12:08 am
- pam5
- Member
- Registered: 16 Jun 2011
- Posts: 92
Re: 20 ft sea going rowing boat
woodworking, I will keep these bits brief as it isn’t really boat building. I made the seats, they were designed to be fitted on rollers.
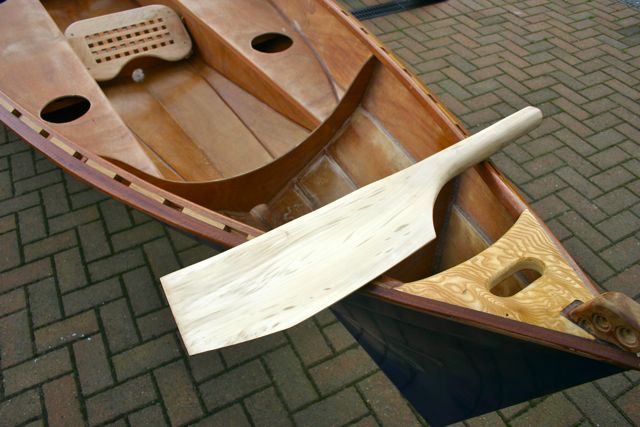
I made the oars, (after making a prototype cleaver type blade to see if it would work) they were from two 15ft x 2 inch by 8 inch bits of wood I bought for £40. I marked them out to get two oars per piece, profiled them out on my band saw then very carefully cut the spoon shape of the blade, which was a bit tricky considering their length. Loads of fettling and sanding later, I came up with a beautiful set of oars. I added a sheet of matting to the front and rear face of the oar to give the thin spoon shape blade extra strength and lashed the whole thing with a couple of coats of resin. all in all I recon it cost me £50 for the two sets together. I calculate the length of oar from a formula relating to the beam of the boat.....and that was that.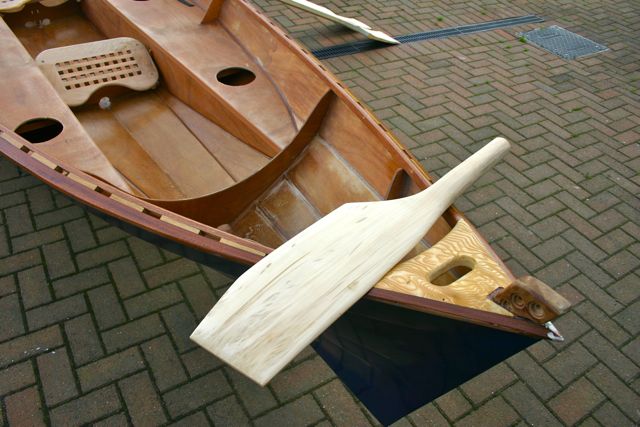
Offline
#36 9 Dec 2011 12:23 am
- pam5
- Member
- Registered: 16 Jun 2011
- Posts: 92
Re: 20 ft sea going rowing boat
the very last job was to fit the water tight hatches and bungs to the buoyancy tanks. I used silicone sealant to form the water tight fits. 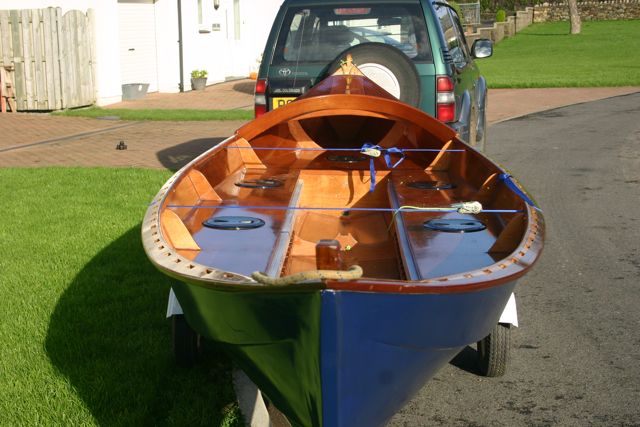
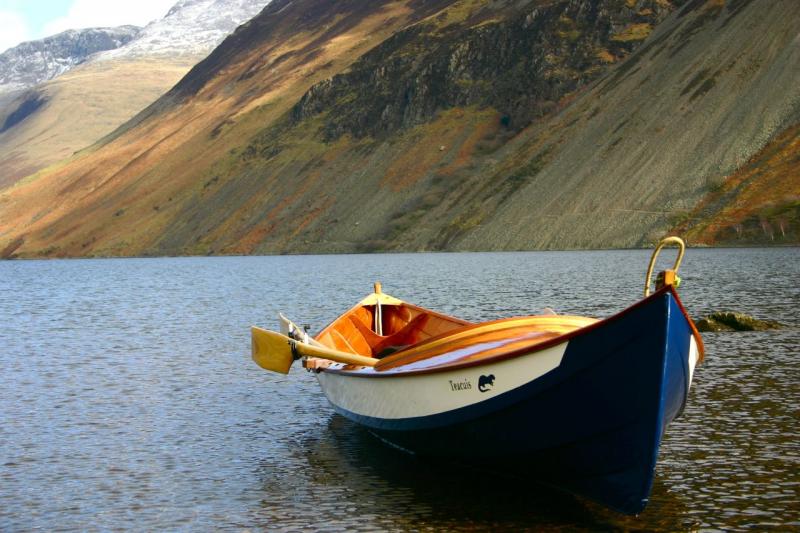
I aim to add a white line to the hull and a motif of an otter along with the name of my boat which is Teacuis after loch teacuis in Scotland, google it and see how beautiful a place it is. we go here and row around the islands taking photos of otters and wildlife.

Offline
#37 10 Dec 2011 8:36 am
- Richard
- Member
- From: East Sussex
- Registered: 7 Jun 2011
- Posts: 75
Re: 20 ft sea going rowing boat
What a fantastic boat and a brilliant post, thanks for taking the trouble to put it up.
It sounds like Loch Teacuis would make a good subject for the Locations section of this forum especially if you have such lovely photographs!
Canoe & Kayak Owner
Offline
#38 10 Dec 2011 11:37 pm
- pam5
- Member
- Registered: 16 Jun 2011
- Posts: 92
Re: 20 ft sea going rowing boat
Tips and things, that I would consider if doing it again
Sellotape used to hold boards together and stickers used to identify them, pulled fibres from the boards on removal, however much as this looked bad initially, after the first coat of resin, it was not noticeable.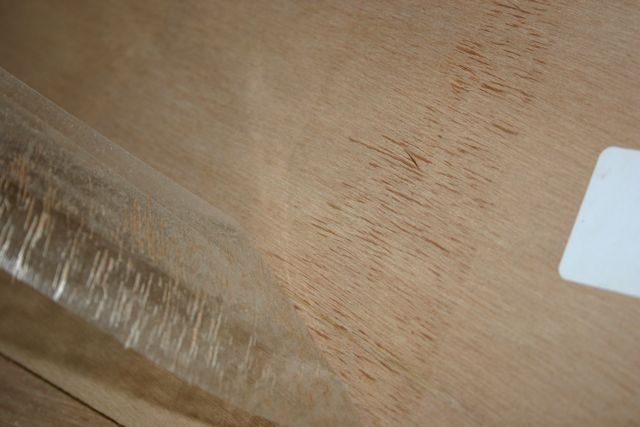
Resin problems:
• Applying to thick a coat, is a disaster, it orange peels, bubbles and takes and eternity to sand off and if your are not careful you can ruin your project right at the very start. Temperature of resin is critical, it must be warm. I think moist environments affect the resin curing. If you use a garage and you live in the north of the UK, you will need to heat your garage to above 13 degrees unless you are happy with a 3 day cure of the resin. Once the resin is dry, you get a sort of a tacky film on it, this needs to be removed with a bit of scotch bright before you sand, if you don’t do this you will block your sandpaper in minutes.
• Only ever apply the very smallest amount for resin/filler if you are filling holes etc, pick the application stick to allow you to keep it to a minimum, don't be tempted to put it on with a wide spatula.
• Sanding, orbital sanding is good, but it is not the answer for all surfaces, at certain points on the boat, the size of the strakes are such orbital sanders catch other parts that you don’t want to sand and if not careful, you will cause damage. I didn’t try with a belt sander, but I could see there may be times it would be ok to use one ?
The times that had a little job, with just one pump of resin, I pumped it into a plastic cup and before stirring, I microwaved the contents for 7 seconds, this warmed it enough, I immediately stirred it and then it was ready for use. Don’t know if this is detrimental to the quality of the resin, it didn’t seem to react any differently for me and once cured, was the same as everything else. You have to be careful as a few seconds more, it got too hot.
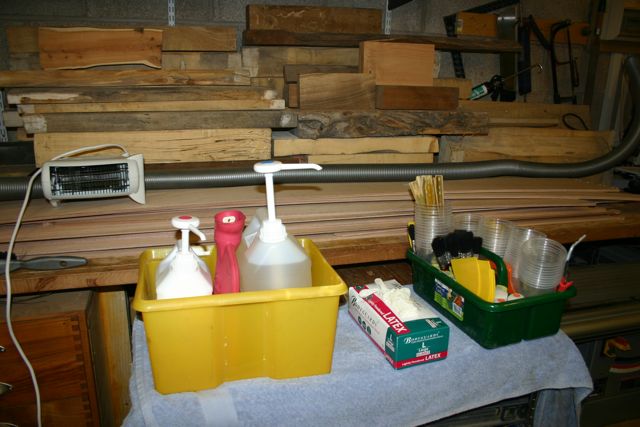
Consumable for the job:
• Box of latex surgical gloves, with powder, these can be bought from the chemist.
• Mixing was done in plastic beer glasses from Asda, there were 250ml or 500ml, when you buy them make sure you look at the base as some of them have a raised middle section that tends to prevent all of the resin from being mixed together as some of it gets held up in the gully around the edge.
• With respect to the spreaders, spatulas, squeezes, I bought it all from Wilkinsons store, they were usually in the tiling section, or decorating section, were very cheap and to a large extent disposable items.
• I also bought my masking tape, small block plane and mini rollers from the same place.
• Wilkinson also has a handy little tool for putting curves or chamfers onto your fillets, it is a little red thing that has different profiles either 45 degrees or curves of different diameters.

Initially for the joining of the large boards, I set up a series of tables to work on, I covered them with a cardboard top to keep spills of resin off the wood. Would I use this method again, probably not as it took quite a bit of effort to arrange them and you were limited to how many bits of wood you could deal with at any one time as you were limited by the width of the table. I would probably clean the garage floor and lay a bit of plastic sheet at the points the joints are going to be and make do with this. You would not be limited to how many boards you could do.
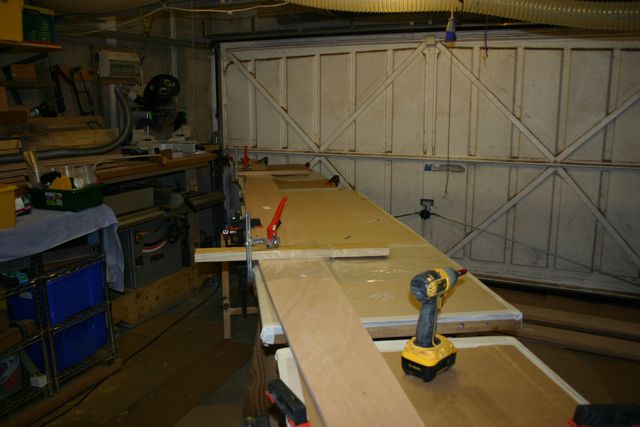
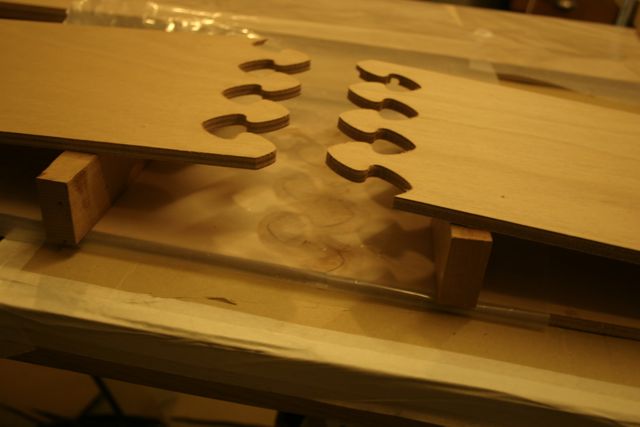
I came across and interesting find with regards to the finger joints. As my table had a cardboard top, I found that when I applied a clamping force to the pad that sat over the top of the joint, th
e cardboard underneath would compress and in effect cause the fingers of the joints to slightly collapse inwards. The surfaces of the male and female fingers faces were at very slightly different levels, this gave you a problem when you sanded and if you tried to sand them down to make one side match the other, you could go into the second laminate of the ply wood and cause the joint to have a dark appearance on one side. If you look at my photos you will see a couple of joints heading this way.
when I was doing a day of resin work I would set up my little heating station, I would also drape a towel over the whole tub, it worked a bit like a tea cosy. Cleaning up as you go is essential, put things in the bin as soon as you have finished with them. I also used a fan heater to raise the temp in the garage before I started to resin. As soon as I started to resin, I turned the heat off as Fyne told me that the resin needs to cured on a falling temperature. 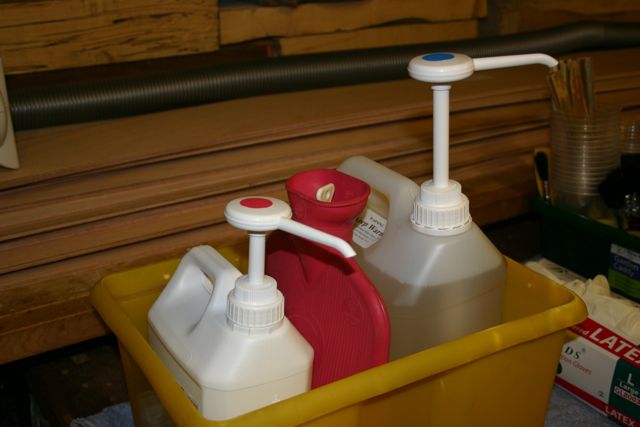
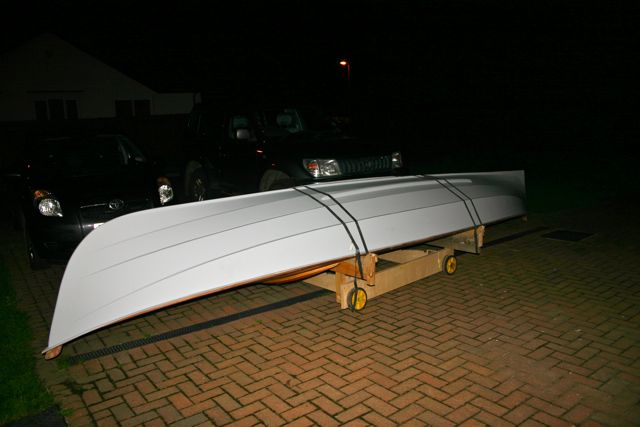
I made a boggy to move my boat in and out of the garage, the leaning point was....I should have made it right at the start not half way into the project.

Applying the paint was pretty easy. I applied several thinner coats opposed to fewer thicker coats. Ultimately I used the soft sponge rollers for application. I did not attempt to clean rollers, I just threw them away after I had completed that coat. With respect to the paint, I applied it with a roller then smoothed it off with a 'guaranteed no hair loss' dry brush it worked very well.
Finally was I happy with the output from the project. On the whole yes, I have learnt a huge amount, I have built my confidence and would certainly want to build another boat or kayak. As this was the first boat of this type in the UK and there were no specific build manuals, I learnt a lot, and perhaps the best part of the project was having to sit back and think things through before I did them. I cant recommend Fyne boats highly enough, they have provided help and advice throughout, I will be buying my next boat from them, There are competitors out there but none of them come near to the deal you get from fyne.
That’s the end of the of this build log. I have just been back through a couple of my previous posts.....and found a load of typos, sorry about them, some of the logs were completed late at night when I should have been asleep in bed so I wasn’t that switched on !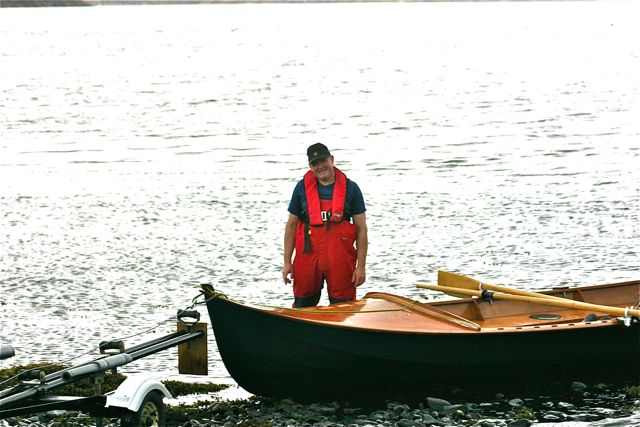
Offline
#39 11 Dec 2011 10:16 am
- Paul
- Employee

- From: Gatebeck Cumbria
- Registered: 4 Aug 2011
- Posts: 134
Re: 20 ft sea going rowing boat
Thank you for a great log.
Please note that Vinyl gloves are recommended for epoxy.
Offline
#40 22 Feb 2012 9:24 pm
- pam5
- Member
- Registered: 16 Jun 2011
- Posts: 92
Re: 20 ft sea going rowing boat
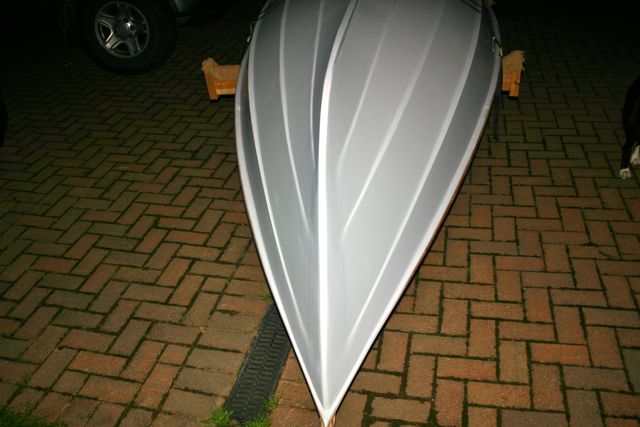
Another few photos to show you one or two things that I have done since my last update. I have added a couple more coats of blue paint to give it the depth it needed, then I added a white banner on the top edge, while I was doing this I made a stencil out of masking tape for the boats name and otter logo, I stuck it onto the boat and then painted right over the whole lot with the white paint. I gave it 3 full coats, then the tricky bit......removing the masking tape with 3 coats of paint on it. Surprisingly it worked, the masking tape had protected the blue paint therefore leaving a blue otter on a white background. ![]()
![]()
Offline
#41 22 Feb 2012 9:30 pm
- pam5
- Member
- Registered: 16 Jun 2011
- Posts: 92
Re: 20 ft sea going rowing boat
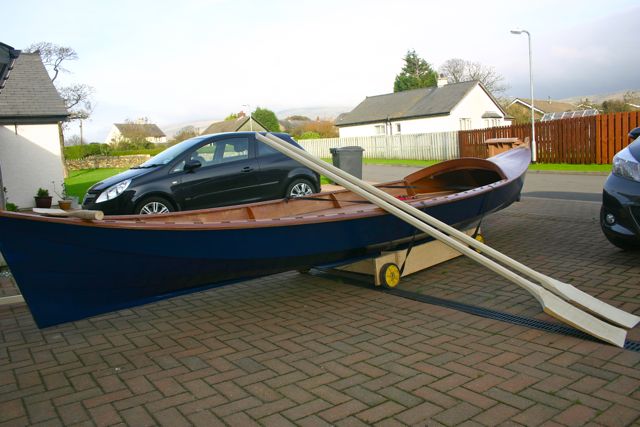
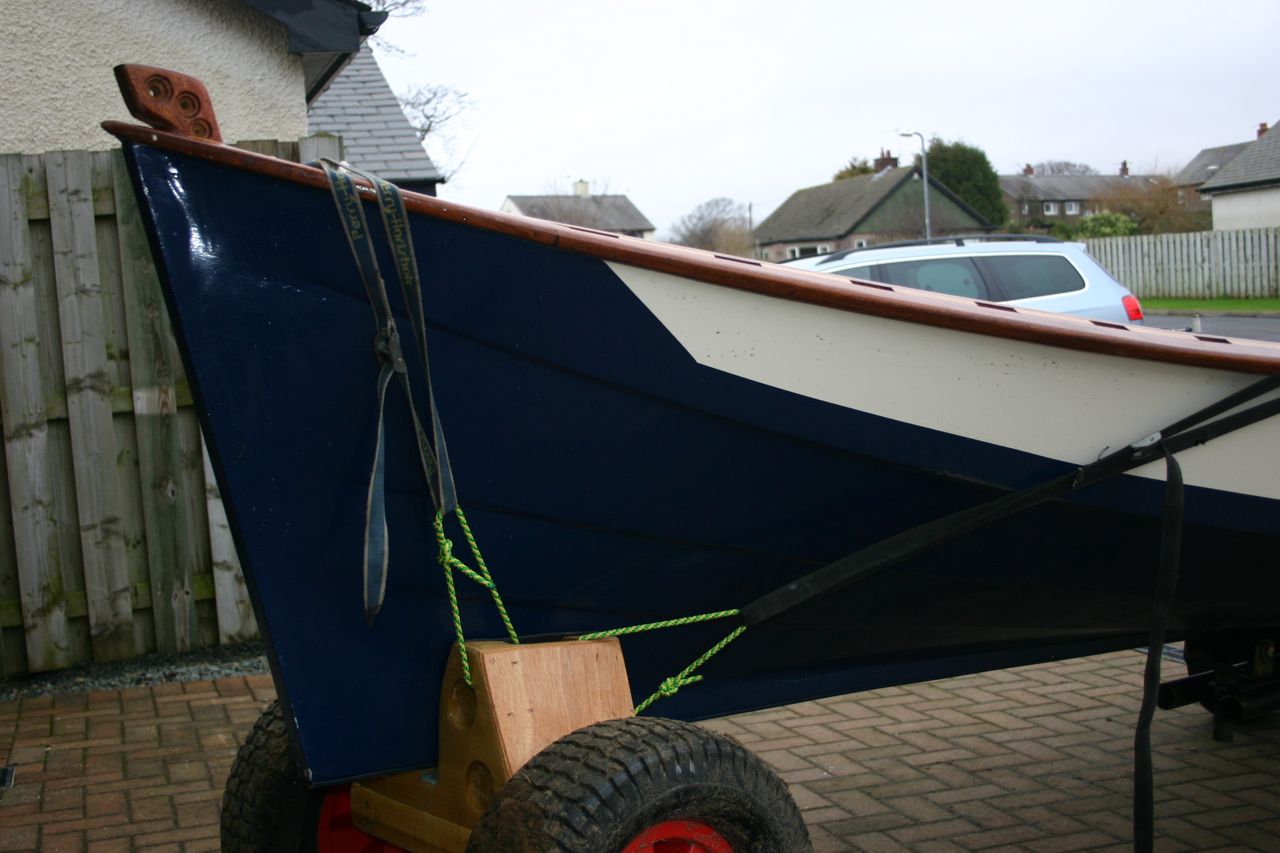
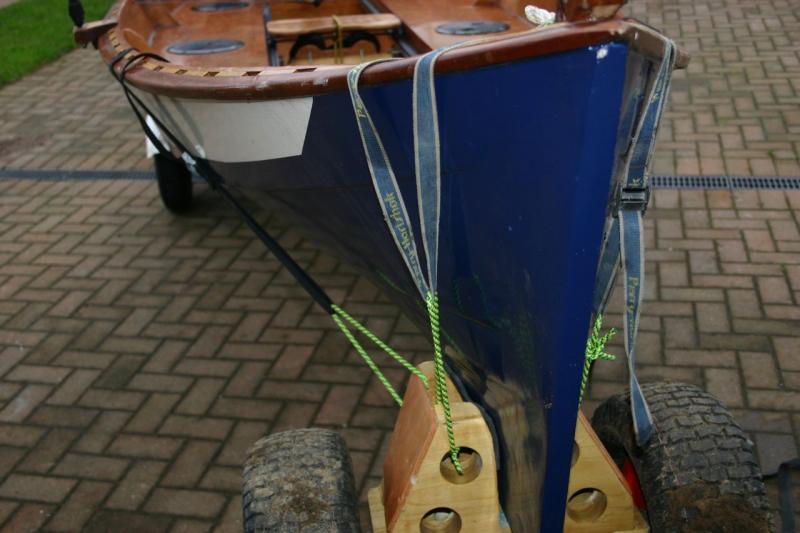
Anyone who has a boat on a trailer knows that loading and launching a boat from a trailer and getting the trailer to the waters edge is very difficult, strenuous and high risk in terms of potentially damaging the boat. When you are launching from rough sites without a slipway that have steep and uneven banks and often muddy, the whole activity of launch and retrieval become a bit of nightmare, unlike a canoe or kayak, this boat has a bit of weight to it and lifting it down to the launch area is not possible it has got to be on wheels.
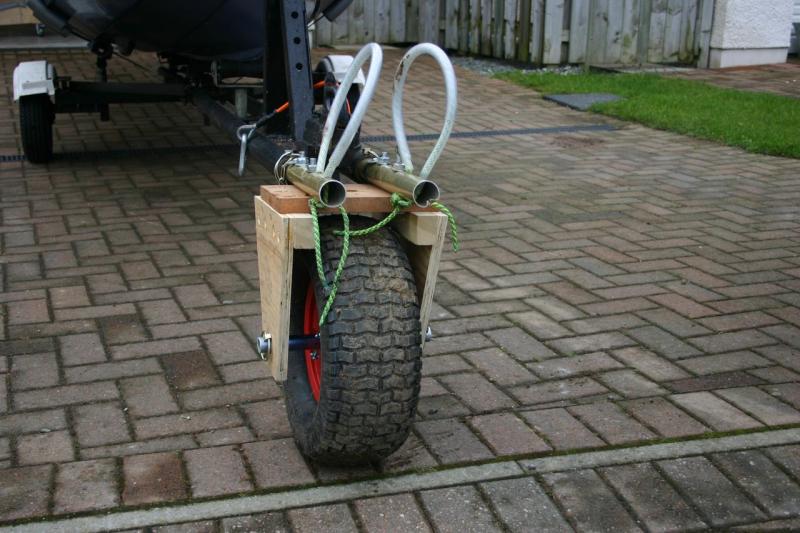
The very first time we launched from the road trailer, the bow fell off the roller and I ended up taking a big chunk out of the hull. We also found that the combined weight of the boat and trailer was fine to pull on the flat, but as soon as you hit a small edge or patch of mud in the uphill direction, it all becomes too much. Having had several traumatic times rough launching, I decided to make a device that would help.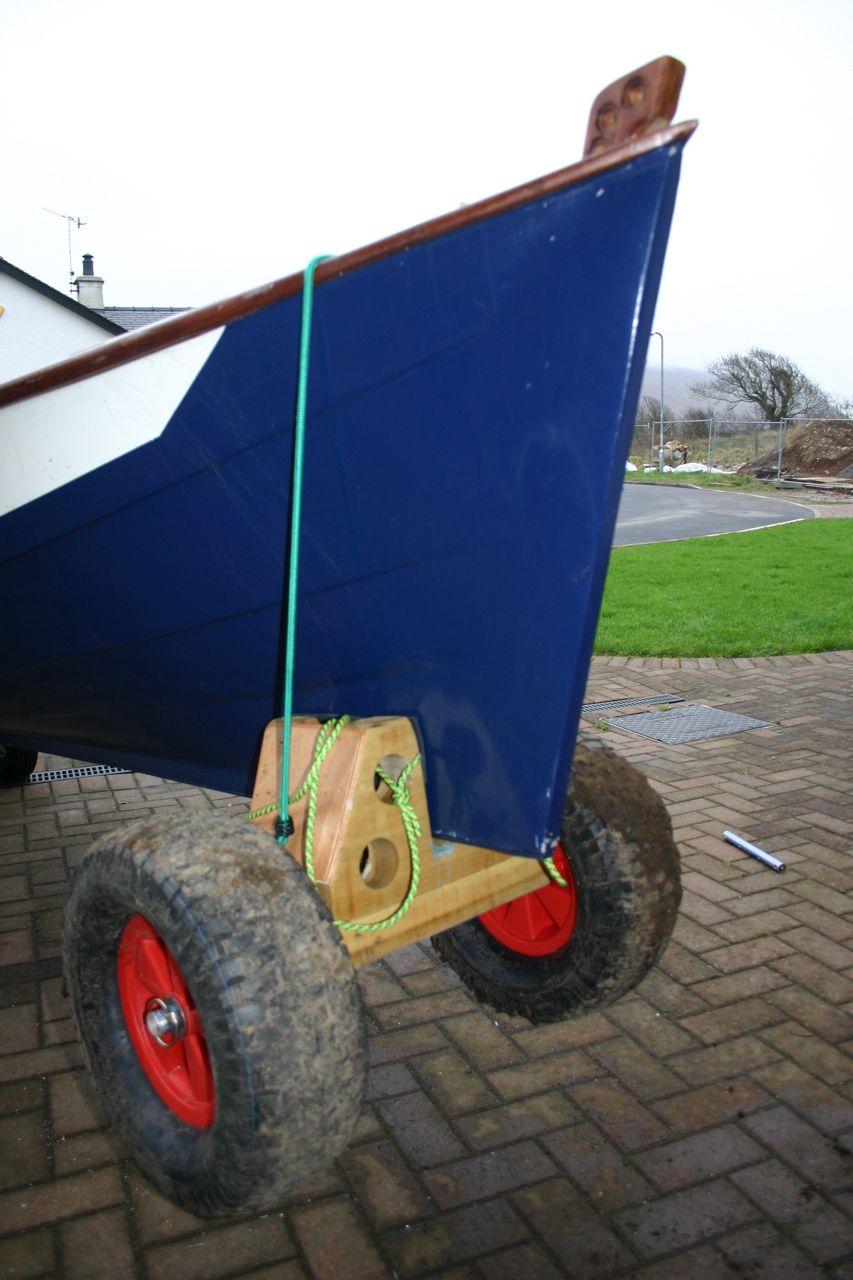
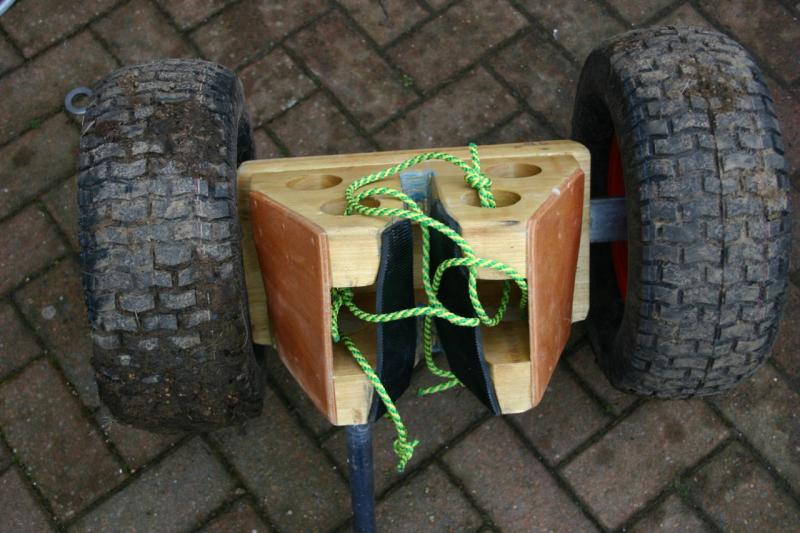
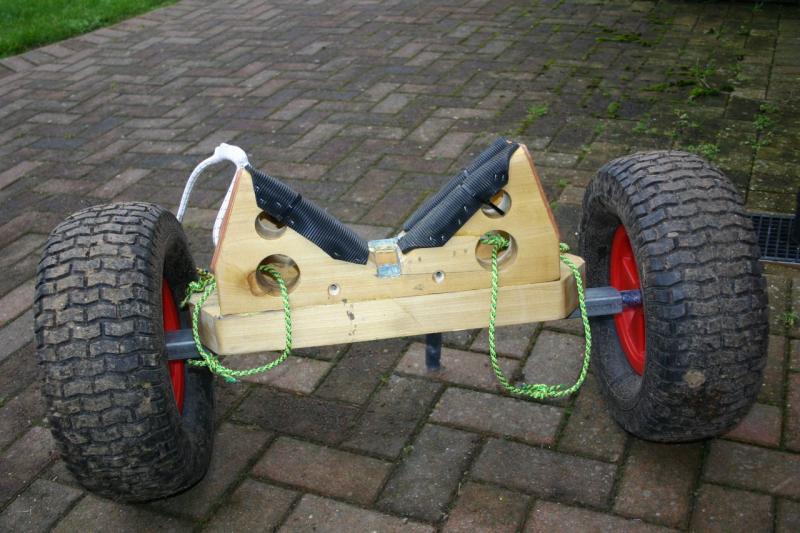
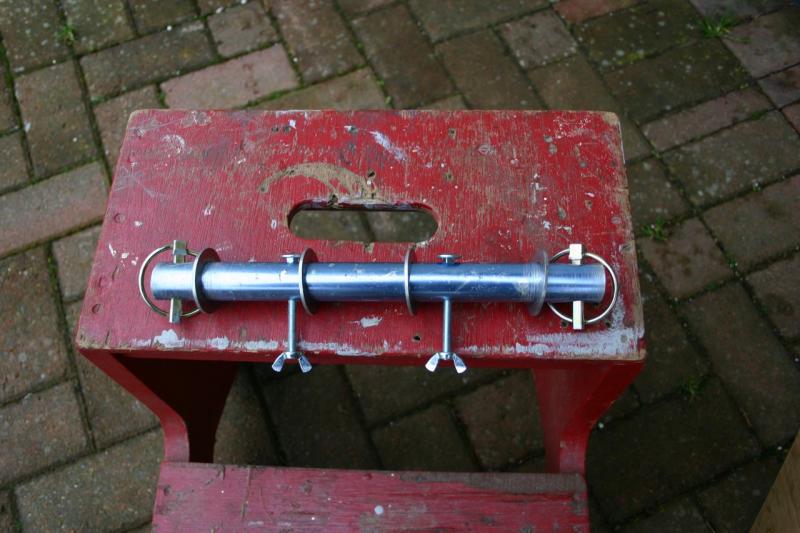
In effect the items are what I call 'hump it wheels', they are strong, light weight and relatively easy to make. You ca apply them before the boat leaves the road trailer, the balloon tyres don't get stuck in the mud and the whole thing breaks down in to separate bits very rapidly. The wheels were dead cheep, costing only £24 each, I got them from a company called Pinnell and Bax Ltd, they were very fast at delivering as well. The wheels axel on a 1 inch alloy pipe and are held on with a sprung pin arrangement. These wheels have made launching/ landing easier and have made it possible for two people to easily pull the boat back up banks and muddy surfaces to the car trailer. If I wanted, I could also dismantle them and bring them with us on our wild camping trips allowing me to pull the boat right out of the water. I spent a bit of time working out how to strap them on to the boat and came up with a simple and quick method. The whole placement of these wheels takes no more than 5 minutes including securing straps. Another advantage of the wheels, especially the rear ones, is that you can apply them as the boat starts to leave the trailer, and they will act as a type of stabiliser to keep the boat horizontal after the point the hull has lost contact with the supporting cushions on the trailer.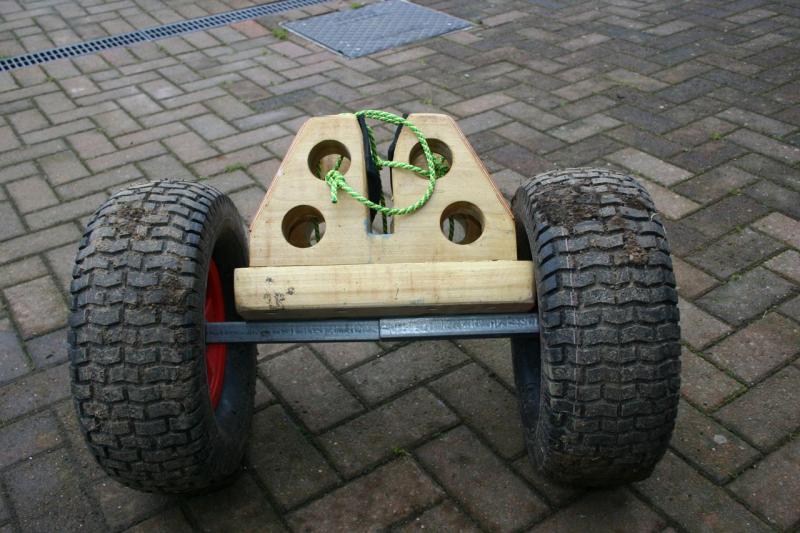
Offline
#42 22 Feb 2012 9:42 pm
- pam5
- Member
- Registered: 16 Jun 2011
- Posts: 92
Re: 20 ft sea going rowing boat
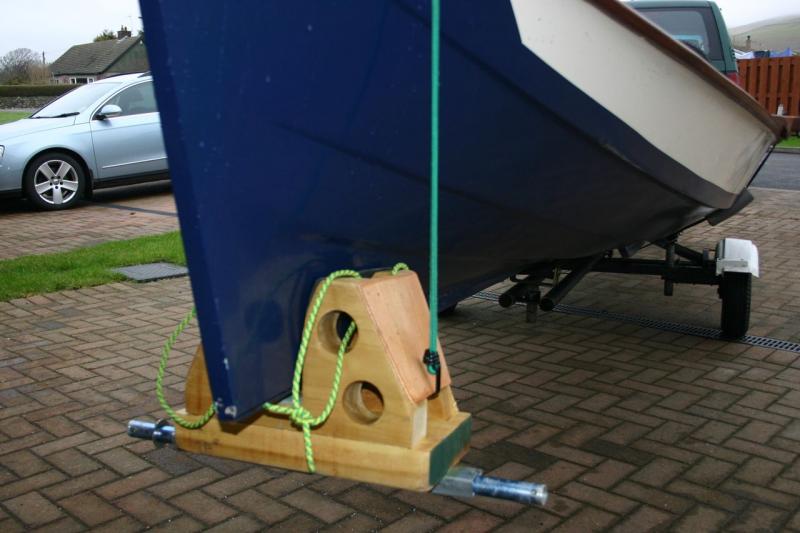
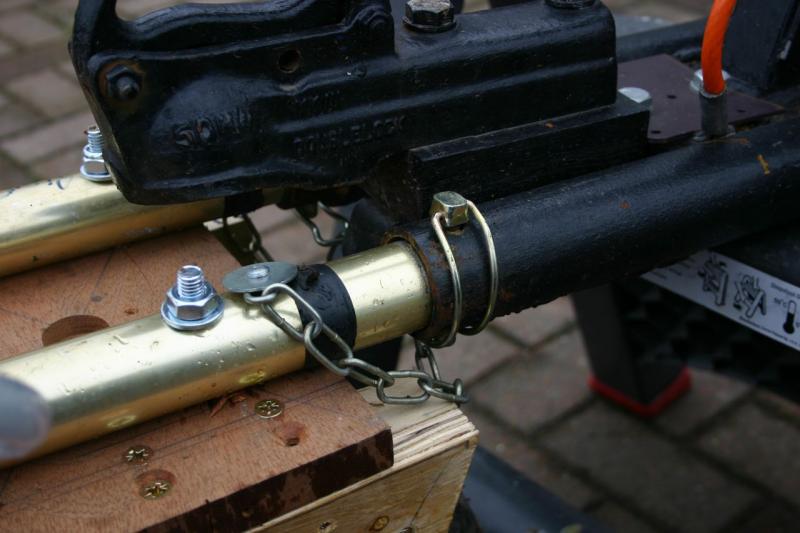
Then there is the jockey wheel from hell. I decided to get shot of my jockey wheel is wasn't any use or ornament so I wanted something a little more beefy. I wanted to use the same wheels as before and it had to be quick change and functional. For the times I do leave the boat on the trailer for launching, I wanted something again that would not get stuck in the mud when the trailer goes under water, this is what I came up with. It is simply a little yolk that has a single axel that fastens onto the front end of the trailer; I also included a couple of pulling straps. Again, it worked very well.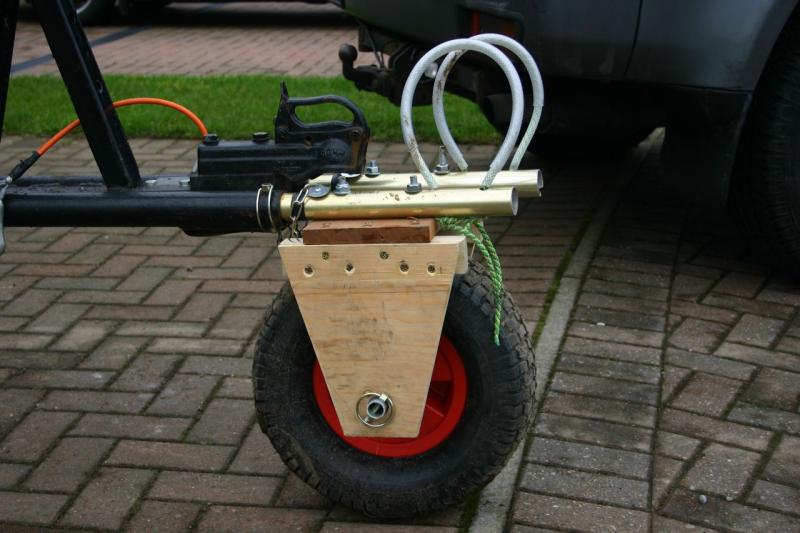

Offline
#43 23 Feb 2012 9:18 am
- gooseneck
- Member
- From: UK
- Registered: 20 Aug 2011
- Posts: 23
Re: 20 ft sea going rowing boat
Brilliant solution to launching
Offline
#44 24 Feb 2012 9:07 am
- pam5
- Member
- Registered: 16 Jun 2011
- Posts: 92
Re: 20 ft sea going rowing boat
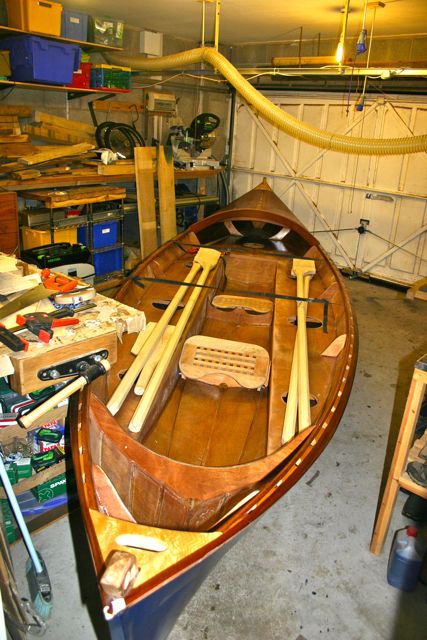
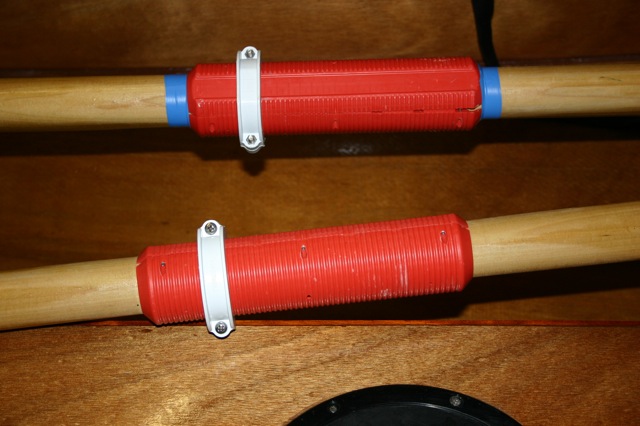
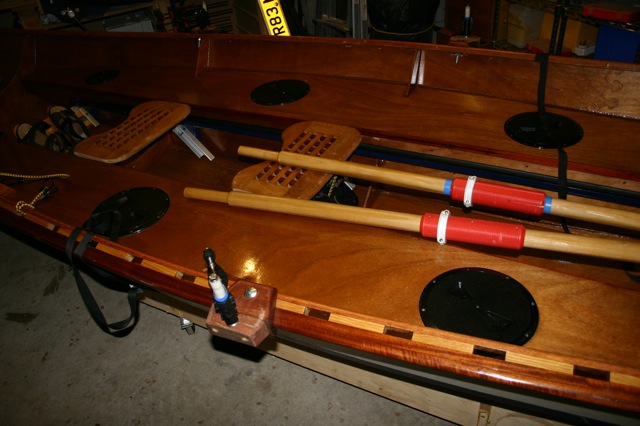
I gave up on my homemade sliding seat arrangements, the whole thing didn't take to the salt water too well. In the end I opted for a system purchased from Neaves Rowing, they were very helpful and weren’t put off by the fact I didn't really know what it was I needed. I bought the following equipment, the wheel/axel/wheel track, rowing gates (oarlocks) oar sleeves and collars. It was a bit disappointing to have to purchase these items rather than make them myself however as they were going to get a lot of use and in the scheme of things, pretty important bits of kit, I could justify it. Here are couple of photos of them fitted in position.
I also redesigned my footrests, making them stronger, adjustable and lighter, I have added 3 rowing positions, front and back when two rowers are on board and the mid position if I am rowing on my own.
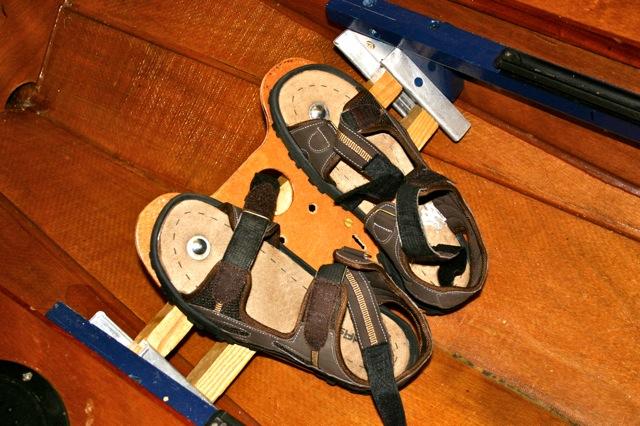
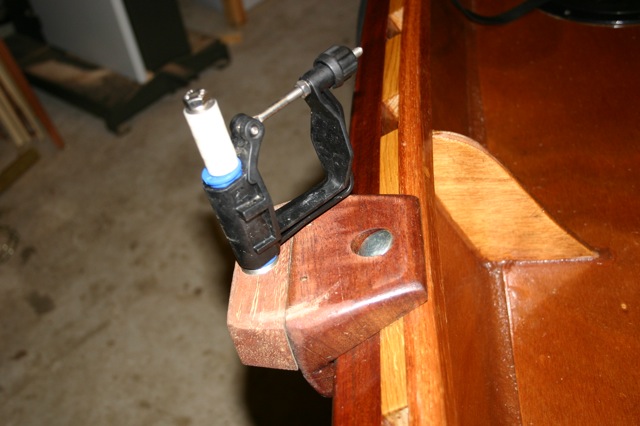
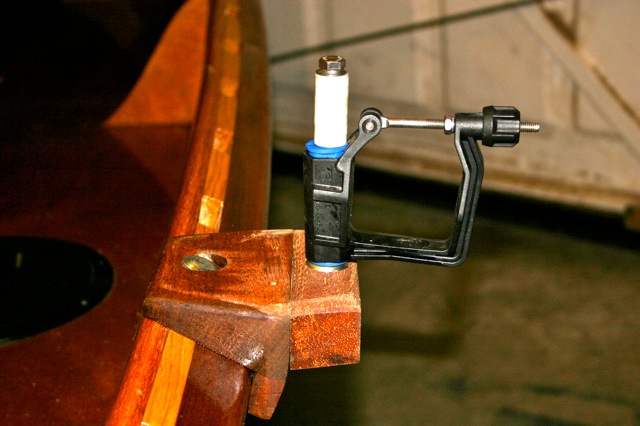
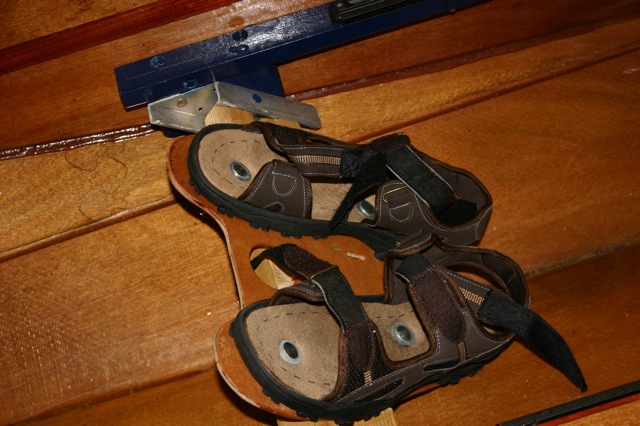
As you can see I bolted some oversize sandals to the footrests rather than having a traditional fitted shoe. The sandals allow me to wear my wetsuit boots while I am rowing my boat. Obviously the oversize sandals allow me to fit my feet in them with wetsuit boots on. The blocks that hold the oarlocks were added once the bits had arrived from Neales. You can see that the top edge of the block sets the angle of the pin on the oarlock to 90 degrees. I hold them in position with a flat washer on the underside of the gunnels where I have utilised the slotted arrangement of the gunnels as a positioning device, it gives me infinite positions.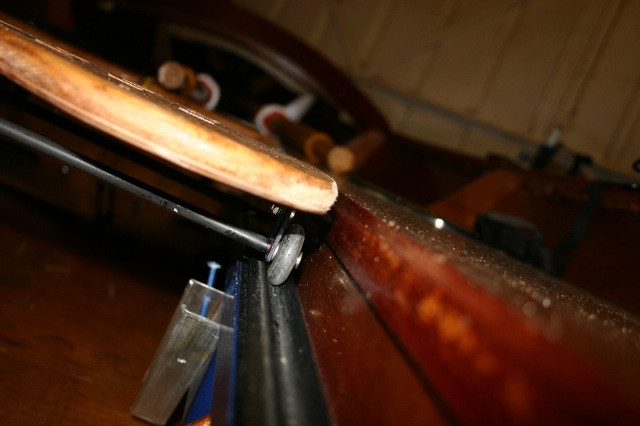
Last edited by pam5 (24 Feb 2012 7:59 pm)
Offline
#45 24 Feb 2012 9:10 am
- pam5
- Member
- Registered: 16 Jun 2011
- Posts: 92
Re: 20 ft sea going rowing boat
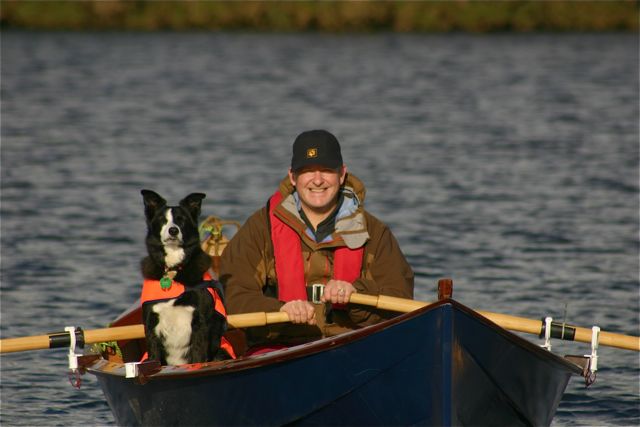
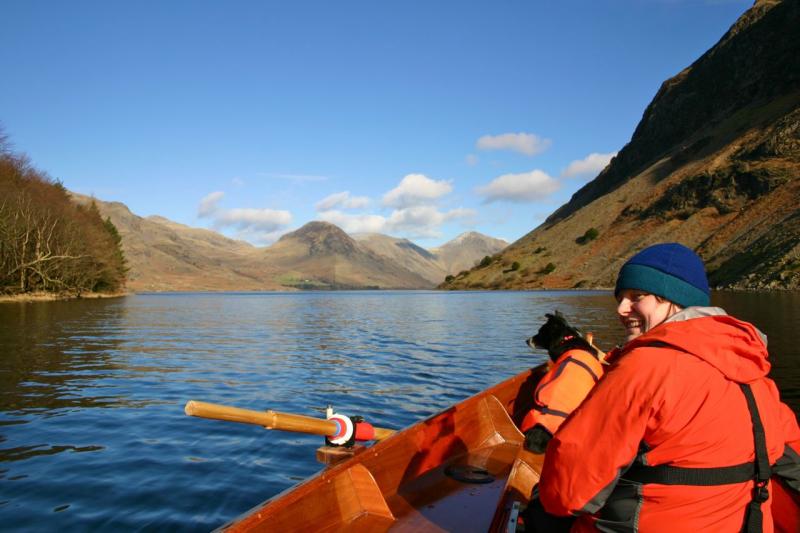
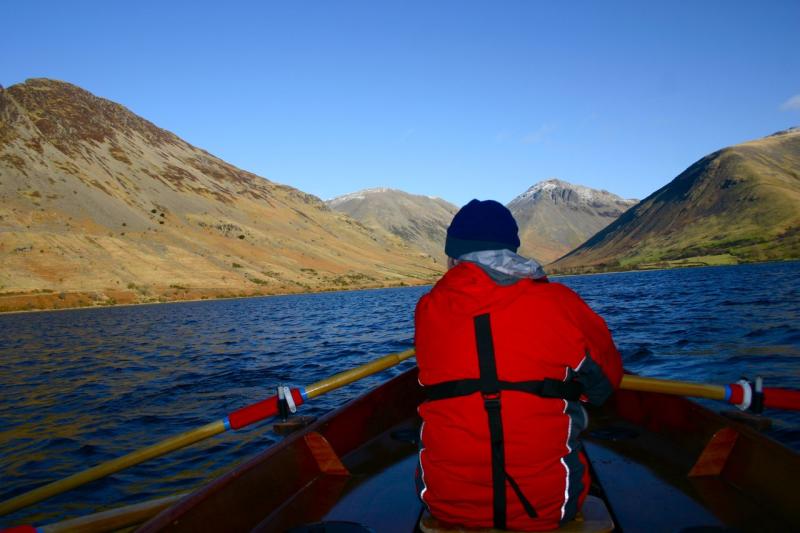
The last few shots were of us having a bit of a row near to where we live, the wind was blowing about 10mph and we rowed for 2 hours. This was the first time we have used the new bits and bobs on the boat and they all worked well. Even though we didn't have any rowing technique and there was a lot of oar clashing and bickering etc, we were able to get a 4 knot from the boat and when we pulled even harder we got 4.5, we were very pleased with this. I will post some photo of our first Scottish rowing trip on the website once we have completed it, this should be sometime in the spring.
Last edited by pam5 (24 Feb 2012 8:14 pm)
Offline
#46 27 Feb 2012 9:03 am
- Richard
- Member
- From: East Sussex
- Registered: 7 Jun 2011
- Posts: 75
Re: 20 ft sea going rowing boat
Stunning
Canoe & Kayak Owner
Offline
#47 30 Apr 2012 10:28 pm
- pam5
- Member
- Registered: 16 Jun 2011
- Posts: 92
Re: 20 ft sea going rowing boat
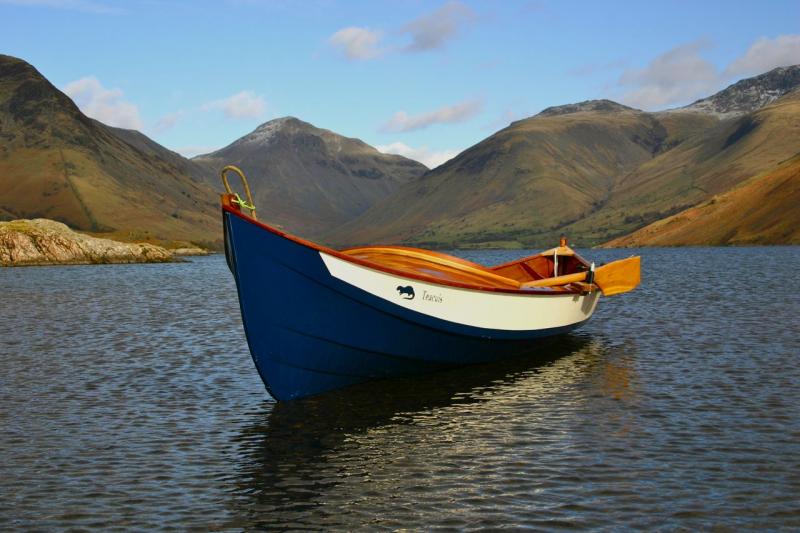
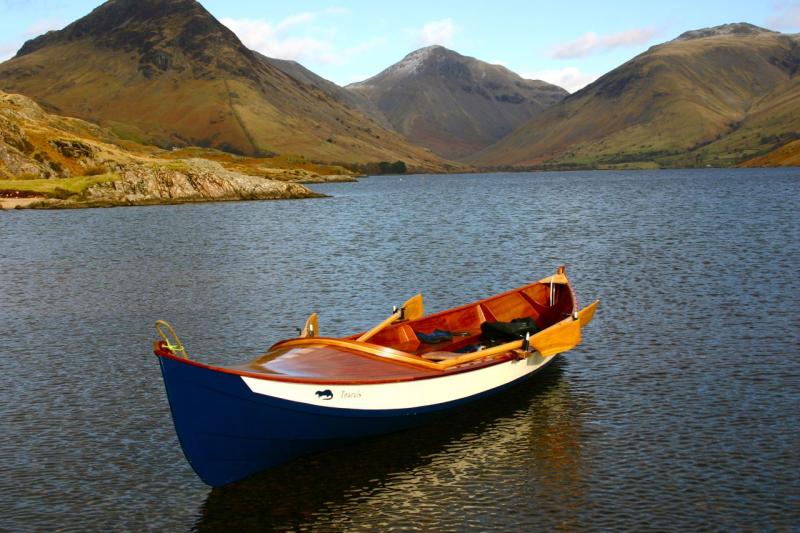
just to wet your appetite, here is a photo of our recent trip to scotland with the boat. I will be adding a bit of a photo diary for the 8 days we were away. I will place these in the locations section of the forum.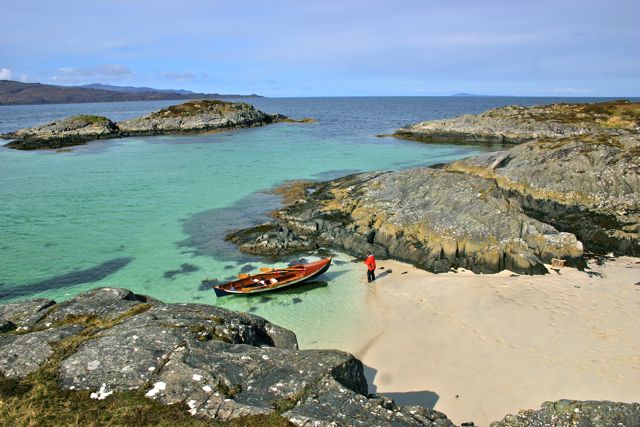
Offline
#48 27 Jun 2012 11:00 am
- pam5
- Member
- Registered: 16 Jun 2011
- Posts: 92
Re: 20 ft sea going rowing boat
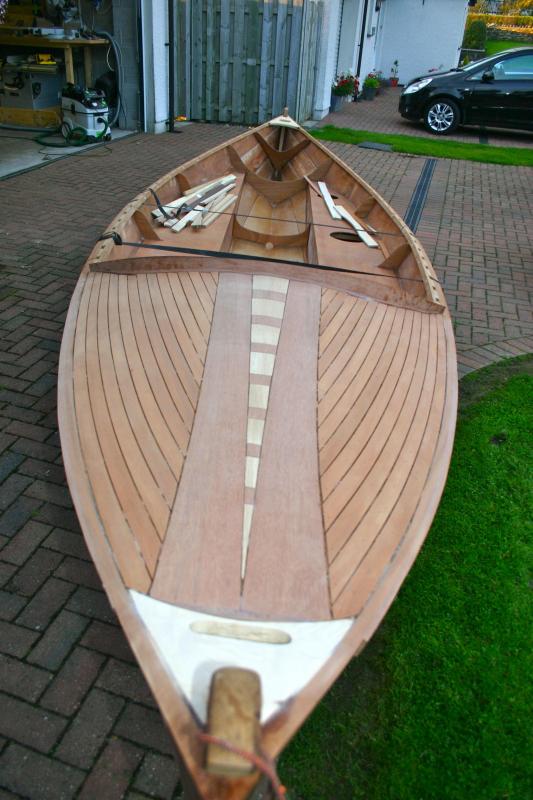
Hi, the boat is about 20.5 ft long, it and designed specifically to be a coastal rowing/cruising boat. If you look at the 'location' section of the forum you will get a good areal shot of the boat showing the internal layout. I know Fyne Boats have the plans for this craft and can supply the parts and advice you need. They have been a fantastic company to work with on all levels and having researched other such companies in the UK, they are the best by far on price and number of designs available. good luck.
Offline
#49 26 Sep 2012 2:15 pm
- g.collee
- Member
- Registered: 26 Sep 2012
- Posts: 1
Re: 20 ft sea going rowing boat
Absolutely magnificent. What a pearl. I am utterly humbled. The photographs of your rowing trip are beautiful too. Thank you.
Offline
#50 23 Dec 2012 6:21 pm
- Alan
- New Member
- Registered: 22 Dec 2012
- Posts: 1
Re: 20 ft sea going rowing boat
This is without doubt the best two man seagoing rowing boat that I have ever seen.
A truly inspirational project and I would definitely follow your lead on building this design.
Thank you for sharing your experience of building this beautiful craft.
Offline