A forum for discussing wooden boats and boat building
You are not logged in.
- Topics: Active | Unanswered
#1 4 Jan 2012 11:49 pm
- beaker
- Member
- Registered: 9 Oct 2011
- Posts: 81
Shearwater sport hybrid build
Having built a Wood Duckling, I really fancied my own kayak. I wanted a hybrid, seaworthy, and no longer than the cellar, so when the Shearwater Sport kit came available, that was the one.
All the crucial prep work done now - a radiator in the cellar, extra lighting, and a thermometer. Time to open the boxes.
Tiny bit of joy #1
The cellar is at least 200mm longer than the longest panel.
Tiny bit of joy #2
The shearclamps are already chamfered for the scarf joint.
Tiny bit of joy #3
The lovely smell of the cedar planks, like freshly sharpened pencils
Down to work. The planks are now joined, and marked up ready for the shearclamps to go on.
Offline
#2 13 Jan 2012 10:48 pm
- beaker
- Member
- Registered: 9 Oct 2011
- Posts: 81
Re: Shearwater sport hybrid build
Shearclamps on now. Rather than force them into a tight upward curve at the stern, I left a little more show there, to plane off later. Hopefully I've taken off the right amount of bevel at the bow and stern side panels. I might need to fettle them a bit as the panels wire together.
Offline
#3 15 Jan 2012 10:11 pm
- beaker
- Member
- Registered: 9 Oct 2011
- Posts: 81
Re: Shearwater sport hybrid build
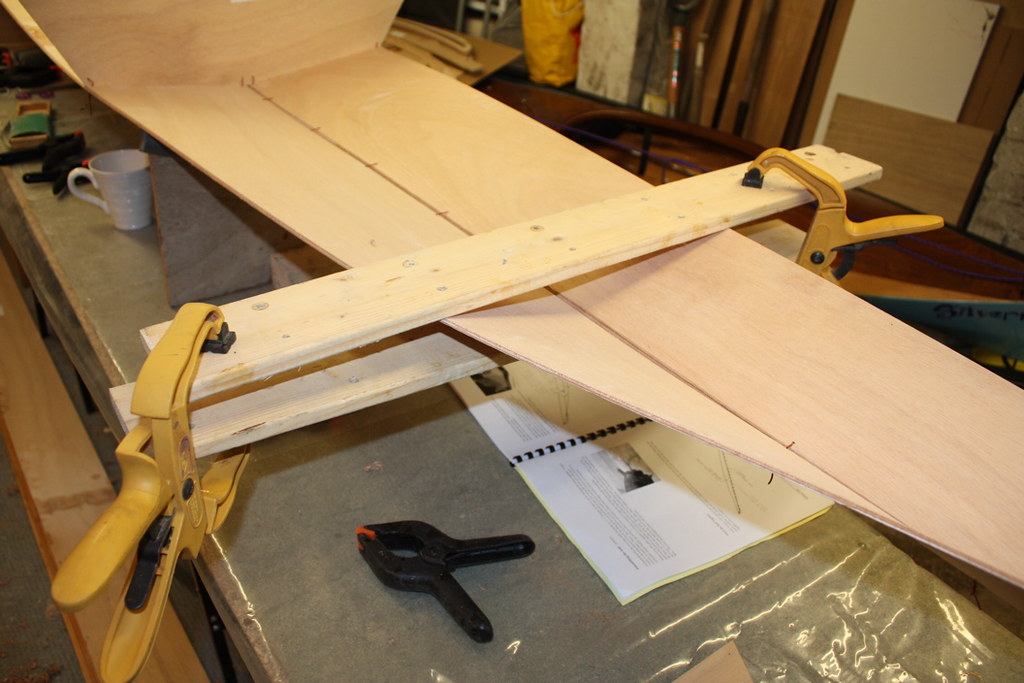
The stitching stage starts now, when the flat panels spring into 3D. Rather than wrestle the bulkheads in, I sandwiched the bottom panels between two planks, and squeezed them down with ratchet clamps. I could then wire them in much more easily.

Offline
#4 20 Jan 2012 11:49 pm
- beaker
- Member
- Registered: 9 Oct 2011
- Posts: 81
Re: Shearwater sport hybrid build
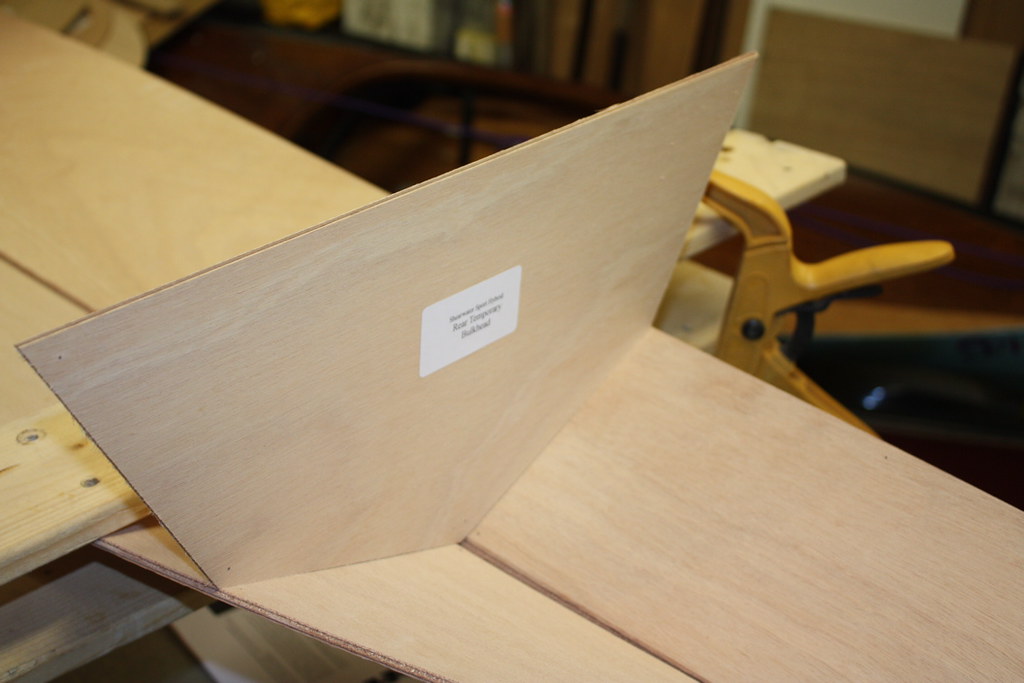
Both side panels hung on now. The temporary forms needed some trimming to clear the shearclamps, but with a few stitches in it suddenly looks boat shaped.
Squeezing the panels together at the bow was much easier than on the Wood Duckling. The bottom panels just needed the clamping pressure, and the sides could go on just pulled in by hand, with the wire twisted to secure finger tight. No need for swearing or soaking with water this time.
Offline
#5 1 Feb 2012 10:59 pm
- beaker
- Member
- Registered: 9 Oct 2011
- Posts: 81
Re: Shearwater sport hybrid build
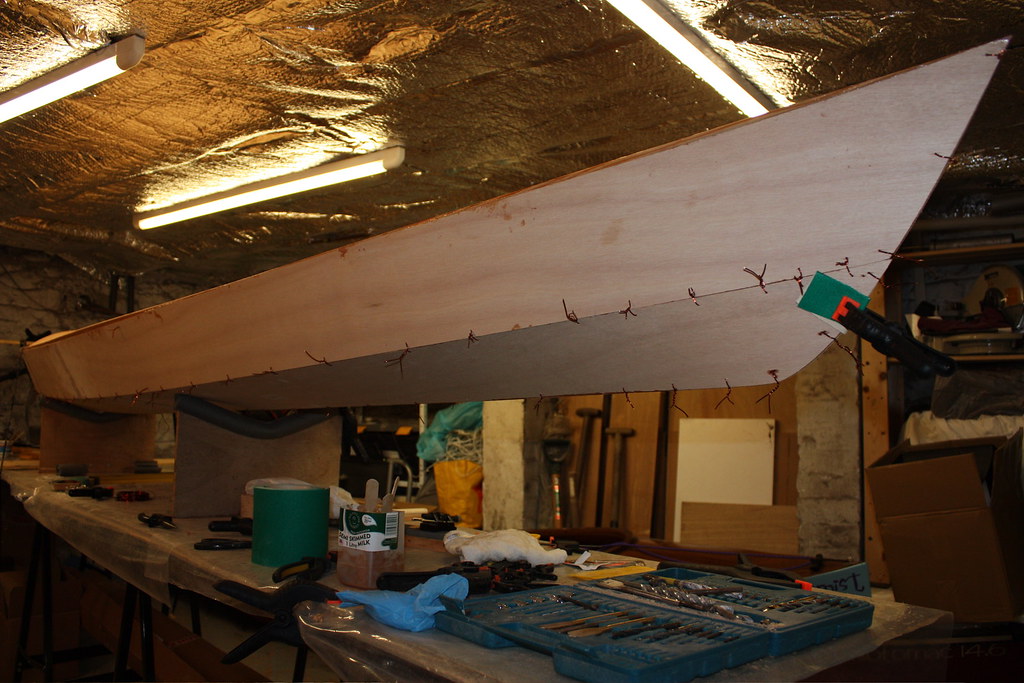
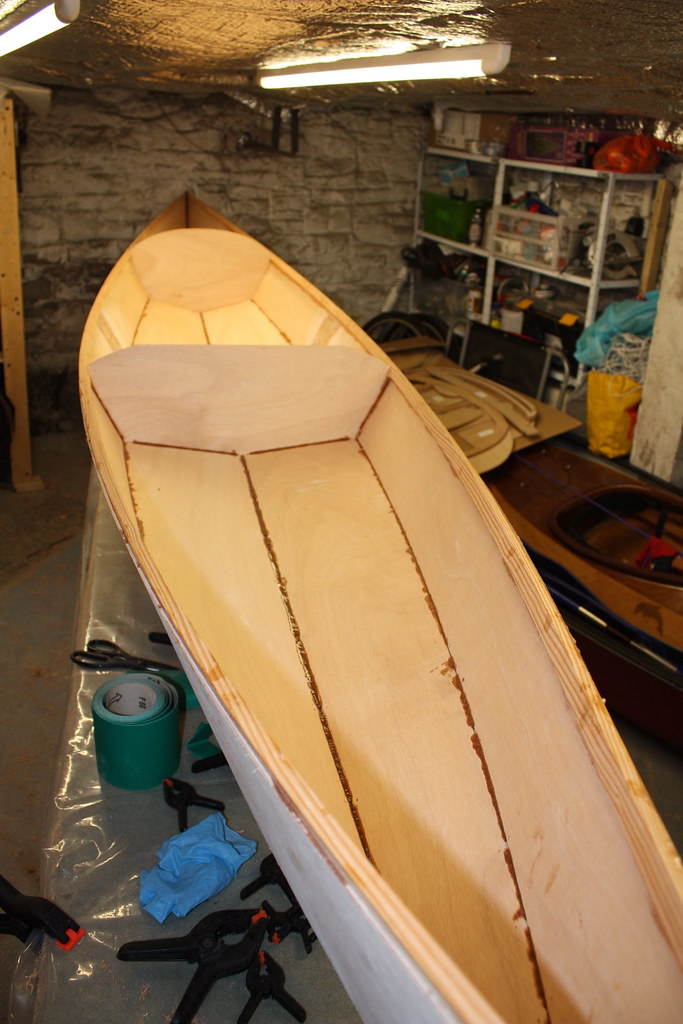
All stitched up and ready to goo
At the bow, there was a gap between the bottom and side panels. On the last build I would have pulled this in by wire tourniquets, but I've learnt from that experience, and did it properly this time. A plank over the top of the bow was pulled down with a looped strap, and squeezed in with clamps. The wires then twisted up easily, holding the panels flush.
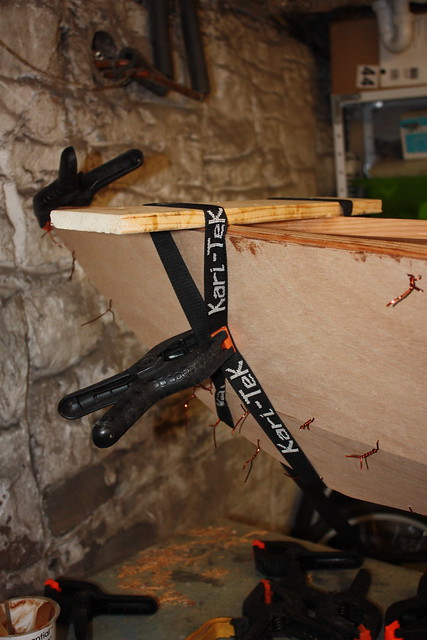
It needed just a little bit of a twist to get it all straight. I found if I held it with a strap at the forward bulkhead to hold it down on the V-trestle, then shifting it a little on the other trestle, it came in true.
Then the tack welds could go in - much thinner this time. There is some amine bloom which I'll have to clean off - probably down to going down too cold when the central heating went off overnight. Then with a little help from a lighter, the wires all came out, and fortunately it didn't all go spradoing into a pile of bits.
Offline
#6 8 Feb 2012 9:05 am
- gooseneck
- Member
- From: UK
- Registered: 20 Aug 2011
- Posts: 23
Re: Shearwater sport hybrid build
I do like the lines of these boats but i prefer to sail. That tip of yours with the plank and strap deserves greater publicity I wonder if the admin person can get it into the tips section.
Offline
#7 8 Feb 2012 9:09 am
- Richard
- Member
- From: East Sussex
- Registered: 7 Jun 2011
- Posts: 75
Re: Shearwater sport hybrid build
hello gooseneck if you are still there. Not normally many on in the morning. Beaker has also sneaked in a neat idae with the sandpaper & clip which should be atip.
Canoe & Kayak Owner
Offline
#8 8 Feb 2012 8:39 pm
- beaker
- Member
- Registered: 9 Oct 2011
- Posts: 81
Re: Shearwater sport hybrid build
Glad the strapping idea is useful. The sandpaper and clip trick was from the wood duckling manual; that boat has even more twist to the ply at the bow.
Offline
#9 9 Feb 2012 10:47 pm
- beaker
- Member
- Registered: 9 Oct 2011
- Posts: 81
Re: Shearwater sport hybrid build
I've started to glass the inside now, beginning at the bow. I'm improving my epoxy skills, although the short version is
"do it precisely as it says in the instructions, and the tips on this site. No, really, exactly as it says."
Getting the cellar hot, then cooling down from about 22 to just above 16 C, meant I had no bubbles or blisters this time. The fillets are much narrower and neater, 15-20mm wide. I still put too much epoxy on the first coat, so the fibres in the plywood came up really rough. However, I was trying to make the last pot stretch to do the bulkhead, so I put it on really thin. The result was much smoother, and a quick pass with the cabinet scraper took the slight roughness off.
I still got amine bloom though, even though it stayed fairly warm. Presumably that's the slight dampness in the cellar. Not much I can do about that, so the next set will have to go on in quick succession between coats.
Offline
#10 11 Feb 2012 10:04 am
- Fyne Boat Kits
- Administrator

- From: Cumbria, UK
- Registered: 22 May 2011
- Posts: 156
- Website
Re: Shearwater sport hybrid build
I hope that you do not mind but your idea about the strap to pull down the bow has been copied and pasted into the help section. It will save a lot of damaged wood and broken wire.
Thank you for a great tip.
Offline
#11 18 Feb 2012 11:01 pm
- beaker
- Member
- Registered: 9 Oct 2011
- Posts: 81
Re: Shearwater sport hybrid build
The epoxy on the inside is done now. I used silica/wood flour to get a lighter colour fillet, and although the darker tack-welds show through a little, they still look fairly neat. However, I'm not totally happy with the surface finish in the cockpit. I'll probably sand it and varnish before I put the deck on.
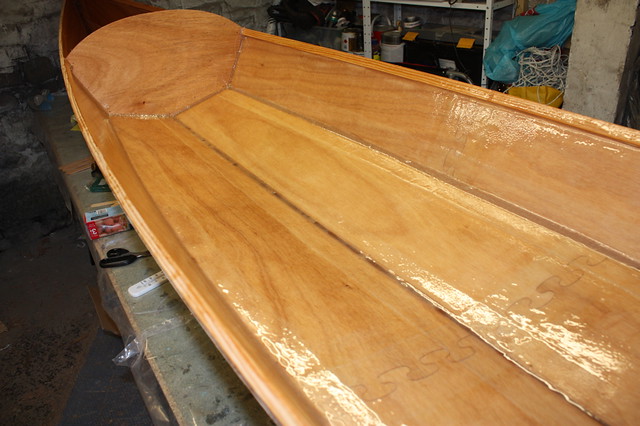
The next bit is sanding the hull, which I'm looking forward to. I've just bought one of these, which seems to actually make things flat and smooth, rather than my old sander, which just scratches tiny circles into the surface.
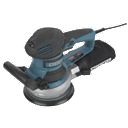
It flattened the puzzle joints on the outside with very little fuss, so I have high hopes for getting a good smooth hull.
Offline
#12 26 Feb 2012 7:49 pm
- beaker
- Member
- Registered: 9 Oct 2011
- Posts: 81
Re: Shearwater sport hybrid build
The whole boat is sanded to 80g now.
Here's the panel joint at the bow - nice and tight, and no filler this time.

Then the fabric, with a second layer on the bottom panels.
Now you see it
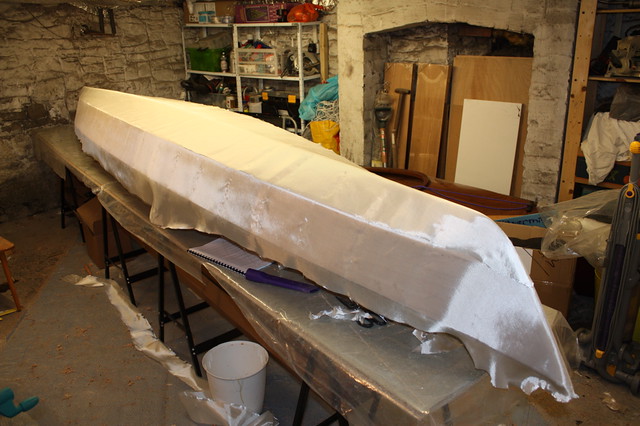
Now you don't.
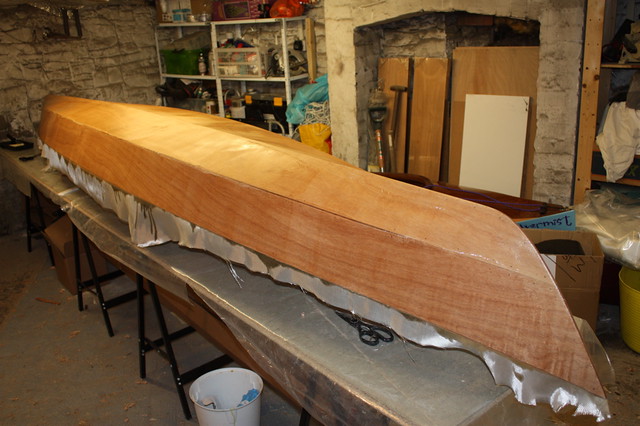
I put the bow and stern patches on after I'd wetted the whole hull out, otherwise they just fall off. The next stage is the fairing to fill the weave, later tonight.
Offline
#13 10 Mar 2012 12:50 am
- beaker
- Member
- Registered: 9 Oct 2011
- Posts: 81
Re: Shearwater sport hybrid build
The wetting out / fill process went without any great bubbles this time. The first coat went on with a roller, then a slurry of microballons with a plastic scraper. To make sure it all happened without amine bloom, I had to get up very early in the morning for the second fairing coat.
The microballons did have a few sags and runs in, but the orbital sander at 60grit then 80grit soon took them off. The concave surfaces near bow and stern went with 80grit hand sanding. There is one tiny patch where I cut into the cloth - I'll put more cloth over this next time I'm fibreglassing another stage.
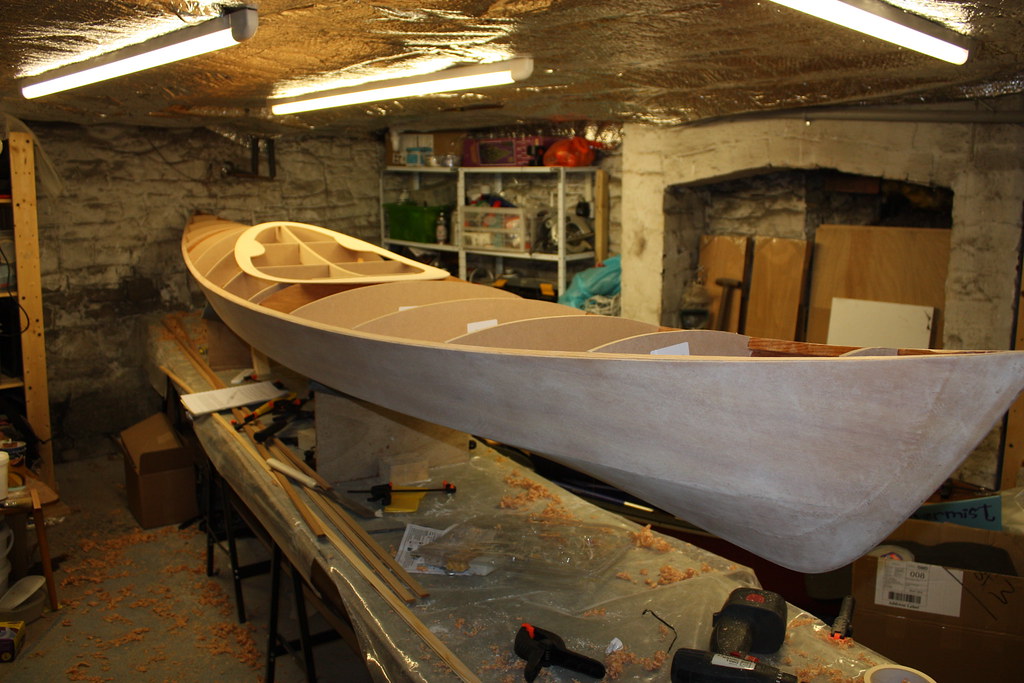
Time to flip it back up, and fit the deck forms and plane the shearclamps. I had to refit some of the forms a few times, to get the curve to meet the edge of the deck panels, and also so a strip laid down the deck had a nice flowing curve with no inflexions.
The cockpit rim is pinned on now, so I can see the overall shape for the first time.
Offline
#14 4 Apr 2012 10:40 pm
- beaker
- Member
- Registered: 9 Oct 2011
- Posts: 81
Re: Shearwater sport hybrid build
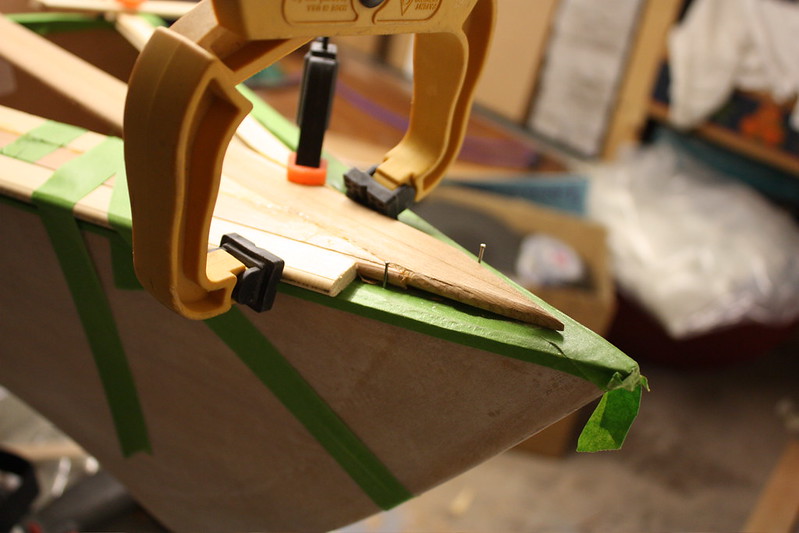
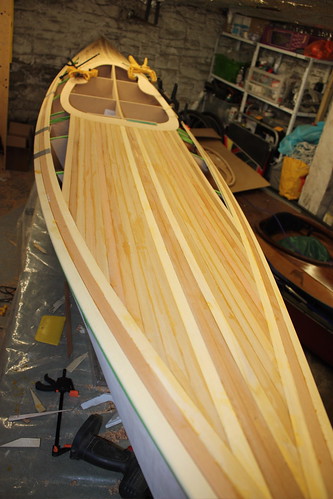
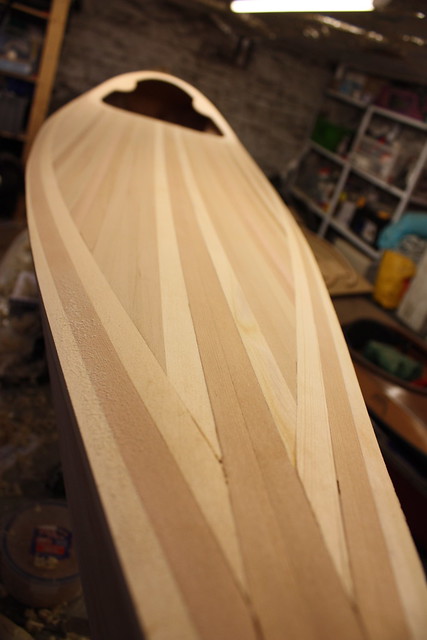
So here we go with the planked deck. I want to go without nailholes, but I'm trying to keep it reasonably simple - a contrast of light/dark/light strips for the gunwales and kingplank, then straight red cedar for the rest of the deck plank. I had doodled a hatful of swooshes, contrasts and inlays, but fortunately went for a more doable design to start.
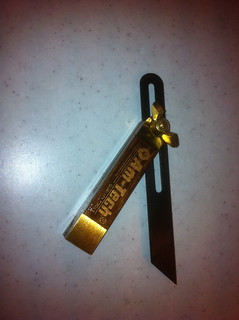
The kingplanks went in fine, and with a few lolly sticks under the rear bulkhead they lined up with the cockpit apron. Plenty of fiddling with offcuts and an angle gauge later, I committed to cutting the points off. Here's the gauge from e-bay (new) for £2.17.
The first planks are clamped on to give me a slot to slide the next ones into. The tricky bit here is that the plank is over 4m long, and has to mitre to the perfect length at both ends.
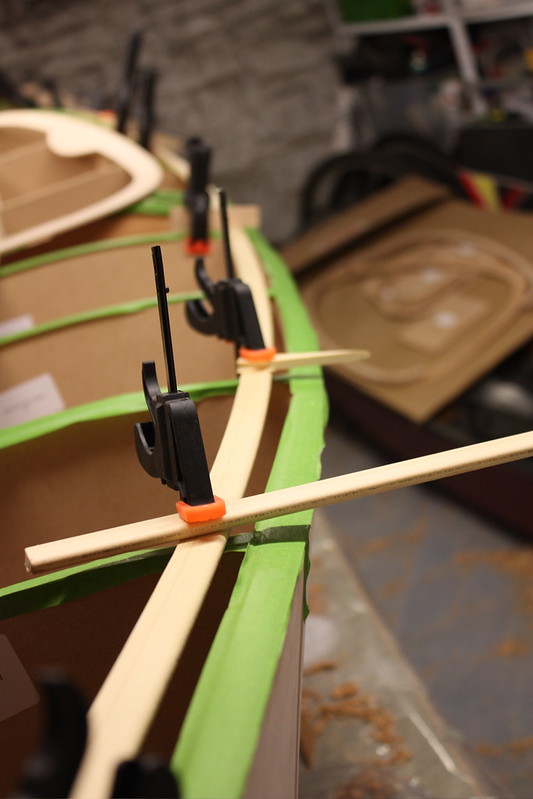
I used some pins into the shearclamp to hold the second plank.
Offline
#15 11 Apr 2012 10:34 pm
- beaker
- Member
- Registered: 9 Oct 2011
- Posts: 81
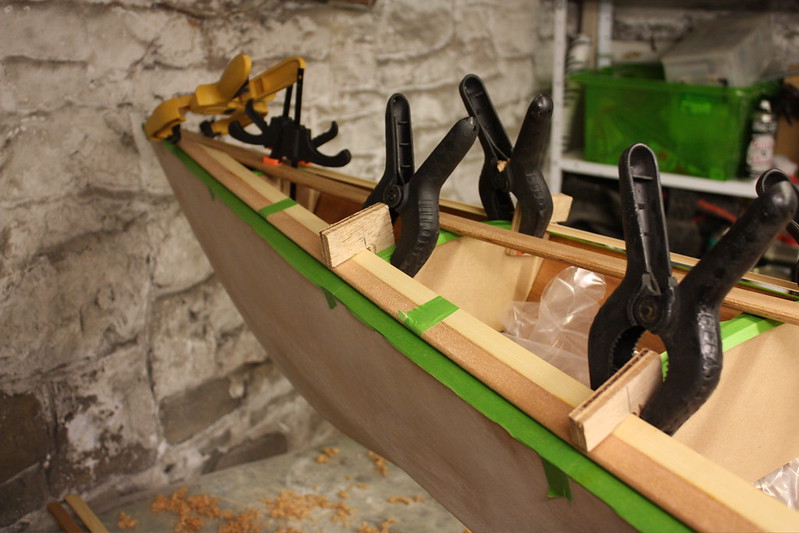
Re: Shearwater sport hybrid build
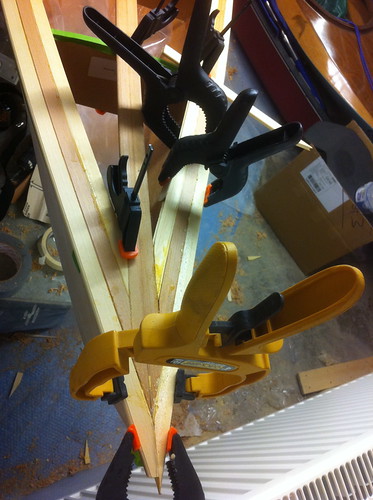
I really should take some notice of my own advice. Somewhere else I wrote not to worry about hiding the stitch holes, it's part of the honest engineering of the boat. Then I go trying to get these planks on by dead reckoning, just to avoid a few neat pinholes in the outside planks, and instead have a fair amount of fettling and some filling to come.
On the other hand, using some clips to hold the free wandering end of the strip whilst fitting and gluing is to be recommended.
Clamp clampity clamp
Offline
#16 14 Apr 2012 9:57 am
- fairplay
- Member
- Registered: 16 Jun 2011
- Posts: 109
Re: Shearwater sport hybrid build
...nice! - it will be worth the effort...
'...so, how many kayaks do you really need?...' - '...one more!...'
Offline
#17 2 May 2012 10:46 pm
- beaker
- Member
- Registered: 9 Oct 2011
- Posts: 81
Re: Shearwater sport hybrid build
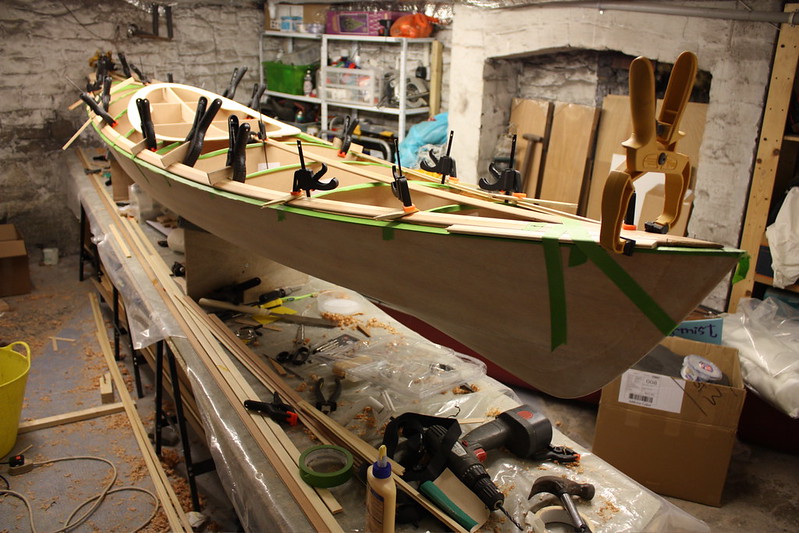
Thanks Fairplay!
It's coming along steadily. There are a couple of tiny gaps between the bead and cove where the foredeck planks hit the cockpit apron, which may need some wood slivers or filler, but in general it's looking good. I'm using fewer clamps, and more bits of scrap pinned to the former, which gives a good tight joint with less risk of dents.
Offline
#18 9 May 2012 9:26 pm
- beaker
- Member
- Registered: 9 Oct 2011
- Posts: 81
Re: Shearwater sport hybrid build
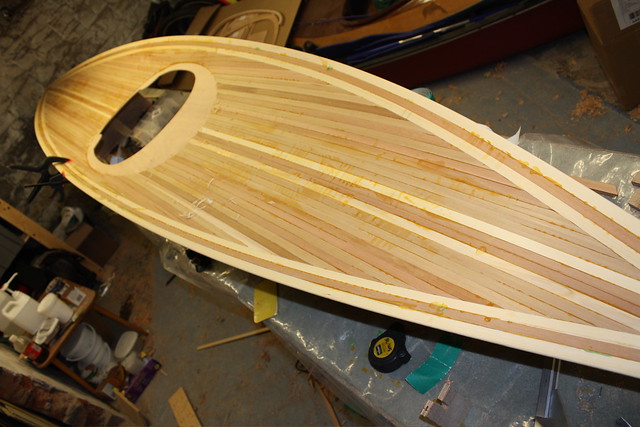
Now I'm starting the planking past the cockpit, which will be mitred at both ends, and whittled out in the middle. Eventually got it to the right shape, and sprung it in for a dry fit. Pulled it out to glue up, and then started fitting it back in...
Crrrrrack...
Ok. Much easier to fit two bits in, and I've got a multi-faceted scarf joint. Hmmm. The damaged surface is proud of the cockpit apron, so when I plane and sand it should all disappear with a bit of luck. On the other side I'm going to scarf rather than bend it in.
Offline
#19 9 May 2012 11:04 pm
- fairplay
- Member
- Registered: 16 Jun 2011
- Posts: 109
Re: Shearwater sport hybrid build
...ouch!...
'...so, how many kayaks do you really need?...' - '...one more!...'
Offline
#20 18 May 2012 11:10 pm
- beaker
- Member
- Registered: 9 Oct 2011
- Posts: 81
Re: Shearwater sport hybrid build
Down to the last two planks on the deck now. They'll have to go in from underneath with a little hidden bodging.


Lift the top off, and the last one goes in.
Offline
#21 19 May 2012 7:45 am
- fairplay
- Member
- Registered: 16 Jun 2011
- Posts: 109
Re: Shearwater sport hybrid build
...very nice!...
...for my next new project (after finishing the Wood Ducks and the Pax) i am planing to build an SUP (standup-paddleboard) with the strip plank technique...as you have a combination of the two techniques with your boat - how do they compare?...
'...so, how many kayaks do you really need?...' - '...one more!...'
Offline
#22 19 May 2012 2:08 pm
- beaker
- Member
- Registered: 9 Oct 2011
- Posts: 81
Re: Shearwater sport hybrid build
The plywood is much faster to getting you on the water, whereas the planks are ideal to noodle along with on dark winter nights. The hybrid means that you can use the ply to set up the shape of the boat, and then be fairly sure the planks won't drift away from the true shape. There is more woodworking to do with the planks, which has its own satisfaction, and an excuse to buy some Japanese saws.
Going for a surfboard style planking, with parallel strips all the way to the edge, would give a much easier build, and probably more likely to get a neat finish. The tricky part on the boat style, with strips around the perimeter, is that every strip has a joint at both ends.
Offline
#23 22 May 2012 7:44 am
- Richard
- Member
- From: East Sussex
- Registered: 7 Jun 2011
- Posts: 75
Re: Shearwater sport hybrid build
Planking looks like a lot of work but tthis is going to be a beautiful looking boat. You may not be in a hurry but I cant wait to see this kayak finished beaker.
Canoe & Kayak Owner
Offline
#24 22 May 2012 10:32 pm
- beaker
- Member
- Registered: 9 Oct 2011
- Posts: 81
Re: Shearwater sport hybrid build
Cheers Richard! This warm weather is giving more of a sense of urgency to the project, so still trying to get a step done each night. Over the weekend I got the underside of the deck glassed. A useful practice for the visible side - wherever there was a trace of the Titebond it really shouts as a pale spot, so I'll have to be careful to clear it all off the outside.
Today it was the footrest mounts. They are made from a temporary form, with a holesaw to make two discs glued together.
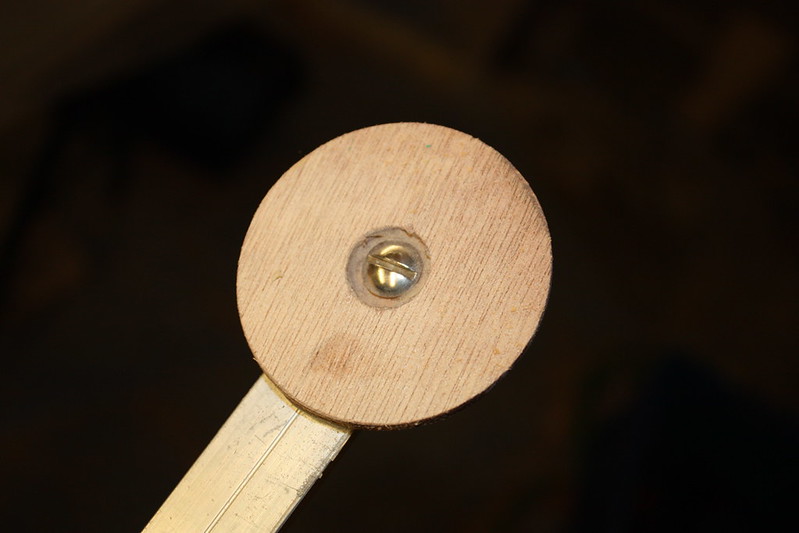
I chamfered the edges, then put some tape over the top and screwed them to the rails whilst still wet. Hopefully I've glued them at the right end!
Next job will be strapping the deck on.
Offline
#25 27 May 2012 9:55 pm
- beaker
- Member
- Registered: 9 Oct 2011
- Posts: 81
Re: Shearwater sport hybrid build
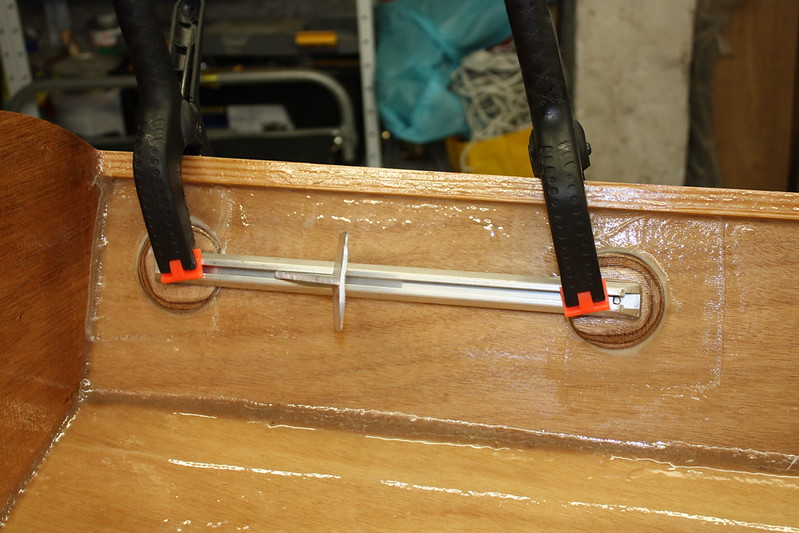
Lots of straps, and gaffer tape in between to pull any little gaps shut, and the deck is back on.
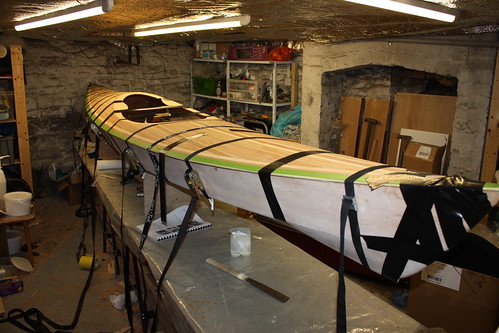
First pass of the sander with 80G. The titebond smudges are now all gone, and the transition from strips to coaming is a lovely shape. There's a little bit of gap filling, but much less than I expected. The overhanging deck was then trimmed round the edge with the Japanese saw, and planed down - a bit more of this to go.
Offline