A forum for discussing wooden boats and boat building
You are not logged in.
- Topics: Active | Unanswered
#1 1 Nov 2020 10:11 am
- Curlew
- Member
- From: nr Skipton, N Yorks
- Registered: 8 May 2020
- Posts: 51
What I learned making my first kit (Shearwater Hybrid 16). My 'tips'
These are tips tricks and suggestions I came up with after building my Shearwater 16 Hybrid. Some are specific but hopefully others are translatable to other kits.
I am no expert; this was the first kit I have built, indeed the first project like this I have ever undertaken. That is the point really, to help out those approaching a kit for maybe the first time with simple things that might have been nice to know before I started. I hope people will add or comment (constructively). I’m sure some experienced builders will read these and smile at my foolishness!
General
Read the manual several times and also watch Jason Eke’s video series of a Shearwater hybrid build. Nick Schade is a great resource online too, some of the other videos out there less so.
Enjoy it, take your time. The main skills required are patience and common sense. Measure twice; cut once, always dry fit everything several times and use sharp tools. Have a good roomy workspace with a bench and ideally two sets of trestle supports shaped for hull and deck contours respectively as you will work on them side by side at times. You will get epoxy on the floor, so lay sheeting if you are bothered.
Keep your hands clean, especially when working with Pawlonia and keep grease and sweat off all the wood. I found decorators hand wipes great for removing uncured epoxy spills on tools and work surfaces and also for cleaning washing-up rubber gloves which I could then re-use.
Panels and stich and glue
Creating a good rolling bevel especially at the ends of the panels makes it a lot easier to get things snug when you start tightening. I drilled a couple of extra holes around the panel junctions at bow and stern to add some extra stitches. Wear work gloves when stitching as the wires puncture your fingers!
https://forum.fyneboatkits.co.uk/img/me … anels.jpeg
The epoxy filleting was probably my worst job on the whole boat. Be brave enough to make it properly thick and have a whole variety of different profiled scrap wood (or even better plastic) tools for smoothing. I would use masking tape next time beside each seam to make it neater. It can be peeled straight off before glass tape applied.
Epoxy of hull and deck. Glass fibre etc
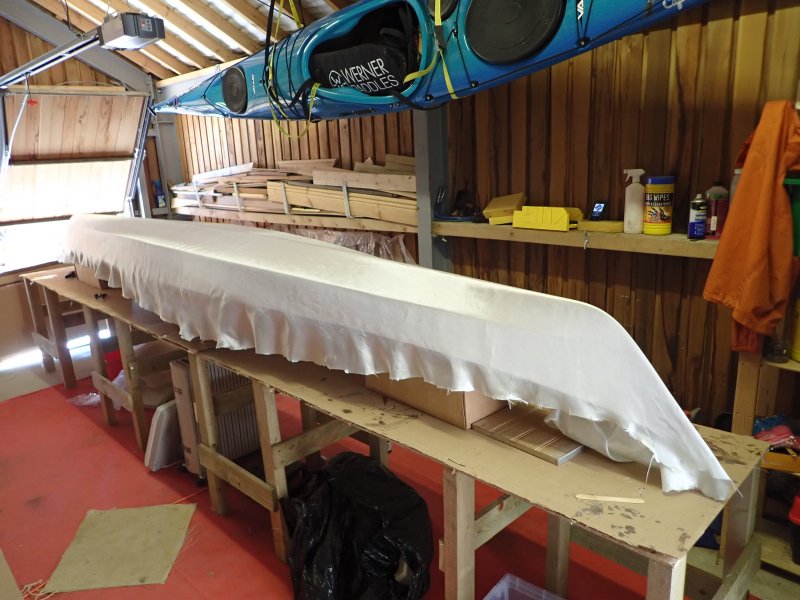
Once glass fibre sheeting is laid out and fairly smooth wait a few hours or better still overnight. It seems to flow and stretch naturally that way. A large dry wallpaper brush is also good for smoothing. No wrinkles!
https://forum.fyneboatkits.co.uk/img/me … -hull.jpeg
I would lay the hull glass pieces next time in 3 separate jobs or, if doing them in one go, in a different sequence next time (ie keel strip or bottom panel first then on top the large complete hull sheet). It is fiddly to do them as suggested, and a real challenge to wet out and smooth 3 layers in one go without bubbles etc. You also get lots of fibres from the cut edges picked up by the brush/spreader if these layers are uppermost.
Before a big epoxy job have everything ready in multiples; pots, plastic gloves, spreaders, stirrers, brushes etc. I used some electronic kitchen scales to weigh every mix rather than volume. Worked really well.
Have the temperature of the epoxy, the wood and the room stable and warm for a good time (12 hours ideally) before starting. Cannot stress this too much. I began the project in cold weather and warmed the epoxy only, then erected a gently heated ‘tent’ over the area overnight whilst it cured but this caused some outgassing. It is OK to let things cool down once the epoxy is applied. It will be set by the next day in any reasonable temperature.
It would be great to have a helper applying, or even just mixing the next batch, for big epoxy jobs especially when the weather warms up. Unless you work really quickly keep to 150g or less in a pot at a time or it can go off in the cup, and once it starts to go it really does go!
Stripping and attaching the deck etc
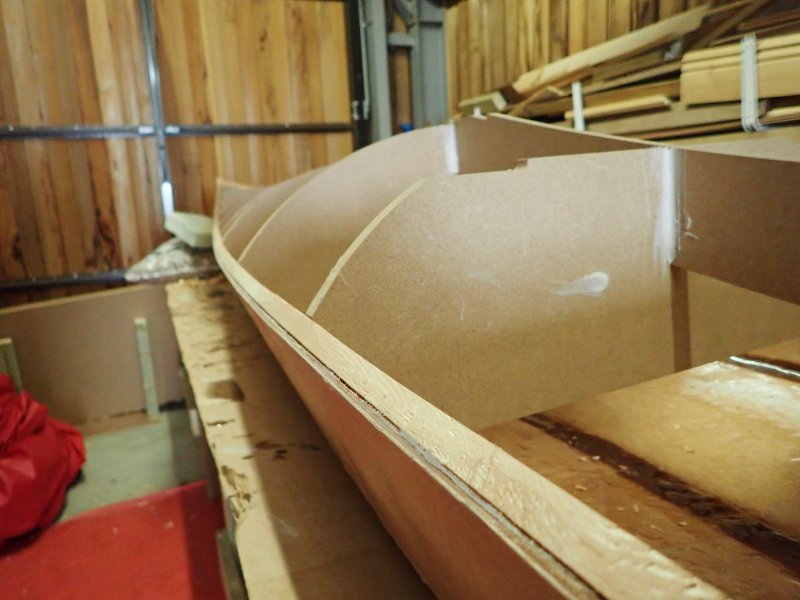
Take time bevelling the sheerclamp, not just the following the profiles but also to ensure the outer edge really comes down to the top of the side panel. This prevents a gap here when the deck is bonded in place that might need filling with a little thick epoxy later. A reasonable portion of the outermost cedar strip overhangs when the deck is first bonded so it is not immediately obvious where the deck/sheerclamp contact point is going to be until it is faired back.
https://forum.fyneboatkits.co.uk/img/me … bevel.jpeg
No More Nails works OK if you don’t have a hot glue gun for fixing the temporary profiles. 2-3 blobs each side left to dry for a good 24hrs. They knock out OK with just a little residue to chip off.
I think the absolute key to a good cedar strip fit is to thoroughly re-fashion the cove or bead into the cut surfaces. I used sandpaper wrapped around a thin edge to start things, also use a piece of scrap wood with a cove as a form (see Jason Eke’s video). Where strips are under quite a lot of curve the cove/bead may need to be angled slightly to keep the upper edges flush when glued.
Check each strip fully before you use it. I failed to spot a small knot in one, it fell out and had to be filled later. I had a few strips with less well finished bead/cove that I rejected too. Don’t worry I reckon I had about 25% too many strips even with wastage.
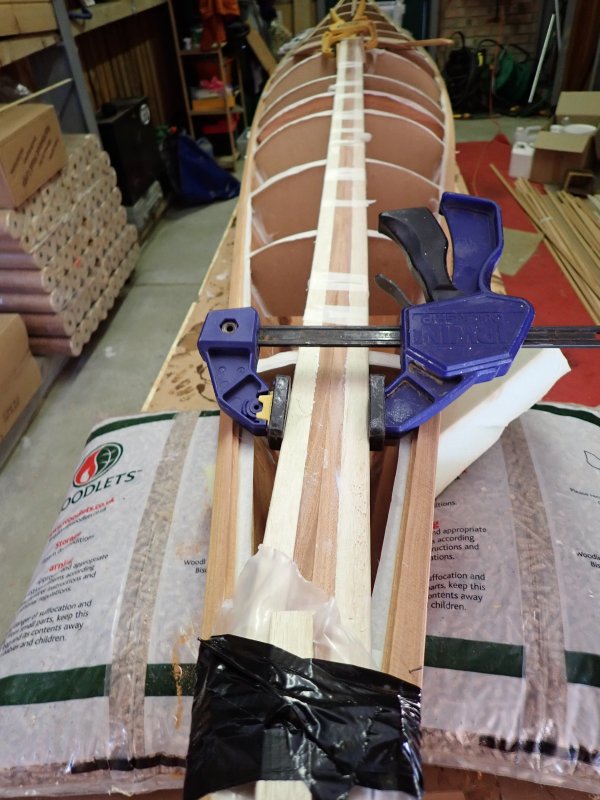
The first strips are under a fair bit of twist as well as bend in the first 15-30cm at bow/stern so take time to really get them good and tight. I used panel pins onto the sheerclamp here (and just two or three on the midline strip) but nowhere else. I used scrap wood wedges, masking tape and clamps in various creative ways to avoid pins or staples elsewhere. Not that hard to do.
https://forum.fyneboatkits.co.uk/img/me … -0837.jpeg
https://forum.fyneboatkits.co.uk/img/me … ieces.jpeg
If you have to join strips then fix them on the workbench beforehand. PVA would be fine if left overnight. A 45 degree scarf is OK. I joined them in-situ on the boat which was tricky (although possible).
Wipe off excess PVA straight away, and if you can reach give it a wipe underneath too. Blobs of dried glue tend to form on the underside unnoticed and are annoying when you prep that surface for glassing.
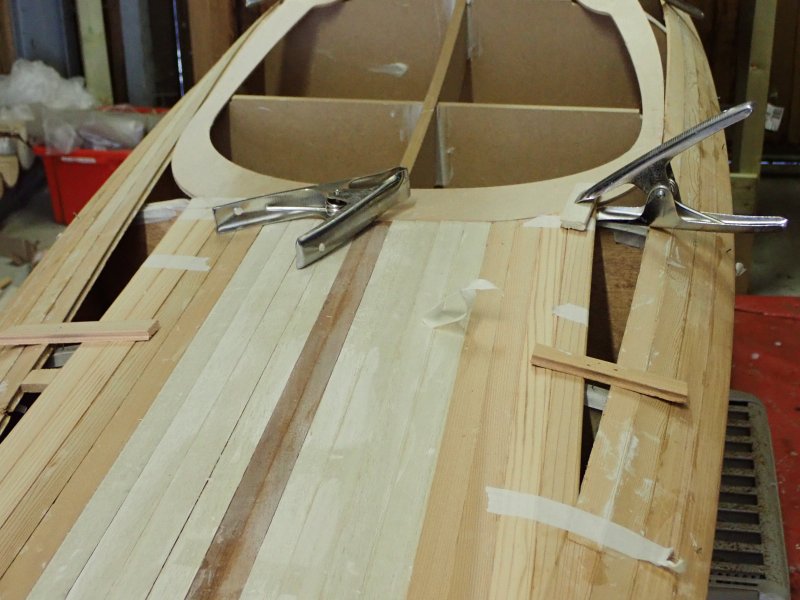
Take lots of time getting the junction between the strips and the cockpit apron edge neat and flat on the upper surface before fixing. If you have to sand later to level the upper edge be careful not to go through the very thin top ply layer of the apron as you do so. Curving the strip ends to follow the cockpit apron is difficult, especially as you get a more extreme curve towards the sides. Mine are not perfect.
When you have done the deck you can chip and scrape flakes and slivers of wood from scrap strips and glue into any defects or pin holes. They generally disappear when sanded.
When fairing/sanding the deck wipe it occasionally with a clean damp rag. This shows up any bits of PVA or epoxy on the surface and also any little gaps more clearly. I used a (really) small amount of wood flour with thickened epoxy as filler in any gaps and then sanded it back. It worked well. The manual should make it clear that a bit of filling will be needed and not to worry!
A dam made of profiled carboard and held in place with Duck tape was fine to make small end pours (with slightly thickened epoxy) for the toggle cord holes to be drilled. Tipping the boat slightly helps too.
When bonding deck and hull together do several dry fits with plenty of straps etc. I found that straps alone tended to squeeze the deck a bit and lift the centre so I ended up placing significant weights over front and rear bulkheads. With really thick epoxy pasted along the upper edges I got both to form a good contact with the deck and bond along almost the whole profile. I also used more weights over stern and bow to hold things down too.
https://forum.fyneboatkits.co.uk/img/me … ded-2.jpeg
Dry fit the coaming assembly with clamps overnight. It then holds a bit of shape which makes it easier to fit. I epoxyed the two spacers and the coaming together on a work bench then transferred them immediately to the boat where I had applied thickened epoxy to the apron edge. Not too messy or fiddly. Be careful with the clamp tips not to dint the coaming surface-use scrap strips under them.
When glassing the coaming protect the deck around the outer edge with plastic sheet and masking tape as well as inside the cockpit in case of drips.
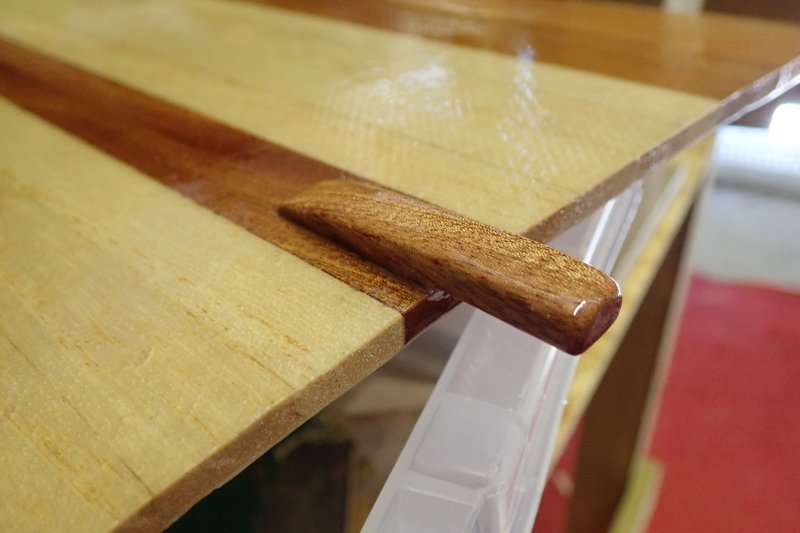
When you cut the hatches do your small starter holes aligned with where the toggles are going to be mounted. The toggle will hide any irregularity here. I made a small shallow ‘fin’ of wood and stuck it on the hatch so it can be lifted off easily. Looks nice.
https://forum.fyneboatkits.co.uk/img/me … ifter.jpeg
Finishing, epoxy, varnish, paint etc
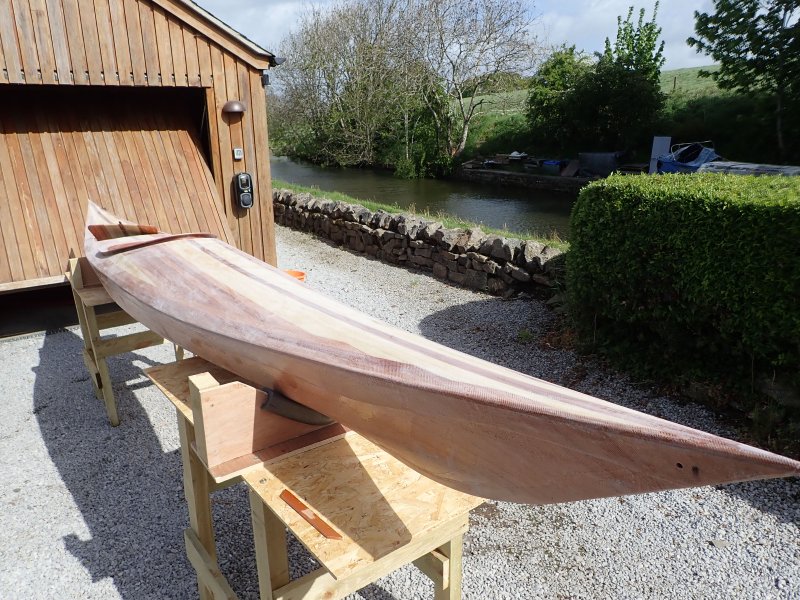
When you do your epoxy skim coats on the hull with the boat inverted take care that it does not flow down and under the side panels and onto what will be the deck edge. Wipe or brush underneath as it goes on. Drips here are annoying to sand later.
Repeat after me; sanding is my favourite thing. It may be tiresome but it is worth it! That even gray haze all over the surface suddenly looks lovely with varnish on top. If weather and location allows sanding outside has to be the best way to avoid too much dust.
https://forum.fyneboatkits.co.uk/img/me … epoxy.jpeg
https://forum.fyneboatkits.co.uk/img/me … sized.jpeg
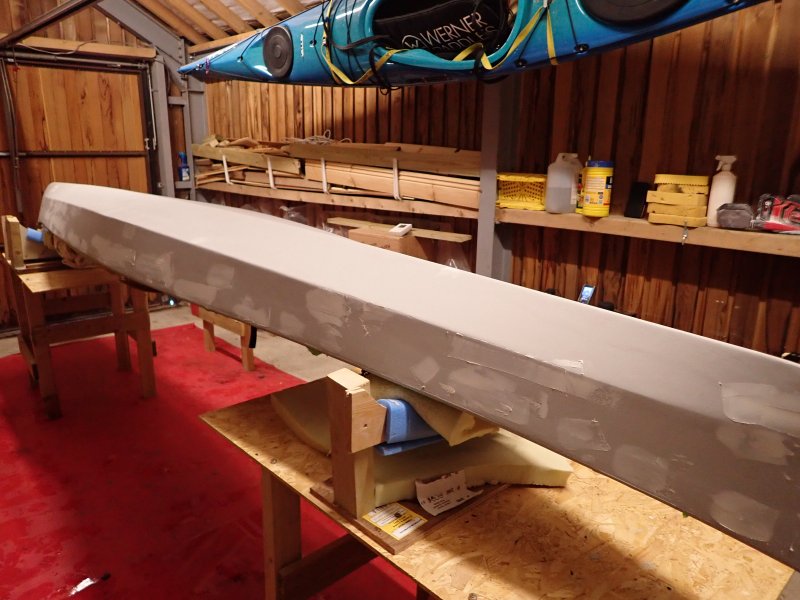
If painting the hull then after a decent bit of sanding apply a first layer of undercoat. The matt surface makes it easy to see areas that might need filling. I used Teroson Marine Filler. It sets within 20-30mins which means you can fill/sand/and re-apply undercoat pretty swiftly. Isopon P38 was also suggested; I suspect it is chemically very similar.
https://forum.fyneboatkits.co.uk/img/me … iller.jpeg
You don’t need to re-sand between coats of gloss paint if they are applied within 3-5 days according to Teamac. It is not fully cured until that time.
When varnishing the temperature is again important. Too cold (15 deg or less) and it gets thick and you end up with a coat that stays tacky for ages and collects all the dust. Too warm (maybe 25deg or more) and it dries so fast it is hard to blend in each section!
Varnish in really good light, or wear a powerful headtorch so you can immediately see any areas you have missed. It is easy to miss bits over pale wood sections especially.
Make sure your last coat of varnish has dried fully before doing any more jobs. It can appear dry buyt still mark with pressure for example when inverted onto a trestle if it is not completely hard. Cold weather= several days to dry. Try with a fingernail somewhere unobtrusive.
When fitting the footrests line them up inside first and mark the nearest screwhole with an awl. Drill that from inside with a pilot hole then align the track on the outside of the boat as a marker for the second, distant hole. It has to be really accurate so the screws don’t cross thread.
Fit the back band and paddle the boat several times before gluing the seat in position. I used some sticky Velcro pads to hold it in place a few times until I was sure it was right. Once stuck down it would be very hard to remove!
A strip of helicopter tape along the gunwhale reduces scuffing a bit.
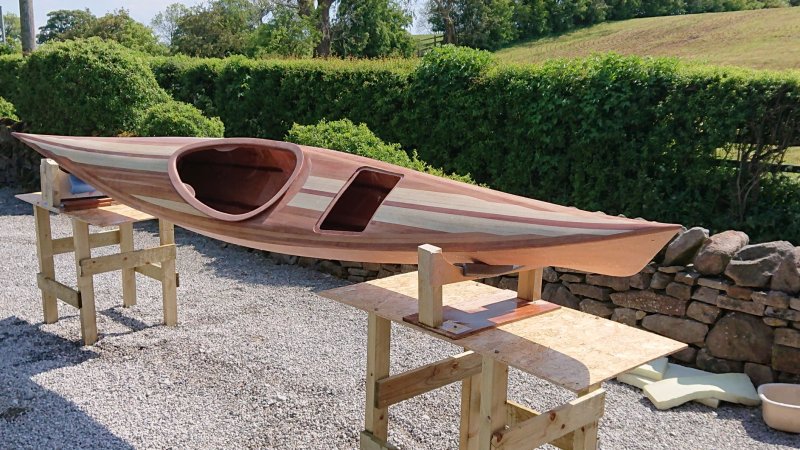
…and finally
Go and use your boat!
https://forum.fyneboatkits.co.uk/img/me … on-13.jpeg
https://forum.fyneboatkits.co.uk/img/me … on-14.jpeg
https://forum.fyneboatkits.co.uk/img/me … on-12.jpeg
Last edited by Curlew (1 Nov 2020 10:19 am)
Offline
#2 9 Nov 2020 6:41 pm
- SteveM
- Member
- Registered: 2 Jul 2020
- Posts: 9
Re: What I learned making my first kit (Shearwater Hybrid 16). My 'tips'
Thanks for a useful set of tips - most would be relevant to the kit I built (a Goat Island Skiff - like you a first-timer), though obviously not the boat-specific points. I particularly relate to the "measure twice, cut once" - I'd even say "measure thrice..." and double check you've measured the right place, I had two slip ups from measuring to the wrong spot, thankfully both recoverable.
I can add a tip about filleting that I learned which is: allow time for the thickened epoxy fillet to start to firm up but not harden, and then with good rubber gloves on, dip your finger in suitable solvent [I used Isopropyl Alcohol] and run your fingertip along the fillet to smooth it. Keep dipping and smoothing over the whole length of fillet. This gives a good finish that needs little or no sanding afterwards. There's a lot about working with epoxy on the Off Center Harbor website which I recommend https://www.offcenterharbor.com
I'll also add that when painting I found a foam roller gave a better finish and used a lot less paint than using a brush. I used the rolling-and-tipping method: apply with a foam roller, then lightly drag the tip of a disposable foam brush over to smooth out the tiny bubbles that sometimes remain. Do both to a small area (max. about 50cm square) and move on. I found the same worked well for varnish too, and it's much quicker than a brush.
Enjoy your boat, let's hope for good weather in Spring and no lockdown!
Last edited by SteveM (9 Nov 2020 6:42 pm)
Offline
#3 5 Jul 2021 5:32 pm
- Nipper
- Member
- Registered: 5 Jul 2021
- Posts: 2
Re: What I learned making my first kit (Shearwater Hybrid 16). My 'tips'
One tip I found was lay the glass cloth onto a dry hull and work in four quarters wetting out the cloth with a stiff brush work from the centre to the ends and middle to the inwals . I tried wetting the hull first on the inside and it was very difficult to get all the bubbles out the outside I did on a dry hull and the finish came out very well.
Offline
#4 5 Jul 2021 11:39 pm
- spclark
- Member
- From: "Driftless" Wisconsin USA
- Registered: 19 Mar 2020
- Posts: 478
Re: What I learned making my first kit (Shearwater Hybrid 16). My 'tips'
Insides will always be more troublesome when it comes to getting fiberglass & epoxy put in place. The corners, concave curves, everything about the insides conspires against a job that ends in perfection. Way too easy to get too much epoxy into areas that make it hard to get out again, which then causes the glass cloth to float leading to bubbles.
One tip I've picked up for such circumstances is to use common paper towels as blotters to pick up and remove the excess when necessary. What's left usually is sticky enough to hold the cloth in place unless you've pushed it too much & it's not got enough slack to lie properly.
I've also come to the point where I'll pre-coat sanded raw wood or plywood with a thin epoxy coat then sand lightly once it's cured, then apply the glass cloth. Much easier to get the cloth wetted this way without getting too much onto the cloth.
Also, rather than a stiff brush to move epoxy around, use one of those thinnish plastic blade things sold for use with polyester body filler. Brushes - even stiff ones - are too flexible across their width to move epoxy around while at the same time leaving 'just enough' behind in the cloth.
Offline