A forum for discussing wooden boats and boat building
You are not logged in.
- Topics: Active | Unanswered
#1 23 Sep 2020 5:40 pm
- Nat
- Member
- Registered: 20 Jun 2020
- Posts: 4
Wood Duck 10 – things we learned
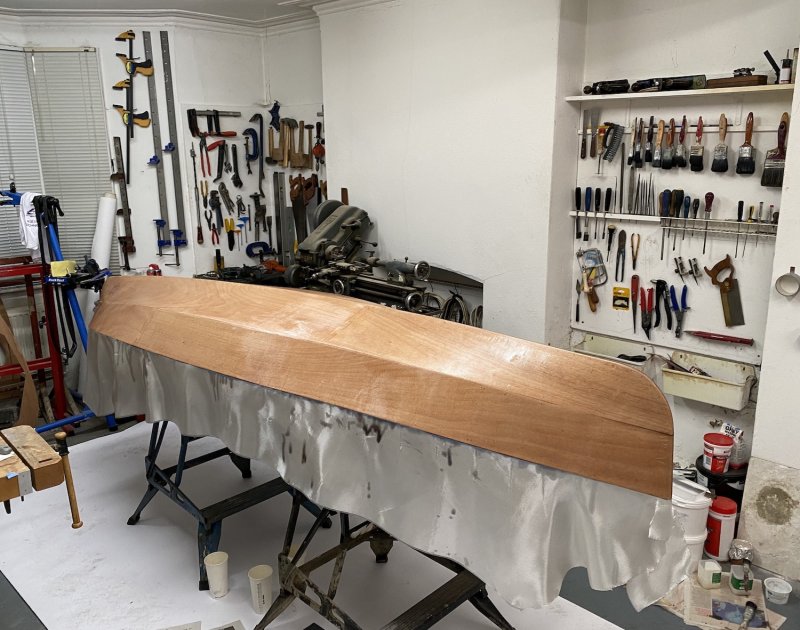
The 16-y-o and I decided to build a 10' Wood Duck together during lockdown, partly to make up for a special holiday that we had to cancel. We went with the kit version. It was the perfect project in every way! We've now been out on the water a couple of times, and I thought it worth noting a few things we learned along the way. Some may sound trivial, and I certainly don't want to suggest there's only one way to do everything. Anyway – here goes.
First - it was good to find you're not on your own. The manual usually explains clearly enough (without always saying why), but isn't infallible, and a regular browse of Fyne's forum, and CLC's (not to mention their deceptively-quick-build video here https://www.youtube.com/watch?v=Tdq8rE4WfhM), really helped in all sorts of ways. And Fyne were always super helpful when, still feeling unsure about something, I contacted them for additional advice.
Second (I'll stop enumerating after this!), it was worth taking longer than I'd anticipated. There's a fair bit of wrangling – persuading seams to line up, deciding when to take things in a slightly different order, etc. – and more often than not, putting in a couple of hours' work then leaving things till the next day felt the best way to go. (If you're working with a teenager, planning regular 6-hour shifts probably flouts the laws of nature in any case!)
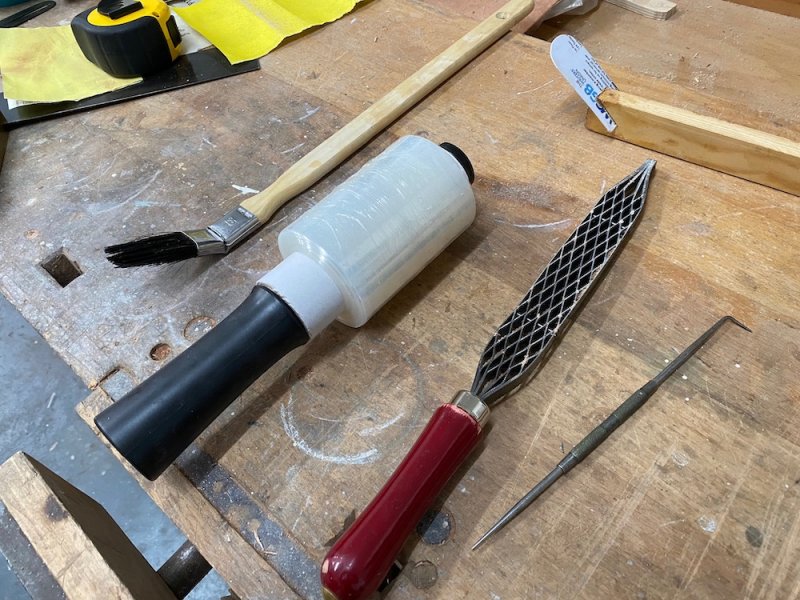
Kit we were really glad to have (apart from the more obvious): 1, Japanese saw rasps (the Shinto you can get from Fyne or Axminster) – just the best for all the bevelling and trimming: 2, metal scriber with sharp point – for piercing of extra stitch-holes (often quicker and easier than drilling), and opening out of others to take an extra strand of copper wire: 3, range of credit-card spatulas with different straight and radiused edges – probably won't all get used, but better than scrabbling around in the middle of a job: 4, a long-handled brush with its head set at 45º – found this in a local hardware/decorators' suppliers. Only used when fitting the deck to the hull, but invaluable: 5, 4" stretch-wrap, as mentioned in the manual (we went through one full roll): 6, couple of Stanley workmates holding home-made V-shaped supports – the variable height was a real bonus: 7, bumper-size box of disposable blue vinyl gloves.
On the general topic – I've been very impressed by various things (materials, tools, other supplies) available from Fyne – they clearly take a lot of trouble in sourcing stuff, and selling it on at very competitive prices.
Useful stuff
Copper wire for stitches – 10 or 11cm lengths are normally plenty enough. You can waste an awful lot of good copper cutting them longer than that. We started just cutting the supplied coils in half – quick maybe, but wasteful.
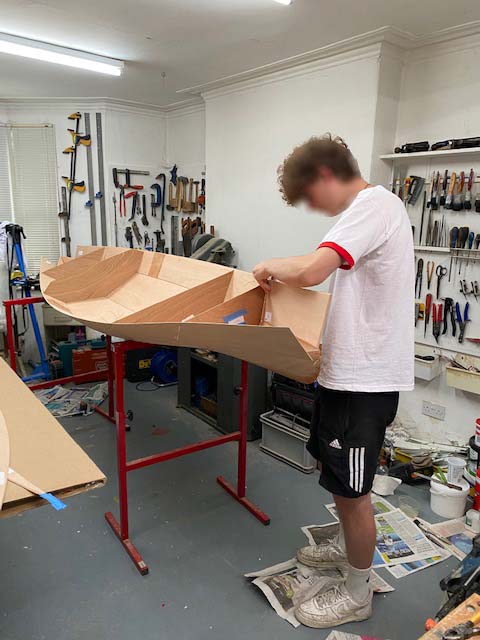
Easing flat plywood panels into complex curves at bow and stern – all the advice was worthwhile: e.g. not to force the pace, to be ready to pierce more holes (like twice as many in critical areas – spreading the strain is good common-sense), to spray with water between times – a couple of times at 20–30-minute intervals, then leaving overnight – and of course, to have faith. It must have taken us three days of gradual tightening and intermittent spraying to close the panels to the concave curve of the transom, for example, but the results are so worthwhile.
To pinch together and apply extra pressure around the bow, the only thing we could get to reliably stay in place was steel spring clamps with hardened plastic glue from a glue-gun surrounding the tips.
Where regular stitches weren't quite enough to persuade bottom and side panel edges to align in the same plane, passing the wire through an additional domino-sized scrap of ply with a central pair of holes 20mm apart, on the outside of the hull, was a definite help (this also allowed a slim wedge/smallish nail to be slipped in as further assistance).
Resin – it does say it somewhere, but is worth repeating: if you've ever worked with polyester resin, epoxy is much gentler, but upping the amount of hardener to get a quicker cure doesn't apply – the chemistry is not at all the same. Ambient temperature does make a significant difference, though. At one point I gently used a heat-gun to speed up the set – but if you do that, be super careful, as heating up already-set resin softens it*, and it would be a shame to undo all your painstaking work...
* fastest method for cleaning up any spills!
A few times we wanted to mix very small quantities of resin – keeping a couple of labelled syringes, one each for resin and hardener (pull plunger out, fill from the pump with finger over nozzle, replace plunger, store nozzle-up between times) enabled accurate measuring and reduced waste. You may want more syringes than originally supplied...
Does it say anywhere that you really don't want to breath in the dust from sanding into fibreglass? Resin dust issues are mentioned; the dust from glass fibre can potentially do much more long-term harm. I'd say wear proper face-masks, vacuum up rigorously if you don't have efficient extraction, and keep grandma, asthmatics and pets well away.
Easier than anticipated to get resin just to the edge and a little further – without running beyond
Somewhere on one of the forums, there's a thread about whether or not to leave embedded copper in the stitch holes, but one factor didn't seem to have been considered. We presumed that getting as much out as possible was the way to go. But what we didn't anticipate was that the small amount of air in an emptied stitch-hole would - not surprisingly – sometimes lead to bubble-formation when the fibre-glassing was done (possibly exacerbated by using the scriber to open out some holes). Small bubbles, maybe 3mm diameter – but sometimes a real pain to expel, and a bit unsightly if you can't. If I was doing it again, I'd just leave the copper in wherever it's embedded in the internal filleting, clipped off on the outside and sanded down – no more noticeable than the pin-prick of an empty hole when you've finished, and a bit of a time-saver.
On the topic of filleting – we laid masking tape 25 or 30mm apart where we judged the edges were going to be: at the time it felt close to overkill, but for the sake of eventual neatness, we're glad we did. Essential to peel it off a.s.a.p., well before the fillet has cured so any raised edges can be smoothed off.
Joining deck to hull, we had the feeling that the quantity of resin recommended by the manual was excessive (maybe not for a fourteen-footer). In any case, we took a slightly different approach, pre-wetting only that part of the fibreglass tape that was going to be rolled out beyond the cockpit and into the prow (similarly for the shorter stern section behind the bulkhead), on the basis that the section of tape directly accessible in the cockpit could have resin brushed onto it in the usual way – bit less potential mess to deal with. So after cutting a full length of tape, we rolled up just as much as was going to be beyond the cockpit, found a container that would hold the rolled-up section quite snugly, checked the depth of resin needed and mixed that, dunked the rolled-up section in it and prodded with a stirrer for a few minutes until wet through, before lifting and draining out excess and laying it in the hull.
The unrolled-up dry section allowed for quick alignment from the bulkhead, then we used the long-handled angled brush to unroll the wet section towards the prow and smooth it into shape (should have mentioned – we had the hull/deck lying on its side, as recommended). Not surprisingly, there was a fair amount of excess resin already in the tape, so starting to brush resin out into the dry section back towards the bulkhead, there was already a supply at hand, collecting in the valley of the wetted tape.
If I was doing this again, I'd stick to that method, but would wait until the resin on the first side had fully gelled before starting on the other side of the hull – both to avoid drips once the boat was rotated 180°, and to allow for any excess resin that hadn't been brushed out, to pool along the angle of the join, which at least looks neat. The whole job might take longer, but that could easily be offset against time spent sanding out drips afterwards.
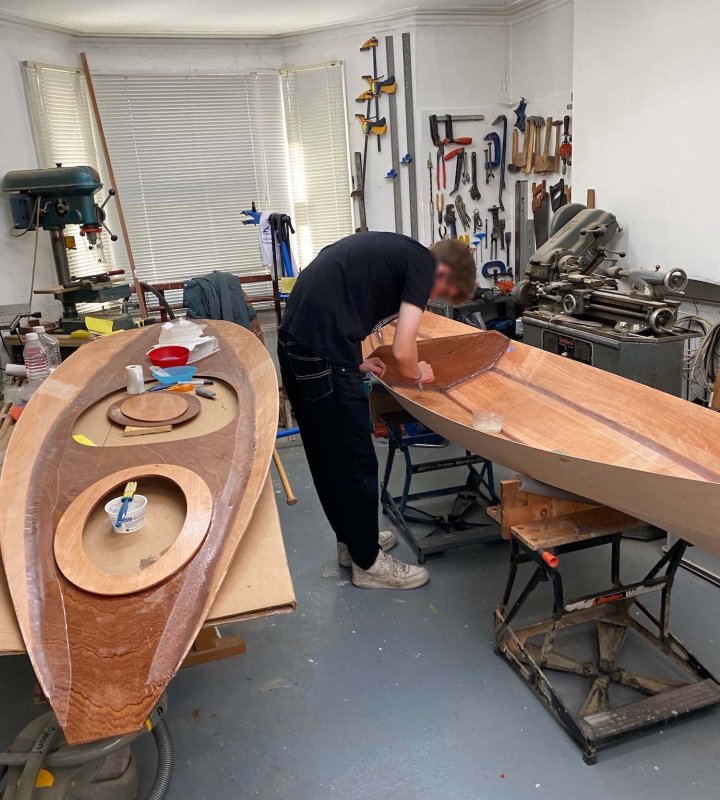
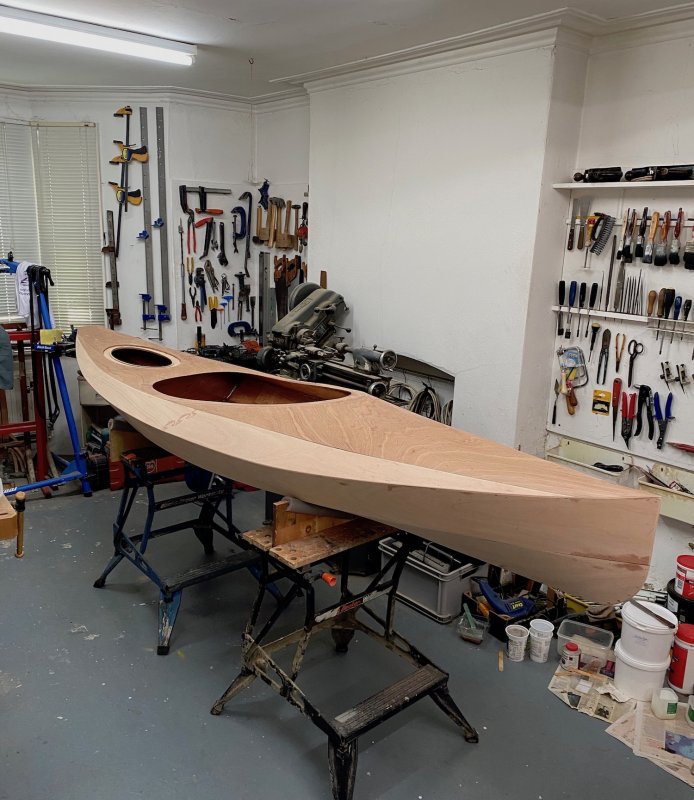
We built the coaming separately, after attaching deck to hull (the coaming clamped to the deck while setting, to ensure proper curvature, with polythene strips between the two to stop them sticking together). The advantage of this is it's much easier to neatly apply the fillet on the underside of the coaming, and then to sand down the underside and seal it with a coat of resin or three before finally attaching the whole thing. The assembly is just visible in one of the photos below.
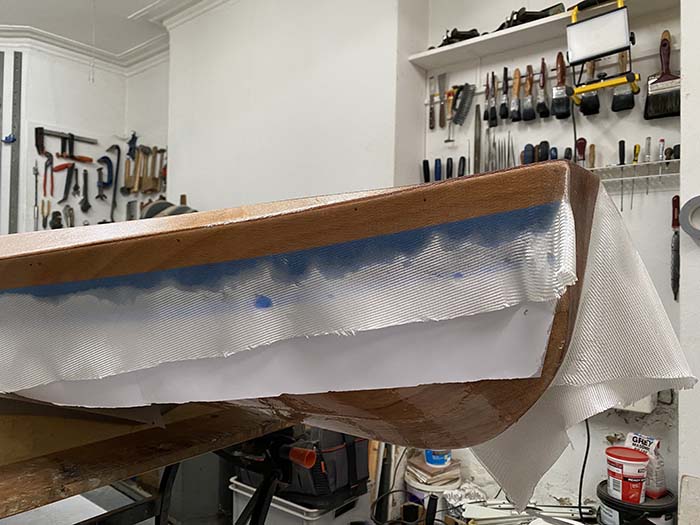
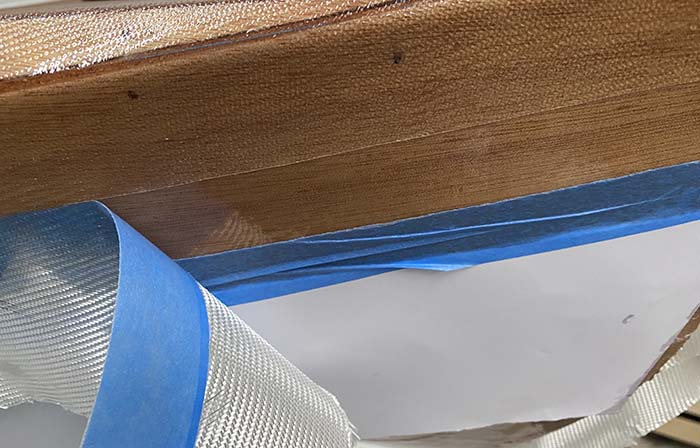
When fibreglassing the deck, the method we used to get a clean edge to the overlap on the side panels was to apply masking-tape along the desired edge, then a second width below that, with strips of paper tucked under the lower run, to minimise the risk of resin dripping onto the side panels (the paper was overkill). With resin squeegee'd over the deck and sheer panels, we brushed it down over the upper edge of the masking tape (see photo). Once the resin had cured to its leathery state – no longer tacky to touch, but still pliable, maybe 5 hours though that will vary – all it needed was to cut with a sharp blade just above the upper edge of masking tape, and to peel the waste away.
I gave up trying to work out if denatured alcohol is legally available in the UK, and didn't want to risk the additives in meths doing something untoward. We just hoovered off sanding dust, then wiped down with a wettex and a bucket of water; seemed to work fine (as long as any bare wood's had its sealing coat of resin – this is crucial to avoid water swelling the grain). And obviously water will take longer to dry off than anything spirit-based.
By the way, the foam brushes from Fyne are excellent, and made tipping out of resin and (especially) varnish a breeze. I found it pretty easy to clean them up for re-use (they shouldn't be soaking up much excess), but also learned that if you do that, the smallest foreign body picked up along the way inevitably produces hairline streaks in the next coat, not noticed until the it's dry. I think the lesson is to use a fresh one for that final coat at the very least, however much you dislike binning things after only one use.

Coaming assembled separately just visible on table to right
In retrospect, if I were doing this again, there's a couple of things I'd do before rather than after bonding the deck to the hull.
I'd resin in a second thickness of ply where bolts for carriers or similar fittings were going to be passed through, and having drilled the holes and sealed the bare surfaces, I'd devise a stray-varnish-and-resin-proof method for holding the necessary nut and washer in place at the bow end, to avoid what can otherwise be a cussedly fiddly job if left until the finishing-off stage.
And broadly similarly, though without the same degree of awkwardness, if using the stud-mounting kit for the footrests, I'd get the studs in at this stage too (despite the cockpit not being firmly in place for accurate positioning, which may be a step too far for some – though for reference, we set the closer stud 112.5cm from the bulkhead and mid-width on the side panels, which allows for someone who's 6'3" to still have a bit of spare adjustment at the further end of the slider). By the way – it's hard to beat plumbers' PTFE tape temporarily wrapped around any bolt-threads, like those studs, that you don't want to accidentally get resin on (and in a similar vein, blu-tack to block any open nut-threads). But in both cases, take care to leave a decent loose end you'll be able to grab hold of later, when it's time to extract it.
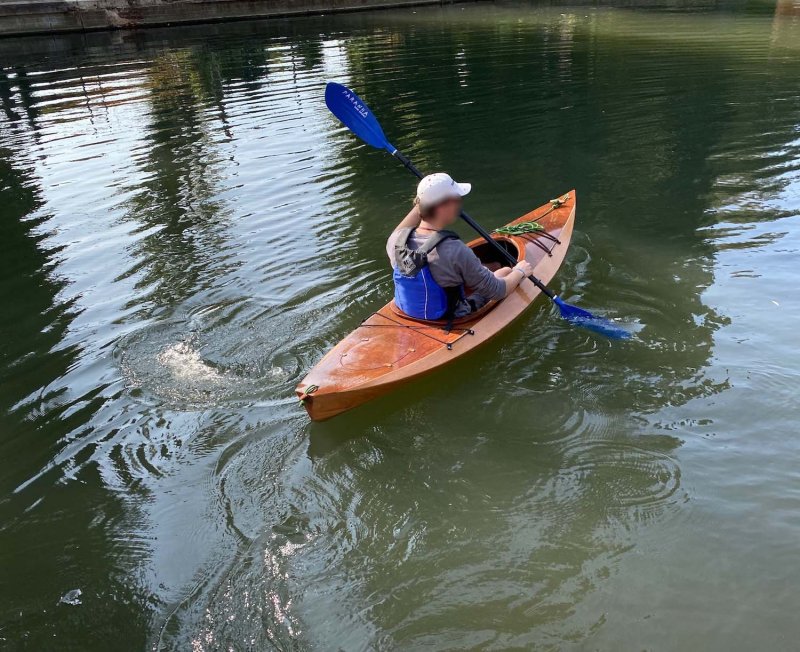
Yay!
Last edited by Nat (7 Dec 2020 10:11 pm)
Offline