A forum for discussing wooden boats and boat building
You are not logged in.
- Topics: Active | Unanswered
#26 8 Apr 2014 8:18 am
- wilddog
- Member
- From: Devon
- Registered: 22 Dec 2013
- Posts: 143
Re: Skerry Build
Believe me, some flapping has happened here and I am aware that my hull will need some attention before she get painted. I have already managed to knock her a couple of times while moving stuff about the workspace, so there are some holes to fill and I still have to fair in the tape on the bow!
I am sure your extra attention to detail will be worth it. There are no prizes here...are there...??
Built a Skerry!
Offline
#27 9 Apr 2014 9:05 pm
- wilddog
- Member
- From: Devon
- Registered: 22 Dec 2013
- Posts: 143
Re: Skerry Build
"Know your enemy" they always say in those shoot'em up movies and I think this applies to boat building too. Mine is glass tape.
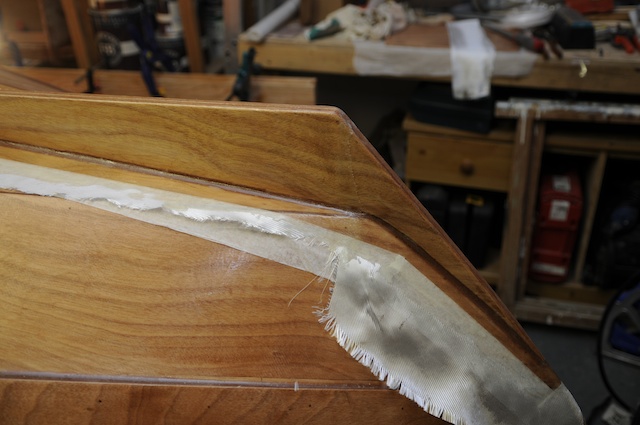
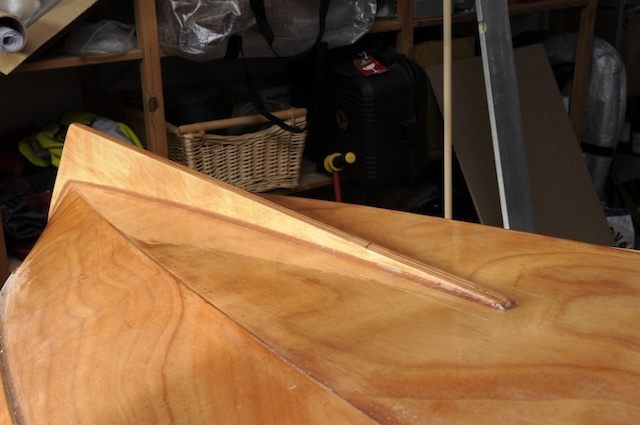
On the face of it it is pretty useful stuff. I have managed to successfully glass in the stems and so I thought (foolishly) it would be just the thing to use to glass in the skeg. How wrong I was!
The manual encouraged me to run two glass tape strips down the sides of the skeg where it meets the bottom of the hull and the to add a wormshoe to protect the end. I figured that a layer of glass over the whole skeg would do a better job, so i turned to the glasstape. But after and hour I had to pull it all off. I have cut out little strips here and there, but the tape is too heavy to really flow around the form of the skeg and all the frayed ends here and there made the process very messy and very lumpy. Running late for a dad taxi gig I decided to rip it all off and start again.
I cleaned up the mess with some meths and trudged off disgruntled.
Over supper and a pint of liquid brain flush this evening I wondered if I might try a different approach. What about using the off cuts of the hull glass for the skeg? It flows well and if I put it on properly there should be only one little cut to make to compensate for the fold round the end of the skeg from hull to stern.
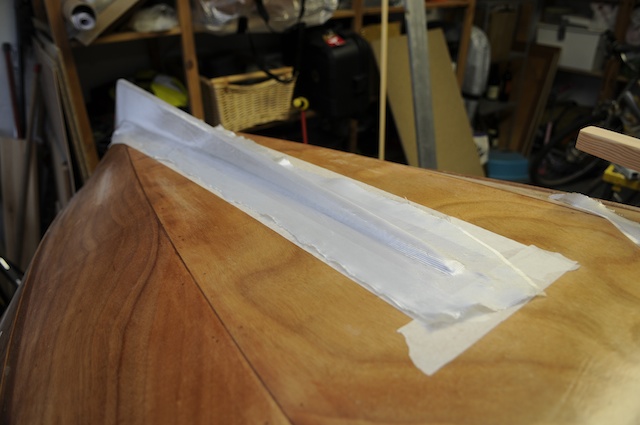
I taped off an area with some masking take and then set to work laying out the cloth. It flowed beautifully around he skeg, hugging the curves and generally behaving like the tape did not. I slathered on some unthickened expoxy and bingo. Job done.
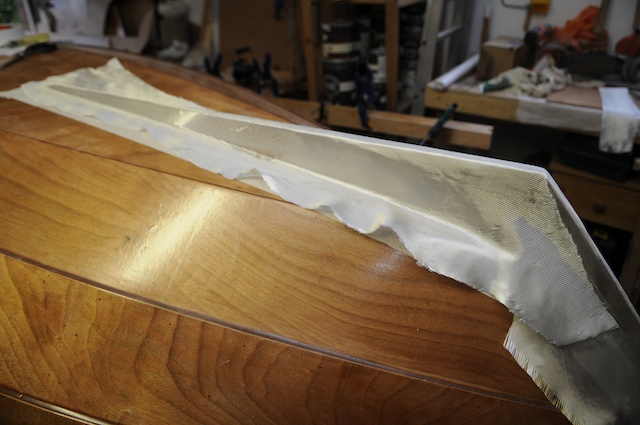
The glass cloth cut to size on the skeg.
All gooped up. Can you see the join?
Built a Skerry!
Offline
#28 9 Apr 2014 11:01 pm
- mtompson
- Member
- From: Dartmouth UK
- Registered: 23 Apr 2013
- Posts: 28
Re: Skerry Build
Now that has got me thinking, as I'm about to do mine. Nice work, question is, do you still bother with a wormshoe?
Last edited by mtompson (9 Apr 2014 11:03 pm)
Building a Skerry
Offline
#29 10 Apr 2014 12:40 pm
- wilddog
- Member
- From: Devon
- Registered: 22 Dec 2013
- Posts: 143
Re: Skerry Build
I have to say that I am not planning to sail in any worm-infested waters, so my answer is probably no...
However, if I change my mind, I think I would simply find a handy piece of metal of some sort or other to screw in place, rather than gluing on a strip of timber.
My best guess is that the glass should do a decent enough job. If any one knows/thinks otherwise, please chip in!
P.S.
I cut off the excess glass and pulled up the masking tape this morning. This took a little longer than I had hoped and perhaps packing tape might work better? None the less, it was easy enough to clean up. One thing I have learned is that epoxy/glass has a healthy respect for a sharp blade or chisel and this seems to be the best way to clean things up. Also a quick rub with some sandpaper on an offending lump seems to warm the gop up and you can then whip it off with a blade.
Last edited by wilddog (10 Apr 2014 12:43 pm)
Built a Skerry!
Offline
#30 10 Apr 2014 1:11 pm
- Dinky Doris
- Member
- From: Wales
- Registered: 25 Aug 2011
- Posts: 23
Re: Skerry Build
The wooden worm sole works really well. It is easy to replace if necessary. We glued it on and then planed it down and glued another on when we took a massive gouge out of the old one. Idon't think the glass would have been up to the job.
DD
Offline
#31 11 Apr 2014 9:03 am
- wilddog
- Member
- From: Devon
- Registered: 22 Dec 2013
- Posts: 143
Re: Skerry Build
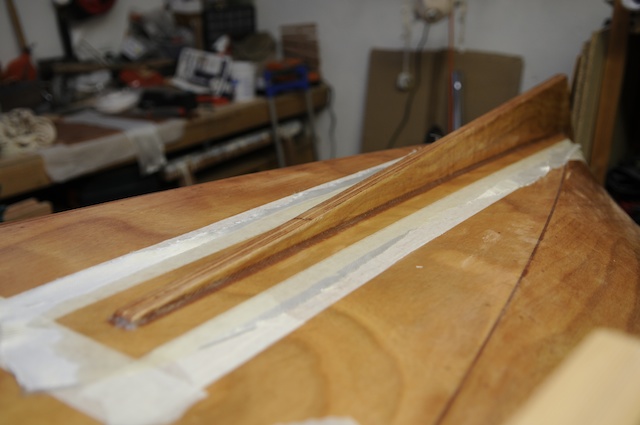
The Skeg is now glassed in and looking pretty dandy even if I say so myself.
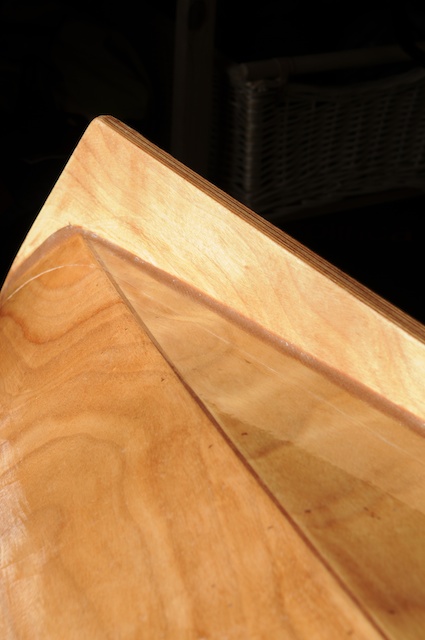
I have managed to get the skeg in 'mostly straight', which was actually harder than it first appeared. She took on a bit of a jaunty swoop when I glued the two sections together and had to be coaxed into shape with gorilla tape to bring her square and I added an extra couple of screws in front of the aft bulkhead to straighten her up. This will mean I have an unplanned blemish inside my hull which will need to be cunningly disguised with fish, picnic hampers and feet when afloat to avoid embarrassment.
I checked the skeg for alignment after she was glued in (note to self, do this before you add glue next time...!) and she lines up pretty well with the bow line as far as i can see (phew). If in the end she is not quite perfect and has a tendency to wander to port, I will just let people know that she just has an in built auto-helm to allow self-steering and to enable the skipper to have both hands on the rum keg as required.
Built a Skerry!
Offline
#32 20 Apr 2014 11:31 pm
- wilddog
- Member
- From: Devon
- Registered: 22 Dec 2013
- Posts: 143
Re: Skerry Build
Two steps forward, one step back...
I have just finished installing the gunwales which are added in two stages. The plans show rather a sharp taper to finish off the rails to the bow and stern, but I have decided to put a more gradual swoop into the bow and stern lines, by shaping the front of the rails from about 6 inches back from the tips. All this work was done with a blockplane and will be finished up when I do a final sand on the whole boat. I have found that the sapele is actually surprisingly prone to chipping when planing on the grain and this can be frustrating. A super sharp blockplane is vital for the initial shaping, but then sandpaper is the best solution.
The whole process was made much slower by not having enough clamps to do both sides of the rails at once. I have about 25 clamps, but mostly spring clamps not so many F-clamps and F-clamps are what you need for this job. The other issue I have had is with the plastic tape that I used to mask the hull when fitting the rails. The epoxy has caused it to disintegrate and it has also left a sticky residue all over the hull which will take a long time to clean up. It would have been quicker not to use tape at all and just clean up the runs with meths soaked rag.
Anyway, I will leave that issue to the final clean up and sand down before painting. Now it is on with gluing in the bulk heads and fileting the insides of the bottom panel, before glassing the bottom panel sometime this week I hope.
Bulkheads glued in and bottom panel seams filled. I have not taped the seams as I find with a good fileting stick a nice even fill is possible. Excess will then be scraped up with a hot air gun and sandpaper.
A pointy bow. Still needs some more shaping, but I have raked the rails back as I found that the suggested profile of the front of the boat looked to stubby in the instruction manual. This has meant that the screws for the rails need to be set well back on installation. I installed the rails using simple chip board screws which I have now removed to shape the rail and which will be replaced with brass screws when finished.
Last edited by wilddog (22 Apr 2014 10:45 am)
Built a Skerry!
Offline
#33 22 Apr 2014 1:53 pm
- wilddog
- Member
- From: Devon
- Registered: 22 Dec 2013
- Posts: 143
Re: Skerry Build
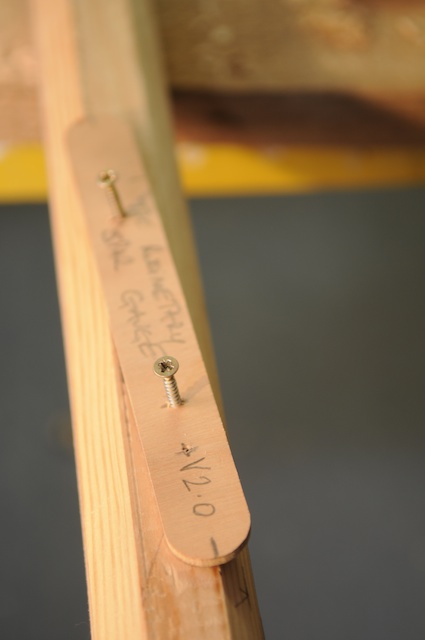
I created a rudimentary spar gauge to help me try and round off my tapered spars. It is not perfect but it does a better job that trying to eyeball the first cuts.
I did post a piece on the boat building help thread, but I have reviewed my tool and I am not sure I have the ratios quite right, so I have removed that post. My tool was built using an 8" fileting tool for Fyne boats and then using this to mark out lines for planing off the corners along my tapered mast sections. My tool was set up at 1.5'":5":1.5" ratio which does not quite produce a perfect octagon all the way down the mast and judging by the results here I will still nee to take a little more off each corner to make the perfect 8 sides.
In fact my spar gauge should have been set to 2.3":3.3"2.3" over the 8 inches according to this info here:
Luckily I have some spare fileting sticks and I can adjust the gauge and have another go.
The theory is sound though and spar guages have been used for years. My home made tool will work...eventually...! The idea is that the gauge is set up at various intervals down the mast or spar, and the pins prick into the timber. These marks are then all joined up with a pencil line and a long ruler.
Here are the pics from the first effort... the not quite perfect hexagon is not bad for a first effort and least I have not taken off too much wood yet...!
Still as long as I end up with a "mostly round" mast, that should do the job right...?

A not quite perfect attempt to get down to an 8 sided octagon on my mast. I need to take a little more off and I will need to adjust my home made spar gauge to make this happen.
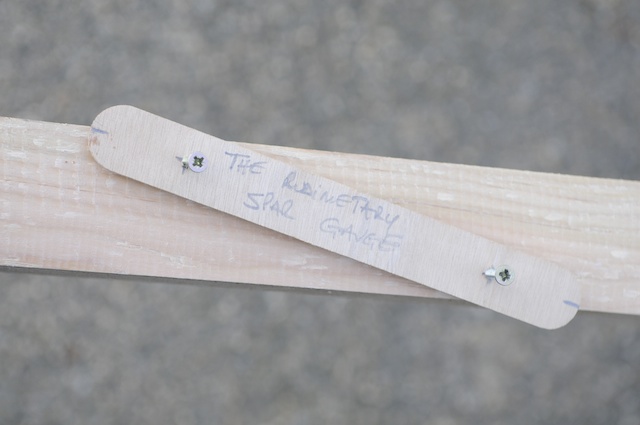
The Rudimentary Spar Gauge v 1.0
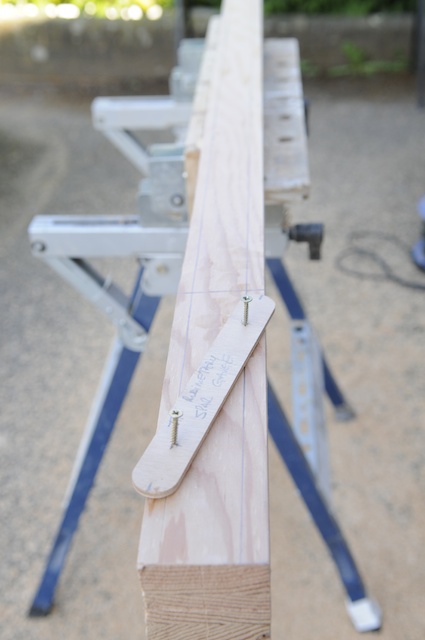
Straight lines along the length of the tapered mast...they should be a little closer to the centre...
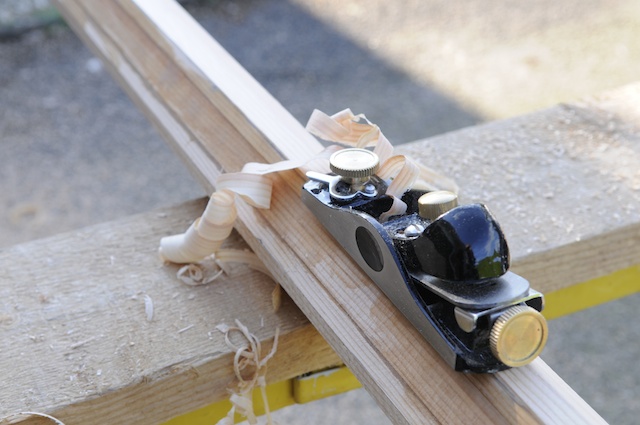
A sharp block plane - the weapon of choice for this job...
Last edited by wilddog (22 Apr 2014 2:09 pm)
Built a Skerry!
Offline
#34 22 Apr 2014 2:45 pm
- jbmerv
- Member
- Registered: 25 Mar 2014
- Posts: 24
Re: Skerry Build
I just tried to post an answer to your post when you removed it!
Thus wuz it:
Nice idea, and thanks for the link, although I think you may have got your sums a little wrong.
Surely the ratio is 1:1.414:1? So for your 8" stick, you should have measured in about 2 1/3" from each end?
By the way, you have exactly the same block plane as I do, lovely, isn't it?
Offline
#35 22 Apr 2014 4:02 pm
- wilddog
- Member
- From: Devon
- Registered: 22 Dec 2013
- Posts: 143
Re: Skerry Build
Yes I did get my sums wrong and I have acknowledged the error in the post above and I hope I have corrected them! I decided that it constituted "bad advice" but 'good experience"...so more appropriate to the build log than the 'boat building help' section of this Fyne Forum!
And yes the block plane is a gem...needs to be super sharp though!
(I now have a incorrectly calibrated Rudimentary Spar Gauge going begging...50% discount...cheap cheap!)
Last edited by wilddog (22 Apr 2014 4:04 pm)
Built a Skerry!
Offline
#36 22 Apr 2014 9:29 pm
- wilddog
- Member
- From: Devon
- Registered: 22 Dec 2013
- Posts: 143
Re: Skerry Build
Happy to report that the Rudimentary Spar Gauge v 2.0 is a roaring success! I have managed to get a pretty fair octagon on both the top and bottom of the mast and I have now started marking out the lines for cutting it down to a 16-side ...polygon??
Very satisfying, meditative to work away with the block plane too. Zen and the art of boat building...
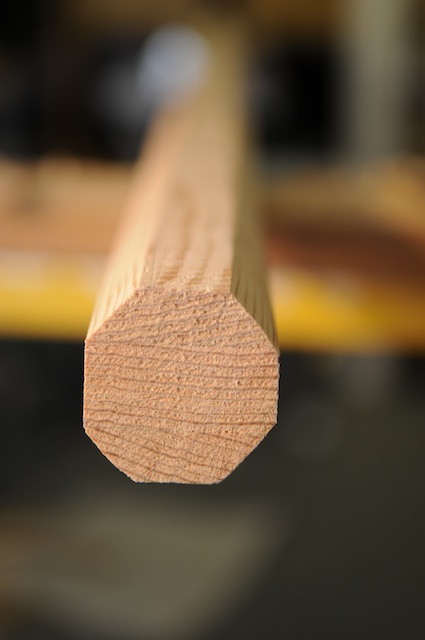
After recalibrating the Rudimentary Spar Gauge to the correct dimensions (!) I have managed to produce a pretty fair 8-sided mast blank. Now to knock the next lot of corners off...
Rudimentary Spar Gauge v 2.0 now modified to the correct 2.3':3.3":2.3" dimensions over the 8" length....the tool of champions...
Last edited by wilddog (23 Apr 2014 9:07 am)
Built a Skerry!
Offline
#37 12 May 2014 5:56 pm
- wilddog
- Member
- From: Devon
- Registered: 22 Dec 2013
- Posts: 143
Re: Skerry Build
It's been a while since I posted an update, but I've been overrun by work and had no time to spend on the boat, worst luck!
My mast is not looking pretty ship-shape and I just spent an hour sanding down the rails. Belt Sander 1, Epoxy 0....
I need to pick a shower free day to hit the inside of the boat in the next week or so as I have a wodge of sanding to do before I can glass the interior...
Built a Skerry!
Offline
#38 13 May 2014 10:49 am
- DerekD
- Member
- Registered: 12 Aug 2013
- Posts: 33
Re: Skerry Build
"My mast is not looking pretty ship-shape".
Forgive this shot in the dark as obviously I don't know what problem you are having here but I'll offer this in the hope that it helps.
When I was making oars I had a similar problem to your irregular octagon when shaving off the square but by the finish it didn't really matter I just kept shaving off the corners until it was round-ish then I used the "inside out" belt sander and I couldn't believe how well that brought things true!
Take the belt from a belt sander, turn it inside out, place the belt over/ around the piece then use a hand drill fitted with a large diameter drum to rotate the sanding belt. ( I used a 50mm sanding flap wheel covered in duct tape sticky side out ).
Apologies if this is an egg sucking lesson
Offline
#39 13 May 2014 1:41 pm
- wilddog
- Member
- From: Devon
- Registered: 22 Dec 2013
- Posts: 143
Re: Skerry Build
That's a good tip.
I actually ended up just using the normal sander on the mast and it has come up pretty well. I have seen/heard the belt sander trick, but I could not find anything sufficiently large to use to drive the belt....so I did it all by hand in the end. Did not take long...
Built a Skerry!
Offline
#40 25 May 2014 12:40 pm
- wilddog
- Member
- From: Devon
- Registered: 22 Dec 2013
- Posts: 143
Re: Skerry Build
After a fair amount of time away from the build,. I am slowly getting there...
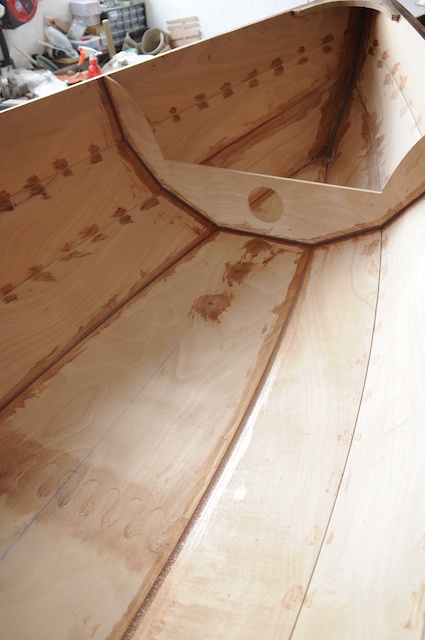
The interior glass is in and rather than use the glass tape for the joint in the forward and aft floatation compartments, I have used some off cuts of hull glass to cover the bottom and the joint between number 1 and the bottom panels. Much easier to manipulate.
Cutting off the excess took quite a while and I need to do a further flow coat to fill the weave, but I have decided to do that when I have done a first coat of epoxy on the rest of the interior.
Still a fair bit to do before I can start painting, but the finishing line feels as though it it round the corner. With so much good weather recently, I am just keen to get the boat afloat...!
I had some goop left over so I used it yup on the rudder assembly.
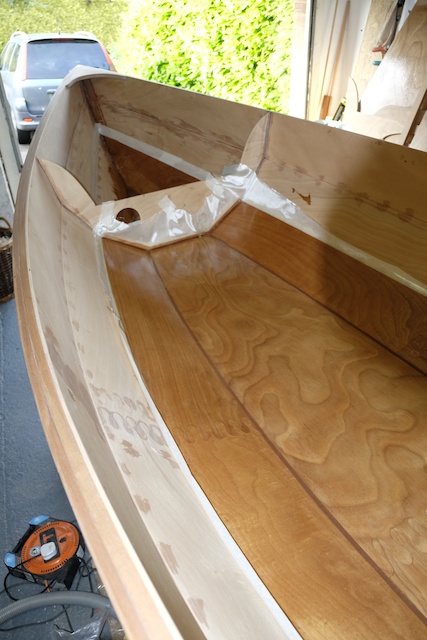
A bright looking interior with 1 "flow coat" of epoxy (3 pumps of epoxy mix to 1.5 coffee scoops of silica) in to fill the weave. Still needs a nother lot, but this will happen when I apply a flow coat to the whole hull, which should do a good job of filling the interior chines.
Built a Skerry!
Offline
#41 25 Jun 2014 9:12 am
- wilddog
- Member
- From: Devon
- Registered: 22 Dec 2013
- Posts: 143
Re: Skerry Build
I have finally managed to get the boat build back on track after several weeks away on a new film project. All good fun, but I have missed all the good weather for boating - let's hope that there will be some fine days for a sail when I get this beauty in the water!
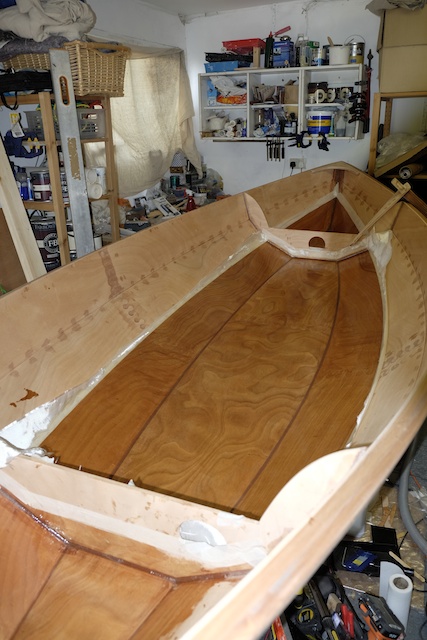
I have now managed to refit the central frame and the forward and aft seats are now glued in. There was a reasonable gap between the aft frame and the hull which took quite a lot of epoxy to fill. There are some sizable runs on the inside of the aft tank on the starboard side as a result. I shall make a not to sit slightly to port to balance the boat under sail...!
The seats went in easily, but Paul handily suggested some light beveling to the underside of the seats where they hit the hull for a snugger fit. Good plan.
I am now jockying the dagger board case into position ready for cutting a hole in the bottom. I think this is the build step we all dread. If it does not work properly, I'll see you all with Davy Jones..!
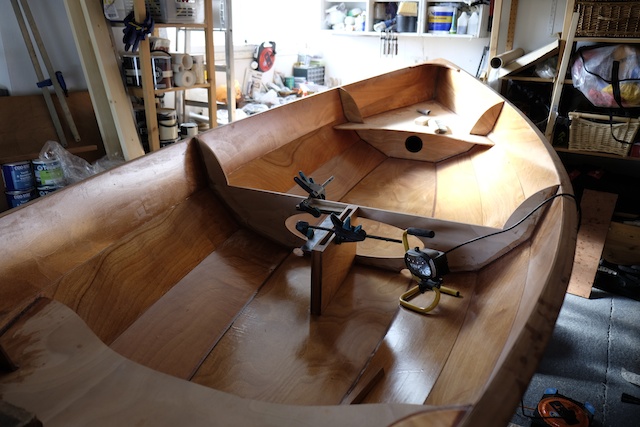
The central frame is now in place with the aft seat also glued up. On each occasion a light sand was required on the hull where the frames and seats where to be installed to provide a key for the new glue.
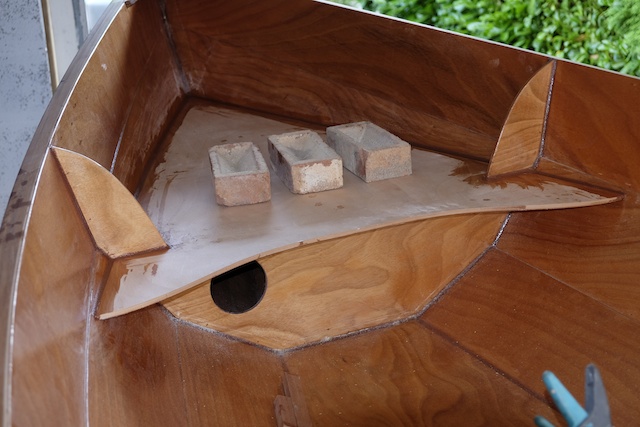
Bricks being used to weigh down the forward seat as the glue goes off. There's a huge difference in drying times at the moment with the warm weather making the epoxy cure very fast. Mixing in small quantities is advised!
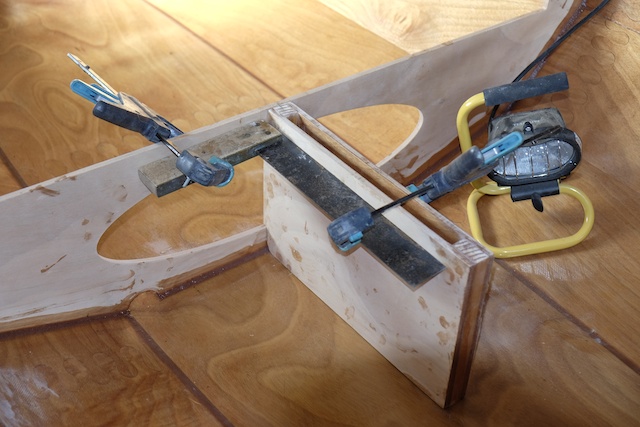
Monkeying about with the dagger-board case to work out the correct position to cut a slot in the hull for the dagger-board.
Built a Skerry!
Offline
#42 9 Jul 2014 8:29 am
- wilddog
- Member
- From: Devon
- Registered: 22 Dec 2013
- Posts: 143
Re: Skerry Build
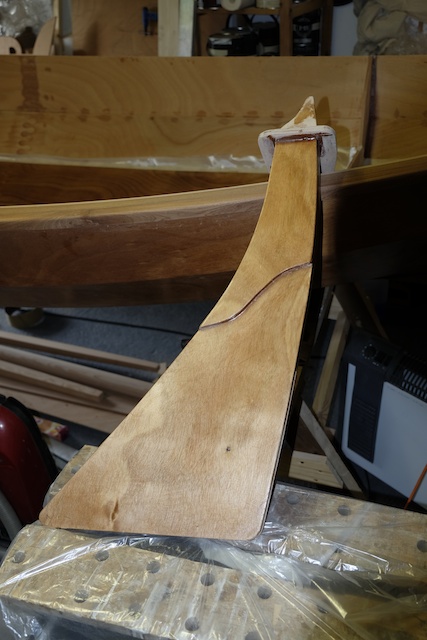
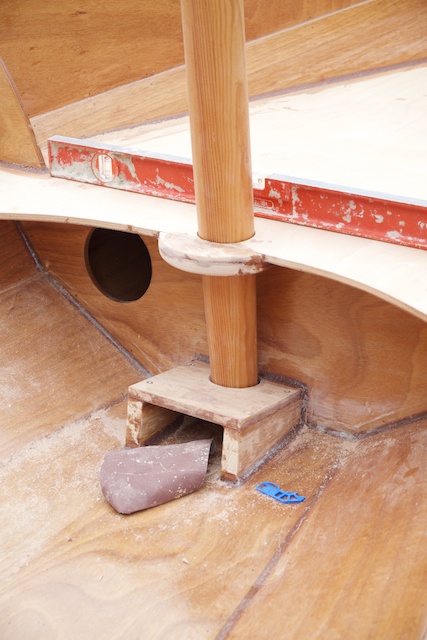
The dagger-board case and the central seat are now glued in and now need fileting.
I am now in the process of building a new mast step and partner to fit the new round mast for my balanced lug rig. By lucky hap the dimensions of the holes for both actually match the dimensions of my two largest circular pipe hole cutters. Serendipity?
One the mast partner and step are in place I can then flip the boat to cut a hole for the dagger board and finish the fileting...
Not long to the final sand and paint now...!
Built a Skerry!
Offline
#43 31 Aug 2014 9:35 am
- wilddog
- Member
- From: Devon
- Registered: 22 Dec 2013
- Posts: 143
Re: Skerry Build
At last the construction phase of my Skerry build is complete.
Yesterday I stepped the mast for the first time and see seemed to sit pretty plumb to my eye.
A couple of weeks ago I cut the slot in the hull for the dagger board. I was nervous about this, but the operation went pretty smoothly. I am not quite sure that the NHS will be knocking on my door any time soon in their search for new surgeons, but I am pretty confident that i could lop off a frost-bitten toe or two without too much trouble.
The mast partner is set aft 1.5" from the forward frame to give the mast from my balanced lug sail a rake of 7°. The sail has been sitting in the garage since May when it was delivered by my local sailmaker. Just shows you how far behind my own schedule I have fallen. To compensate for the need to move the partner back I have build a semi-circular partner extension from two pieces of 9mm ply. This sits out from the seat by about 1.75" and then extends forward under the seat to the frame. It has a small step in it so that the partner will fit flush to the seat top.
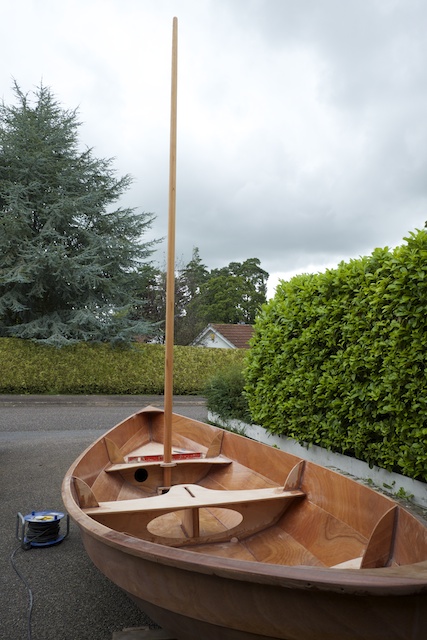
The complete boat. I have sanded the hull ready for painting and I am now working on the inside. Not long now before I can launch her, though I am sad to have missed the summer season!
Last edited by wilddog (11 Sep 2014 5:37 pm)
Built a Skerry!
Offline
#44 3 Sep 2014 6:13 pm
- Yambo
- Member
- Registered: 17 Jul 2014
- Posts: 36
Re: Skerry Build
She's looking grand wilddog! You've done a great job all round and I like the round, tapered mast. Good stuff.
Offline
#45 8 Sep 2014 9:00 am
- wilddog
- Member
- From: Devon
- Registered: 22 Dec 2013
- Posts: 143
Re: Skerry Build
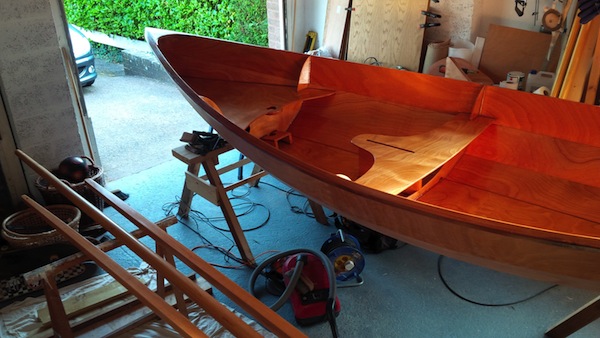
Two coats of varnish on the interior now completed this weekend - while struggling valiantly with a "man cold" I might add. I may add one more coat tonight, but I am also keen to paint the hull this week. The spars are looking very ship shape, but still need another slathering of varnish. The Coovar varnish that I got from Fyne boats is really very good, no apparent runs and excellent coverage.
I have some jaunty rigging arriving in the post today and am picking up my trailer this week. I dare to dream of having her in the water in the next couple of weeks..
The bad news is that it is "back to school" today for my kids and for me...
Last edited by wilddog (11 Sep 2014 5:35 pm)
Built a Skerry!
Offline
#46 11 Sep 2014 4:45 pm
- wilddog
- Member
- From: Devon
- Registered: 22 Dec 2013
- Posts: 143
Re: Skerry Build
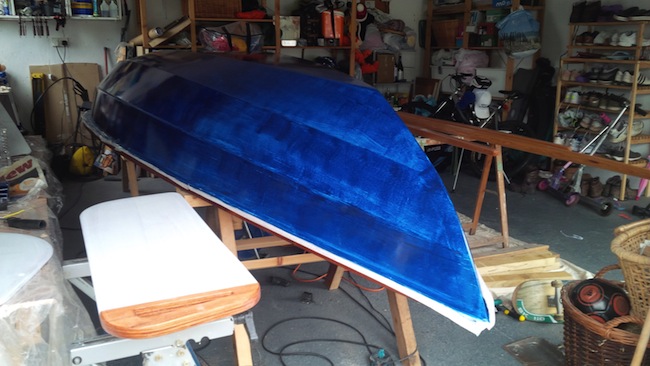
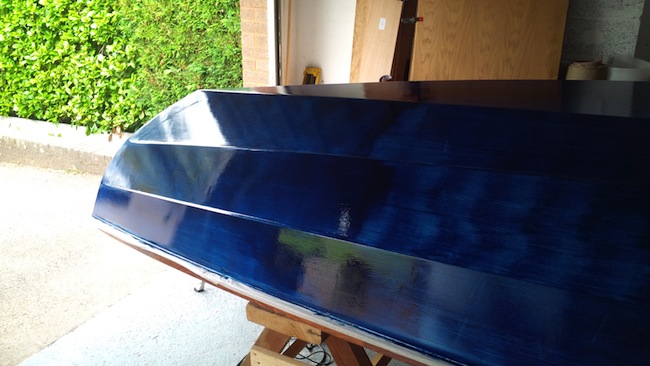
Undercoat and first topcoat on. Looks pretty patchy now, and I expect is may need three coats of colour to make sure the undercoat does not show through at all.
Last edited by wilddog (11 Sep 2014 5:34 pm)
Built a Skerry!
Offline
#47 24 Sep 2014 8:45 am
- wilddog
- Member
- From: Devon
- Registered: 22 Dec 2013
- Posts: 143
Re: Skerry Build
Still not quite done!
I painted on what i had hoped would be the last coat of paint on the hull on Monday evening. Everything was going swimmingly until on the last half of the last panel (top of the starboard bow panel), my paint started to produce an orange peel effect on me and I cannot understand why. I had not had this problem anywhere else on the boat - not even on this section on previous paint coats. I had hit the bottom of the tin, so it was possible that there was not enough thinners mixed into the final dollop that went into my roller tray and I also had a bot of a fight with some peeling masking tape, so perhaps some of the tape's glue messed things up? The other possibility was that I had not cleaned that section down properly after the light sand I have done between coats. Either way, this one section of the boat looks a bit of a lumpy mess.
The family are keen that i should ignore and just get the boat in the water for a row as soon as possible and then re-paint over the winter, but I confess, in my quest for perfection, these bobbles are mighty irksome...
Built a Skerry!
Offline
#48 7 Oct 2014 9:33 am
- wilddog
- Member
- From: Devon
- Registered: 22 Dec 2013
- Posts: 143
Re: Skerry Build
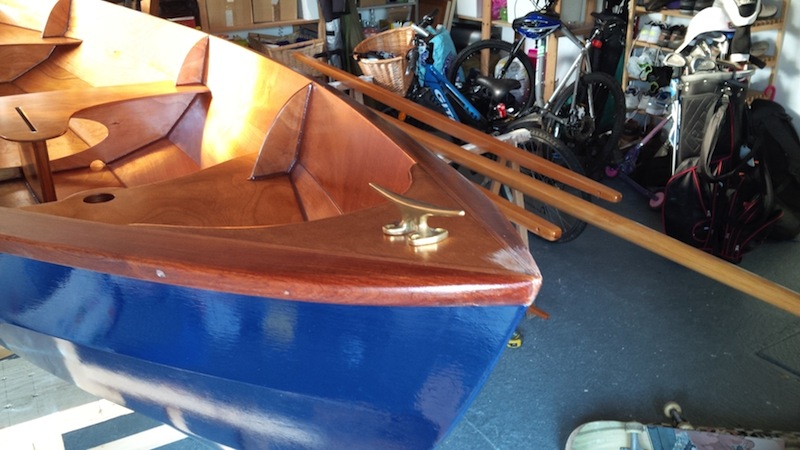
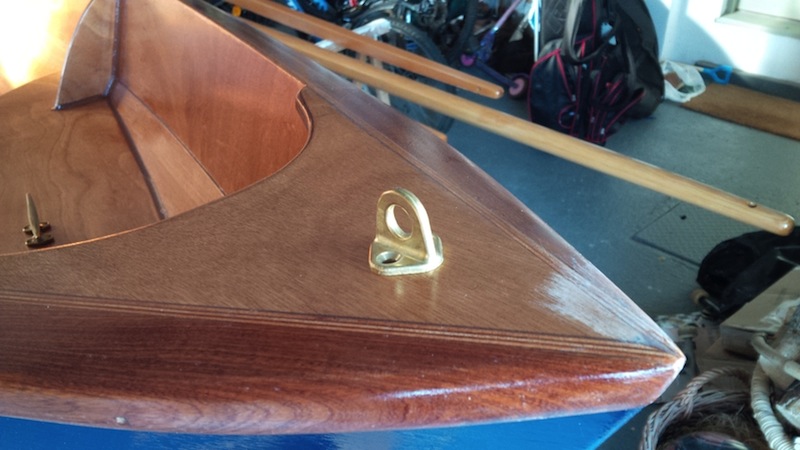
I am still pondering how best to fit the painter to the boat however as I have yet to see a fitting that looks small enough to sit neatly on the sharp bow of the Skerry. Too small of course and there's no chance of fitting a decent weight of rope.
Yet when I dry fit a cleat or a fender eye to the top of the forward breast hook, it does not seem to look quite right...my other option is a ring bolt which would allow a more permanent fastening for the painter. Ultimately this fitting will probably need to double up as the fitting for an anchor rope too I suppose...
Notice the paint job...! I have a little re-varnishing to do where I had a paint run under some tape...otherwise that chore is done..!
I have made a backing plate for the bottom of the forward breasthook (a piece of ply, shaped to fit with a little glass for strength) to give it a little extra strength if I do choose to fit the painter there, but of course now I am wondering if this is the best course of action at all...
Built a Skerry!
Offline
#49 7 Oct 2014 4:54 pm
- gooseneck
- Member
- From: UK
- Registered: 20 Aug 2011
- Posts: 23
Re: Skerry Build
Have you thought about drilling a hole in the bow hook, passing a rope though the hole and then tying a knot in the rope so that it cannot be pulled out?
Offline
#50 7 Oct 2014 6:02 pm
- wilddog
- Member
- From: Devon
- Registered: 22 Dec 2013
- Posts: 143
Re: Skerry Build
Yes I have thought of that very simple solution, but I am not sure this is quite what I am after. Something brassy on the front would look dandy! But what??
Built a Skerry!
Offline