A forum for discussing wooden boats and boat building
You are not logged in.
- Topics: Active | Unanswered
#1 8 Jun 2013 11:38 pm
- pam5
- Member
- Registered: 16 Jun 2011
- Posts: 92
Expedition Wherry, first build in the UK.
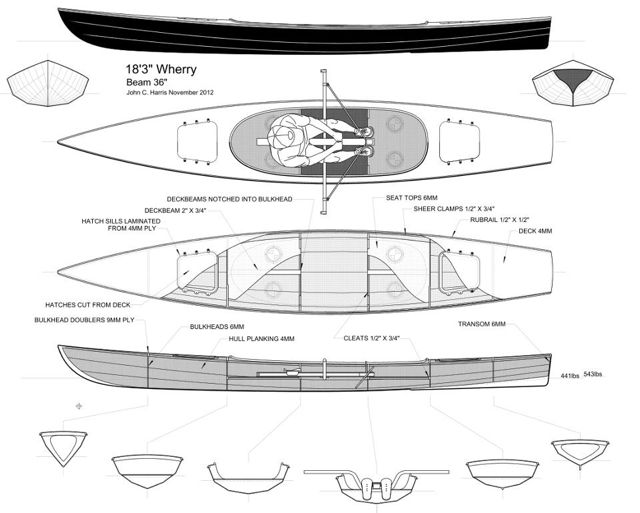
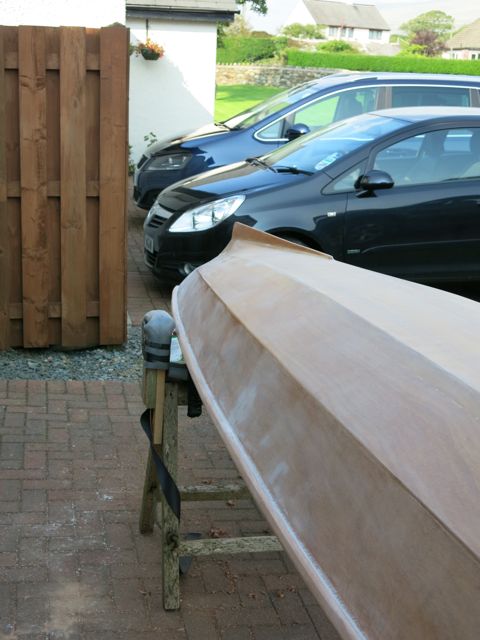
I have started another boat from Fyne Boat Kits, this one is a single seat, decked wherry, the guys call it an Expedition Wherry. It is just under 18.5ft long, takes a drop in rowing unit, is decked at the front and back, both decks contain hatches for stowage of equipment. The main features for me are its reported sea worthiness, and its lightness. I have built a 21ft seagoing row boat a couple of years ago that we have used for expeditions in Scotland. I wanted to supplement this with a single seated boat for my solo west coast of Scotland expeditions. I have only just started the project and aim to keep you posted of the stages.
Ultimately I have to have it completed and well tested on the water before October this year as the first expedition is planned. I have deliberately started the build later on into the year to make the best use of the temperatures and hopefully less humid conditions both of which caused me some problems on my last build. I aim to also add a cedar strip deck to set the boat off. Keep an eye on the forum as I add pictures and descriptions of the progress.
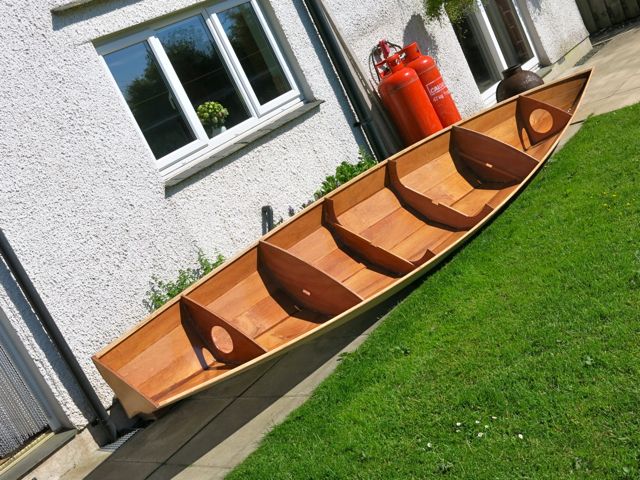
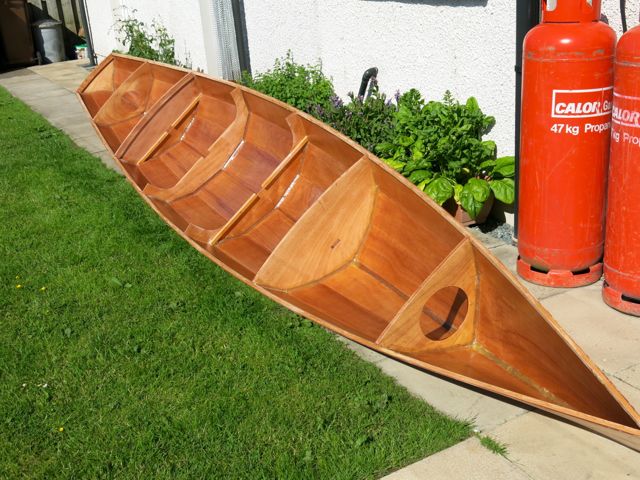
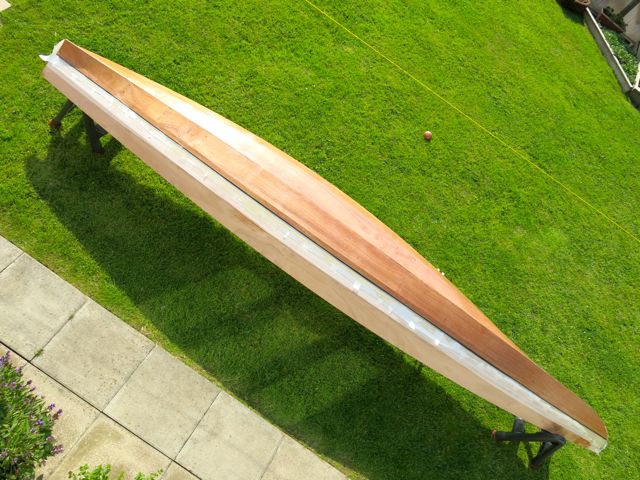
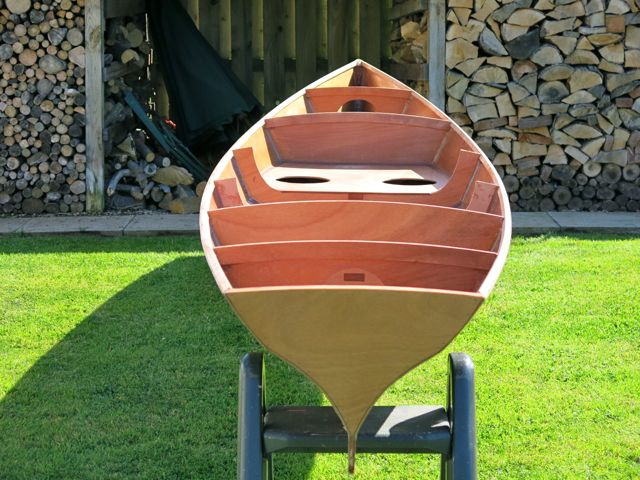
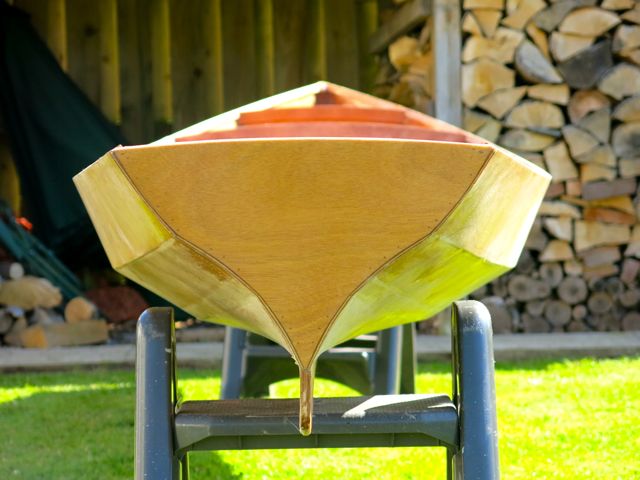
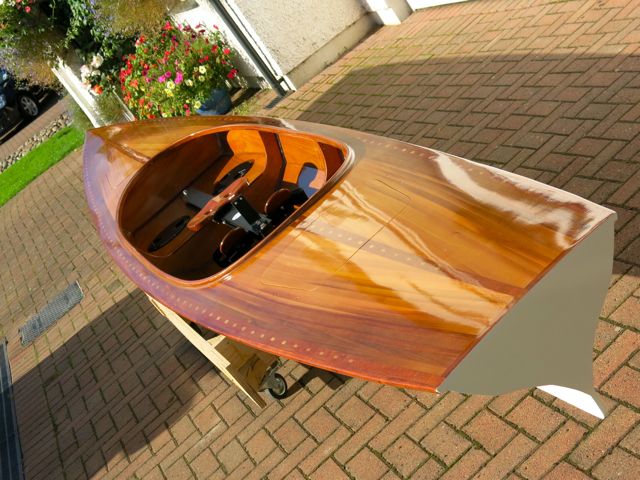
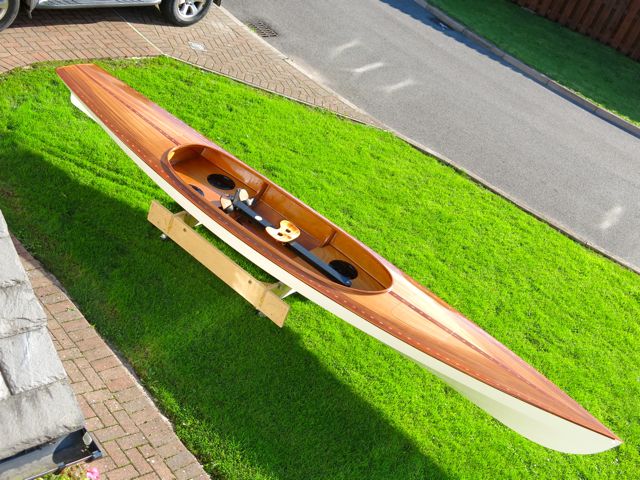
here is a snap shot of my finished efforts, read on and see how I got to this point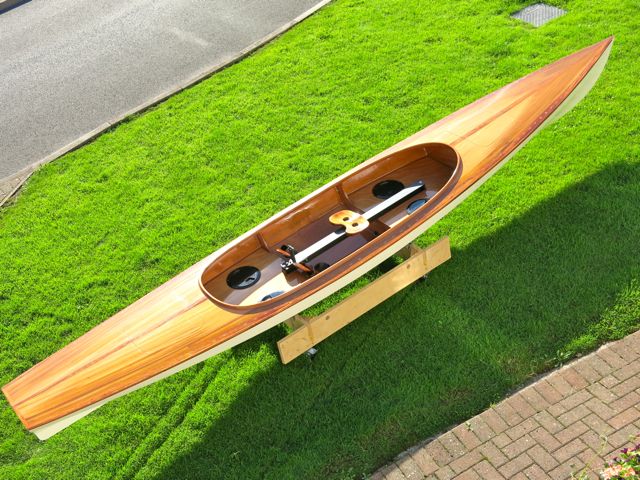
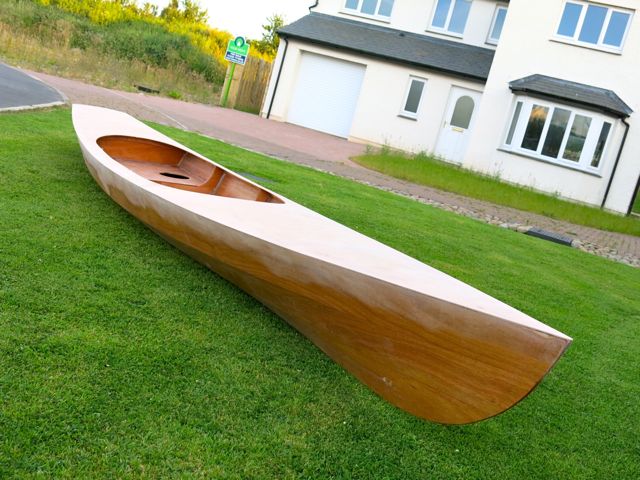
And here is a shot of the finished article one lovely autumn morning here in the lake district cumbria. have a look at the end of the blog for more shots from this day. 
Last edited by pam5 (30 Nov 2013 5:08 pm)
Offline
#2 9 Jun 2013 10:31 pm
- pam5
- Member
- Registered: 16 Jun 2011
- Posts: 92
Re: Expedition Wherry, first build in the UK.
As with all of Fyne boat kits, it was well protected and wrapped in cardboard. Some of the components needed breaking out of the boards, they were held in place with very small tabs. It is important to cut them out with a Stanley knife rather than snapping them out. Snapping them out could result in damaging the parts as the ply wood delaminates.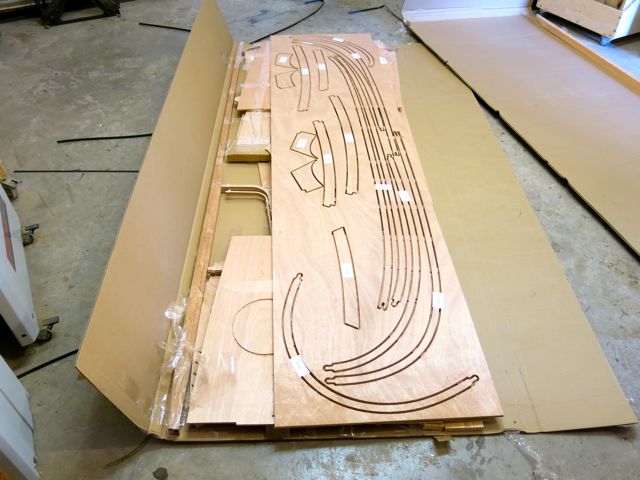
The next step is to prepare the work area. I set up a long table. The hard surface of the table would be good for the gluing up and holding of parts.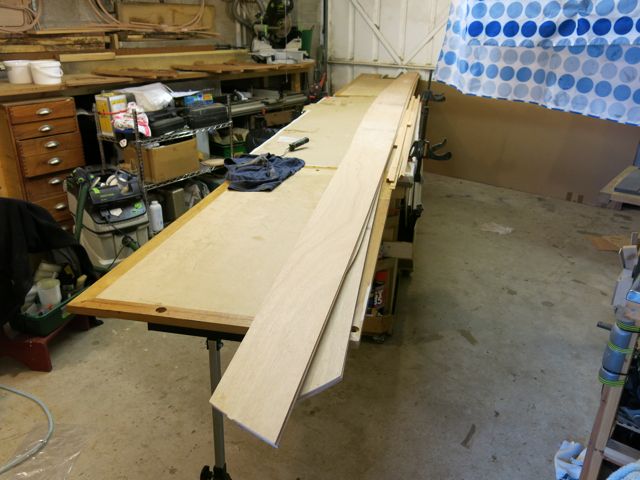
I also spent a little time preparing an couple of profiled holding brackets. I used the first and next to last bulkheads to generate their profile. These would be quite helpful when it comes to joining up these very flexible and long bits of wood.
Next comes the joining of the hull planks (strakes). Fyne tend to cut the jigsaw puzzle joints in such a way that they cant be joined to the wrong bit, nevertheless I always do a dry run before hand to ensure the strakes fit together and have smooth curved edges bending in the right direction. Any sudden changes in direction, or kinks in the strakes indicate something is not right (the wrong bit in the wrong place). Dry fits are a bit difficult because the tightness of the joints and the difficulty in breaking them apart, but it is always worth doing. Stickers can come off when your are unwrapping the package and possibly end up on the wrong board. If this happens and goes unnoticed the whole job could be down the spout on the first leg.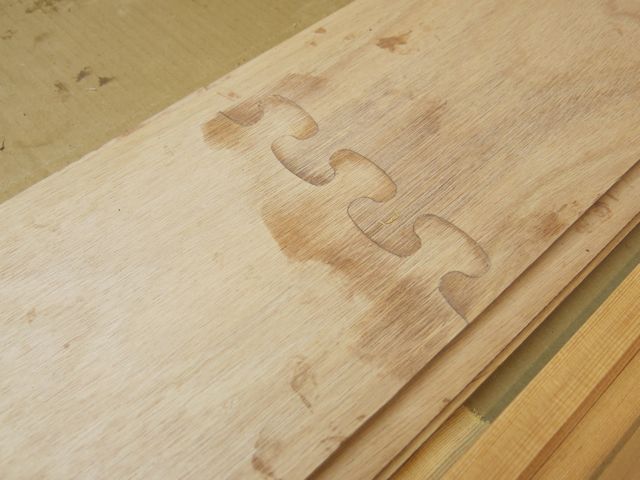 On this build I am determined to keep the excess resin to an absolute minimum, I spent a lot of time on the last build sanding off unnecessary resin. Once I applied the resin any excess was cleared away before clamping. Also I did not spend a lot of time sanding the joint to take away the colour difference, when everything gets its first coat of resin everything becomes the same colour so it would only be work for the cat. I clamped the strakes in doubles ie both bottom strake joints done together and clamped together.
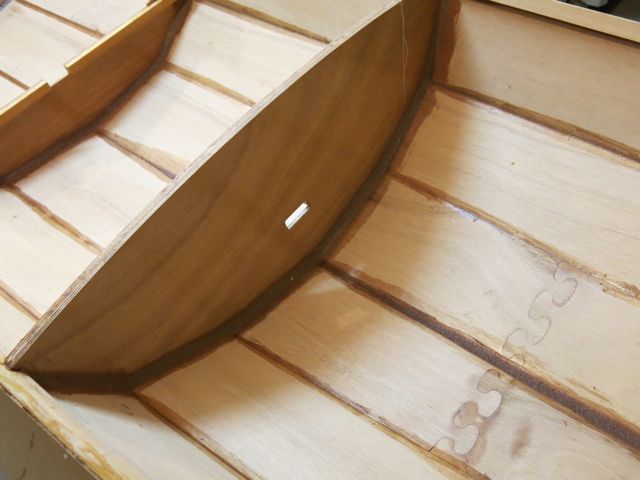
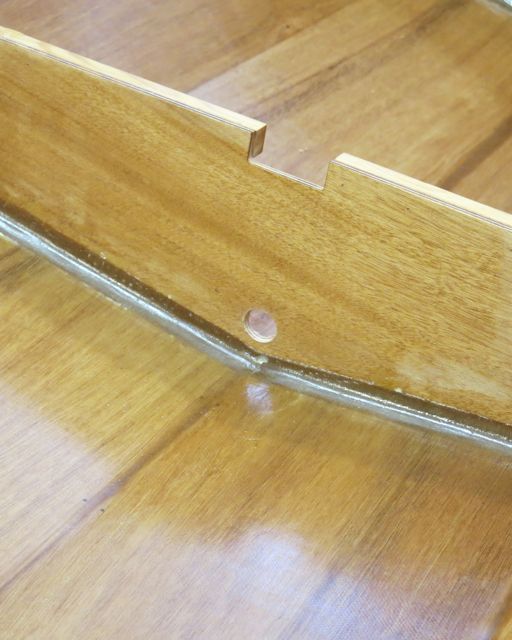
The bulkheads have a number of small pieces of wood (doublers and cleats) that you need to stick to them. The purpose of these extra bits are, doublers:- increase the thickness of the top edge of the bulkheads to allow easy fitting of the deck, and the cleats which are nothing more than a 3/4 bit of wood glued to the bulkheads at certain positions so the seat deck can sit on them. Once all joined on with resin, you can apply a couple of coats of resin to save work later on.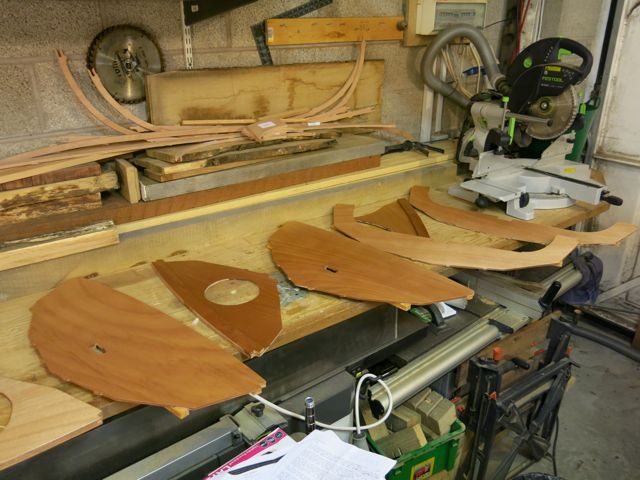
This next photo shows them clearly.
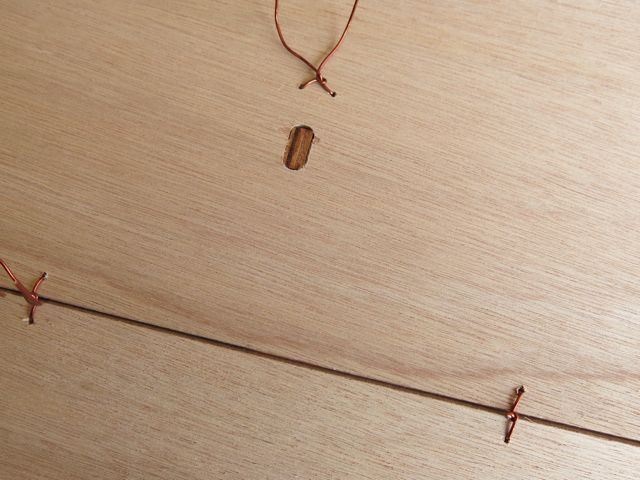
Next step is to join the strakes together. As mentioned I made a couple of profiled yolks. The strakes are only 4mm thick and therefore very flexible. I worked out the correct position for the yolks and secured them to the table. strakes 1 were put together and loosely wired up, then folded apart and positioned in the yolk. The yolks allowed the strakes to bow in the middle but the bench prevented them from bending too much.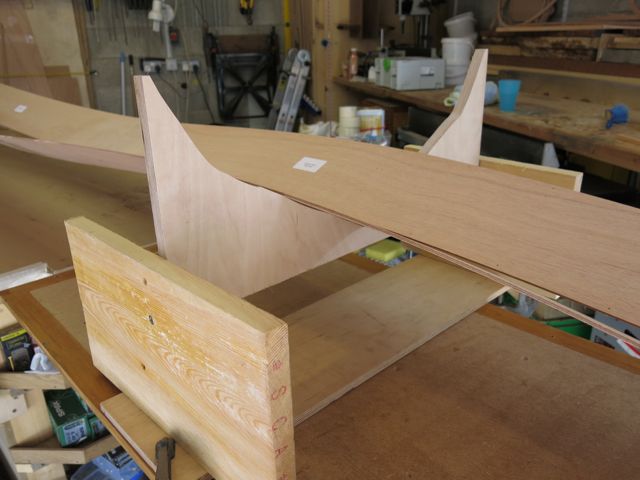
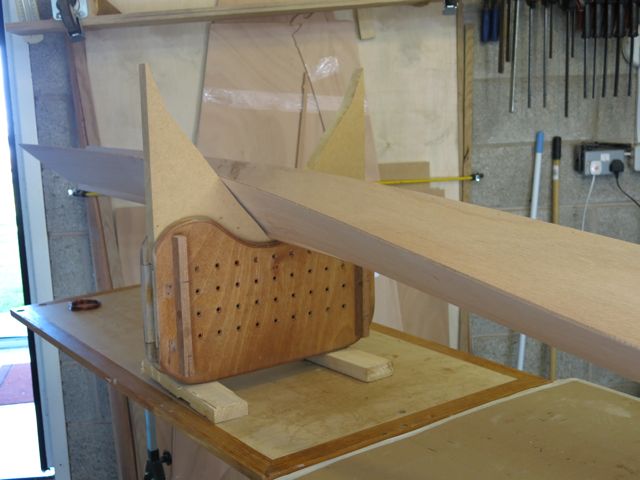
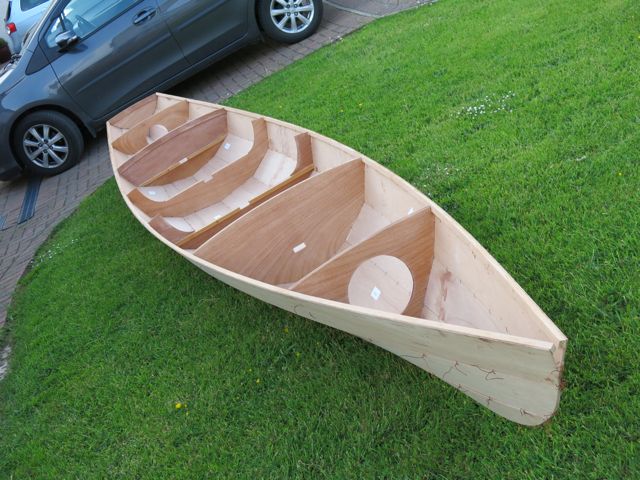
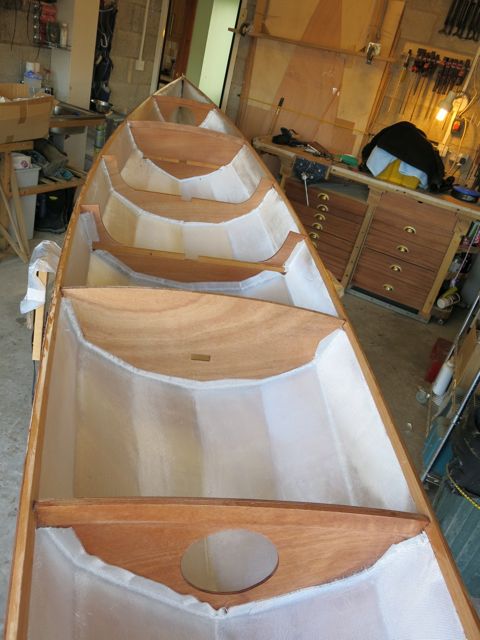
Next I stitched strakes number 2 into position, the yolks proved very useful here, they set the shape and held the strake enough to allow me to wire them in position to strakes number 1. As soon as this was done I positioned the bulkheads, they dropped into position again aided by the profile of the hull shape that was set by the shape of the yolks, if you know what I mean. It is important to ensure the bulkheads are in the correct position (facing the right direction), with the cleats and the doublers pointing in the correct direction ready to accept the cockpit seats, generally the rear and forward bulkheads all face towards the centre of the boat. See photographs. 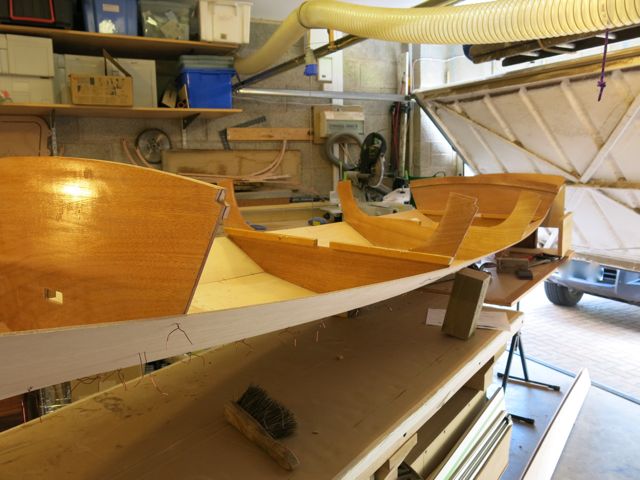
As a result of the increased weight of the bulkheads being added, I had to add some support to the underside of strakes 1 to stop it bending too far. I added the wires to secure the bulkheads and added the last strake, which again was held nicely in place by the yolk. I added the wires and all of a sudden I had a loosely stitched up boat.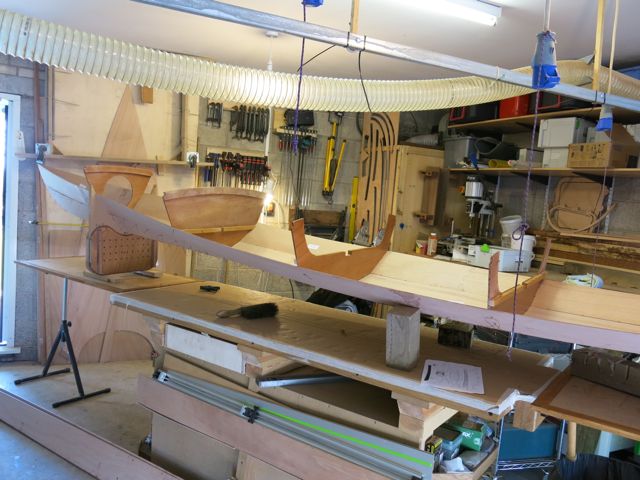
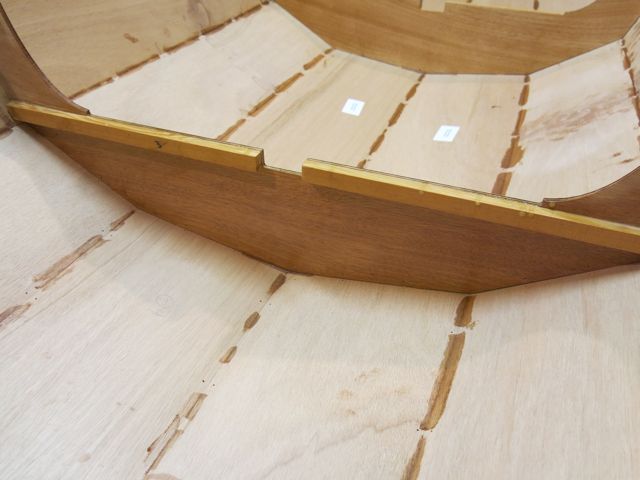
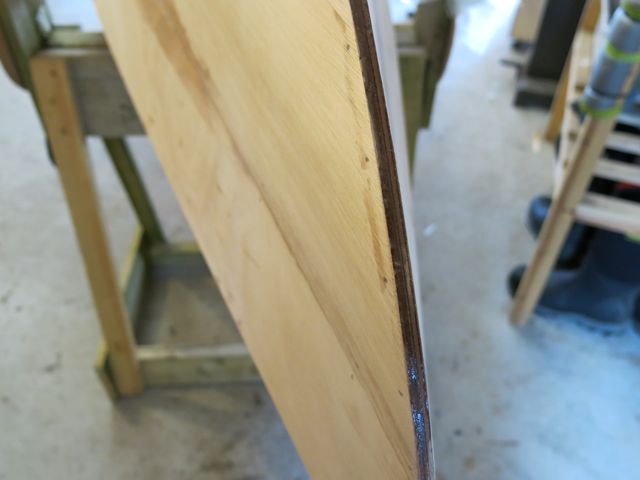
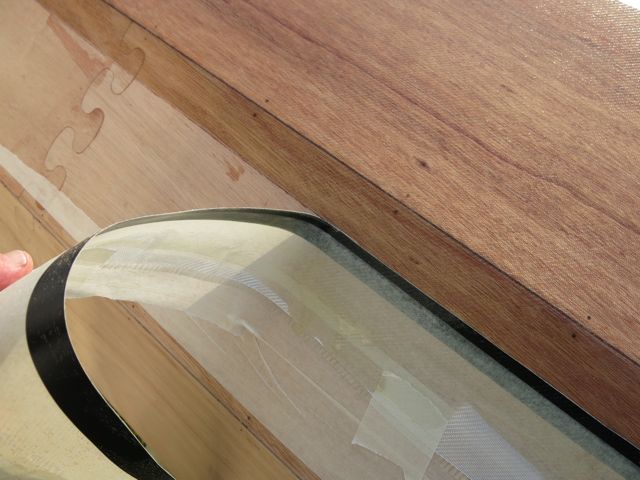
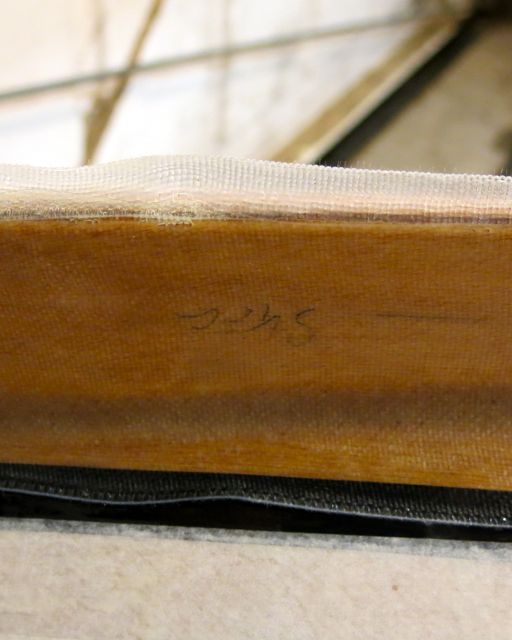
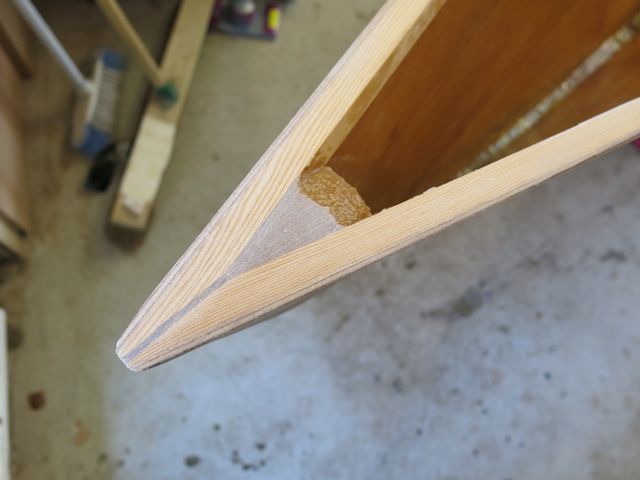
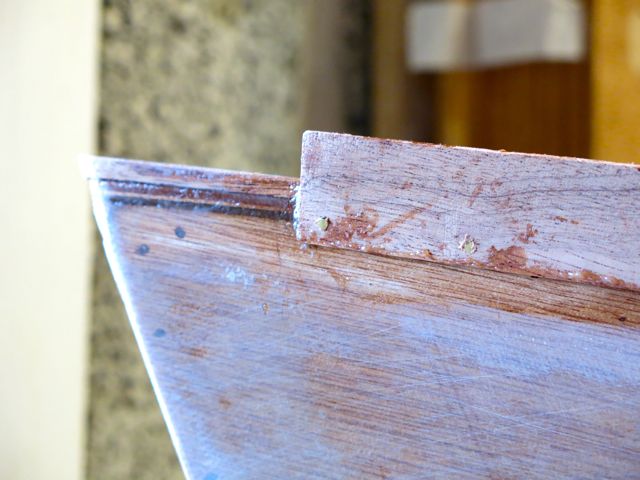
I forgot to mention the shear clamp, a thin strip 3/4 X1/2 inch redwood that comes in several pieces that you need to scarf together and then resin onto the top edge of the hull panel number 3 (called the shear). The piece of wood once glued on becomes the internal edge you can glue/nail the deck onto. 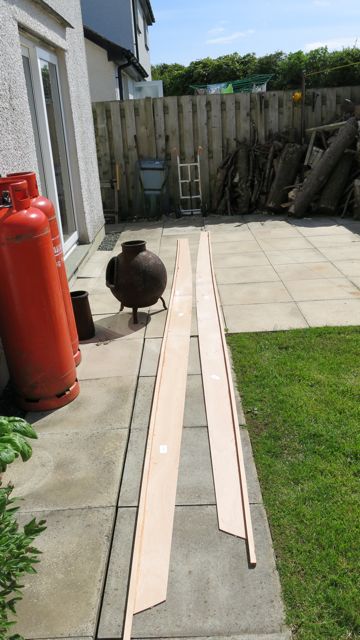
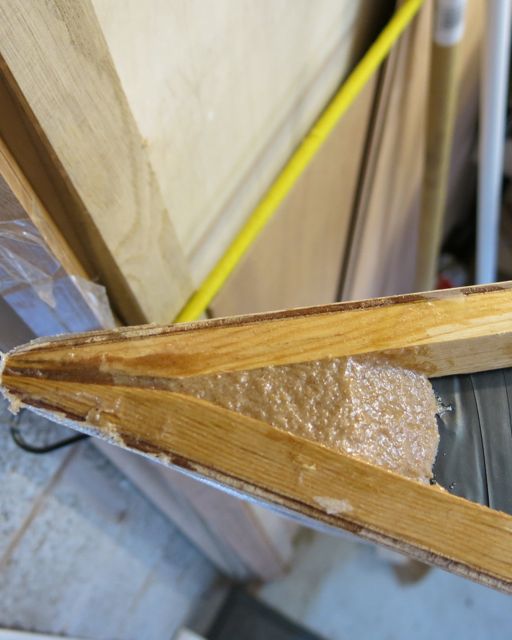
Obviously the gluing of the shear clamp needs to be done before you add strake number 3 to the boat. Before you can wire up the bow, you need to trim the angles on the end of the shear clamp so they meet in the middle. It sounds simple but is actually a little bit tricky, as you can see mine was what could only be called a rough fit. I am not too worried, as this will be back filled with resin and then sheathed in fibreglass.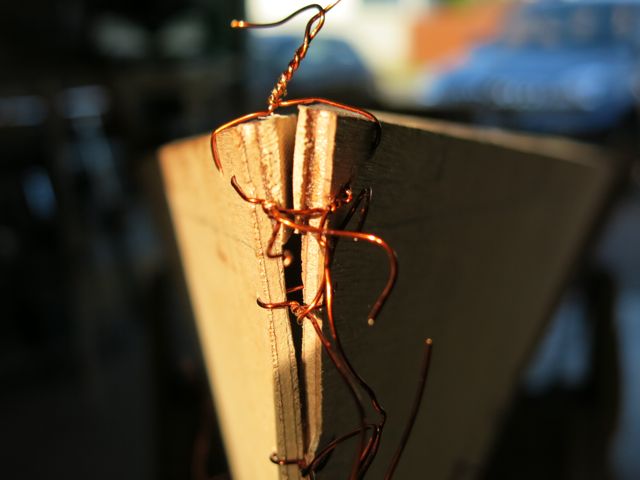
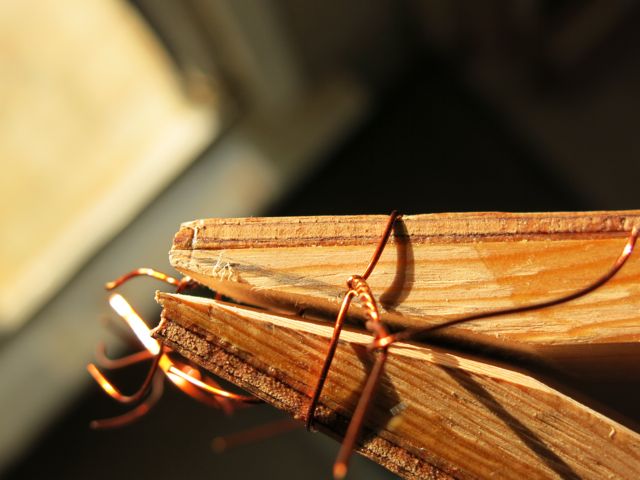
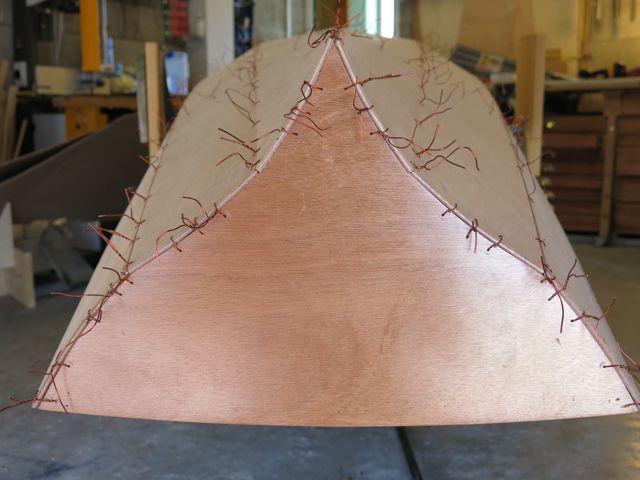
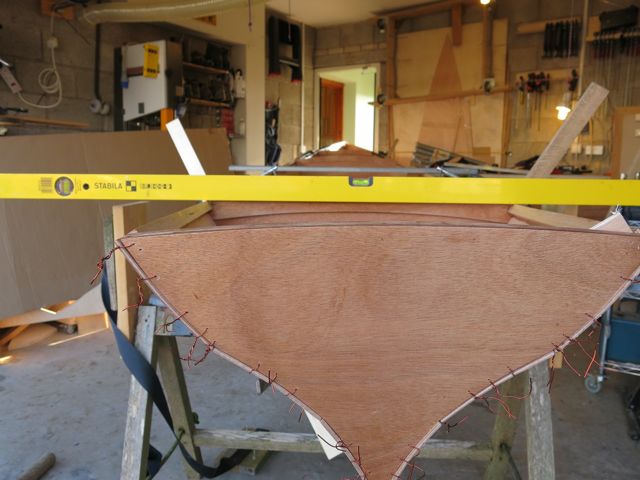
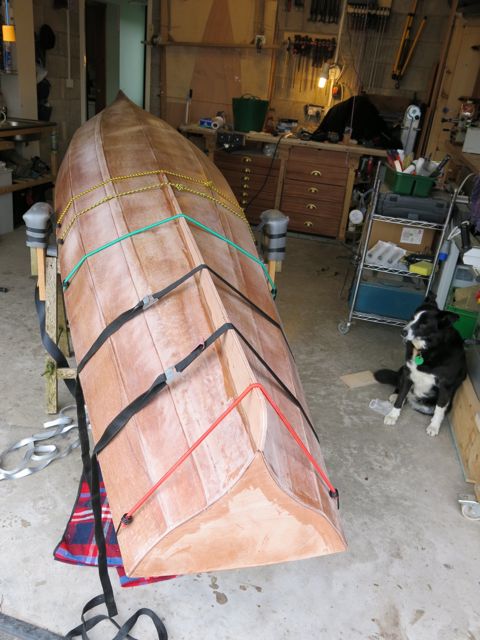
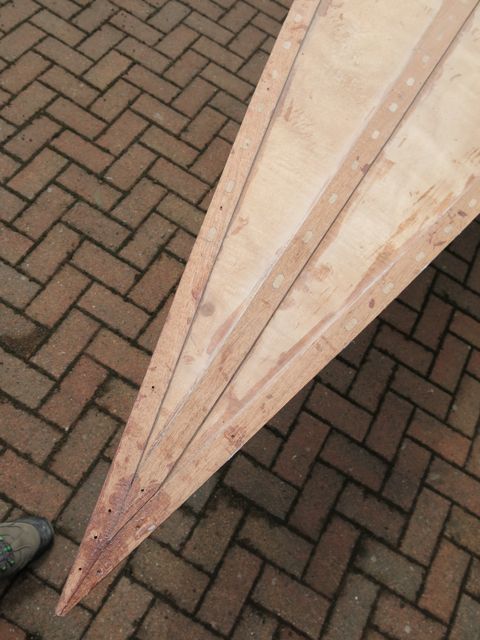
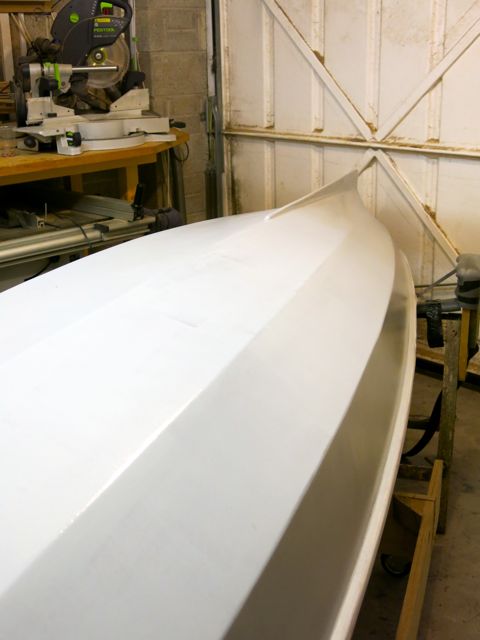
Next comes the tightening of the wires, I flipped the hull upside down and set too my pliers. Having built a boat before, you would perhaps think that this bit would come easy to me, this is not the case, after tightening hundreds of wires I still can honestly say I have go the knack. Some snap, some don’t pull tight some work fine. Nevertheless it gets done after a couple of frustrating hours and a lot of copper wire. I make sure the bulkheads are pulled into the strakes all around. I also had to drill some additional wire holes especially around the transom, which seems to apply a lot of twist and change in angle. The photos show how it started off and ended up. 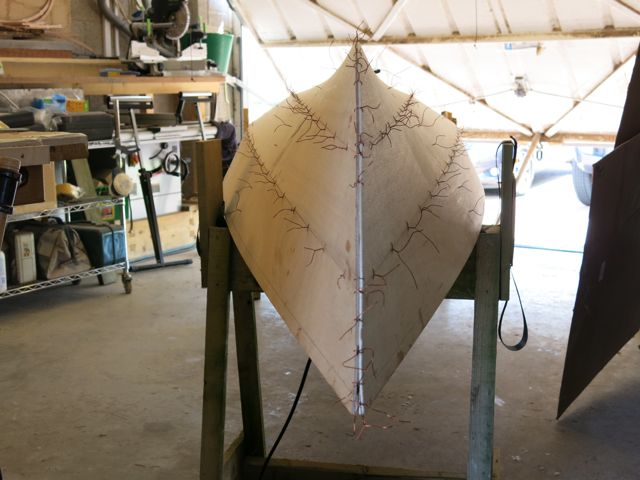
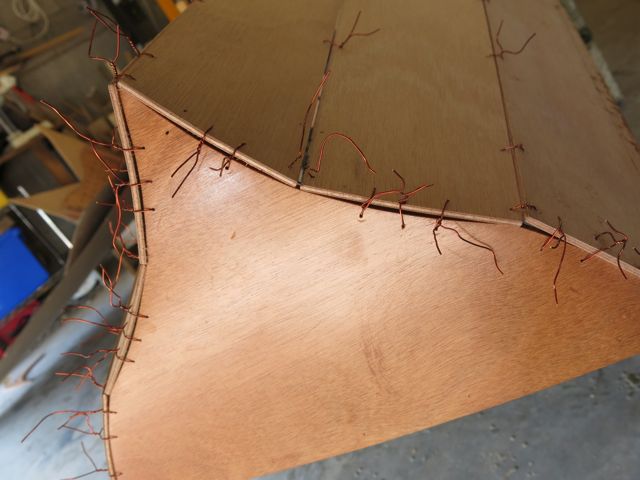
This is the boat wired up out on the lawn while I changed my easels from the webbing ones to the solid ones. 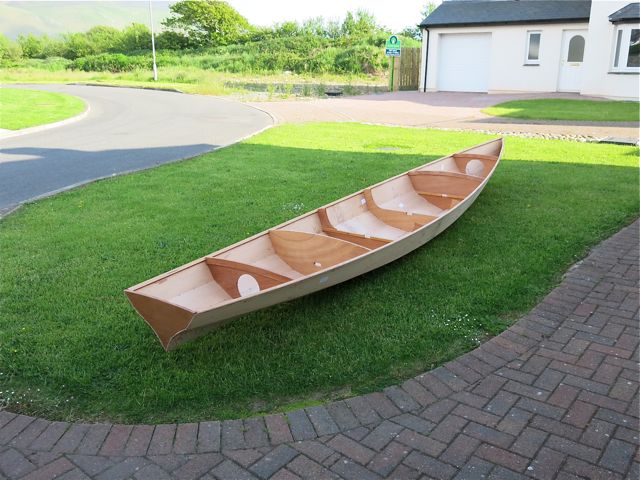
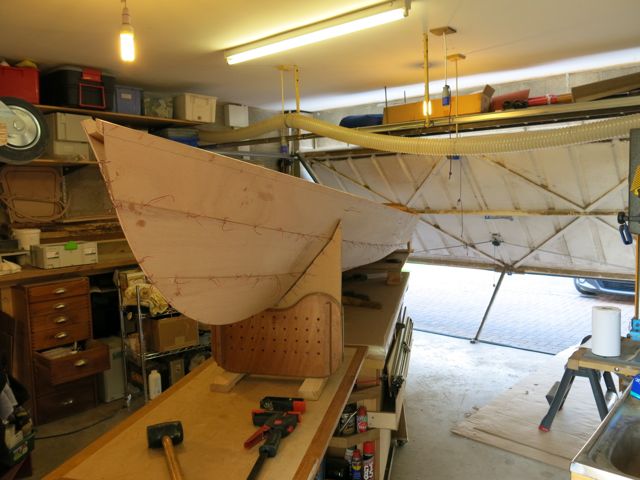
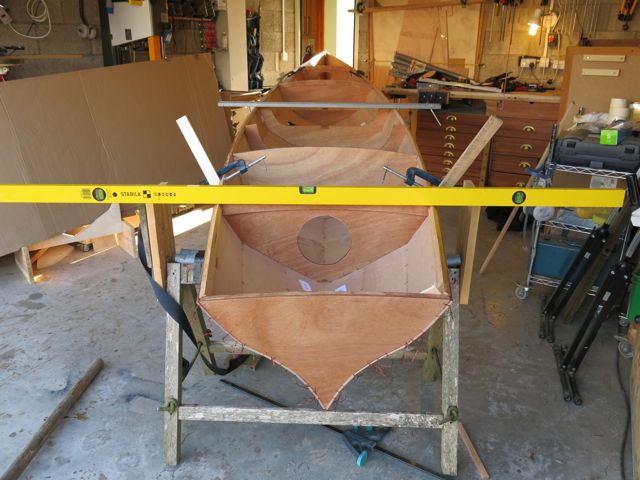
The next job was to get it back on the easel and secure it good and proper then to align any twists in the boat shape making sure it is absolutely parallel from front to back. I secured the boat like this and clamped the restrains with a tight bungee, it seemed to work very well. 
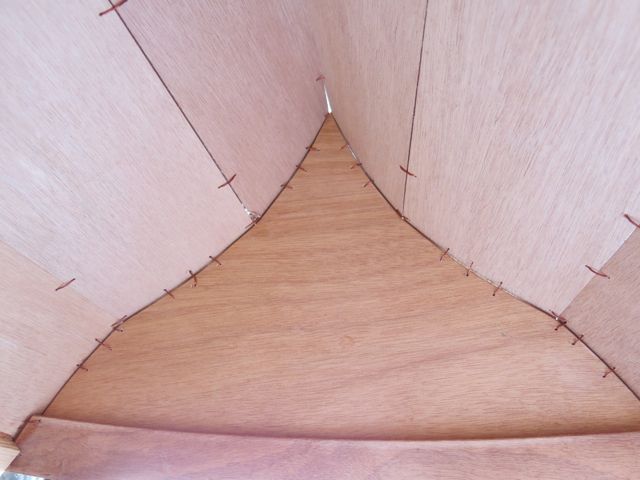
With the boat secure I used a long spirit level and positioned it at every bulkhead to ensure the point of rest on each sheer clam was the same, then I worked from front to back gently twisting the boat until all the measurements at every bulkhead were completely level. I found that if you got the stern level and found the bow to be slightly out, any adjustment at the front resulted in an opposite twist at the stern. I spent 20 minutes chasing the twist out. As a final check I used my eye to look for parallelism using two straight edges and thankfully it was perfect.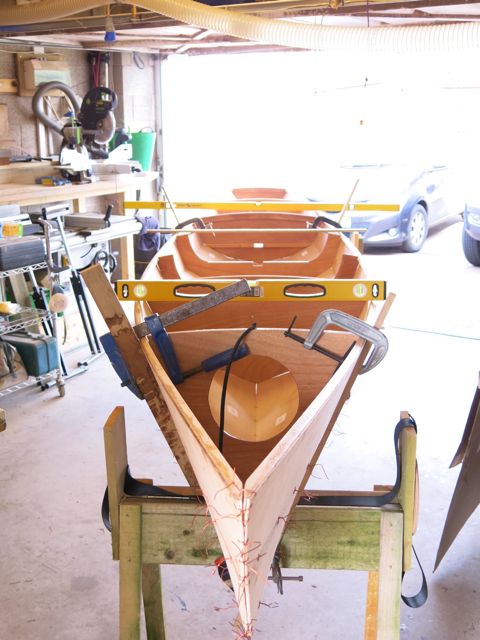
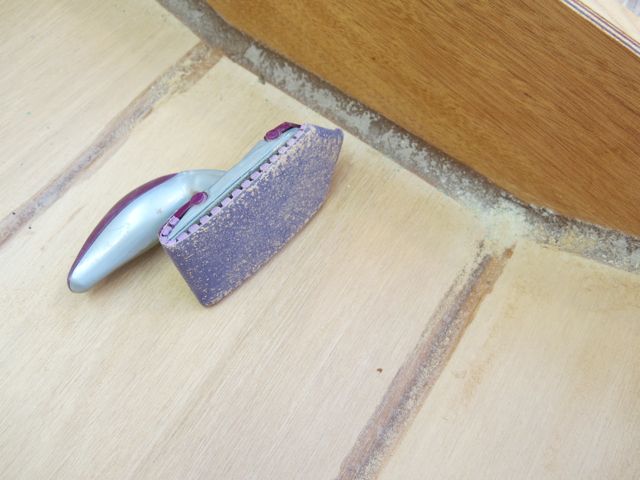
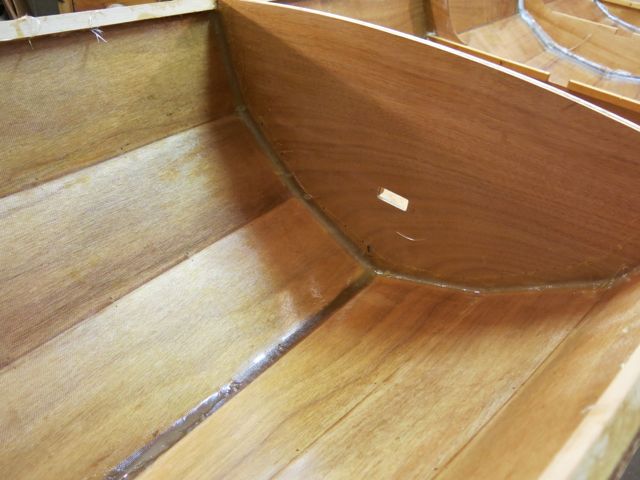
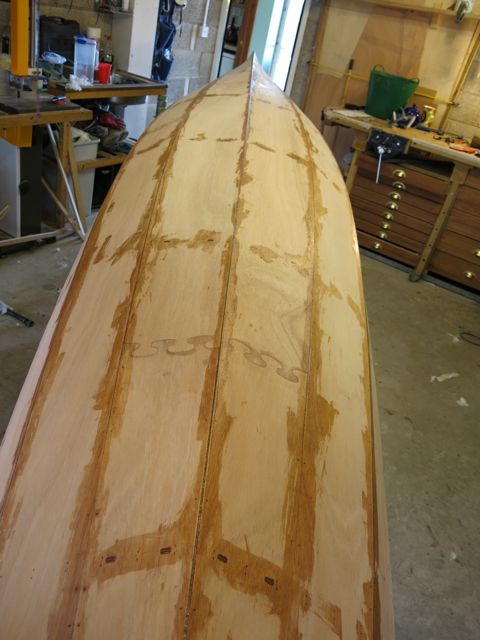
While locked in this straight position, I then tab welded the panels throughout the entire hull. As I wanted to minimise work later, I was very careful to minimise the amount of thickened resin and cleaned all excess away. I also tabbed the bulkheads at the bottom and top edges. Here is the finished result. Before the resin dried I checked the straightness again with the straight edges to ensure nothing had moved. I used this tool to wipe off the excess resin and create a broad radius at the joints.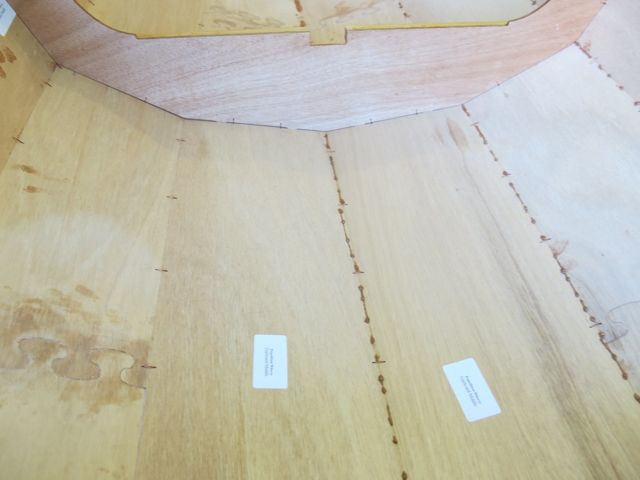
The following day I removed all of the wires and sanded by hand all resin areas and removed all of the stickers !.
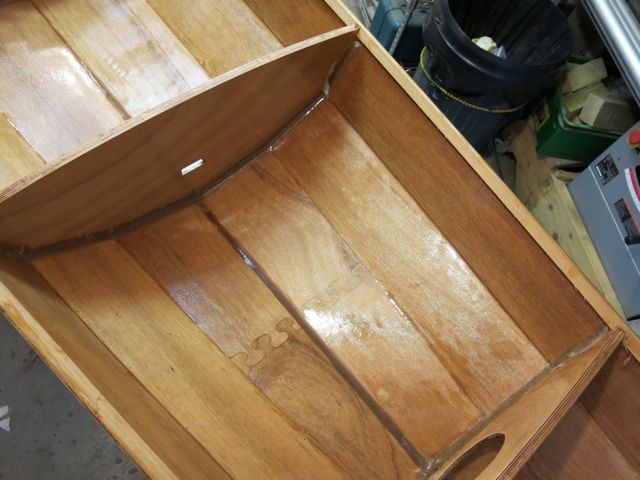
Today I prepared the boat for the internal fillets. The instructions I had suggested that the interior did not need filleting between the strakes. This didn’t feel comfortable so I asked for advice and was told to apply a very small fillet between the strakes so that’s is what I did. An important point I made on this boat was that I was not going to waste time getting things to a cabinet makers finish on the parts of the boat that were covered with decks. I wasn’t going to rush things and make a mess but I was going to take a balanced view. If you can’t see the area, don’t spend hours refining the fillet finishes. 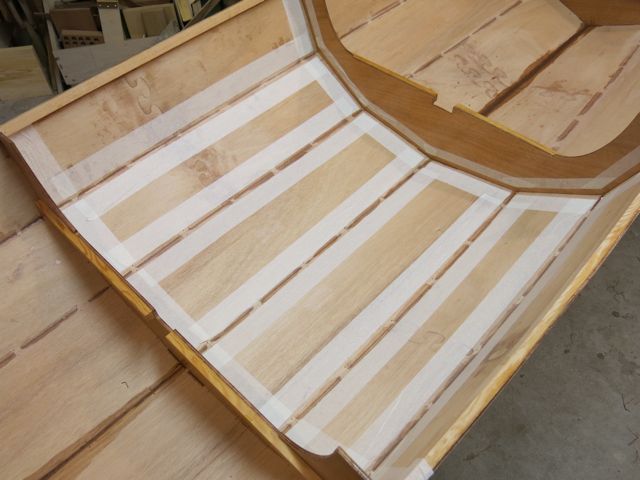
To that end I only taped up the parts of the boat that were going to be seen, the other areas were done free hand and underwent a good amount of cleaning up to remove resin overruns afterwards. I know when the glass goes on, and the resin is added, everything will look the same.
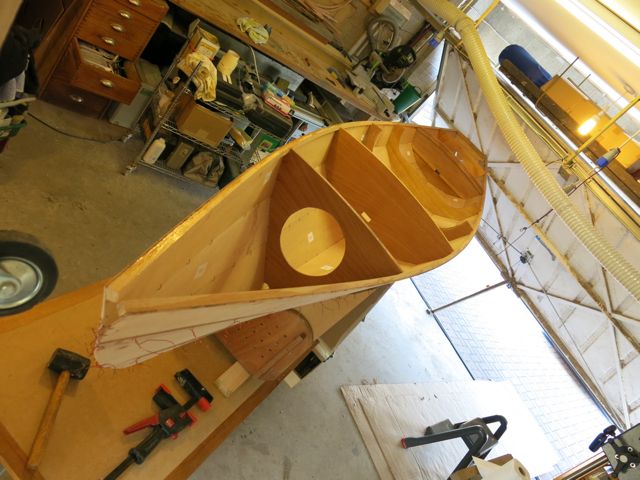
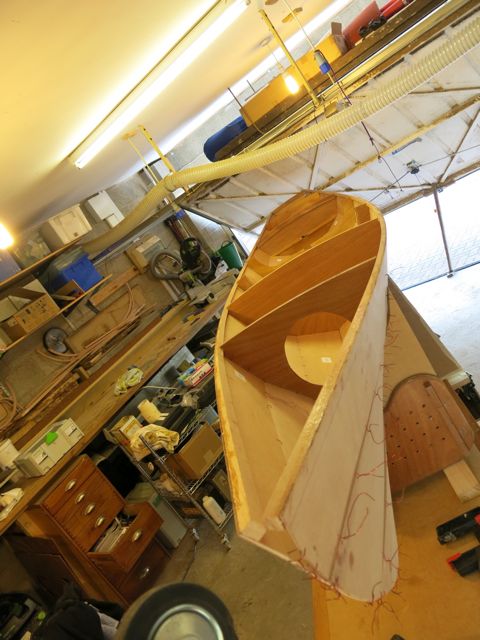
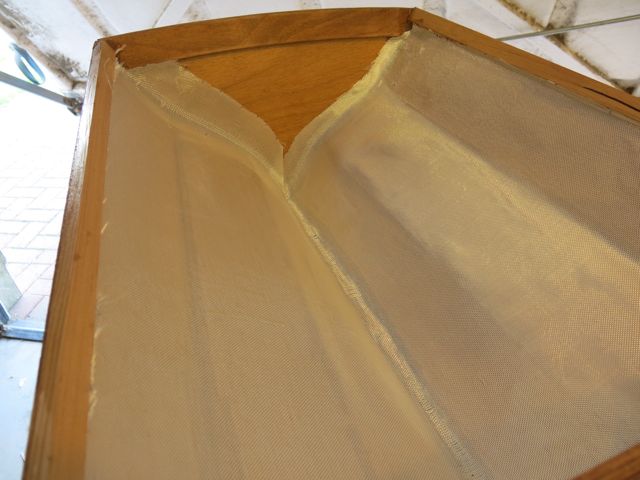
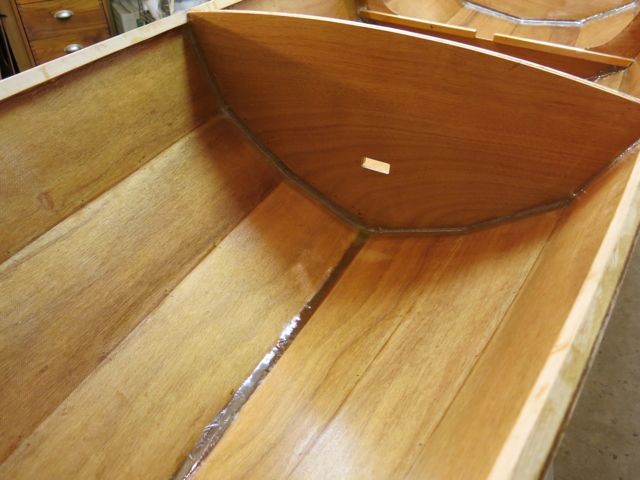
Here are some photos of the interior fillets. On the last boat it was suggested the fillets on the bullheads were too small, so I have tried to make up for it on this boat. I started with large fillets on the bow and the stern then went on to do the bulkheads. I used the radius tool that I showed above. I also blocked off the limber holes in the bow and stern bulkhead. I have cut a hole in these bulkheads for water tight hatches and want to make them watertight for safety, so the limber hole had to go. I will replace it with a watertight bung.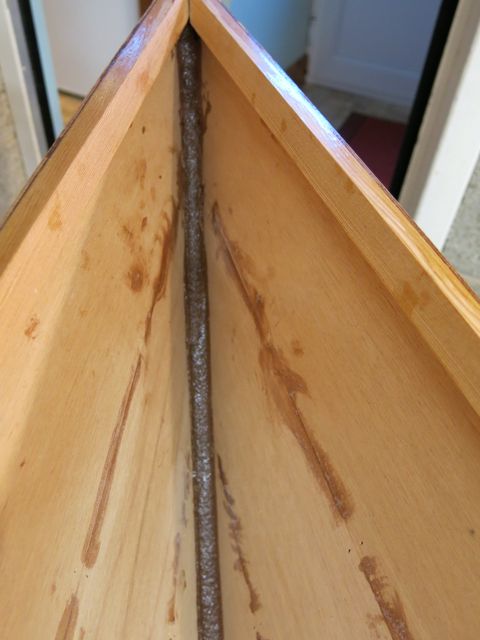
Last edited by pam5 (19 Jun 2013 10:20 pm)
Offline
#3 10 Jun 2013 9:43 pm
- beaker
- Member
- Registered: 9 Oct 2011
- Posts: 81
Re: Expedition Wherry, first build in the UK.
Oooh, the anticipation when you first unwrap, with the promise of adventures to come. I look forward to seeing photos of those shapes on a white beach in the Western Isles.
Offline
#4 11 Jun 2013 1:15 pm
- Paul
- Employee

- From: Gatebeck Cumbria
- Registered: 4 Aug 2011
- Posts: 134
Re: Expedition Wherry, first build in the UK.
The boat is looking good but I advise you to remove the sticky labels as soon as they are redundant to avoid a stain or change in wood colour.
See this link: Identification Labels
Offline
#5 18 Jun 2013 9:17 pm
- pam5
- Member
- Registered: 16 Jun 2011
- Posts: 92
Re: Expedition Wherry, first build in the UK.
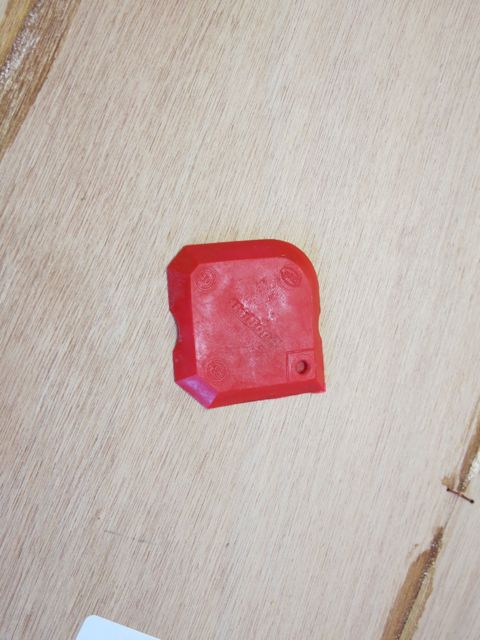
The fillets once dry need to be sanded down to prep them ready for the next application of glass and resin. I need to apply glass between each of the for the entire length of the boat. A really good cheap tool I found for corner and tricky sanding situations is this (see below). It has a swivel handle and is good to hold. 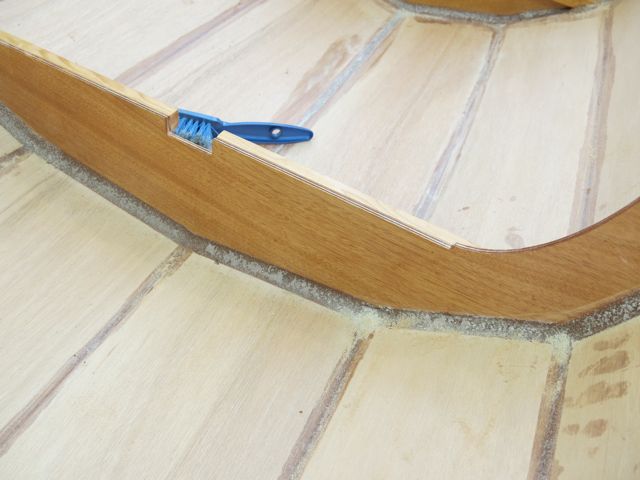
Once the internal sanding is complete and this includes all fillets, all internal surfaces and removal of any pencil marks I am ready to glass up the inside compartments.
I turned the boat upside down and used the hull shape between each bulkhead as a pattern for cutting out my glass sheet. I cut the sheets about 1/2 wider than the bulkheads. Each piece of glass sheet was marked with a small dot to indicate its mid point and help me correctly position it when it was being dropped into the compartment. Then came the careful job of positioning each piece and trimming off any corner bits or inaccuracies. One in position they were smoothed out and left overnight. I forgot to say fitting the glass sheet into the bow compartment was a bit of a pig, dread to think what it will be like to apply the resin in this compartment, I am already not looking forward to this bit.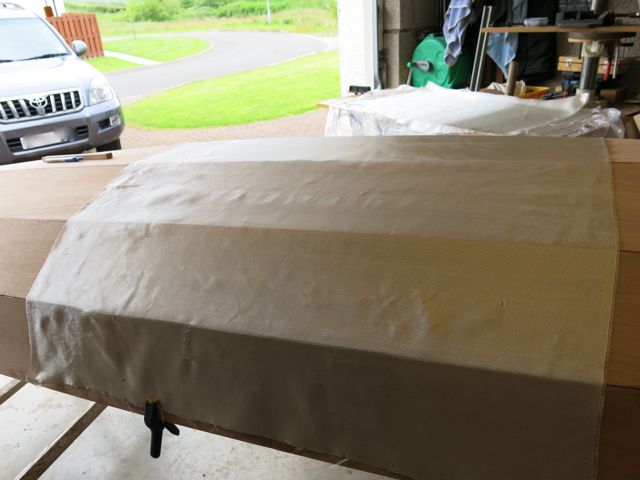
Offline
#6 18 Jun 2013 9:30 pm
- pam5
- Member
- Registered: 16 Jun 2011
- Posts: 92
Re: Expedition Wherry, first build in the UK.
After 24 hours I set off applying resin to the compartments. I used about 2-3 pumps each side of each bulkhead, I had the resin nice and warm and low viscosity. I used a rubber tipped squeeze and set off on the bow section and it turned out to be as miserable a job as I thought it would be, don’t think I will be winning any prizes for that bit. For all compartments I poured the resin in the centre and worked to the sheer. The remaining compartments went well and to a large extent quite neat. I took more care on the bits that will be visible, here are a few photos of the finished, but not dry job. I will have a bit of sanding to do on the glass that protrudes up the side bulkheads.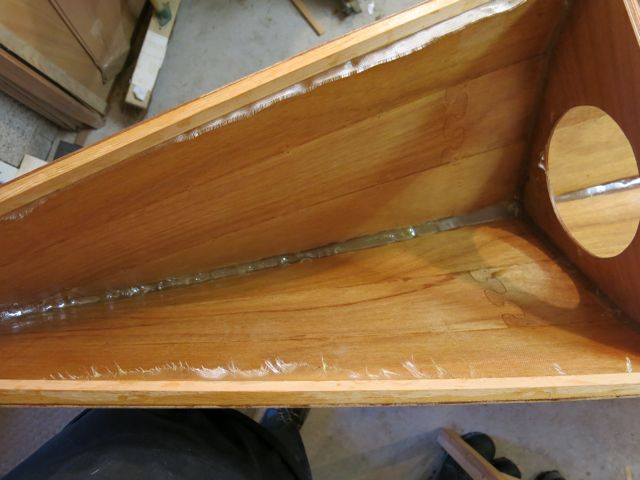
Offline
#7 21 Jun 2013 11:28 pm
- pam5
- Member
- Registered: 16 Jun 2011
- Posts: 92
Re: Expedition Wherry, first build in the UK.
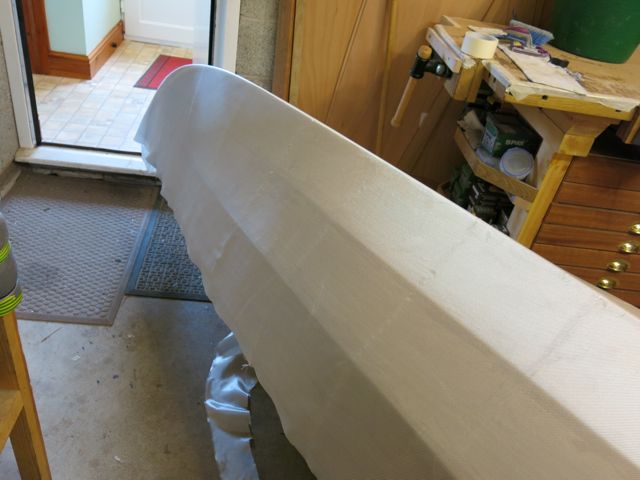
I don't enjoy sanding and I always like to encourage others to help out !. We did all of the sanding by hand and took a bit of time over it, it always looks terrible when it is done, yet once that first coat of resin goes on.....you sigh relief as it comes up great. The resin was slightly thickened to fill the weave. on the subsequent coats I will only use thickened resin on the central bulkhead that is visible, the rest will get just a good lash of the standard resin mix unthickened. Here are some shots of the finished product after coat number 1. It is my intention to put at least one more coat on everything except the central bulkhead position and I will add as many coats as needed to fill the weave in the middle bulkhead position.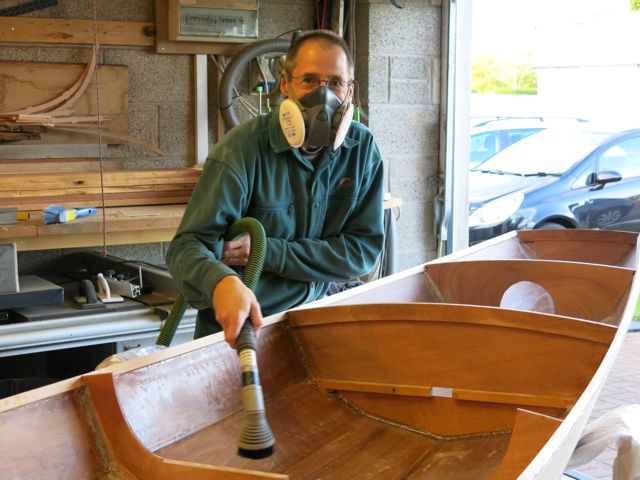
Offline
#8 26 Jun 2013 10:59 pm
- pam5
- Member
- Registered: 16 Jun 2011
- Posts: 92
Re: Expedition Wherry, first build in the UK.
When the second internal coat was touch dry, I was able to flip the boat over and start preparing the hull, I made a relatively runny mix of silica and wood flour and set about filling in the holes and the gaps joints of the strakes. I started with a 50ml injection but gave up as it took too long and ended up setting and wasting half of it before it could get it onto the boat. Plan B was to revert to a good old small steel scraper. It was a great tool, firm enough to push the resin into the gaps/holes and sharp enough to scrape any residue off completely. I was very careful in removing all excess resin so the subsequent sanding would be minimal, and it was successful. Finally I checked and double-checked there was no excess or any runs of resin.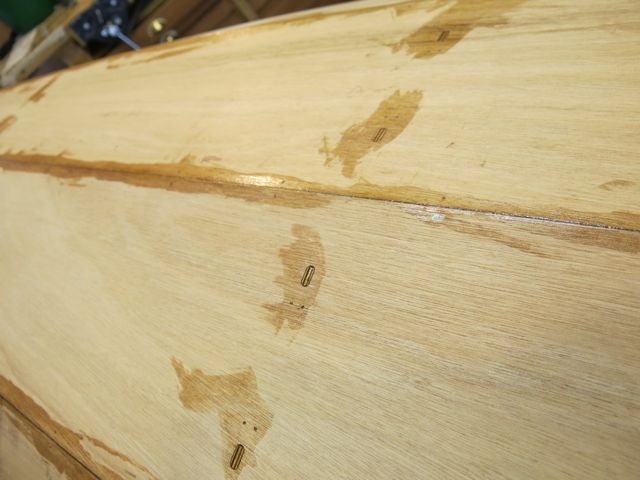
The sanding, was very easy, and took only a short time. I made sure that the shear strake was free from any resin wetting effects as I wanted the option of leaving this strake with a wood finish when it comes the paint job.
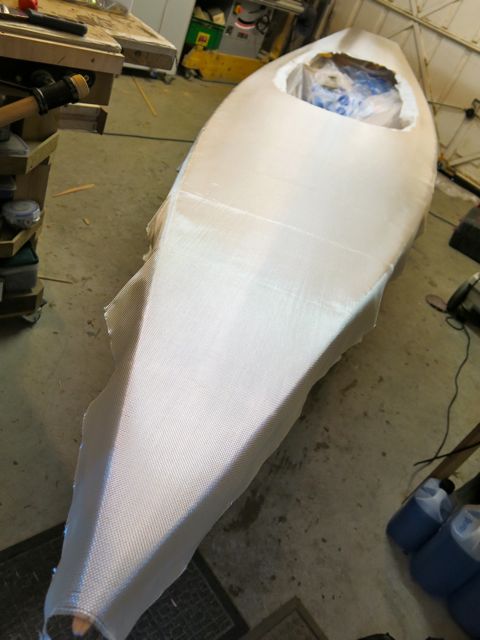
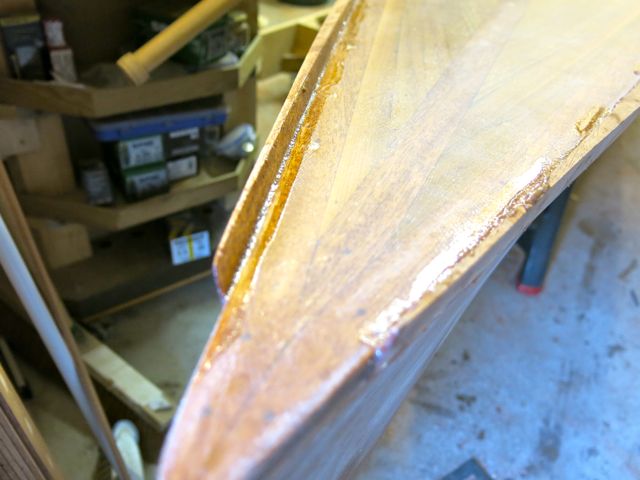
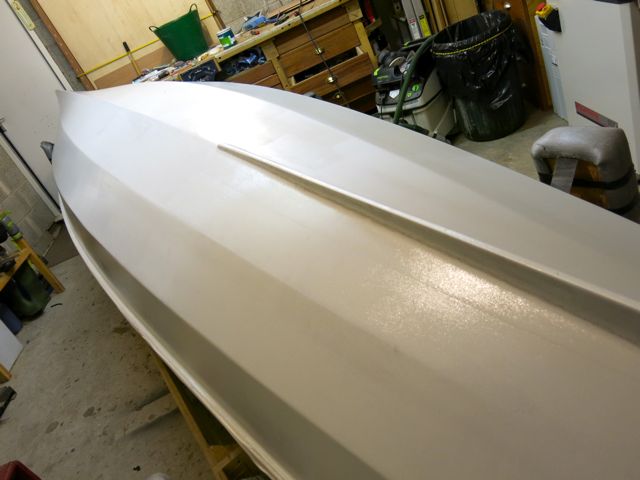
The next job was to prepare to glass the outside of the hull. The plan is to use two separate full length pieces that would overlap just beyond the first strake. In effect I wanted the bottom strake double skinned to afford the boat more protection when I run it stony beaches in Scotland. I extended the overlap over the second joint and up the second strake by a couple of inches as I felt this joint along with the hull joint would be getting the most damage during landing. see the photos below. I left the glass on the boat for a good 24 hours before applying the resin to allow it to settle and straighten out. this worked well 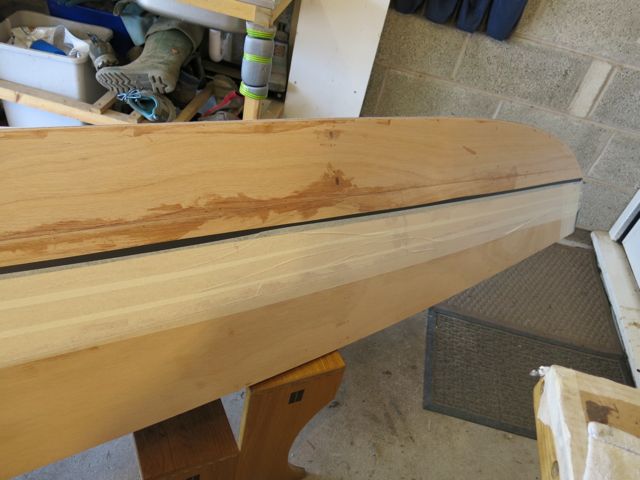
I applied masking tape with a single black tape to identify the edge of the glass at the point I wanted to trim it off once dry. I had a helper at this point who mixed the resin while I applied it to the boat. I did two pumps per application and worked from the stern to the bow. I had a soft rubber edged grout filling tool. it was brilliant and pushed the resin into the glass with only a couple of passes. I was careful not to over fill the glass with resin and I retraced my steps every now and then to ensure there were no excess pools of resin or obvious runs, again this was to minimize the amount of sanding needed at the next stage. I was very pleased with the results, it turned out fine, with no runs or bubbles under the resin. I did the resining of this glass around 7pm working up to 9pm ensuing the temperature in the garage was falling and therefore minimising the possibility of air bubbles forming.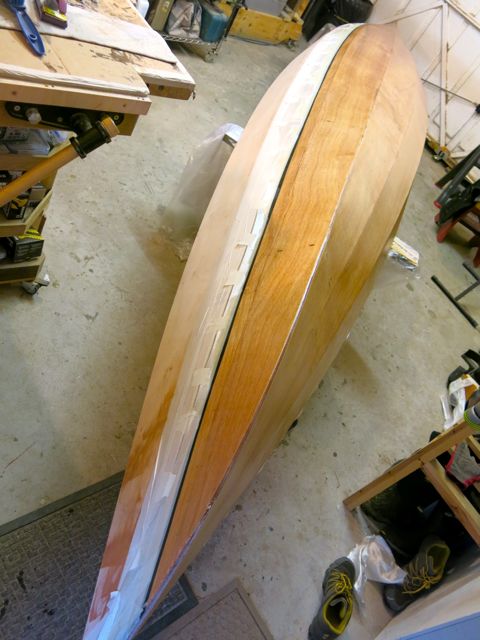
 Once dry in 24 hours, I lightly scored along the black tape line with a Stanley knife and peeled of the masking tape to leave a perfect edge on the resin. I tidied up the overhangs on the stern and bow and sanded the whole thing down with 120 grit ready for the next layer of glass.
Offline
#9 30 Jun 2013 11:15 pm
- pam5
- Member
- Registered: 16 Jun 2011
- Posts: 92
Re: Expedition Wherry, first build in the UK.
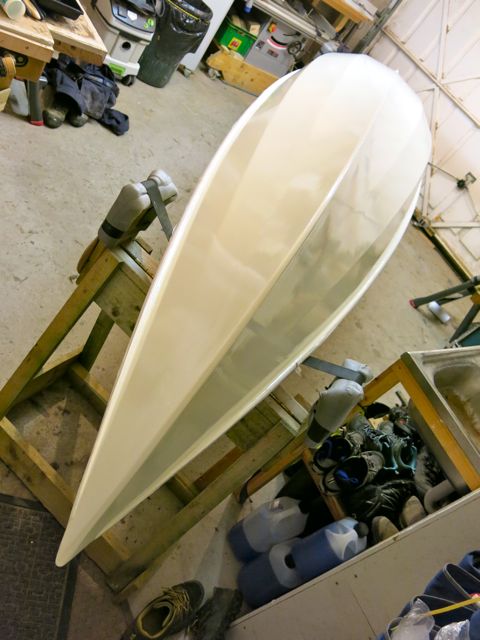
This is a shot with both sides of the boat glassed, as you can see I have sanded it down with 120 grit. You can clearly see the double skin overhangs at the end of the first strakes I flipped the boat over and added the last coat of slightly thickened resin to the inside sections to fill the weave. I only used a squeeze and did not use the roller, the finish was much better and I was able to keep the resin to a minimum. This was the final filler coat on the inside. I flipped the boat over again ready for fitting the skeg.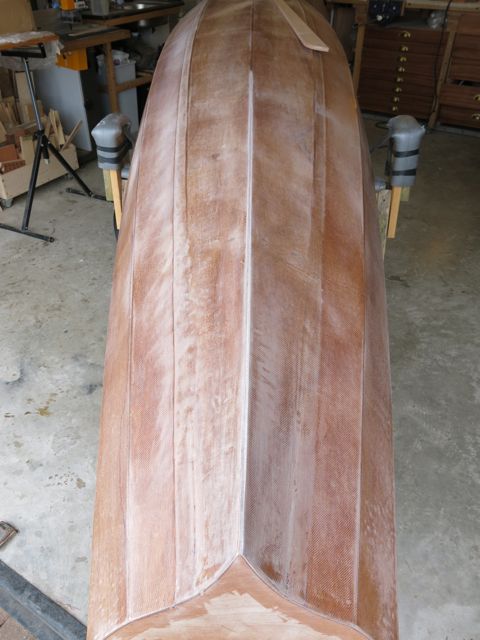
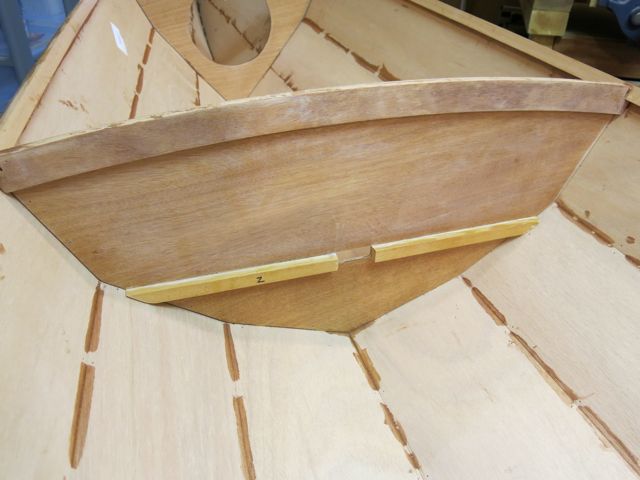
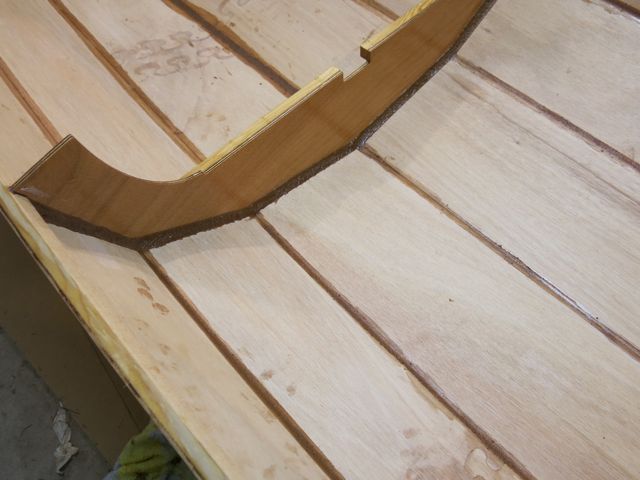
I used a sanding block to make a 'land' on the stern section of the hull, the purpose of this is to make a good flat contact point for the skeg. I did a dry fit of my skeg, using the strap arrangements to see if they would worked. Once on, I spent a bit of time making sure everything was square then I marked a couple of pencil lines on the sides of the skeg to help me realign it when I was about to resin it into position. The straps were removed and the lines allowed me to accurately drill the holes that I was going to use to screw the skeg from the inside of the boat. 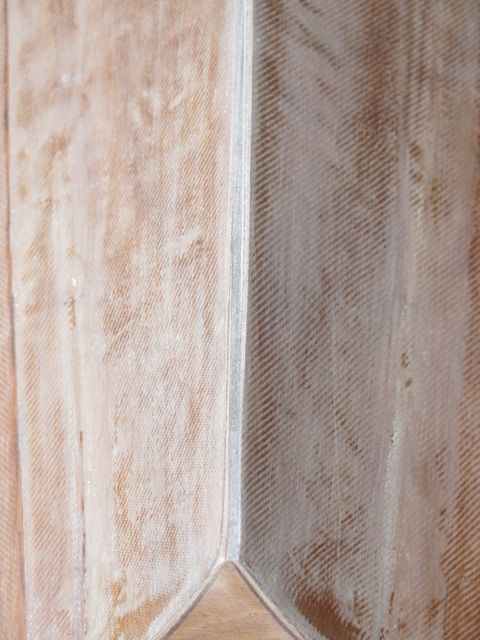
I applied silica thickened resin to the skeg and the prepared section on the hull. I then carefully applied the straps ensuring everything remained straight and square. I climbed underneath and drilled my pilot holes into the skeg from the inside of the boat and secured the skeg from the inside using stainless steel screws. A final check just to confirm everything was still straight and then a quick tidy up of the excess resin again being careful to remove every bit of the surplus to reduce the sanding later on.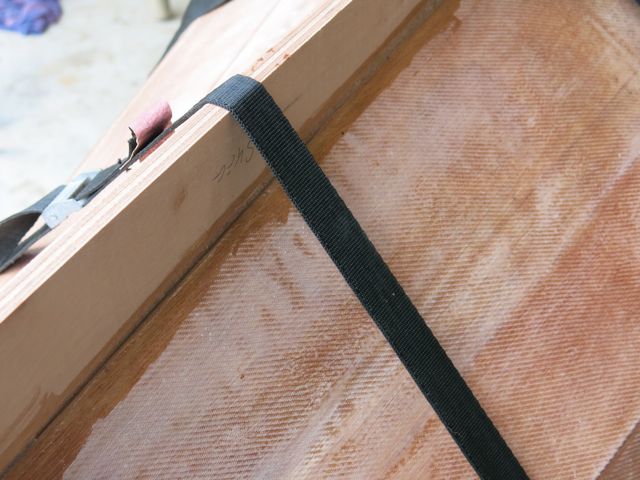
while this was drying I decided to add the 100mm strip of glass down the centre of the boat to act as a protection rubbing strip. In total this will now give me three layers of glass a the most vulnerable bit, which some might say is too much but I feel is ok and adequate for landing the boat on stony beaches in Scotland. Again you can see I added my masking and black tape to keep any dribbles under control and give me a straight line to gut against.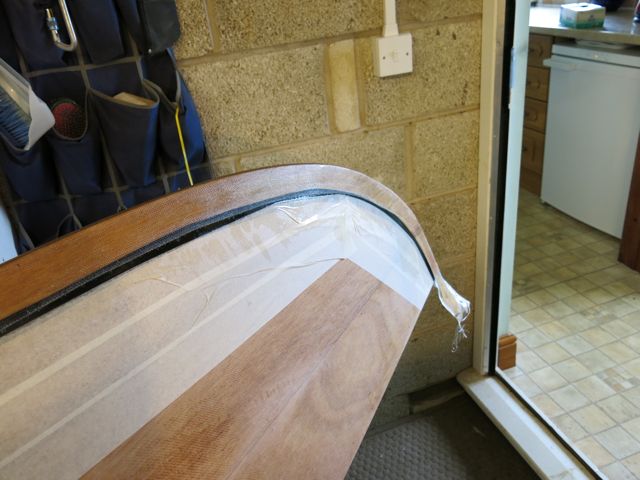
Offline
#10 2 Jul 2013 10:45 pm
- pam5
- Member
- Registered: 16 Jun 2011
- Posts: 92
Re: Expedition Wherry, first build in the UK.
Last night I beefed up the fillet on the skeg, it was a bit of a rough job as I made the mix a bit too thick and it didn’t run smooth when I applied it, there will be a bit of rework to do when it is dry. 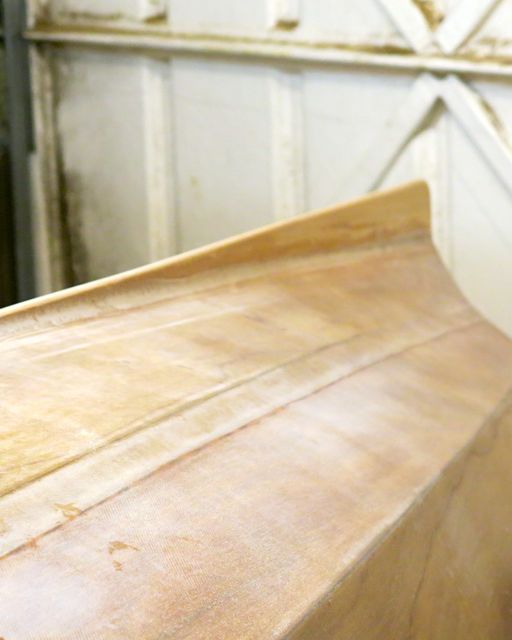
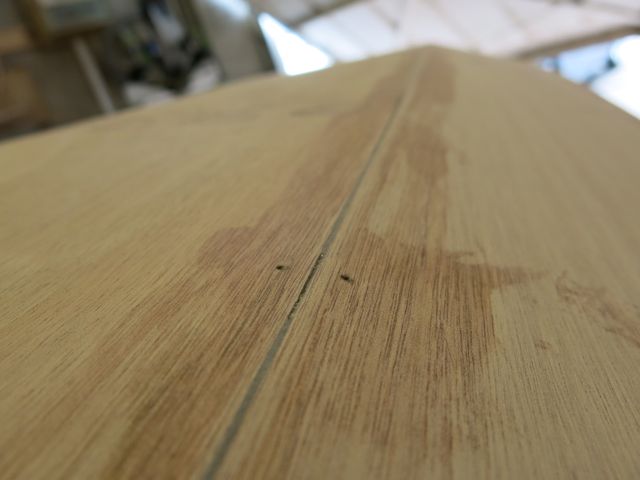
Tonight I sanded it reasonably smooth (smooth enough) and applied a strip of glass to either side of the skeg. The glass just came to the top of the skeg but the angle was too steep to bend it over the top, so I just let it stand proud and I will sand it off when dry. The purpose of the glass on either side of the skeg is to give me a little bit more lateral strength on the skeg. I will probably add a small sacrificial edge (screwed with small brass screws) onto the bottom of the skeg as this will wear down as a result of landings. Oh yes, dont forget to remove all of your pencil marks before you glass or else they will be fixed for ever like this one !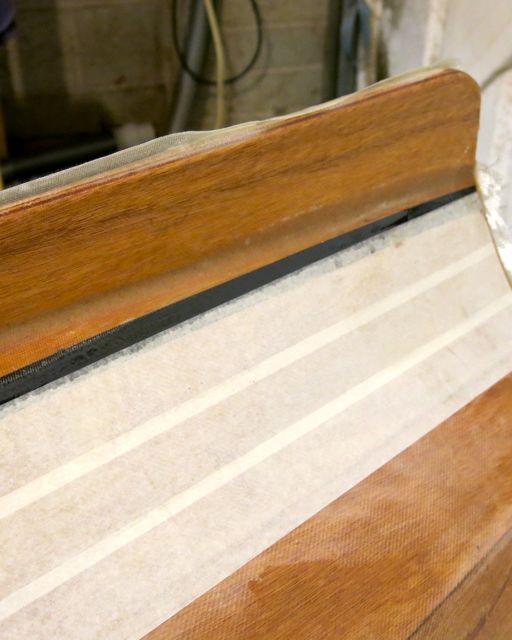
Finally I added a profiled patch of glass to the outside face of the transom, again the edges will be easily sanded off when dry.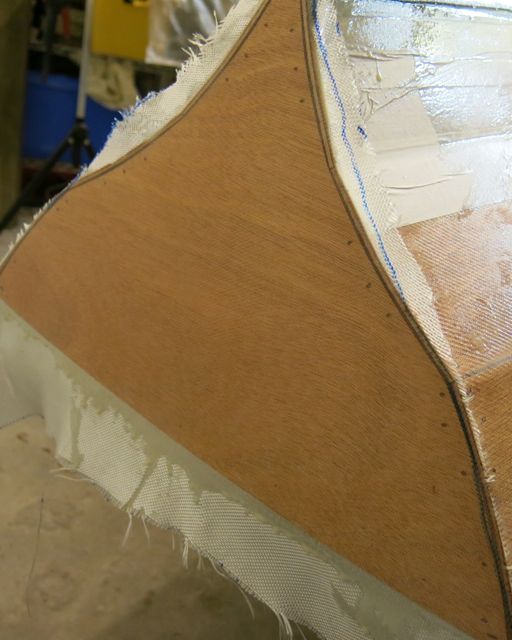
Offline
#11 6 Jul 2013 8:28 pm
- pam5
- Member
- Registered: 16 Jun 2011
- Posts: 92
Re: Expedition Wherry, first build in the UK.
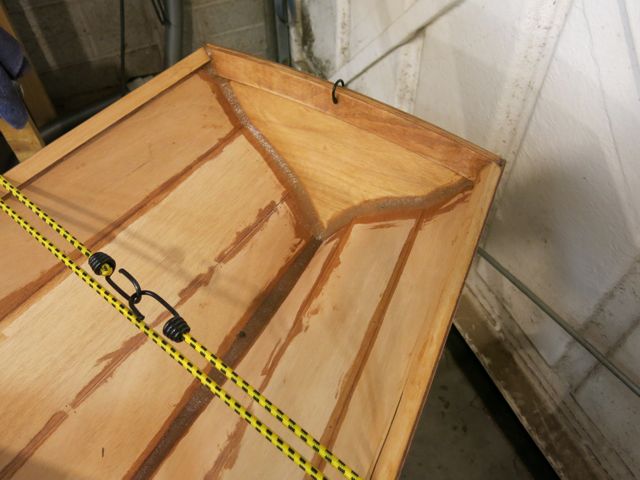
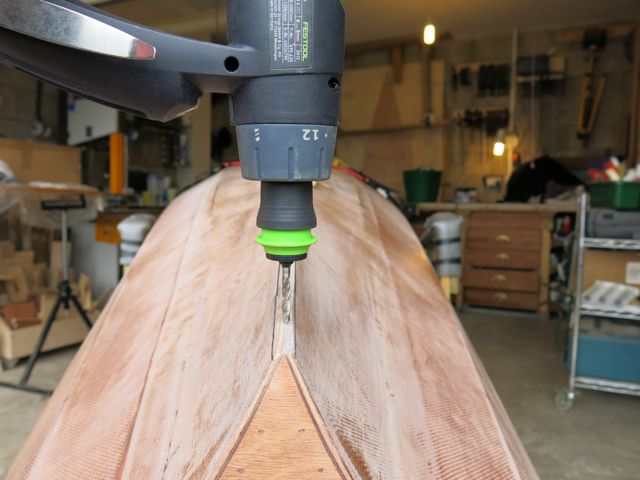
Tonight I will be doing some little jobs on the side. I wanted a hole through the bow of the boat to attach a hoop of rope. Fyne boats suggested I build a little profiled dam that I could fit in the bow of the boat and backfill the gap with resin/silica mix. I did this. The dam was made of card and I wrapped it in tape to make sure the resin didn’t stick to it. I added about three pumps of material. It worked well and because of the mass getting hot as it cured, it cured quite quickly. I then carefully drilled a series of drain holes in each of the bulkhead to take a watertight bung.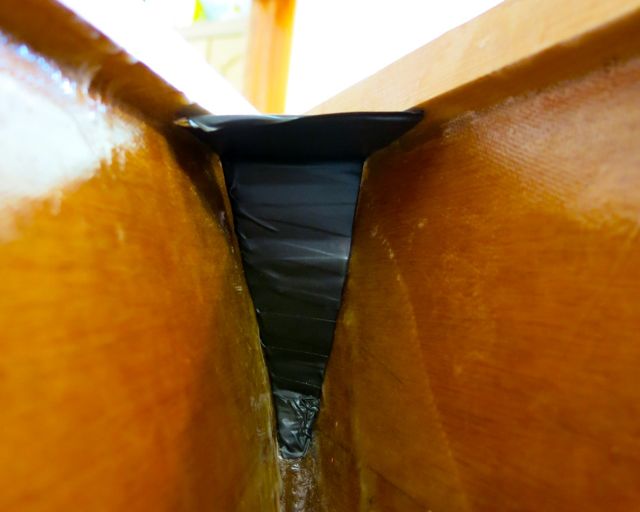
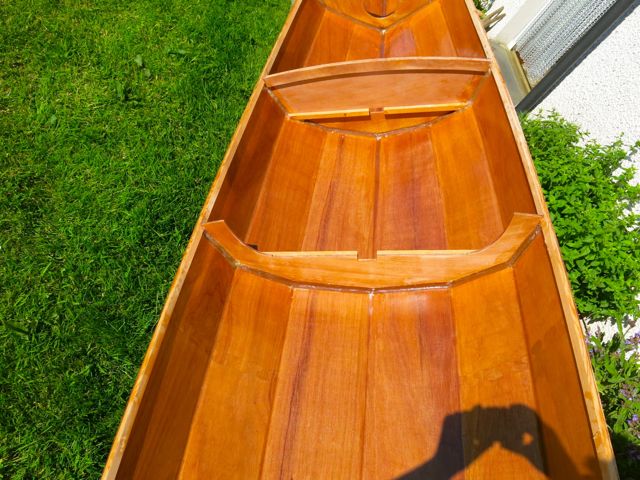
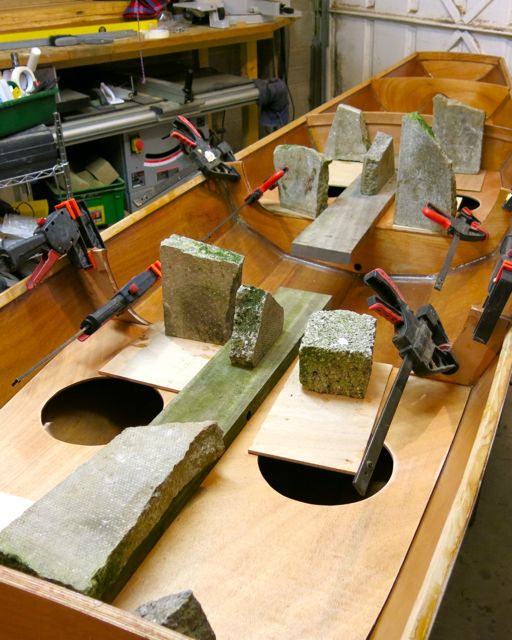
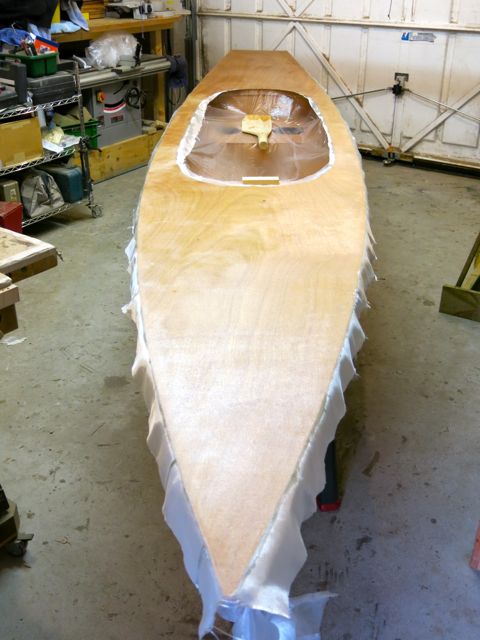
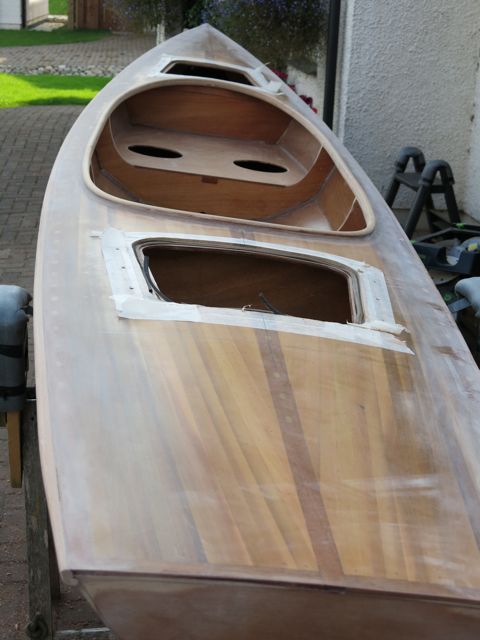
Now for the first set of decks. I cut the support beam to length and gave it a good coating of resin to waterproof it, I then made quite a thick silica/flour/resin mix and added to the areas the seat decks would be contacting. I made sure the decks fitted prior to adding this adhesive as I wanted a straight forward drop in fit once the adhesive was in place. I also ensured the underside of the decks that contacted he adhesive had been rubbed down. I added the decks, and weighted down with broken flag stones and left overnight.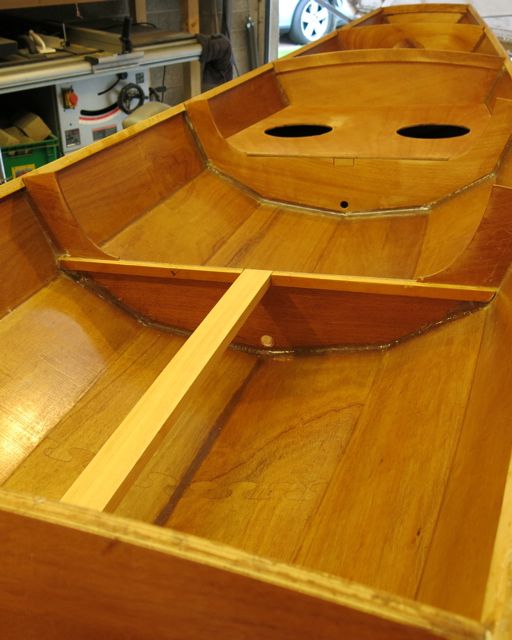
next morning I added the fillets around the decks, I taped them out to keep it neat and tidy, again all went well and the fillets turned out neat.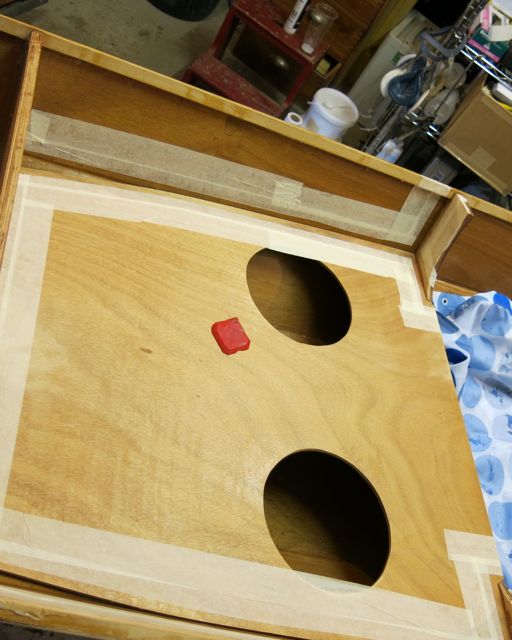
Here are a few shots of the boat in its current state; showing the nice lines. Tomorrow I will flip over and do the final sanding of the hull before adding a couple of filling coats to fill the weave of the glass. 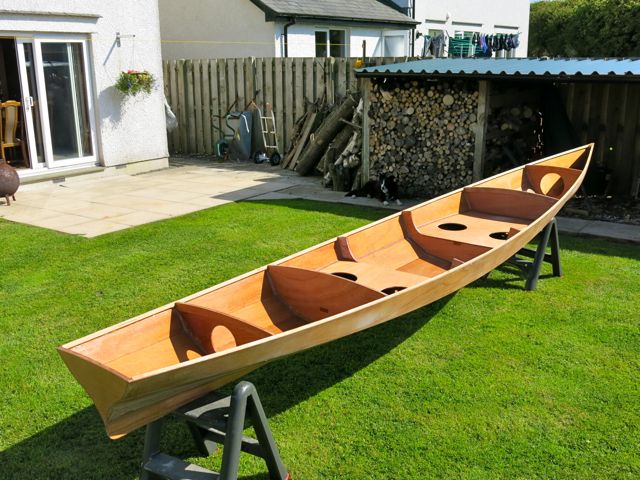
Offline
#12 9 Jul 2013 11:03 pm
- pam5
- Member
- Registered: 16 Jun 2011
- Posts: 92
Re: Expedition Wherry, first build in the UK.
I learned a lot doing the fill coats. The success or failure is all down to minimising the amount of resin you apply. I found too much just results in orange peel effect. As mentioned earlier I used the squeegee and made sure all of the resin on each application was scraped down as far as I could. The advice from fyne boats was to add 2 or 3 tea spoons of silica to the mix, this makes it almost like a mustard consistency. Apparently the silica powder/resin mix rolls very well and will spread a long way without any problem. This turned out to be the case and I was able to cover the entire boat with 3 pumps of material. The squeegee instantly turned the sanded surface into a very good finish with only a couple of passes. I sanded in between the two coats and once I applied the last coat I finished the surface off with a dry sponge roller. This converted the very smooth surface to a slightly mat surface . I used the roller to drive out the very very small lines you get by using a squeegee. The final finish was good and it will only take the lightest sanding down before I apply the undercoat paint at a later date.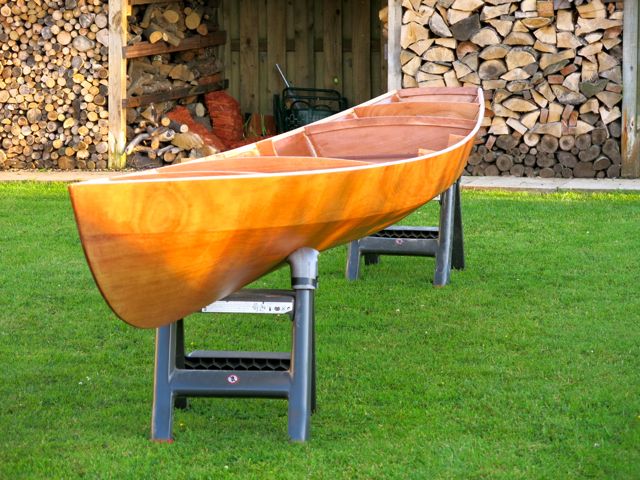
Next comes quite a tricky bit, the joining of the deck assembly. It is only 3mm ply as I intend to add another cedar strip affect on top of this. As it is only 3mm, it is very flimsy, so I had to assemble a wider makeshift table to allow me to glue the joints. I lined the outside of the table with plastic sheet. Before I started on gluing the joints, I tried resting the parts of the deck on the shear of the boat to make sure the size was about right. I returned the deck to the garage and glued up. Once dry tomorrow I will add a full sheet of glass to the underside to add strength. How I would do this was a point of debate and in the end we decided it would be best to carry out the glass application while the deck was resting on the boat, obviously the boat will be covered in plastic sheet to protect against any drips of resin. I will let you know how this goes in a couple of days.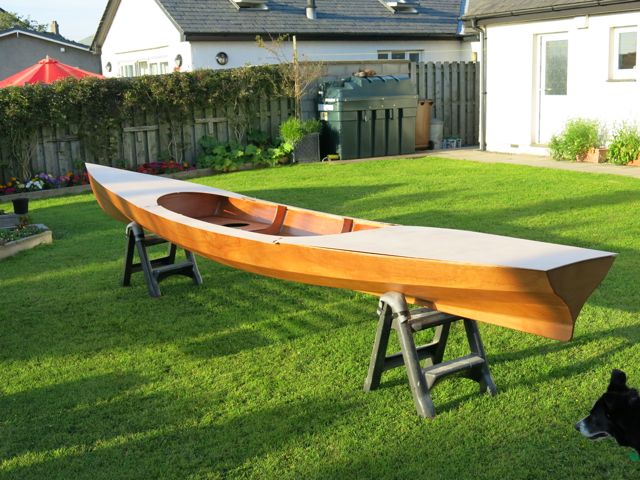
Offline
#13 14 Jul 2013 10:40 pm
- pam5
- Member
- Registered: 16 Jun 2011
- Posts: 92
Re: Expedition Wherry, first build in the UK.
The glass was rough cut to size and the middle cut out to reduce weight during the application of resin. applying the resin was a bit tricky a the whole thing was very flimsy and driving the resin into the glass resulted in the wood flexing all over the place as it was only 3mm thick. Once applied and left to dry I had a concern that it would dry with the inverse rocker of the boat and would not flex enough when it was turned over and stuck down to the sheer clamps. This turned out not to be a problem, once it was dry it was still very flexible and would mould to the shape of the bulkheads and sheer line.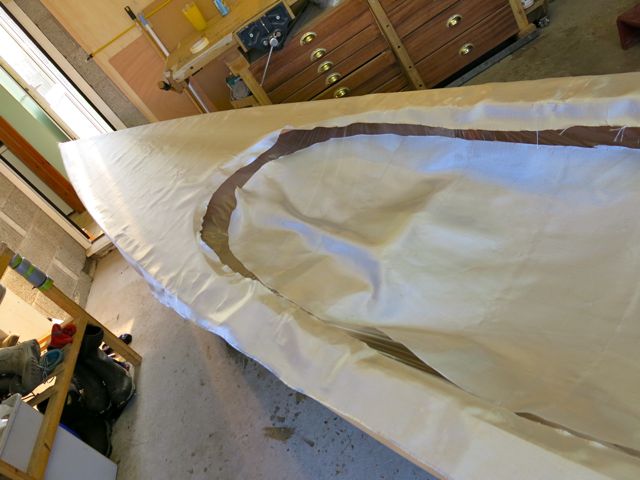
Next, I spent a bit of time sanding and applying another coat of resin to the internal before I started to fit the deck. prior to fitting the deck I made a plaining guide. I used the left over piece of wood that all of the bulkhead doublers came from. I took the largest doubler and extended its profile, tidied it up with a bit of sanding and there you go, a brilliant plaining guide. I used this to profile the angles of the sheer clam in readiness for the deck. It took about an hour just getting things correct. I was careful not to remove any wood from the sheer line of the boat. 
fitting the deck was a quite a bit of a job. I did a dry run first of all to see if the alignment was OK, and then experimented with hold down devices. The easiest way to effectively hold it down was going to be bricks. I added an additional boat support under the middle of the boat as there was going to be a considerable amount of weight. I positioned the deck and applied resin, silica, flour mix to the tops of the bulkheads while propping the deck up with a stick, then with the centers over the bulkheads weighed down I gently lifted the deck and applied the mix all around the sheer clamps and edges of the bulkheads. I applied a huge number of bricks to hold everything don and crossed my fingers there would be no lumps or bumps.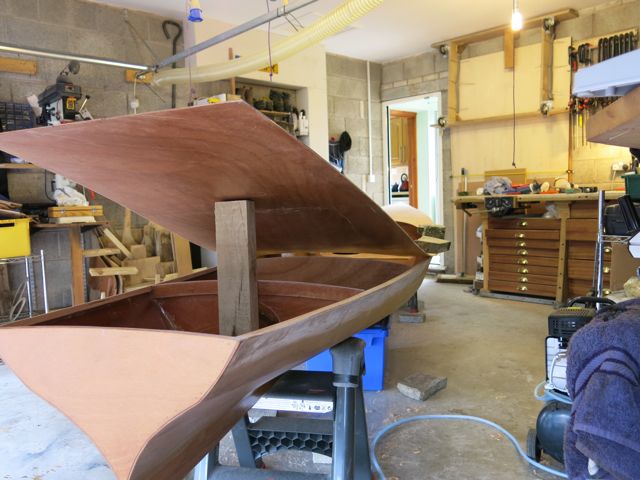

The following day I took a belt sander to the edge and smoothed it flush with the hull. here are a couple of photos of the decked article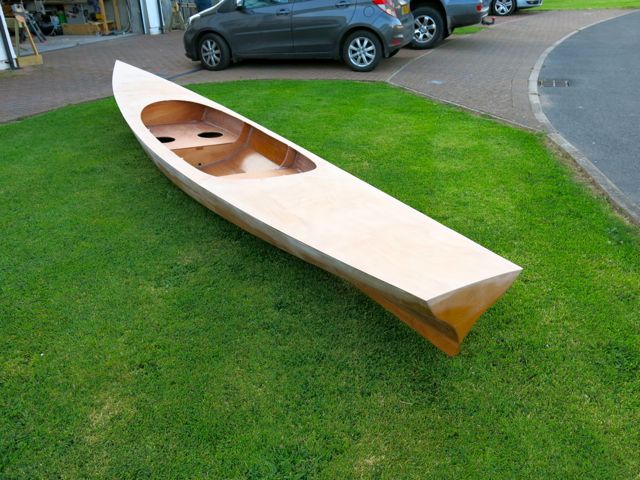
Offline
#14 23 Jul 2013 12:06 am
- pam5
- Member
- Registered: 16 Jun 2011
- Posts: 92
Re: Expedition Wherry, first build in the UK.
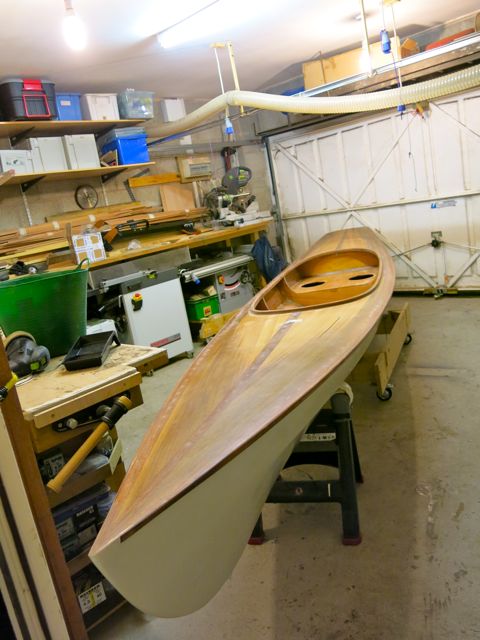
I have been off air for the last few days, here are some of my recent photos. The skin deck is on and I have now been preparing the cedar strips. I bought some cedar boards from fyne. I planed them down and put a straight edge on them. I then run them through my band saw and cut 4mm strips. I tried to put them through my planer to bring them down to 3mm strips with a smooth face on one side only. Even with a sole plate fitted to the planer to lift the strips closer to the cutter block, the machine wasn’t that keen on cutting at 3mm. I got some variable results so decided to stop. I would fasten them to the boat at this thickness and give them a heavy sand down with the orbital sander.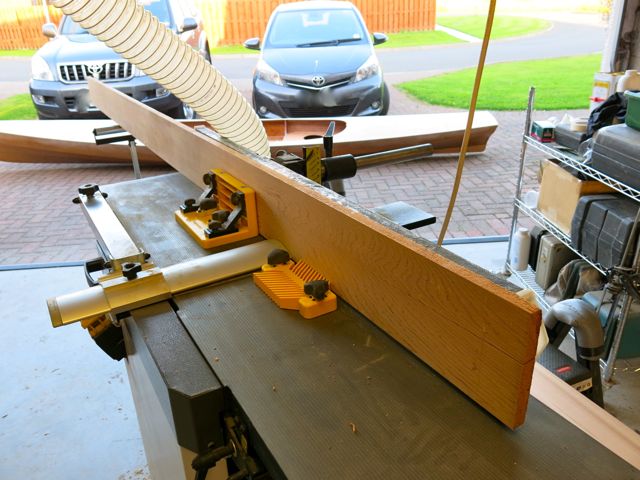
When I built my last boat, one of the things I liked most about its appearance was the block effect gunnels, these set the boat off. below is a photo of the gunnel on my last boat. The design of the wherry doesn’t lend itself to these type of gunnels, and the extra weight would not fit in with keeping it as light as possible. 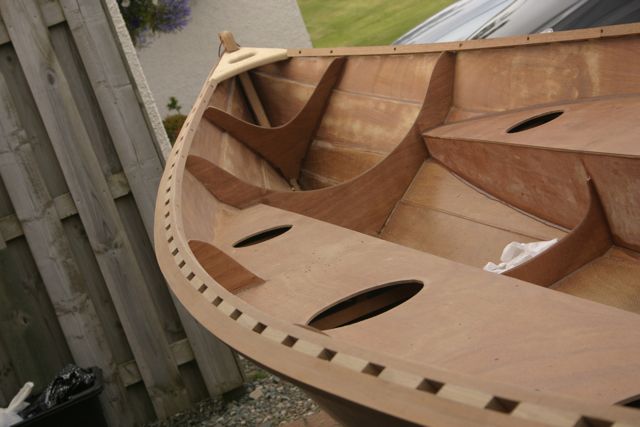
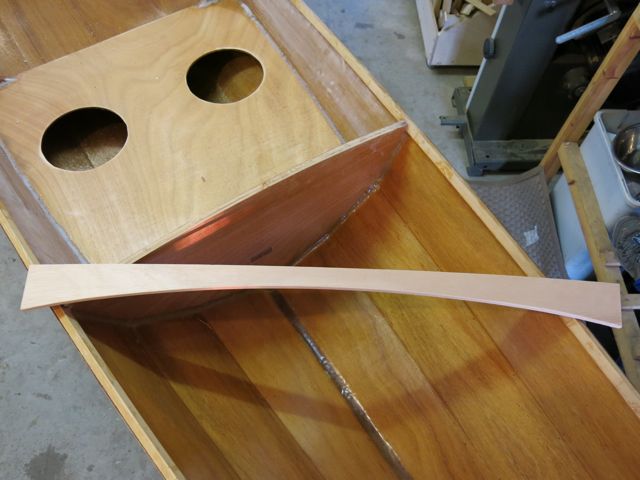
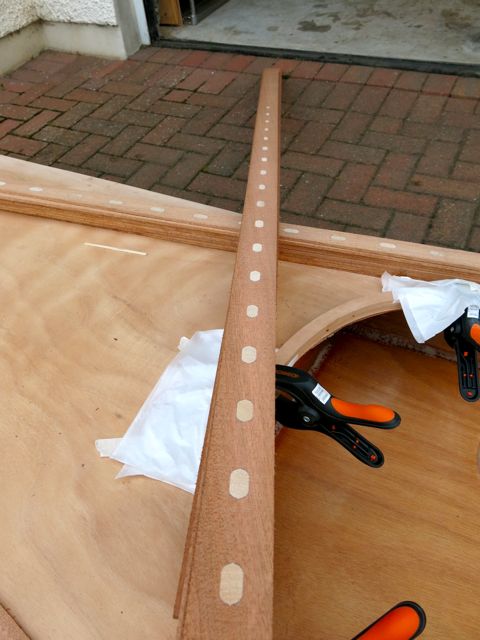
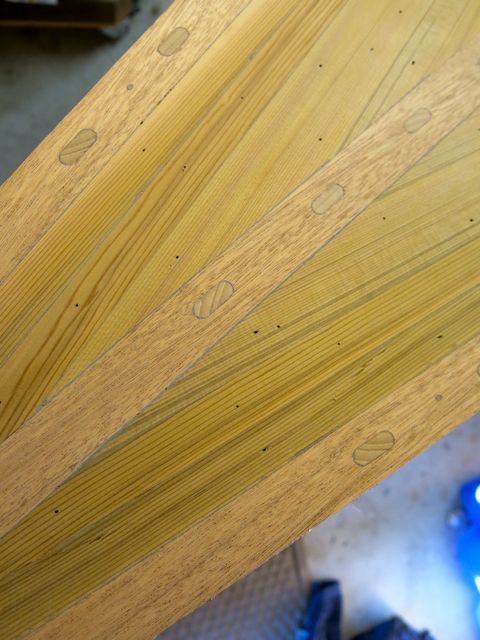
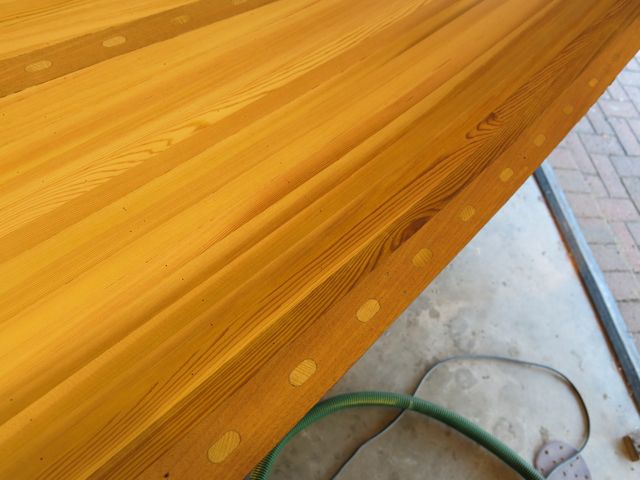
As a compromise I did this. I got a block of mahogany made it square on the planer, marked out equally spaced points along its length, then set to with my router and drilled a series of slotted holes along one edge. I made them deep enough to take an oval dowel. I knocked these dowel in with a silica/flour mix. On the other edge of the wood, I repeated the process but this time I reduced the diameter of the dowel from 14mm to 12mm, 10, and eventually 8mm dowels over the length of the wood. 
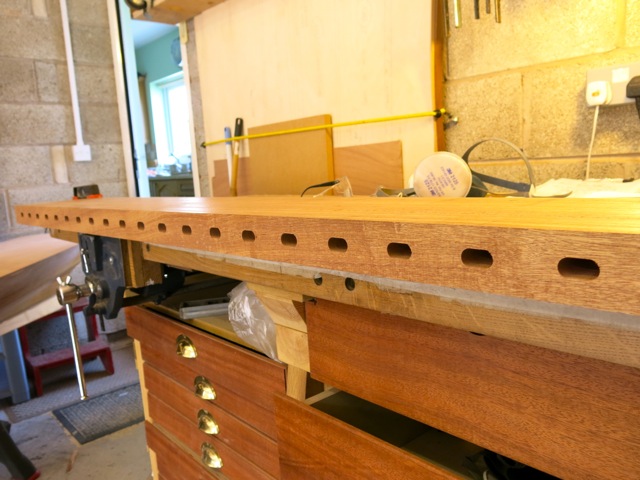
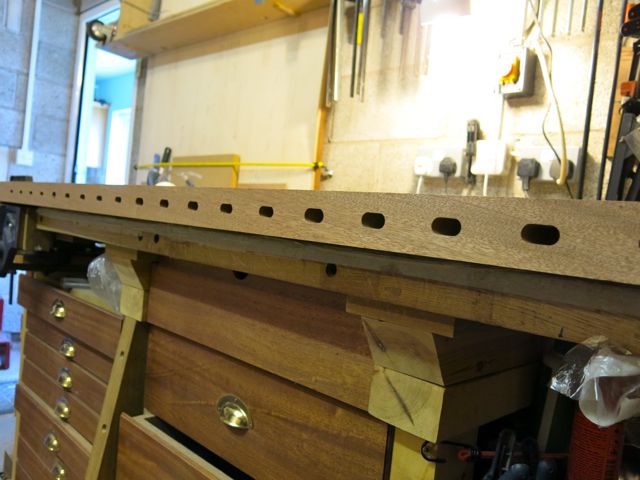
Next after the resin had set, I trimmed the excess dowel ends off using the band saw and created and new edge. Then from this edge I used my fence on the band saw to cut through the mahogany and dowels to give me a series of 4mm strips that had the dowel slices in the middle.
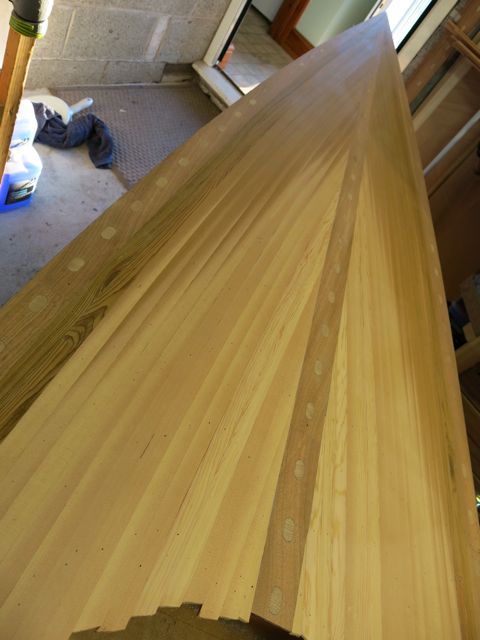
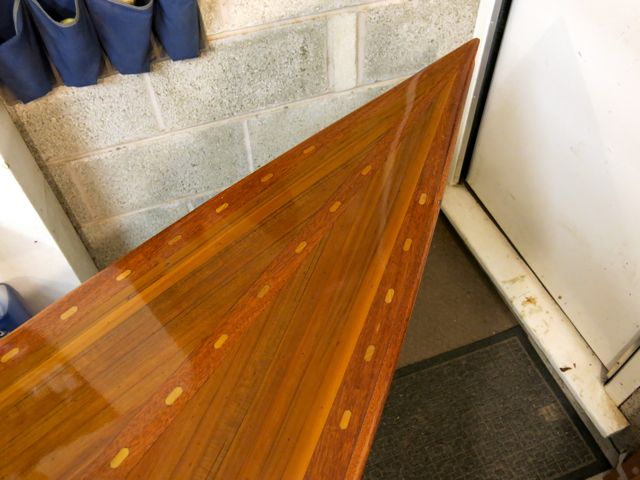
It worked fine and the results looked good. I aim to add these decorative strips to the sheer edge of the deck, hopefully they will replicate block gunnels. a bit of a block . The constant size 14mm dowel strips will be based around the midships and the taperd strips will be at each end. I ill also add a strip that runs down the centerline of the deck front to stern. Here are some photos of the finished (not sanded) strips ready to be resined onto the skin. So if you can imagine I will have this pattern on the edges of the boat and down the centre line then the rest will be filled in with cedar strip. 
Offline
#15 3 Aug 2013 10:03 pm
- pam5
- Member
- Registered: 16 Jun 2011
- Posts: 92
Re: Expedition Wherry, first build in the UK.
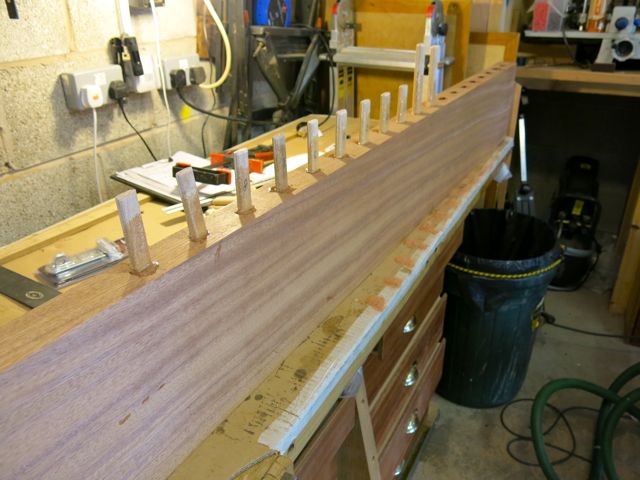
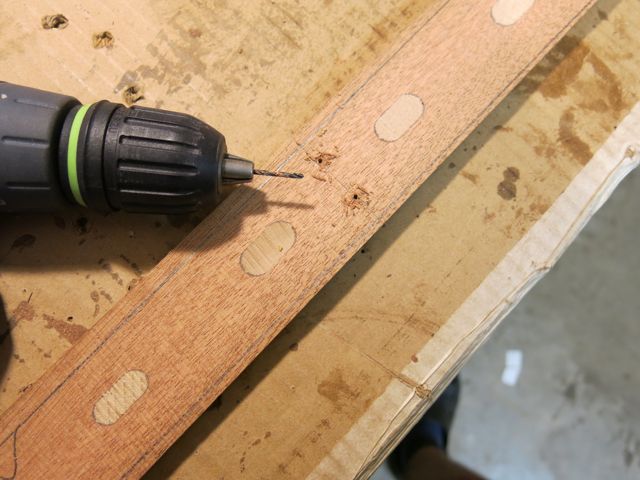
Prior to adding the strips to the deck I needed to taper them, this was done with a wonderful £2.00 block plane, it worked a treat. I took care to make sure everything was symmetrical. I then pre drilled some holes and attached the strips to the edge of the boat. My method was to use 2mm serrated nails, and the drill size was 1.5mm. The idea was to knock the nails in after the adhesive resin had been applied. As the nails push in, the strip will be forced onto the resined under deck (the force comes from the serrations, and the serrations also prevent the nails from popping out under the upward spring load of the deck). 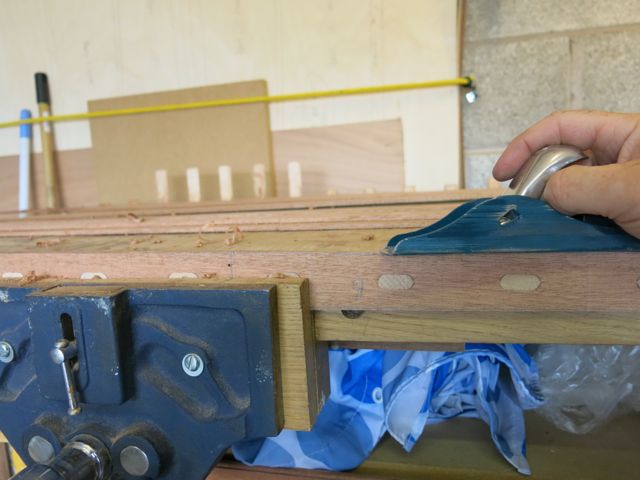
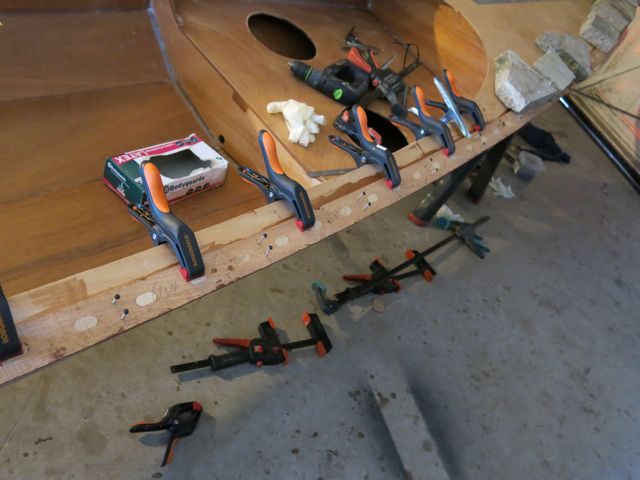
When the resin was dry I gently pulled the nails out. To help keep everything tight I used clamps in the places I could, and heavy bricks everywhere else. Here is a picture of the strips in place. I took careful care with the miters at the front where everything meets.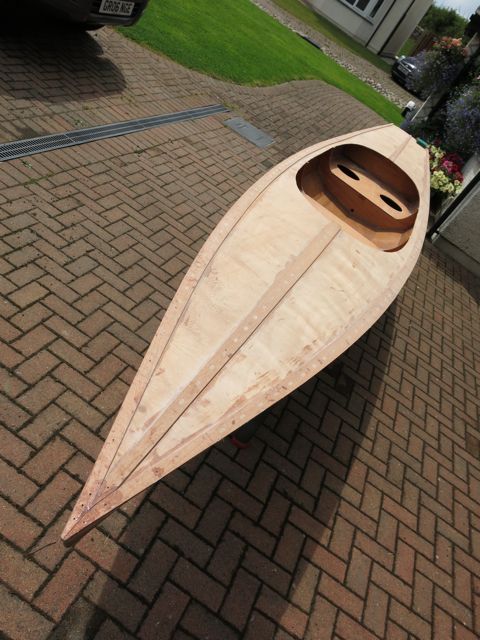
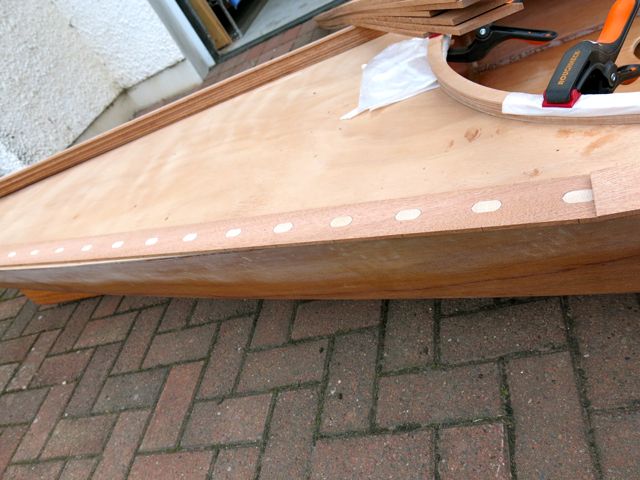
In between the strips I planned to add red cedar strips. Fyne boats suggested I try and grade the cedar and make use of the change of colour over the length of the strips. To that end I arranged all of the strips and graded them into different types. I then did a trial fit on the deck, moving the darker section more to the bow on each strip added and making it a lighter colour against the centre strip. I took quite a time to cut all the miters neat and tidy, I used only a Stanley knife for this. 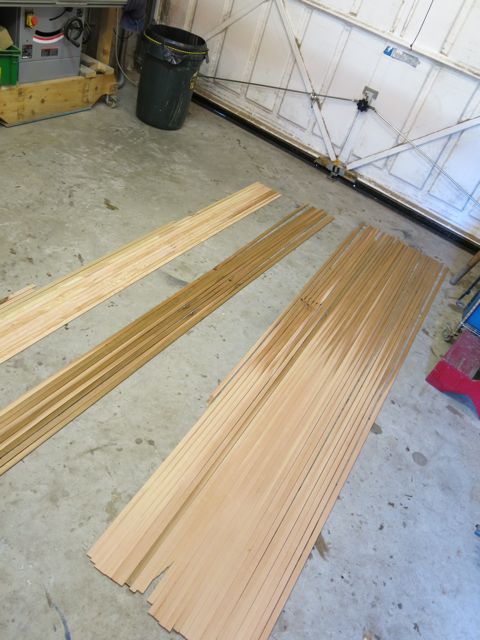
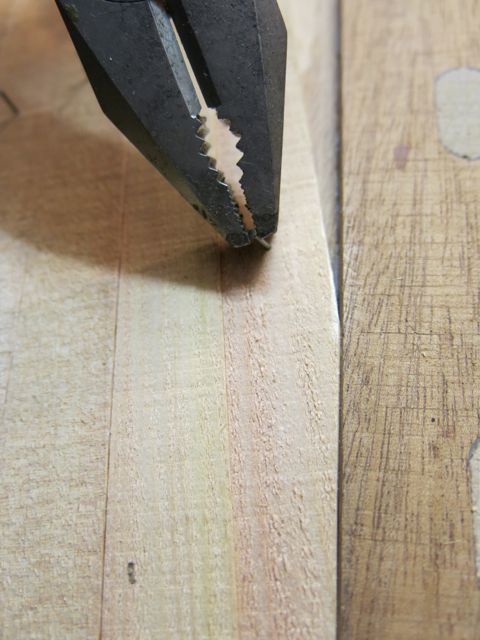
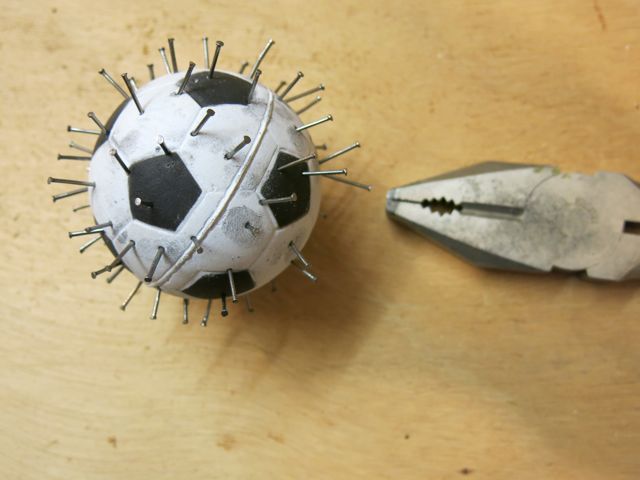
Once happy with the dry fit, I stripped out and then added the resin adhesive, and strip-by-strip added the entire front deck. It took me quite a time. I held these strips down onto the adhesive with a very small brad that I held in pliers and then gently pushed in by hand. Once dry these brads will be pulled out and as the holes will be so small they will get filled in by sanding and hopefully make them invisible. Picking up brads with sticky gloved hands was difficult so I came up with this idea, I just picked them out of the ball with the pliers and didn’t need to touch them with my fingers, it made life a lot easier.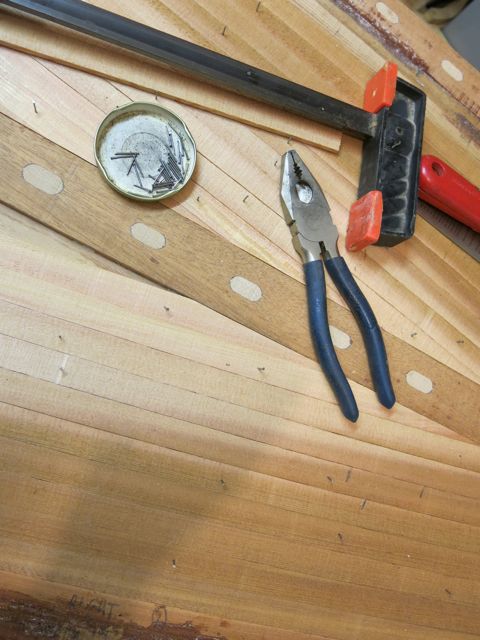
The end product for the deck looked good, and when sanded I think it will look even better. Tomorrow I will start the process all over again on the back section on the boat. I must say, this deck section has slowed the build down.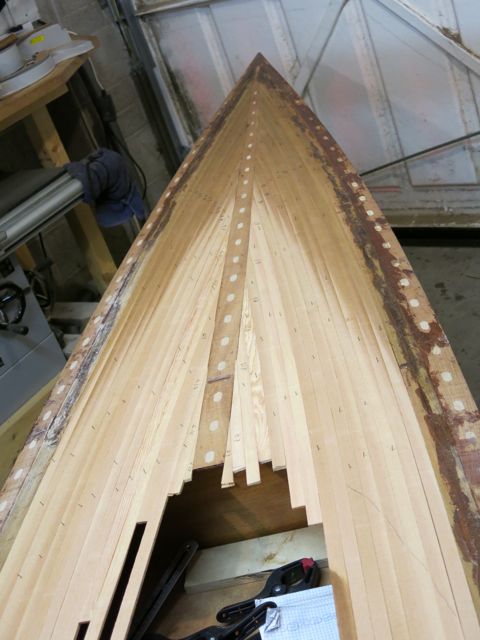
Offline
#16 3 Aug 2013 10:09 pm
- pam5
- Member
- Registered: 16 Jun 2011
- Posts: 92
Re: Expedition Wherry, first build in the UK.
Completely nothing to do with my build, but it was a nice photo I took the other day at Keswick. As a boat fiddler, it appealed to me, hope you like it.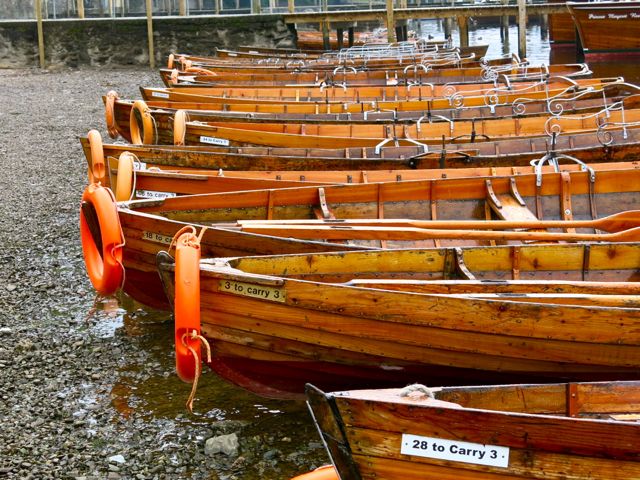
Offline
#17 7 Aug 2013 10:24 pm
- pam5
- Member
- Registered: 16 Jun 2011
- Posts: 92
Re: Expedition Wherry, first build in the UK.
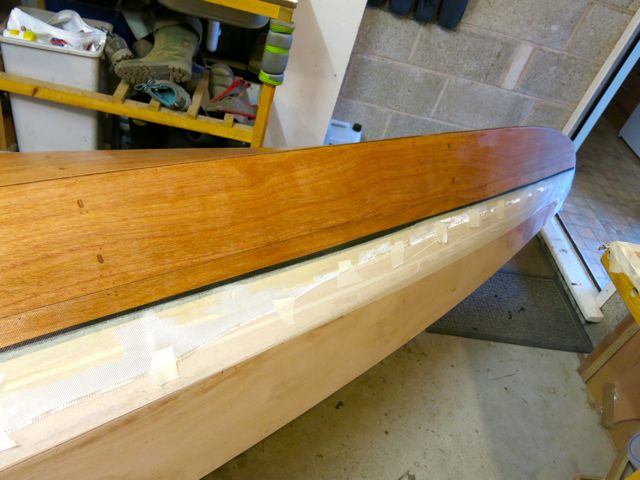
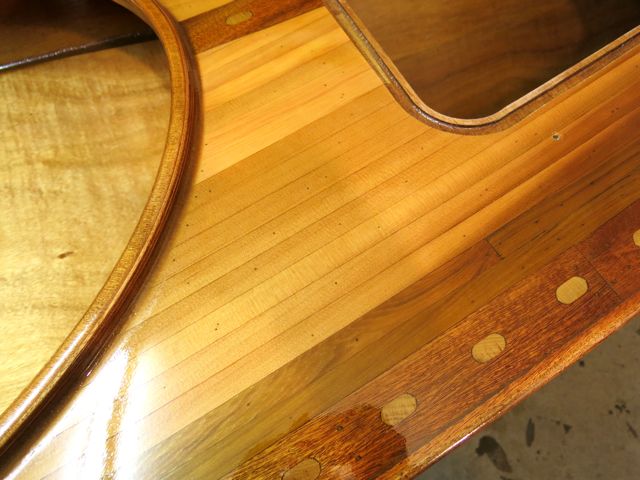
Sanding was quite a bit of work. It was all the more difficult by the fact I had not planed the cedar strips, they were just relatively rough cut. I used an electric belt sander for the rough bits then moved onto a random orbital for the finishing off. I went down to 120 grit, the end product looked great. Here are some photos. The texture and colours of the cedar are wonderful. 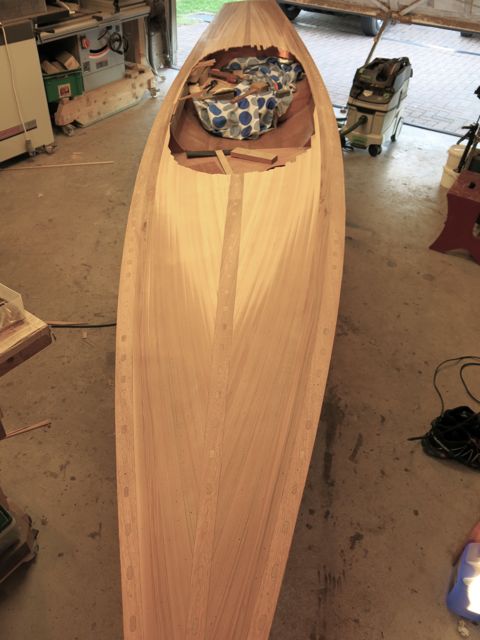
Quality control check being carried out.
I would have liked the rear deck to have been a little different but I ran out of dark tinted strips and cobbled the colour patter together with what was left over. 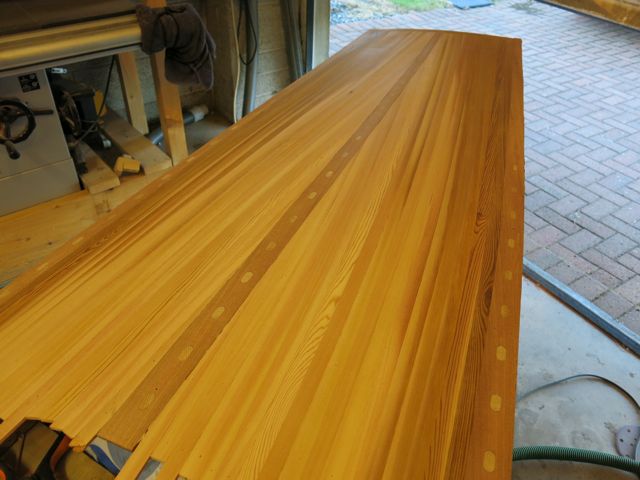
Once down to a 120 grit all over I started the laborious process of filling the tiny holes. I mixed two colours of hole filler one lighter than the other for the lighter strips. Next night more sanding. I will get the deck down to 320 grit before I apply the glass sheet and seal the whole thing up. 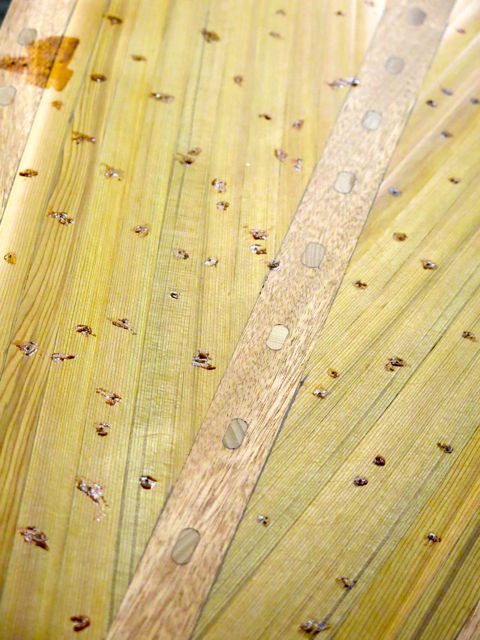
Offline
#18 11 Aug 2013 9:04 pm
- pam5
- Member
- Registered: 16 Jun 2011
- Posts: 92
Re: Expedition Wherry, first build in the UK.
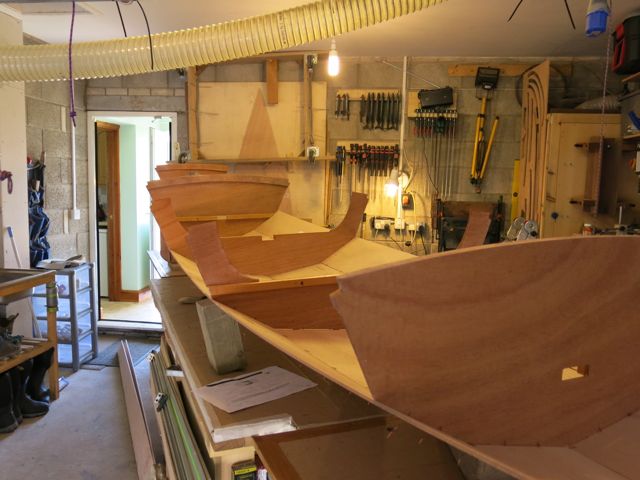
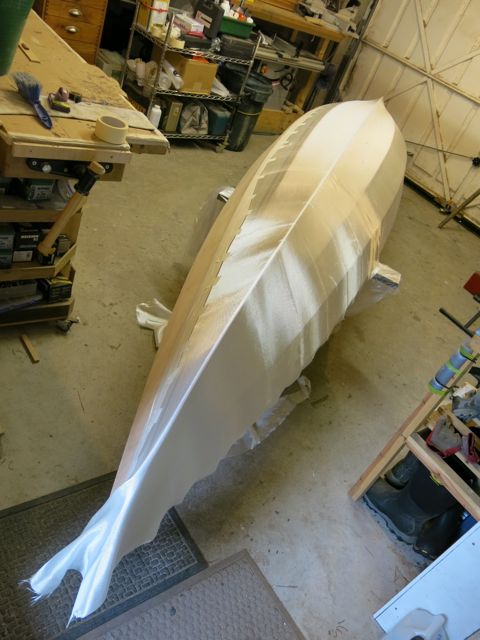
This is the full sheet of glass in place. Again I left it for 24 hours to settle before applying the resin. I was careful to keep the temperature of the resin pretty warm and the whole thing was covered and complete in 1 hour.
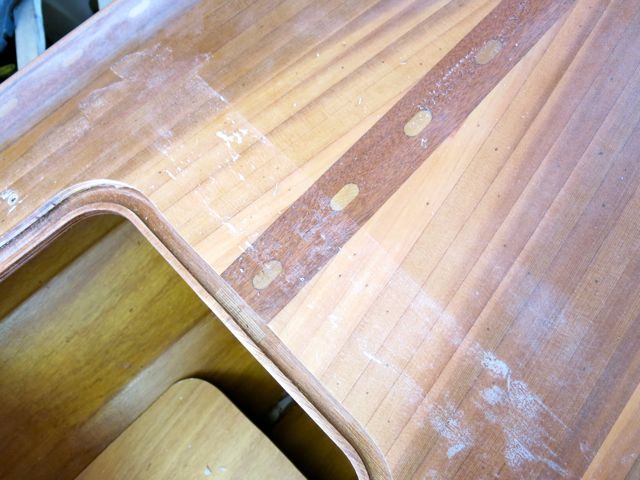
Once dry 24 hours later, there was a quick sand down and application of a second filler coat laced with silica only. Here is a photo giving a sneak preview of what it all looks like so far. As you can see I have left the strips overhanging into the cockpit and, these will be trimmed off one the deck is completed with its entire filler coats. I had concerns about the pattern of wood on the stern, from above it looks ok.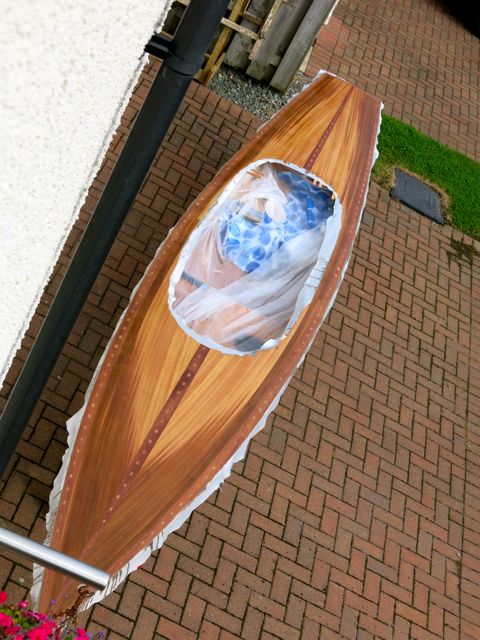
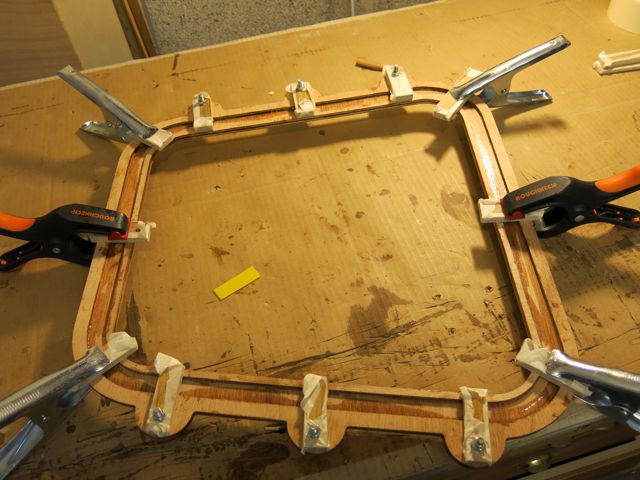
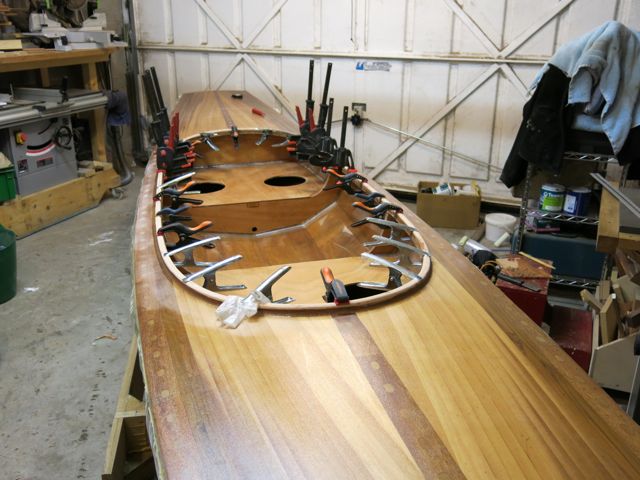
The next couple of days were nothing more than sanding and filling. I did however complete the coaming, I glued the two laminates together to make a single coaming. Then I had a bit of time looking at the deck hatch sills. As part of building and gluing them up, I utilized the holes to make a few wooden clamp with them then added the resin and clamped with a few additional clamps. 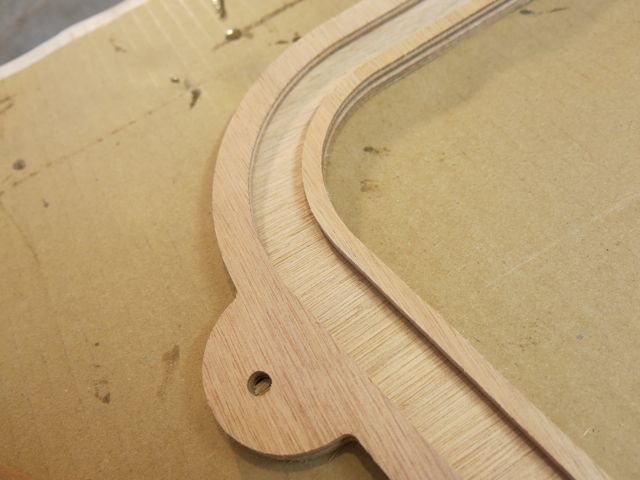
I will be coming to a very unsettling bit in the near future, the cutting of the deck hatches !!! not looking forward to that bit.
Offline
#19 16 Aug 2013 10:02 pm
- pam5
- Member
- Registered: 16 Jun 2011
- Posts: 92
Re: Expedition Wherry, first build in the UK.
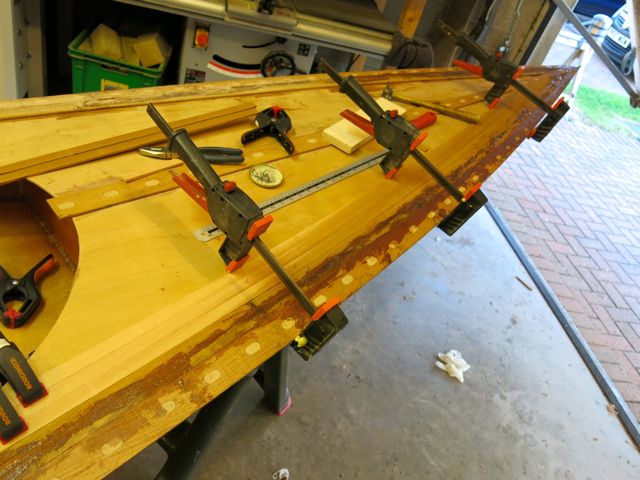
Sorted out the coaming last night. I put it on the bench and with support board and then routed the edges round. I added the tape around the perimeter and then glued the thing to the deck. Once clamped, I added the external fillet to finish it off. 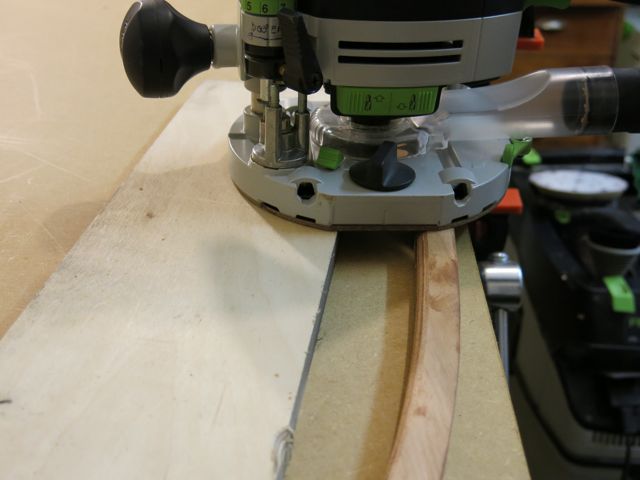

Tonight I sanded everything down and made it all smooth and round. it looks good. 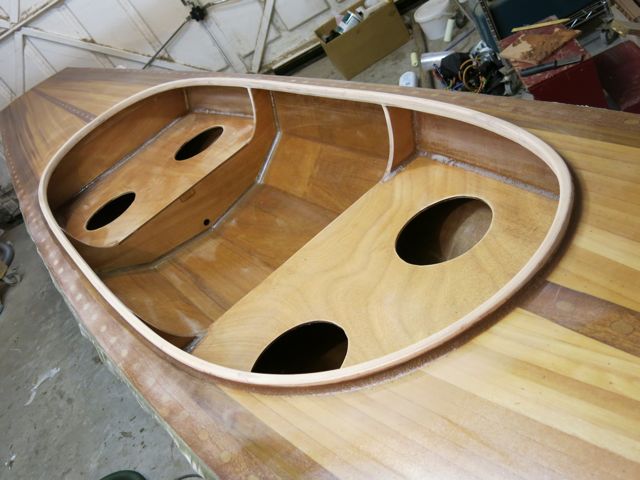
Offline
#20 18 Aug 2013 8:58 pm
- pam5
- Member
- Registered: 16 Jun 2011
- Posts: 92
Re: Expedition Wherry, first build in the UK.
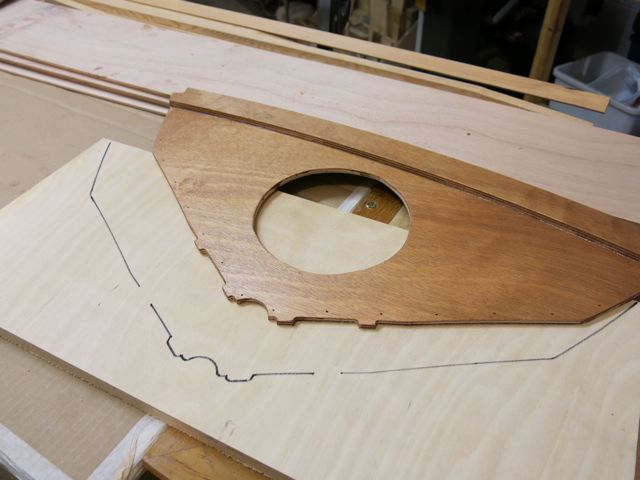
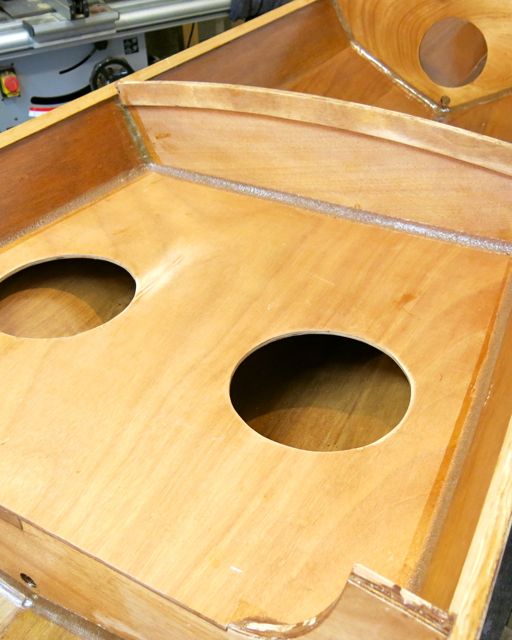
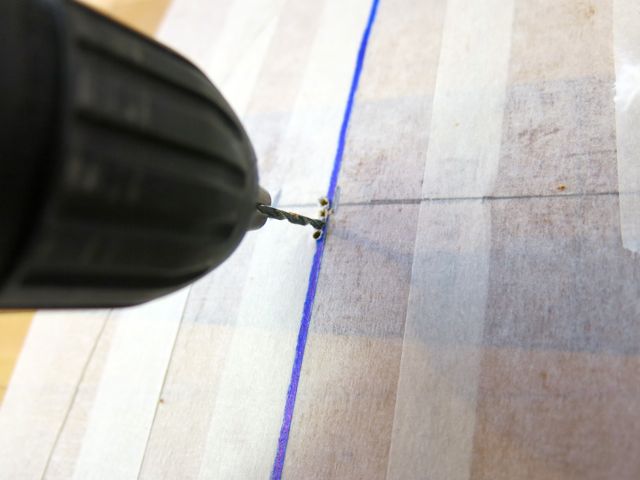
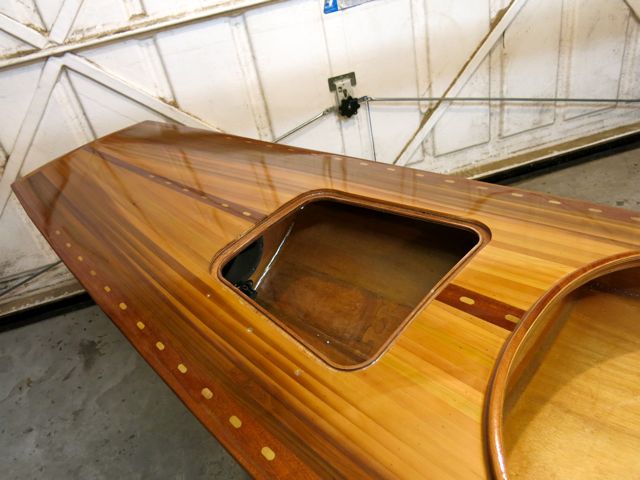
I took time to cut out a cardboard template for the hatch. I made it 4mm smaller than edge on the sill. the idea was that once I trace around it and mark the size on the boat and then cut on the outside of the line, it will be absolute size. I taped the whole area off and marked the shape using a center line on the deck and a centre line on the cardboard template to align everything. I then drilled a few chain holes with the same size drill as the saw blade. I had some advice on cutting tools, some of these were pad saw, one was a bonsi saw and my choice was........ a good old jig saw with a fine hacksaw blade. Before committing to the deck I traced the curve corner on a bit of ply the same thickness as the deck and had a go to see if the saw blade could get around it. It was fine so I started on the deck. It was easier than I thought, especially with my wife to hold the cable out of the way so I just concentrated on cutting the line. You will see I added a couple of little lift tags in the centre of the hatches, these were grabbed just as I was about to complete the cut, they prevented the deck dropping inside and snapping off the last bit before it is cut through. 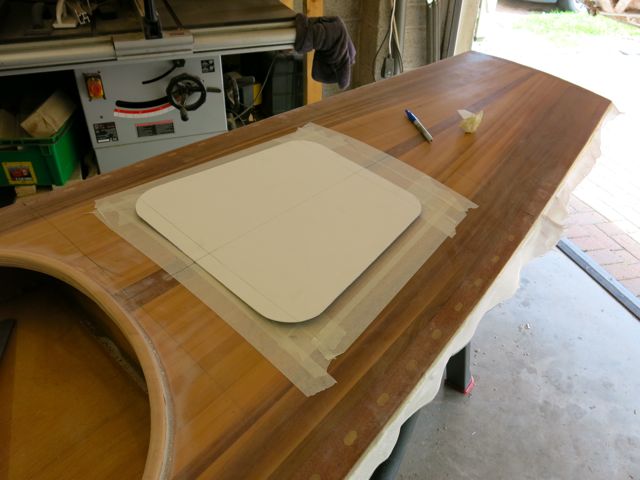

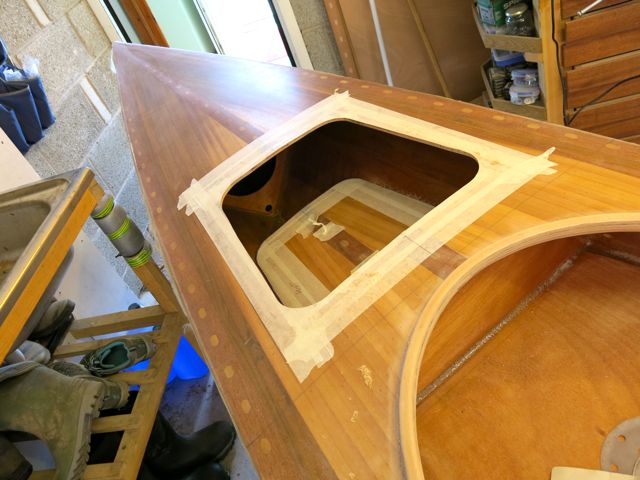
I sanded the sills while they were on the workbench and positioned each one inside the hatch held with a few small clamps. In this position I could locate the holes on the underside of the sill and then drill through the deck from the underside (ensures perfect hole location). Fortunately I had one of these 'drill around a corner drills' and it was ideal. 
I lashed the contact faces of the sill with resin/silica/flour mix, and carefully moved it into position. I utilized the drill holes and some M5 nuts and bolts to help with the clamping onto the underside of the deck. I sprayed the M5 nuts and bolts PTFE spray to ensure that any resin that contacted them would not adhere to the steel. In effect the bolts reduced the number of clamps I needed to apply. I finally wiped around the inside to remove any drips and smooth out any edges, then added a few clamps at key points. Once dry I will remove the bolts and reuse them to attach the toggles 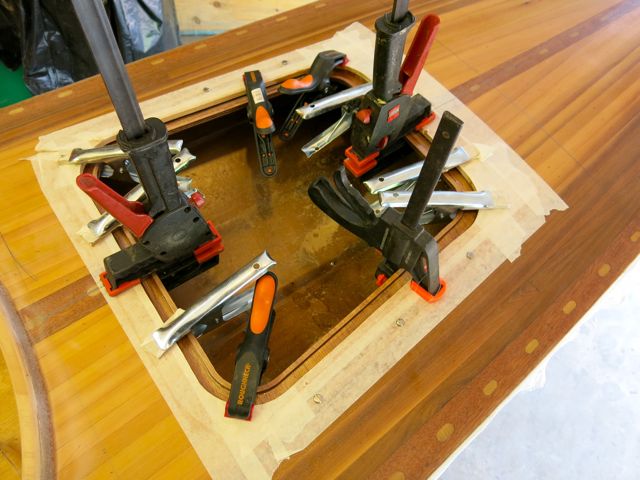
Offline
#21 28 Aug 2013 12:00 am
- pam5
- Member
- Registered: 16 Jun 2011
- Posts: 92
Re: Expedition Wherry, first build in the UK.
Hatches sills all sanded down, and they both look good, there was a bit of fun and games getting the bolts out, the nylocks did their job and locked! so much for the PTFE spray.
I wanted to get the interior hatches (hatch on the face of the first and last bulkhead) fitted. I used a high modulus sealer to seal onto the bulkhead. I also had to re-drill the bung holes as they had got a bit of resin in and the bung assembly wouldn’t fit. 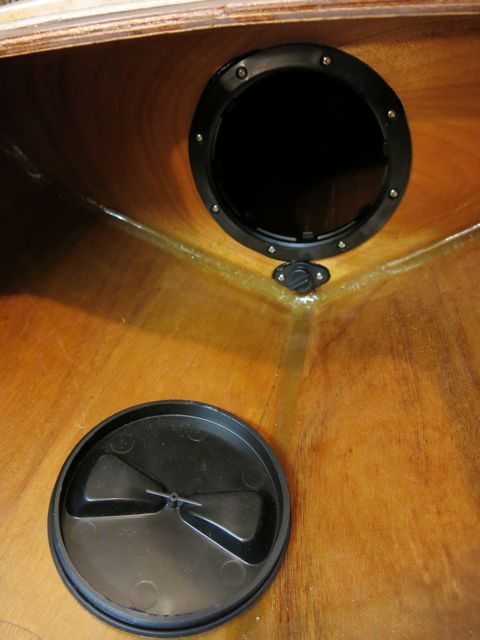
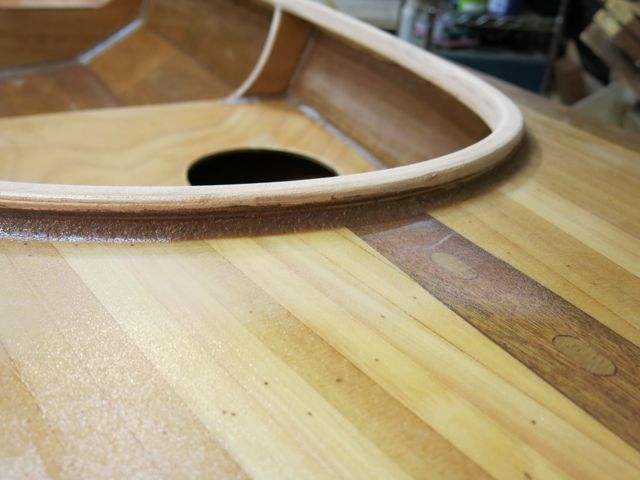
Then came a bit that took an inordinate amount of time to sort out....it was the rubbing strip. We had some discussion how to do it, there was a suggestion I round over the sheer edge of the boat and add the rubbing strip 5-10mm below the sheer, or the alternative was to leave the sheer edge sharp and add a rubbing strip flush with to this. I opted for this idea. I didn’t feel the section of wood supplied was big enough to take two radius edges and get securely fixed to the boat taking into consideration it would also need to be faired up against the camber of the top deck. I decided to make my own of a slightly larger section. I therefore needed to screw it on as the nails supplied would not have enough purchase on this larger section. The length was mitered. I also added the underside radius to the rubbing strip while it was on the bench. With a lot of fiddling, lash up with resin and a set of spare hands, we eventually got it secured.
you can see from the photo that I tapered the ends and also protruded it above the bow and the stern. The idea was to leave it proud so I could plane it flush with the deck and in effect create a tapered look over its length, getting smaller to the stern and bow.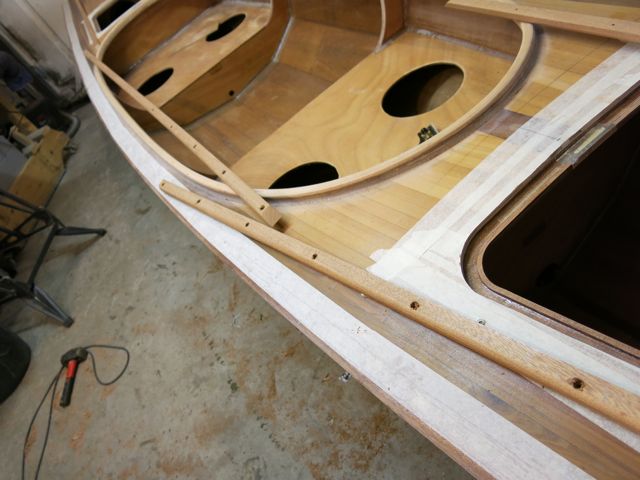
Once the resin was dry, there was a load of sanding/fettling to do to make it flush, tapered and smooth. Also I added the top radius with my router. Ultimately it all came good and looks OK.
Next came the sanding of the rubbing strip and further general sanding of the both external and internal surfaces....god I hate sanding, it seems never ending. I came across a problem with the masking tape around the hatches. It had been on for a week and was not keen to come off. Once it was persuaded, it left this sticky residue.......oh boy was that hard to get off. Tip, don’t leave masking tape on the surface and sit your boat out in the sun. I added a caot of resin to the bare wood f the coaming and the rubbing strip and sanded it down once dry. further sanding and eventually, flip it over so more sanding and then add the first coat of undercoat. I applied it with a small roller. Surprisingly the undercoat has not revealed any nasty bits that require rework, looks like the obsessive sanding has paid off.
Offline
#22 4 Sep 2013 10:08 pm
- pam5
- Member
- Registered: 16 Jun 2011
- Posts: 92
Re: Expedition Wherry, first build in the UK.
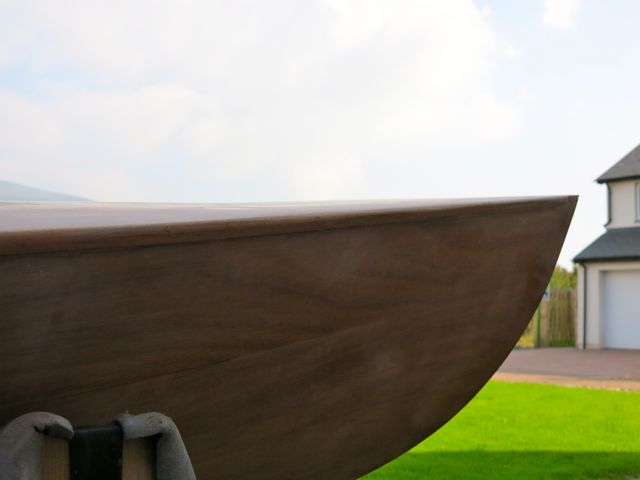
I added in total 3 coats of ivory white gloss, I used the same short hair roller again and it left a great finish. The end result was good and has added a new dimension to the hull.
The next stage involved a final sanding of the deck and interiors ready for the varnish. The masking tape around the rubbing strip worked well especially where the rubbing strip runs out at the bow
There’s nothing much to say about the varnish, even with only one coat......the pictures speak for themselves.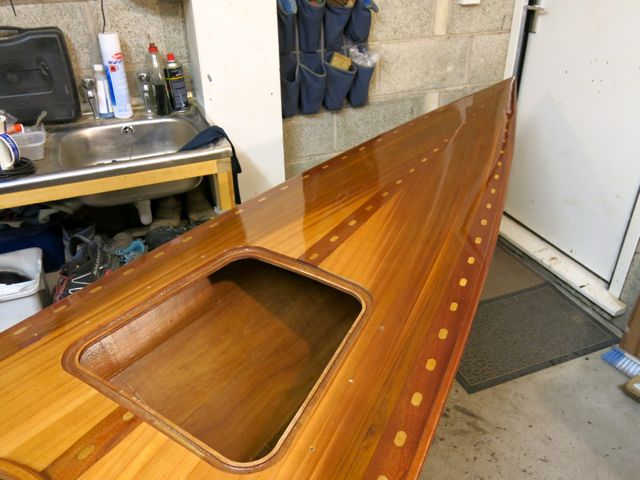
Offline
#23 8 Sep 2013 9:01 pm
- pam5
- Member
- Registered: 16 Jun 2011
- Posts: 92
Re: Expedition Wherry, first build in the UK.
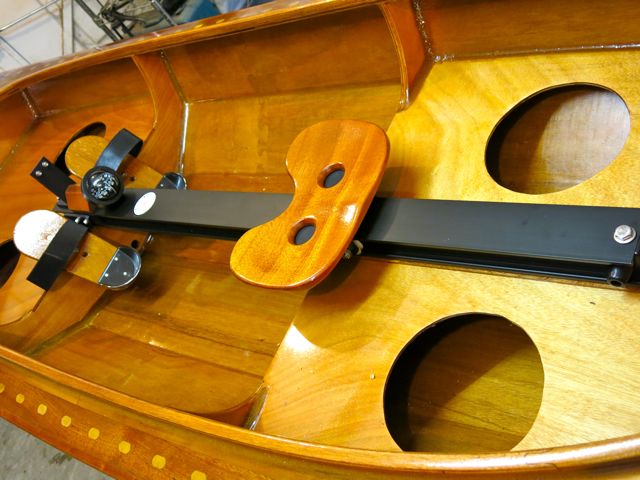
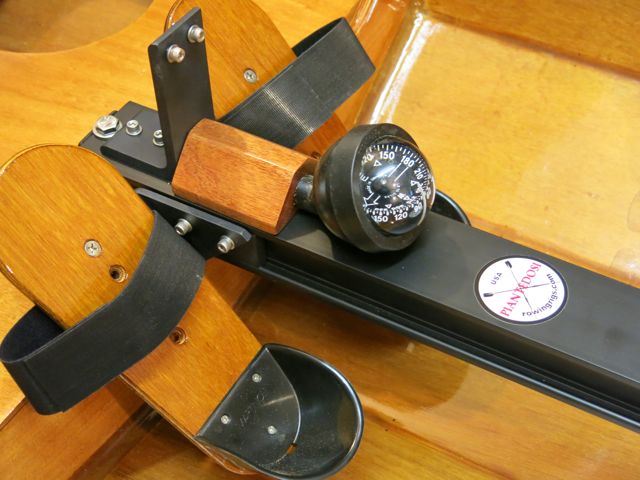
Not had much time this weekend so didn’t get done as much as I had planned. I trialed the rowing unit, it needed a slight lift to get the outriggers over the gunnels (about 5mm). I made a couple of small platforms, screwed them down and with the unit in place I drilled the through and positioned them in place with a couple of stainless bolts and wing nuts that can be tightened from inside the hatches. I added the last coats of varnish. I also made a small block to hold my compass, I will add a bit of adhesive velcro to the rail to hold it in place. I will also have to add a couple of small stops to make sure the seat when in the forward position does not clash with it. 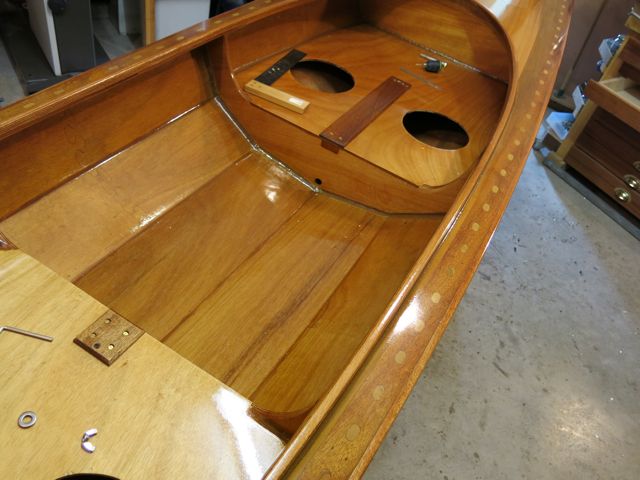
Offline
#24 13 Sep 2013 4:34 pm
- Dinky Doris
- Member
- From: Wales
- Registered: 25 Aug 2011
- Posts: 23
Re: Expedition Wherry, first build in the UK.
Gorgeous deck and I think that the stern with the slightly random look is attractive – so much better than stripes. Grading before starting is a good tip. You have inspired me.
I am looking forward to some pictures of it afloat.
DD
Offline
#25 14 Sep 2013 8:57 pm
- pam5
- Member
- Registered: 16 Jun 2011
- Posts: 92
Re: Expedition Wherry, first build in the UK.
All painting and varnish completed, hole drilled in the bow for a rope. Today I spent time preparing an extension for my roof rack, I will put a couple of photos on when completed. Hopefully at his point I will be able to transport the boat and do the official launch. I have the boat name and emblem to put on and the last two jobs will be the rubber seals on the hatches and the hatch toggles that I also made today.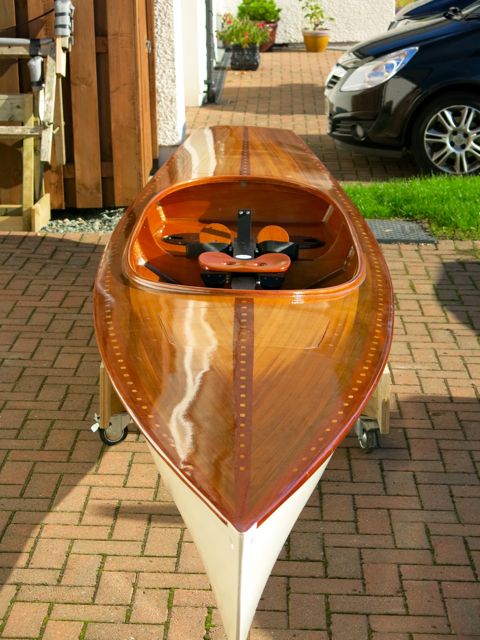
Last edited by pam5 (15 Sep 2013 8:54 pm)
Offline