A forum for discussing wooden boats and boat building
You are not logged in.
- Topics: Active | Unanswered
#76 6 Apr 2020 11:14 am
- Bergen_Guy
- Member
- Registered: 6 Feb 2020
- Posts: 353
Re: Waterlust sailing canoe in Norway
Hi again Martin, that little hole in the bottom, I would fill in with some very thick epoxy, and it will end up with glass cloth over it from both sides, so nothing to worry about. When it comes to fitting the bresthook, have a look at the photos earlier in the thread, it takes a surprising amount of force and quite a few clamps to get everything in the right place. I ended up tacking some wooden wedges to the shear strake from the outside so that I could use a clamp to hold the bows together while 'forcing' the breasthook into place with another clamp. I ended up putting the fillet in the bow / apply the glass cloth at the same time as bonding the breasthook in.
Offline
#77 6 Apr 2020 11:32 am
- spclark
- Member
- From: "Driftless" Wisconsin USA
- Registered: 19 Mar 2020
- Posts: 478
Re: Waterlust sailing canoe in Norway
Right... breasthooks at both ends MUST be fitted and securely held in place somehow, even if not bonded with thickened epoxy, after the panel ends are pulled together with stitches. The shape of the hull at stem & stern will be too straight & lacking ‘fullness’ otherwise if the fillets are put in before the proper shape of stem & stern have been realized.
Stern is trickier than stem too. That last frame being so much closer to the end being brought into shape puts vastly more strain on the puzzle joints which just happen to be right about on that frame. Use whatever means of reinforcing the 4th panel outsides and the sheer clamp (I noticed a split beginning on one of mine while initially dry-fitting the stern breasthook) until you can put the breasthook in permanently and then fillet the resulting V-shape inside between panels.
I ought to have pictures of both ends’ clamping arrangements that gave me the correct profiles. I just got up though, need breakfast & COFFEE before opening my laptop to post ‘em here.
BTW I was a newbie to epoxy when I started this too. Learning curve flattens quick if you follow basic handling principles. I also lucked into finding another Waterlust builder in Texas who ‘flattened’ my curve early on! MOST helpful answering ANY questions I raise as I’ve encountered things that’d otherwise have made me proceed much more slowly. He just doesn’t spend time on any forums that I’m aware of. I’m trying to emulate his gracious help by ‘paying it forward’ to others like yourselves.
Last edited by spclark (6 Apr 2020 11:33 am)
Offline
#78 6 Apr 2020 1:23 pm
- spclark
- Member
- From: "Driftless" Wisconsin USA
- Registered: 19 Mar 2020
- Posts: 478
Re: Waterlust sailing canoe in Norway
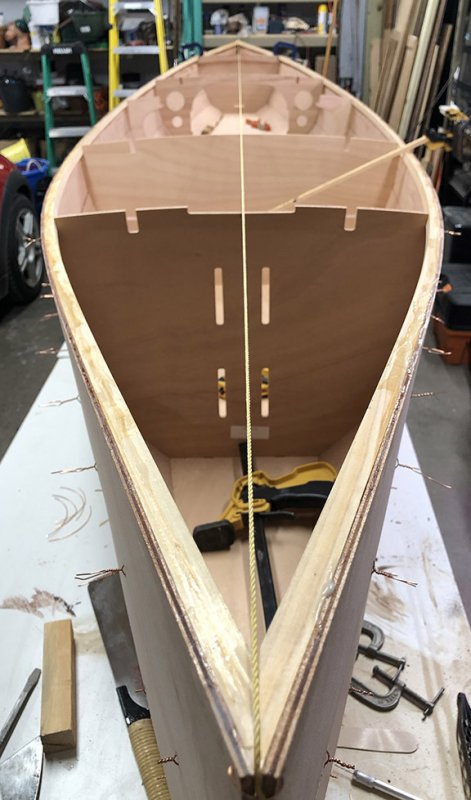

What I saw after getting panel ends stitched together but before I made any attempt at dry-fitting breasthooks at each end.
Note the evident straightness of the panels at the shear edge once they pass the frame closest to the ends. This is not how the design is to be realized, those shapes require more of a curve outward which adds fullness to the hull body below in these critical areas.
Offline
#79 6 Apr 2020 1:49 pm
- spclark
- Member
- From: "Driftless" Wisconsin USA
- Registered: 19 Mar 2020
- Posts: 478
Re: Waterlust sailing canoe in Norway
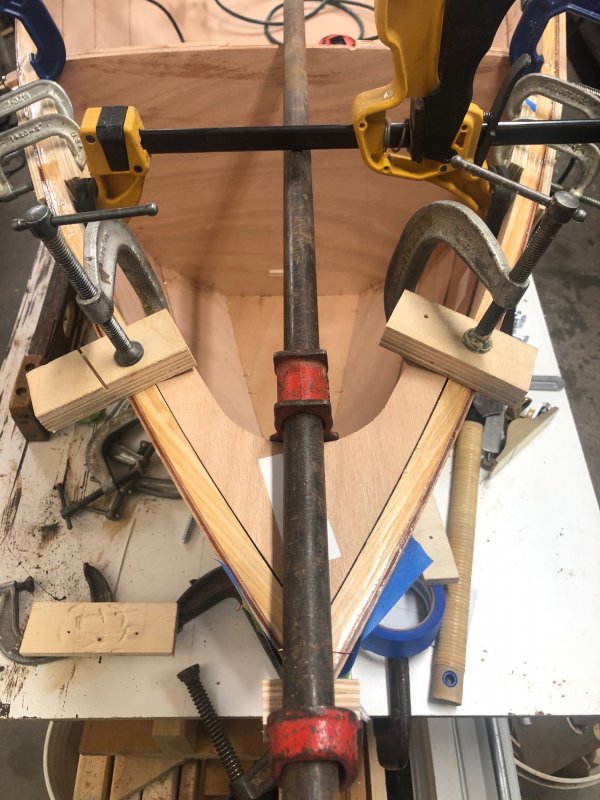
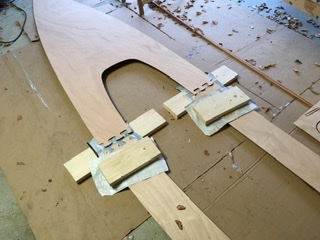
Planing a bevel off the edges of each breasthook as needed - it doesn't have to be much at all, and taken off the bottom edge only - leave the curve of the factory parts intact along the upper edges! - once the breasthooks are fitted, forces the sheers into the desired curved shape. The panels underneath get pulled outward as a result. This is good!
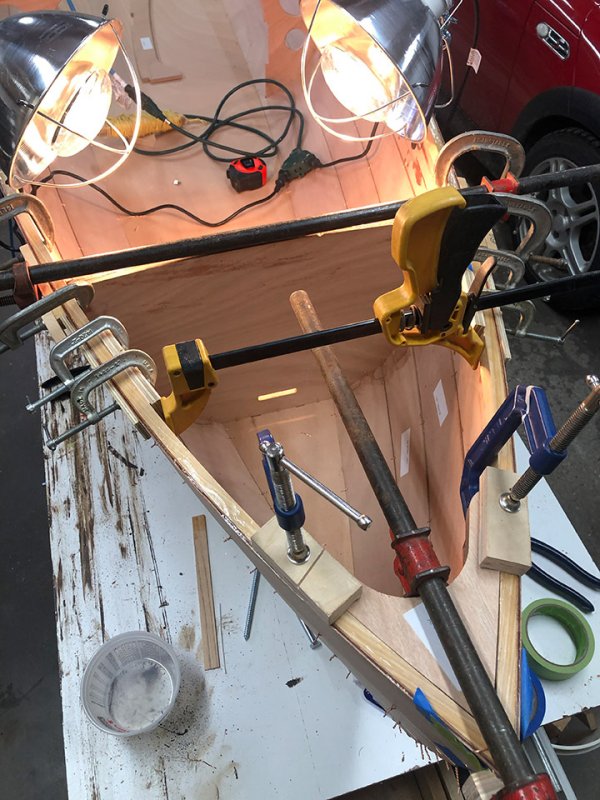
Here you can see how the breasthooks after being fitted. They may not have been bonded in place yet but the important points are to note the curves evident in the sheers now, and how the various clamps are arranged to force the breasthooks into their proper places and at the same time keep the hull panels from pulling out away from the frames behind, and perhaps cracking loose the puzzle joints or sheer clamps too!
These are as fussy as anything I'd yet accomplished with this build, and the manual lacks any details about how to go about this part. They do recommend this kit be undertaken by folks having experience with stitch & glue before so I guess it's a bit of caveat emptor, eh?
I've heard it said that you can never have too many clamps for building a boat. Some of what's in these pics I acquired almost 50 years ago when I built a 14' stripper scow in my parents garage the winter after I graduated from college.

That craft suffered the ills of my lack of knowledge of woodworking in general and the use of lumberyard-quality components selected more specifically, rotted away in no short while leading me to cut it up then burn the pieces a few short years later. Heavy too! But it'd plane in a decent breeze!
Offline
#80 6 Apr 2020 1:57 pm
- spclark
- Member
- From: "Driftless" Wisconsin USA
- Registered: 19 Mar 2020
- Posts: 478
Re: Waterlust sailing canoe in Norway
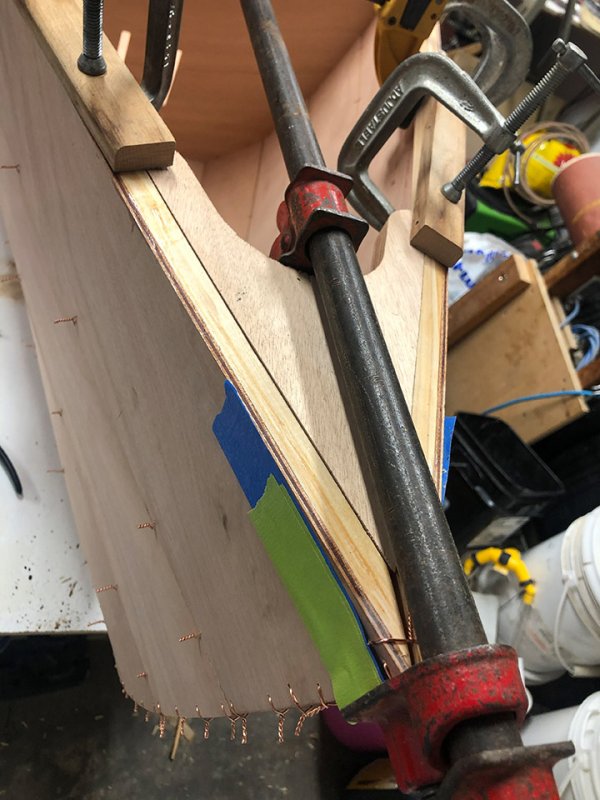
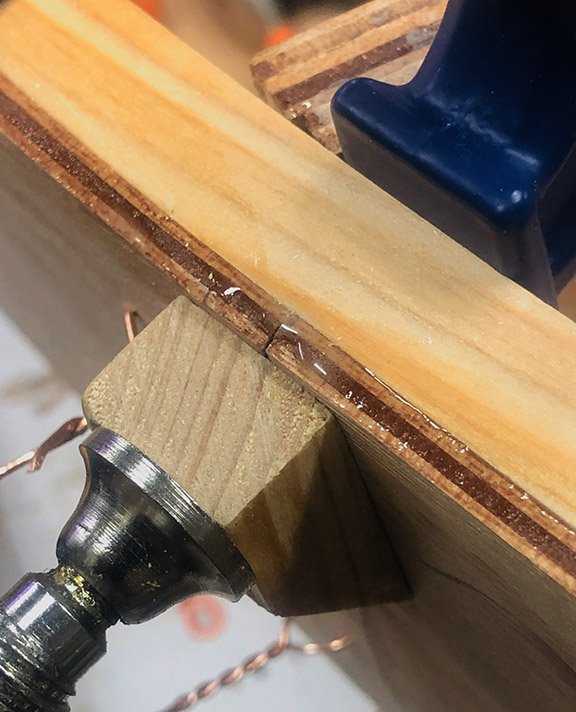
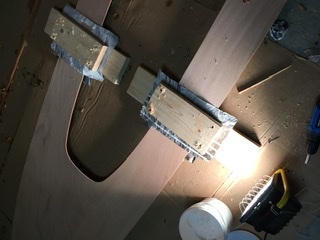
Oh and be careful at the stern doing the panel-forcing operation. The puzzle joint on panel #4 gets positioned just aft of that last frame. There's a lot of stress on that joint when you force the breasthook into place! I found I had to use a quick-clamp set up to spread the panels a bit to bring the aft ends together correctly. Seems counter-intuitive but it works if you're careful.
Problem is those stresses can both split the sheer clamps and cause that puzzle joint to open up a bit. I added reinforcing blocking to both elements on both sides (visible at the top of this image) to help hold things together until the epoxy holding everything together at the ends had cured.
Close-up of what I noticed before adding extra support and the clamps to hold it in place:
Offline
#81 6 Apr 2020 2:00 pm
- spclark
- Member
- From: "Driftless" Wisconsin USA
- Registered: 19 Mar 2020
- Posts: 478
Re: Waterlust sailing canoe in Norway
Go back and review Guy's images too for how he added blocking to support the clamps. You can barely see in my images where I added a V-block to hold the panel ends together when I used a pipe clamp to pull the breasthooks into place. Otherwise, without being restrained from the spreading force, those copper wire stitches just won't hold the panel ends together at all!
Offline
#82 6 Apr 2020 8:38 pm
- Bergen_Guy
- Member
- Registered: 6 Feb 2020
- Posts: 353
Re: Waterlust sailing canoe in Norway
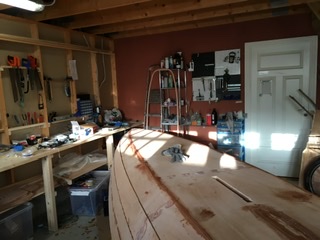
Today I managed a few small jobs. I have glued the deck panels together. I know the instructions say that should be one of the first things that gets done, but I was not sure where I would find space for such a large thing, so I waited till now. When I joined the hull bottom panels the puzzle joint was not perfect, I think it needed more pressure on it than the pile of slates I used, so today I tried using two pieces of wood, and sandwiching the puzzle joint in between. The top piece is then screwed to the bottom piece, separated from the glued up joint with sheets of plastic.
This is the preparation stage
And here is is screwed together with the lamp on it for warmth. The aft joint looks similar. I did spend a bit of time choosing which way up each panel would be to give a nice grain pattern on the deck. I hope I chose right!
I also did the small fillet joints around the console today. I took the advice from SP about using a gloved finger wetted with alcohol- in my case meths, to smooth the fillet. I show for comparison a Mk1 fillet on a frame, and the Mk2 filet on the console edge for comparison. The latter, in my opinion is nearer and worth the minor extra effort.
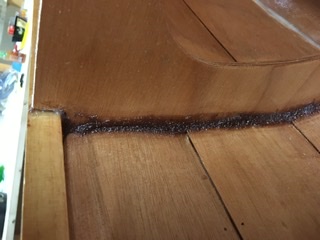
A mk1 fillet : structurally sound, but a bit rough.
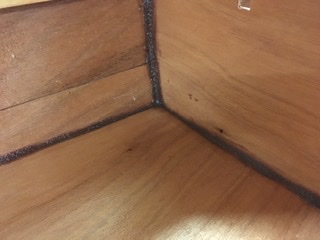
A Mk2 fillet, I hope just as strong, but a smoother finish. Given how hard epoxy is when cured I imagine this is much quicker in the long run if you want nice looking fillets.
I also spent a bit of time mulling paint again, SP’s preferred source has some lovely colours... anyone know of a similar outfit over here that does more subtle colours than the basic bright ones?
Last edited by Bergen_Guy (6 Apr 2020 8:38 pm)
Offline
#83 7 Apr 2020 3:58 am
- spclark
- Member
- From: "Driftless" Wisconsin USA
- Registered: 19 Mar 2020
- Posts: 478
Re: Waterlust sailing canoe in Norway
Yeah I decided against doing deck assembly first too. Seemed kinda silly given that it’s not needed until much farther along in the build. Way too big a piece to leave lying about.
Maybe the CLC folks thought the smallish puzzle joints are a good intro / warm-up exercise? I dunno... mine’s still in 3 pieces, 2 of ‘em leaned against basement wall.
BUT it won’t be for long!
Got second coats on hull exterior the last two days, third in bottom & panels #1. Very Pleased with how she’s looking now, ought to be an easy job to lightly sand then prime once deck’s on, fiberglassed & overlap down onto panel 4 faired in.
(I’ll post an image later once I can massage one enough that it doesn’t display sideways here....)
Last edited by spclark (7 Apr 2020 4:01 am)
Offline
#84 7 Apr 2020 7:25 am
- MartinC
- Member
- Registered: 3 Apr 2020
- Posts: 353
Re: Waterlust sailing canoe in Norway
Many thanks for all your help.
I decided to re-do it all, so I spent 4 (happy!)hours scraping out all the epoxy and re-glued the whole thing with the breast hooks in. What a job! I haven't dared peek into the garage yet to see what it looks like.
Many thanks again.
Offline
#85 7 Apr 2020 8:40 am
- MartinC
- Member
- Registered: 3 Apr 2020
- Posts: 353
Re: Waterlust sailing canoe in Norway
Just looked into the garage and all seems ok.
Last night, in the heat of the battle with setting epoxy, clamps and copper wire, I took the decision that the only way I was going to get the stern to close over the breasthook was to put a bolt through and gradually tighten the nut, whilst restraining the fore and aft movement of the breasthook with a clamp. The bolt hole is underneath where the rub rail will go so will not be seen.
As a 'newby' I found my biggest lesson is that dry fitting is one thing, but once you have epoxy on a surface it is as slippery as an eel, and you really need to think through clamping dynamics before starting to mix the epoxy.
Never mind, no harm done except a ruined pair of jeans!
Today will be spent tidying up and taking stock.
Once again thanks to you both for guidance and moral support.
Offline
#86 7 Apr 2020 9:33 am
- Bergen_Guy
- Member
- Registered: 6 Feb 2020
- Posts: 353
Re: Waterlust sailing canoe in Norway
Ah Martin - I should have said that, I quite agree - wet epoxy does seem to be quite a good lubricant! Sounds like you have made an important step forward to making the pile of parts boat shaped though. I think that was a big moment for me, when the thing takes on all the right curves.
I just went out to the garage to check how last nights efforts came out. All looks good, the puzzle joints for the deck have worked well, the clamping method with the screws worked perfectly on one joint, very well on the other, and no worse than just using weights on the 'worst', but even that one was cleaned up with a few strokes of the plane, and was better than the worst joint in the floor panel. To be honest though even the 'bad joint' in the floor panel now looks no different from the others once its under glass and two layers of epoxy. I just know it wasn't perfectly flush and took a bit of work to make it so.
My really neat looking fillets have bubbled in a few places, so don't look quite so perfect this morning. I had the hot air on them last night for a bit, and I guess that the temperature change was a bit too much. They still needed a bit more time, so the hot air is on them for a bit longer. I think next job is turning the hull and starting work on the outside!
more later!
Offline
#87 7 Apr 2020 12:12 pm
- spclark
- Member
- From: "Driftless" Wisconsin USA
- Registered: 19 Mar 2020
- Posts: 478
Re: Waterlust sailing canoe in Norway
Here’s where I left it last night after checking to make sure everything was ship shape for overnight -
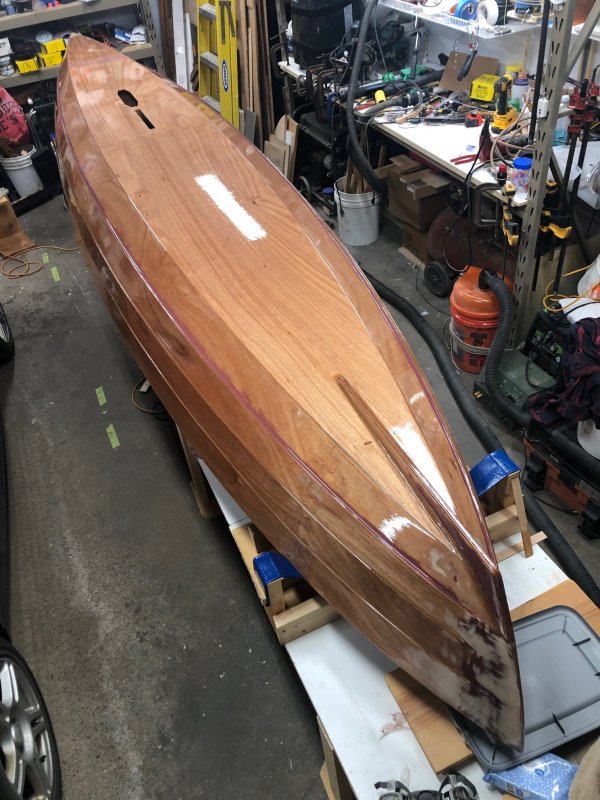
Port side’s panels 2-4 got second coated Sunday afternoon, then starboard side’s yesterday morning. Once port’s cured hard enough to allow turning starboard side up - so panels would put gravity on my side to reduce any tendency for epoxy to run or drip - I coated panels #1 and the bottom. For those that was third coat as ‘glass + fill = 2, then this last one.
Before rolling port side down though I took time to work out a more stable means to secure hull in this fashion:
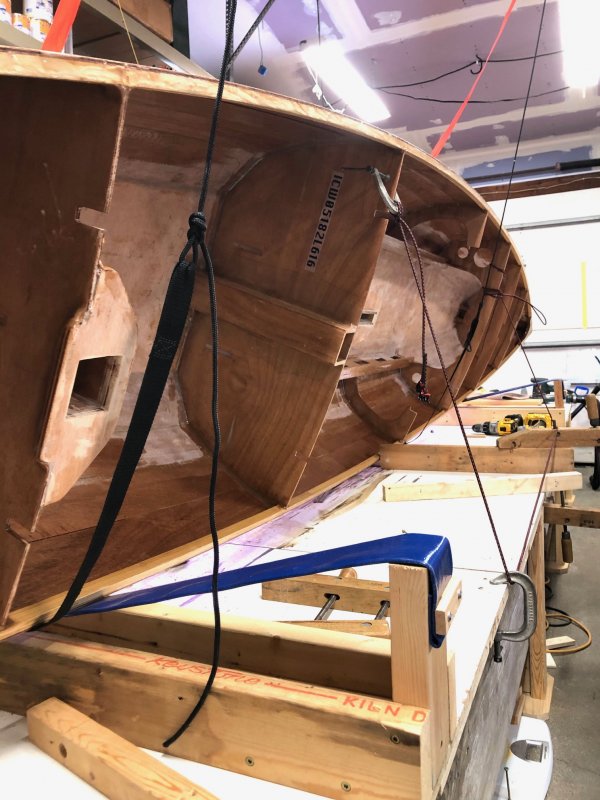
Look carefully & you’ll see 5mm braid used as a restraint, fixed in place with c-clamps as lashing points, to keep hull from rolling back onto the web supports I’d built yesterday.
Sunday’s makeshift effort was a bit precariously balanced, something that made me uncomfortable until I could get the HarkenHoister straps back on.
A lot of the fun of this build is the challenges over stuff like this and how to solve them. MartinC that’s how I view your success over drawing your panel ends together while fitting breasthooks. There’s really no wrong way to achieve something as long as the end result is a proper and durable result, even if it means a bit more work for aesthetics than if you’d known a better way was possible before you started.
That last thought’s where I’ll leave this post; we’re here because we want to be here, sharing our experiences with others. We all learn from our successes as well as our mistakes.
Oh - one last thing - I “fixed” these images so they’d display properly upright by e-mailing them first to myself, using my iPhone where the originals live. This operation allows reducing the file size too, something I’ve done before using Photoshop on my laptop MacBookPro. That route certainly offers the ultimate in image ‘fixing’ power but it’s not necessary for what is available elsewhere....
Last edited by spclark (7 Apr 2020 12:18 pm)
Offline
#88 7 Apr 2020 12:16 pm
- Bergen_Guy
- Member
- Registered: 6 Feb 2020
- Posts: 353
Re: Waterlust sailing canoe in Norway
I was looking at paint again - and got thinking about what finish to use for the bottom of the cockpit area. I was thinking that having it 'smooth and shiny', although beautiful, is possibly asking for trouble and that maybe using a non slip paint / varnish with sand in would be a good idea. I know that SP has already included some lovely 'hiking toe holes' in the longitudinal rails, which looks like a cunning plan, any canoe sailors out there with something to say on this topic?
Offline
#89 7 Apr 2020 12:27 pm
- Bergen_Guy
- Member
- Registered: 6 Feb 2020
- Posts: 353
Re: Waterlust sailing canoe in Norway
Ooh - that's looking very nice SP! I see you left the deck stringers out so far too - I was going to turn over, do the underside, and leave the deck stringers out till after I have done all the sanding inside, as I figure they will just get in the way, and fitting them will be a relatively small job, whereas the finish sanding on the inside could well take a while and being nicely set up for that is probably an advantage. Couldn't agree more also on your comment on solving the small problems along the way. There have been a few times where I have just had to stand there and think, usually while looking around the garage at what 'stuff' I have available to push, pull, clamp, direct hot air etc!
Offline
#90 7 Apr 2020 12:28 pm
- spclark
- Member
- From: "Driftless" Wisconsin USA
- Registered: 19 Mar 2020
- Posts: 478
Re: Waterlust sailing canoe in Norway
Thought about that slippiness aspect of cockpit floor I have, yes. But not ready to pick a solution as there’s much to do yet before I get there.
Several solutions are out there, all have plusses and minuses - the latter probably cost for extra materials the biggest.
I’d be mindful of durability overall, maybe ease of cleaning next up. Some products are ground rubber or cork that can be sprinkled onto fresh epoxy or paint, leaving a textured surface behind. Pricey is the adhesive-backed padding I’ve seen but I have to wonder just how durable that stuff is after a couple year’s heavy use? Then there’s the adhesive-backed tape stuff meant for applying to stair treads, or the strips you can buy for putting on shower or bathtub floors to reduce tendency for mishaps in that area. Lots of options, some vastly more permanent than others!
Offline
#91 7 Apr 2020 12:36 pm
- spclark
- Member
- From: "Driftless" Wisconsin USA
- Registered: 19 Mar 2020
- Posts: 478
Re: Waterlust sailing canoe in Norway
Careful over adding heat during cure. Early on I ran across useful tip about having everything brought up to temp first before applying epoxy. Idea being rising temp makes outgassing happen - particularly where wood and other porous materials are getting their first coat.
Try to allow time sufficient to let project materials acclimate to any rise in temps you’ve initiated.
Not as much a problem when things have been coated as the cured film seals the pores.
Mild heating from heat lamps positioned carefully or electric space heaters in the vicinity but not directly facing the work will aid cure but need careful placement and monitoring in use to prevent accidents.
Offline
#92 7 Apr 2020 8:55 pm
- Bergen_Guy
- Member
- Registered: 6 Feb 2020
- Posts: 353
Re: Waterlust sailing canoe in Norway
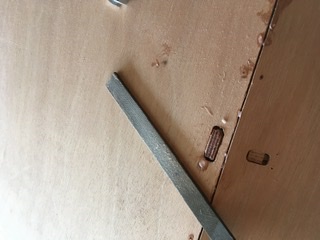
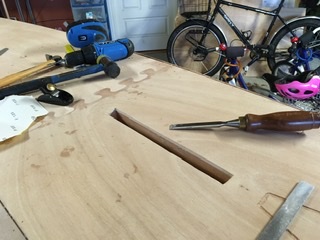
I didn’t get so much done today, but I did turn the boat over and start getting ready for glassing the underside. I don’t have a router so I cut the centreboard slot out by drilling holes and then using a chisel to ‘join the dots’ this seems to ha e worked well enough. Trimming the frame tabs where they poke through the hull was easily done with a block plane. In the places where blobs of epoxy were standing proud of the hull I found that a metal file works very well to quickly remove them.
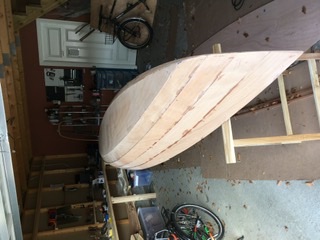
I managed to turn the hull on my own without much problem, it’s still pretty light. The masking tape I used to cover all the stitch holes is off, I only found one or two where epoxy would have run through the holes had the tape not been there. I guess if that will be the case for others may depend on how warm your workplace is.
A file makes short work of blobs of epoxy that have seeped through any small holes where the frames tab into the hull
One centre board slot.
Offline
#93 8 Apr 2020 10:58 am
- MartinC
- Member
- Registered: 3 Apr 2020
- Posts: 353
Re: Waterlust sailing canoe in Norway
Hi.
Nice job! Good tip re. the file.
Having flipped the boat over to do the tack welding, I noticed there is very little space between planks 3 and 4 for glue. Is it worth opening the copper fastenings a bit to allow more space for the fillets later? What did you two find?
Offline
#94 8 Apr 2020 12:30 pm
- Bergen_Guy
- Member
- Registered: 6 Feb 2020
- Posts: 353
Re: Waterlust sailing canoe in Norway
I agree, there was not much space. I didn’t loosen anything to get glue in, just pushed the joints open a bit midway between stitches to try and get a bit of resin in, or tried to make a ‘micro fillet’ just to get something to hold. As long as most of it is stuck together then the whole thing should hold together well enough till you get to the later stages where larger more solid joints are put in place.
Offline
#95 8 Apr 2020 12:33 pm
- spclark
- Member
- From: "Driftless" Wisconsin USA
- Registered: 19 Mar 2020
- Posts: 478
Re: Waterlust sailing canoe in Norway
No, I wouldn’t advise loosening the copper stitches any. The unthickened epoxy going into the open lap joints - however narrow the gap - will wick itself into the wood grain easily enough, making for a solid bond once cured. The thickened epoxy that goes in next is reinforcement, yes, and also boosts the joints surface area as well as ‘finishing’ the joint’s appearance once you’ve faired it into the upper plank’s surface. Once cured the lapped portion of both planks ought to be stronger than the plywood on both sides! You’re effectively creating a ‘rib’ at the overlap.
I did a brief video clip I posted earlier showing how I approached these seams. Should have slowed down though, the time-lapse sequence plays a bit too fast at normal playback speed for close examination.
Here in the USA we have small plastic syringes available for farmers and veterinarians that the public can purchase without needles. These serve well for placing unthickened epoxy along joints like these laps, and is what I used to do that first critical wetting-out operation. But there’s no reason a proper job of placing the epoxy can’t be done with a small, wide bristle brush. I used one to ensure there were no trapped air bubbles in the mix I’d placed with a syringe. A brush also’s very handy for evening out any disparities in the amount of mix placed and also for brushing epoxy up onto that upper plank’s surface a bit. This wets out the grain prior to adding thickened epoxy of fillet that should cover perhaps 5 -10 mm of the upper panel once faired to a thin edge. Check the build manual for a picture of how the fillets should appear in section.
Last edited by spclark (8 Apr 2020 12:50 pm)
Offline
#96 8 Apr 2020 4:48 pm
- MartinC
- Member
- Registered: 3 Apr 2020
- Posts: 353
Re: Waterlust sailing canoe in Norway
Many thanks both.
All tack welding now complete. Looking frward to removing the copper wire tomorrow.
Keep up the work!
Offline
#97 8 Apr 2020 6:25 pm
- Bergen_Guy
- Member
- Registered: 6 Feb 2020
- Posts: 353
Re: Waterlust sailing canoe in Norway
I spent some time getting ready for glassing the underside. I filled the joint between the bottom and panel 1, and filled the gaps around the frame tabs. While I used a syringe for the unthickened epoxy, for the thicker filler I have found my favourite tool is currently a bent knife. It really is a lot like spreading peanut butter on toast... I then rubbed off the stuff I couldn’t scrape off with a meths soaked rag. Seems to work pretty well. So now waiting for that to cure.
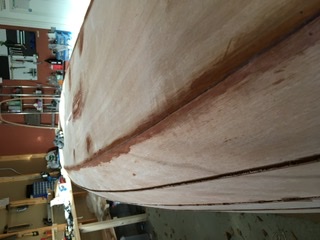
The filled gap between panel and bottom.
It rained all day, but now the sun came out, making for some lovely light in the garage, even with the door shut!
You can see I also filled the outline of the mirage drive hole. I don’t intend to use one to start with, so want that to be flush, or thereabouts. I am more of a sailor, who knows if I will want to add one later. Knowing me that will be the first thing I will want to try once I have it up and running, but we will cross that bridge when we come to it.
Other excitements today was trying to find what pintle and gudgeon are in Norwegian, and finding anyone who sells them... although a seafaring nation, they don’t seem to have a big choice of chandlers. I think a lot of the small boatbuilding here is very traditional and they make everything they use themselves, mostly out of whole trees...
Offline
#98 9 Apr 2020 4:42 pm
- Bergen_Guy
- Member
- Registered: 6 Feb 2020
- Posts: 353
Re: Waterlust sailing canoe in Norway
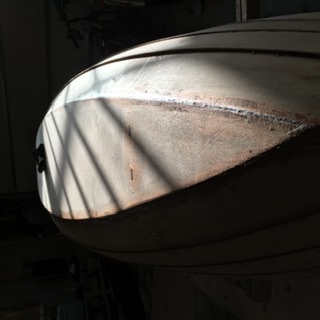
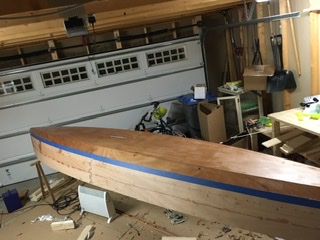
Today was a bit of cleaning up and faring the hull and stems and generally getting ready for glassing the hull. I think my main observation, which you will probably have heard almost everywhere, clean up as much as you can before it cures. There was one spot I hadn’t noticed yesterday, and most of my effort was spent on that one spot. The glass is now on and roughly cut to shape. Hopefully I get time to get the epoxy on this evening. I am not particularly looking forward to this task, but I hope it will be easier than doing the inside.

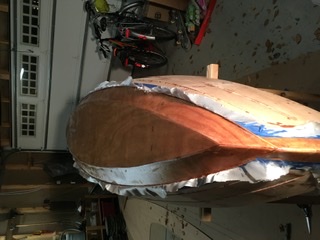
See that blob on the stem. That was the only major piece of faring needed, the stem had a bit of a wobble in it, which needed material removing from one side and adding to the other.
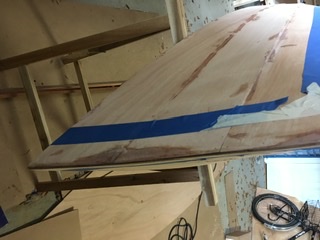
After scraping, filing and sanding, it looks good enough to me.
Glass cloth waiting for resin.
I have upped the heating capacity in the garage with one more radiator, which I put directly under the hull. I hope that helps to keep the resin flowing smoothly!
More later, maybe...
Offline
#99 9 Apr 2020 9:15 pm
- Bergen_Guy
- Member
- Registered: 6 Feb 2020
- Posts: 353
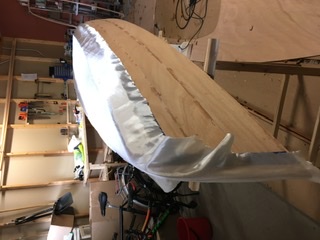
Re: Waterlust sailing canoe in Norway
Well, I think I did a better job than on the inside, maybe it’s a bit more practice, maybe better preparation, or maybe it’s just an easier shape. I am hoping it feels soon so I am not till midnight waiting to cut the excess off.
Offline
#100 9 Apr 2020 10:50 pm
- Bergen_Guy
- Member
- Registered: 6 Feb 2020
- Posts: 353
Re: Waterlust sailing canoe in Norway
Offline