A forum for discussing wooden boats and boat building
You are not logged in.
- Topics: Active | Unanswered
#1 23 Jan 2014 12:53 pm
- wilddog
- Member
- From: Devon
- Registered: 22 Dec 2013
- Posts: 143
Skerry Build
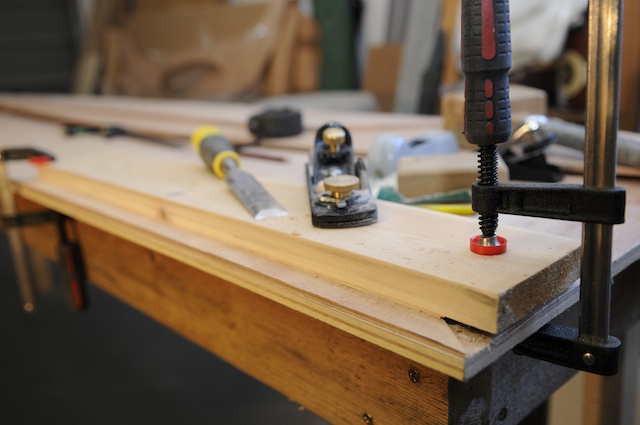
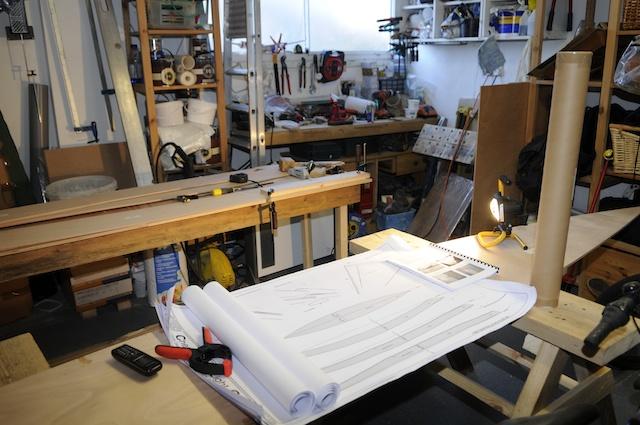
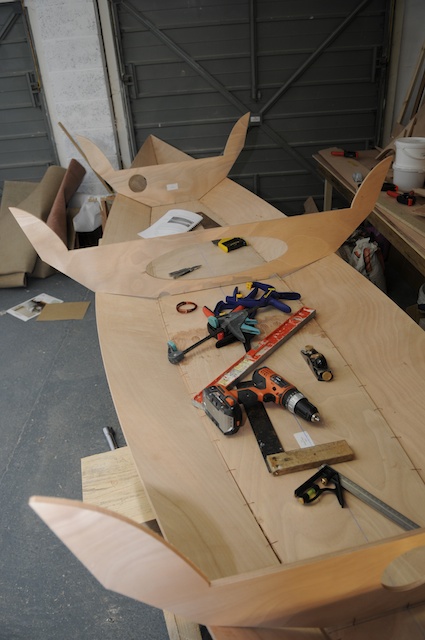
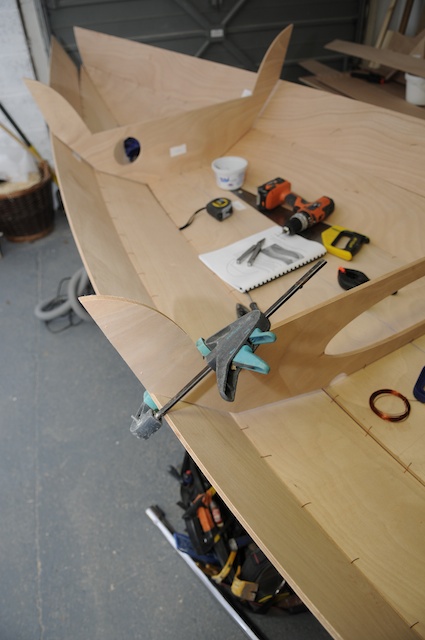
I have just started the project, but you can see I mean business...note the glued up bottom hull plank (which now serves as handy extra work bench of sorts), the plans (I must read them more carefully to avoid future errors), the phone to call Fyne Boats for help (the most useful tool in my shop) and my cunning plan for cutting the gains with a guide clamps (at the wrong width in this instance), block plane and chisel.
The puzzle joints are great, as they seem to ensure that the planks are properly aligned when you glue them together, but I did notice that it is hard to be certain that all the fingers are 100% flush when glued and clamped. A couple of my fingers seem to be a little proud, but nothign that some sand paper cannot fix.
Hoping to have the boat on the water one day, as long as I can avoid further/future mishaps along the way.
Andy
Built a Skerry!
Offline
#2 3 Feb 2014 10:09 am
- wilddog
- Member
- From: Devon
- Registered: 22 Dec 2013
- Posts: 143
Re: Skerry Build
I have now managed to steer the project back on course having had to 'heave to' to complete minor repairs on my over sized gains. A quick chat with Paul to find a fix and I cut some slivers of ply and epoxied them to rebuild the gains back to the correct width.
The patching up took longer than planned as it is well below 10 deg c in my garage at the moment, so that the epoxy is taking a long time to cure.
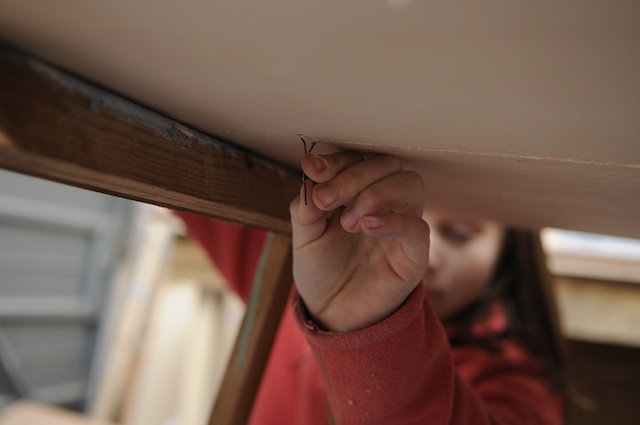
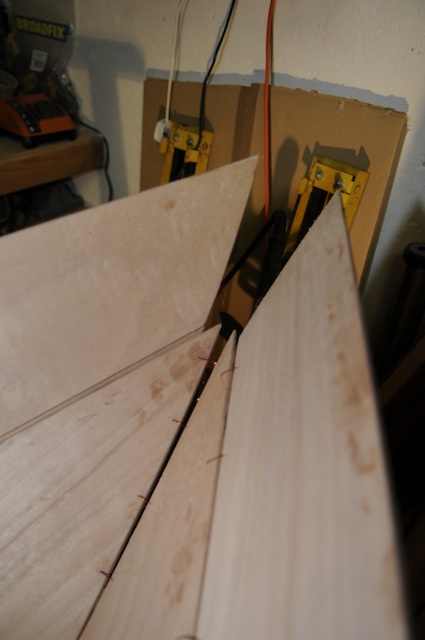
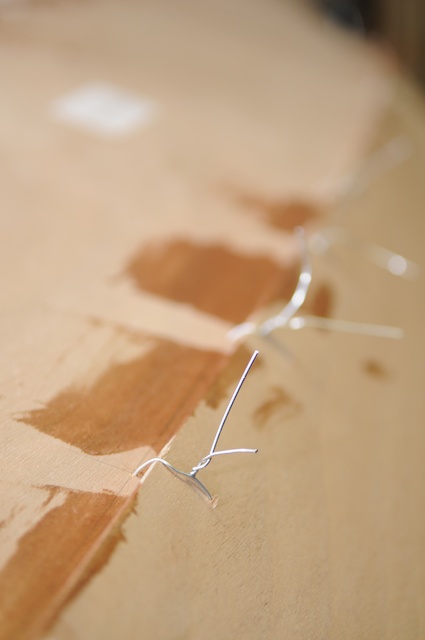
Anyway, patching up completed I have now managed to start assembling the hull and something resembling a boat is appearing in the garage. Like any good Victorian Dad, you'll note that I am employing child labour to help stitch the hull – my daughter Maddy press-ganged into using her little fingers to twist the fiddly copper ties.
I have now loosely tied in the first panel and installed the frames. The frames put so much power through the ply that the boat pops into shape, putting the first real pull on my glued up puzzle joints. However, the frames seems to have done rather too much work and the gap between no. 1 plank and the bottom panel seem to be too big and I am not sure that tightening the copper wires after the frames are secure will draw the wood together adequately. Instead I plan to remove the frames and then tighten the ties as much as possible before re-installing them, in the hope that the gaps will close sufficiently. Still if the gaps persist, I suppose my kids can be employed to plug the gaps with their fingers when we are afloat...?

Built a Skerry!
Offline
#3 3 Feb 2014 11:14 am
- Richard
- Member
- From: East Sussex
- Registered: 7 Jun 2011
- Posts: 75
Re: Skerry Build
It is lookikng good but dont be tempted to tighten the wire at this stage.
Canoe & Kayak Owner
Offline
#4 3 Feb 2014 2:00 pm
- Paul
- Employee

- From: Gatebeck Cumbria
- Registered: 4 Aug 2011
- Posts: 134
Re: Skerry Build
Richard is right: do not tighten the wires yet. It is easier to move the panels into the correct position if they are not tightly bound. The best time to move everything into place is once the panels are all tied together.
Please note that the panels should be moved by hand and then the wires tightened, if you use the wire to close the gap then either the wire will break or the wood with tear.
Offline
#5 3 Feb 2014 4:00 pm
- wilddog
- Member
- From: Devon
- Registered: 22 Dec 2013
- Posts: 143
Re: Skerry Build
OK Good tips. Thanks both!
Built a Skerry!
Offline
#6 5 Feb 2014 11:34 pm
- wilddog
- Member
- From: Devon
- Registered: 22 Dec 2013
- Posts: 143
Re: Skerry Build
I have now stitched in both number 2 panels and both seem to come up short at the stern by 3/8". I think they can be eased back by loosening the stitching all round ad perhaps getting a better fit between the bottom panel & number 1 panel may help. Lots of "Robbing Peter to pay Paul" it seems at this stage.
Built a Skerry!
Offline
#7 6 Feb 2014 11:14 pm
- wilddog
- Member
- From: Devon
- Registered: 22 Dec 2013
- Posts: 143
Re: Skerry Build
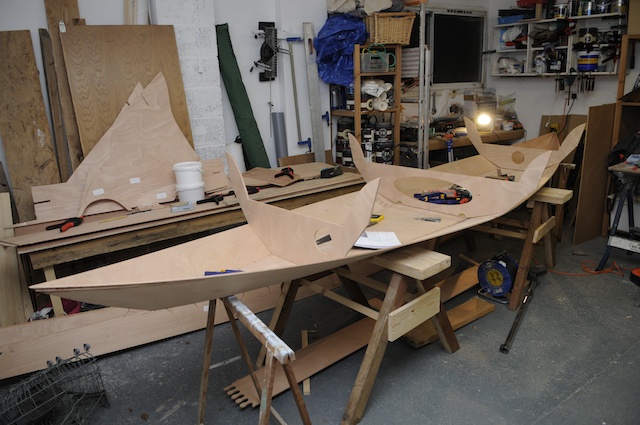
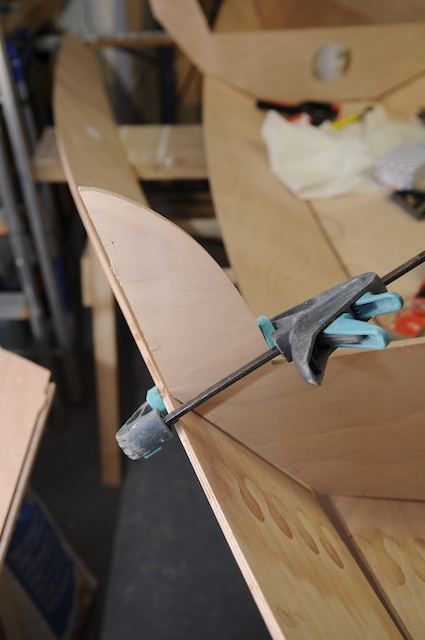
So after a little push-me, pull-you, I think I have managed to draw the no 2. panels in sufficiently into the stern. In this pic below you can see that m first effort was much too short. There is still a little more pulling to do, but again, I am pretty sure this will ease in with final stitching and the addition of no 3 panel.
No 3. panels have been glued up a little late as there was a mishap on the original delivery with the courier managing to break the puzzle joints, but Fyne boats replaced these panels for me and I have only just glued them up this evening.
Fitting no 2 panels is definitely easier with a helper, but all mine skived off to bed and so I had to jerry-rig some clamps to the frames to help hold the panels in place while I stitched away. It actually worked rather well.
Getting close to gluing things up which I am looking forward too...
Built a Skerry!
Offline
#8 10 Feb 2014 5:43 pm
- wilddog
- Member
- From: Devon
- Registered: 22 Dec 2013
- Posts: 143
Re: Skerry Build
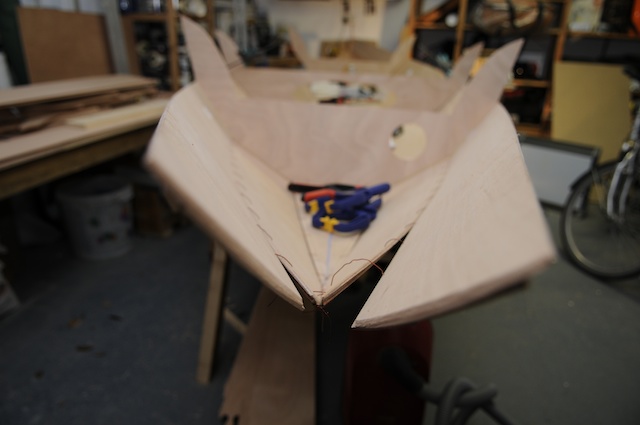
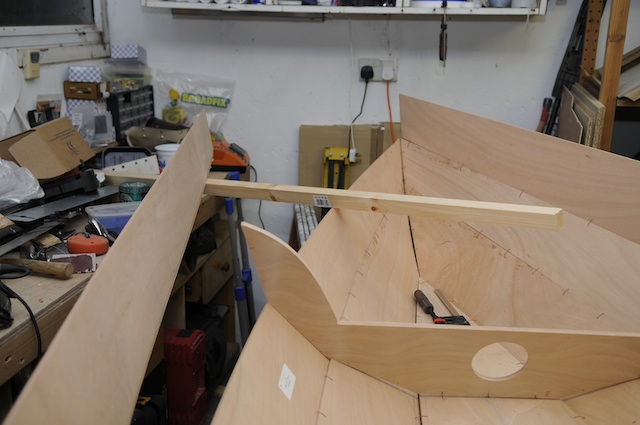
My top tip from my efforts to date when wiring the hull would be to be sure that the 45 degree angles required to be planned off the stems end up being more like 30 degrees on the top panel, such is the sharpness of the bow profile. I un-stitched the stern to fix the slight mismatch of the number 2 panel, but since then I have figured out that this tweak can actually be done without undoing all the stitches, but using a rasp and some sand paper.
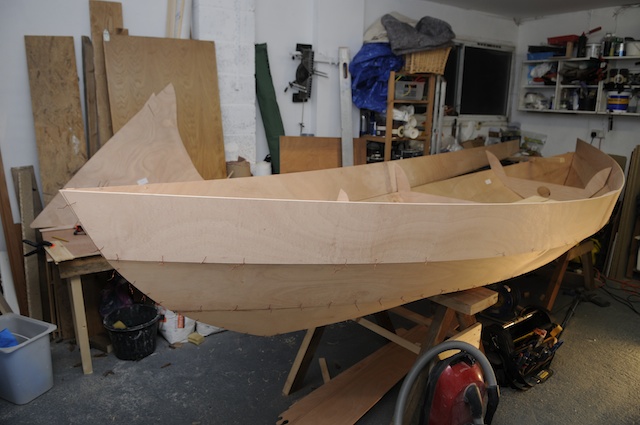
The hull is now starting to look like a boat and it is all too exciting for words. My issues with the gains - which seemed like an age ago now - is well resolved and the repairs worked out well.
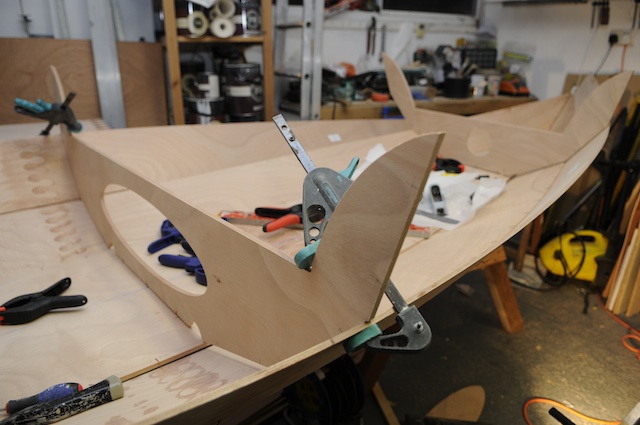
I was without helpers to add number 3 panels and my clamping technique did not work, so I had to devise a support for the panels using an off cut of batten to support the stern section while I tied in the bow. Seemed to work pretty well.
I have now, annoyingly run out of copper wire. Did I cut it too long? Have I lost some? Who knows...

Built a Skerry!
Offline
#9 2 Mar 2014 7:06 pm
- wilddog
- Member
- From: Devon
- Registered: 22 Dec 2013
- Posts: 143
Re: Skerry Build
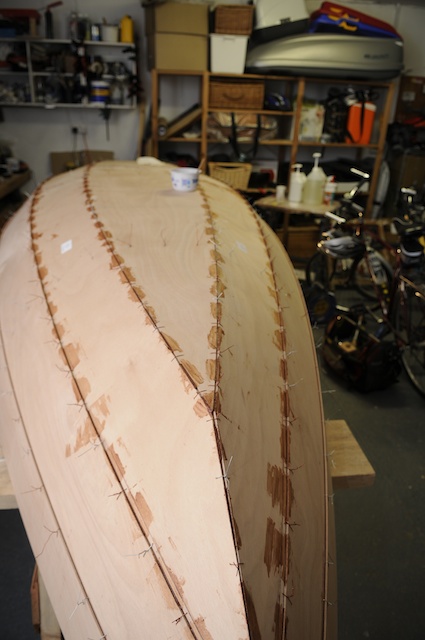
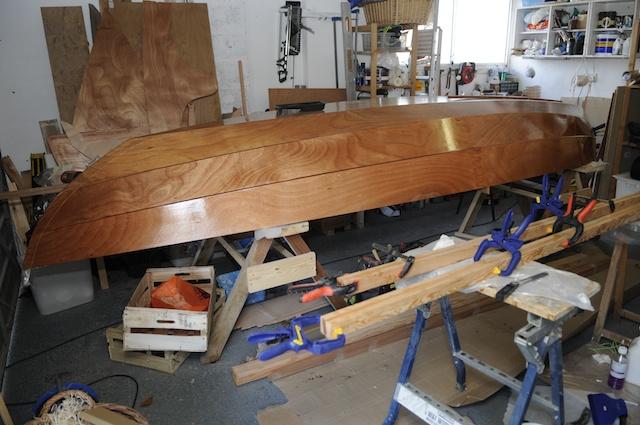
Today felt like a significant day after what has been quite a frustrating time with the stitching process. I first ran out of copper wire and had to find something to replace it, finally settling on 2mm galvanised steel wire.
The steel wire was much harder to manipulate around the bulkheads and in the stems and harder to twist (pliers essential) but it is much more robust that the copper wire, which has been snapping each time I tried to draws the panels together for final alignment and tightening. The net result was that I have had to replace at least 50%, of the original copper wire, probably more. The final tightening of the frames and panels has taken a long time (a hour an evening this week), so it was immense satisfaction that I finally managed to mix up some epoxy fillet mix to start my gluing process.
The gluing has gone well so far and I am wondering if the 'peanut butter" consistency mix might just do the job between the lap joints rather then using the more fluid seam epoxy and a fiddly syringe. I'd be grateful to hear form anyone who has also decided to use a stiffer fillet mix to tack weld the lap panels together. I am sure that the benefit of a more fluid 'seam epoxy' (as per the manual) may well seep into the wood better, but I am also mindful of runs and drips, which I hope (finger crossed) I have managed to avoid with the thicker mix.
My lap joints seem to fit very snugly together and I am pretty sure that the heavier gauge wire has really helped with this, especially in the areas where the timber is more keep to pop apart (ie. around the bulkheads and at the stems).
Anyway, it is really nice to be on to the next phase. She looks more like a boat every day!
Last edited by wilddog (4 Mar 2014 10:03 am)
Built a Skerry!
Offline
#10 3 Mar 2014 9:37 pm
- mtompson
- Member
- From: Dartmouth UK
- Registered: 23 Apr 2013
- Posts: 28
Re: Skerry Build
Try and get those stickers off the wood asap, you may get some tan marks, can be tricky to sand out for varnished wood areas..
Building a Skerry
Offline
#11 4 Mar 2014 10:00 am
- wilddog
- Member
- From: Devon
- Registered: 22 Dec 2013
- Posts: 143
Re: Skerry Build
Thanks I'll do that today!
Built a Skerry!
Offline
#12 10 Mar 2014 10:36 pm
- wilddog
- Member
- From: Devon
- Registered: 22 Dec 2013
- Posts: 143
Re: Skerry Build
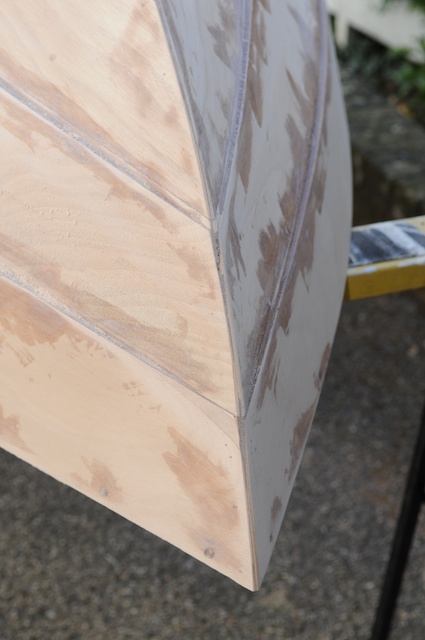
I had a busy time gluing up various key features this weekend and filling in the lap joints/chines on the outside of the hull. My plan to skip the seam epoxy step and use my mustardy fill to tack weld the hull went well. The mustardy mix was sufficiently strong to allow me to take out all the wires on the stems before fileting/glassing the insides of the stems (which was done yesterday evening).
Once the tack welds were dry I was then able to use the same mix to create a nice long smooth seam along the chines.
Now the boat has been flipped and the inside stems glued/glassed, I have also tack welded #1 & #3 panels with my mustardy mix, ready to whip out the wires there, ready for final fileting.
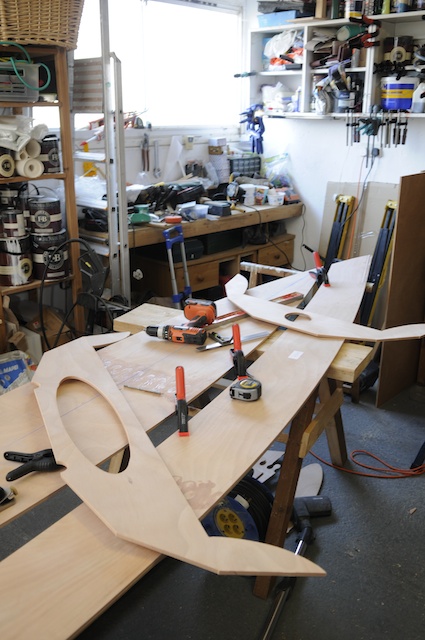
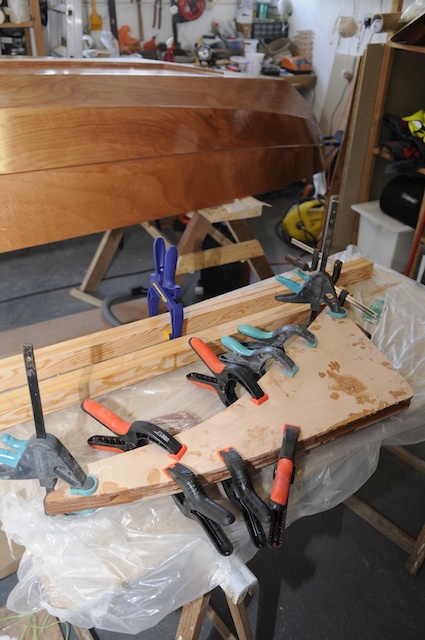
While all this glue was going off on the main hull I also started to glue up some of the other parts, including the skeg, the dagger board and the tiller extension.
Feeling happy with progress so far and while i am aware of the many tales of epoxy woes, this far I have not had any issues with 'sag', running or mess. Mix it up thick chums, that's the ticket!
Built a Skerry!
Offline
#13 13 Mar 2014 10:36 pm
- wilddog
- Member
- From: Devon
- Registered: 22 Dec 2013
- Posts: 143
Re: Skerry Build
Sanding and more sanding...
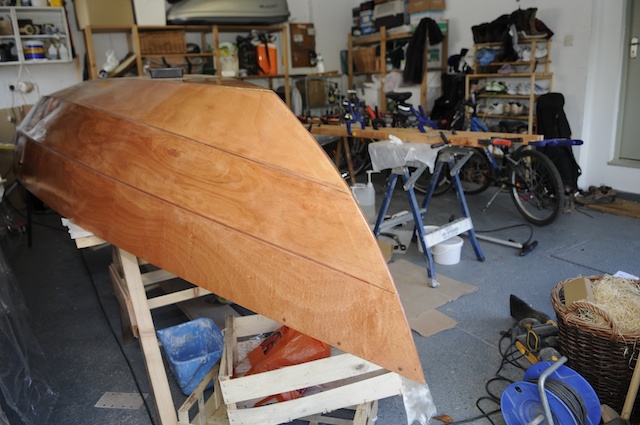
It was a belter of a day today here in East Devon, so I took half a day off and took the boat out of the garage for some serious hull shaping.
The rasp worked well on the stems and then I switched to my sander - which I then manage to drop, cracking the dust collector. Funny for about five minutes as dust spewed out all over the place when I fired her up again, before I realised that I had run out of gaffer tape for a quick fix...Grrr!
The bow stem is looking nice and shape, but it turns out that my stern stem (now glued and glassed inside) has a bit of a twist or kink in it. The top panels were hard to stitch and are poorly aligned and although I checked the stern from above for plumbness (is that a word?) when I took the hull out of the garage today, it was less then perfect. This annoyed me at first, but the problem was fixed with a blast if the sander and now the stem looks pretty good. The down side was that I sanded deep into the second plank on the aft port side, but the hull will all be painted so it will not be noticeable.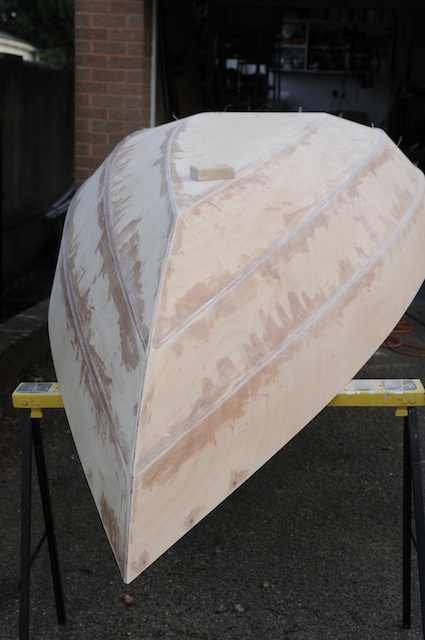
My lap joints are pretty fair now, will a few dimply depressions here and there I think will smooth out with another light epoxy fill before glassing the hull. I had hoped to do this this weekend, but as ever, this may be a little too ambitious...still summer is not that far off now...need to get on...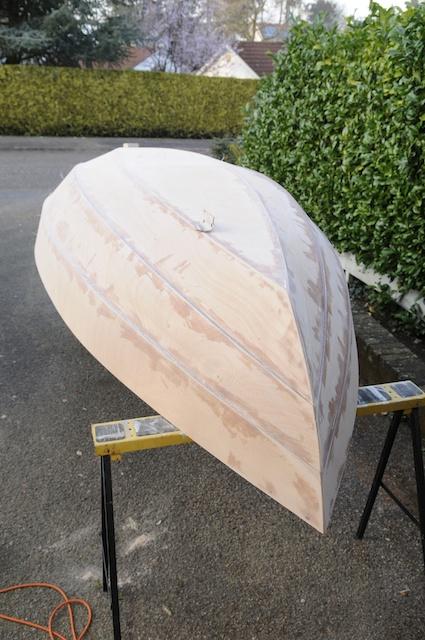
Built a Skerry!
Offline
#14 14 Mar 2014 10:36 am
- Paul
- Employee
- From: Gatebeck Cumbria
- Registered: 4 Aug 2011
- Posts: 134
Re: Skerry Build
It is always worth spending some time lining up the bow and stern but as you found errors can be corrected with the judicious us of a sander. This area is going to be covered with glass tape and judging by the photographs will look perfect when painted.
You are making a good job of it.
Offline
#15 14 Mar 2014 9:02 pm
- wilddog
- Member
- From: Devon
- Registered: 22 Dec 2013
- Posts: 143
Re: Skerry Build
Thanks Paul!
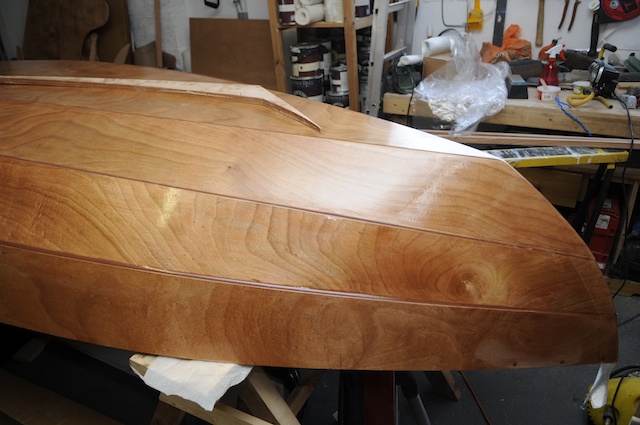
I lined the stern and the stem up as best I could in the cramped garage and they were more or less plumb when I started to glue. The issue was more to do with how I had drawn in one a couple of the stern panels. This had not gone well as I had slightly misaligned the rear frame. Still, I have made a decent enough correction and it all looks good now.
"They'll never know" is my watch-word. Besides, people would normally pay a fortune for that sort of "character".
I am now at a crucial phase. After a wodge more sanding tomorrow to fair up the port side of the hull, I hope to be glassing the hull on Sunday and then I'll need to attach the skeg. The skeg needs some shaping to make it fit snugly to the hull and stern, but I am also minded to fair down the bottom of the stem slightly to make the seam wider, to give the skeg a better fit. At the moment my stem is a fairly uniform width all the way up. Of course this work to shape the stem for a decent dry fit for the skeg needs to happen before I glass the hull. The glass will change the final fit of the skeg, but hopefully not by too much.
After all that that I can turn my attention to the inside of the boat.
Last edited by wilddog (14 Mar 2014 9:06 pm)
Built a Skerry!
Offline
#16 26 Mar 2014 10:22 pm
- wilddog
- Member
- From: Devon
- Registered: 22 Dec 2013
- Posts: 143
Re: Skerry Build
To glass or not to glass that is the question...well actually that is not quite the question, the question really is do I try and knock out the 'wetting out' phase of my hull glassing operation this evening and then 'fill the weave' tomorrow morning or do I start the process in the morning and hope I can finish it during the day.
I have hit a bit of choppy water on the build at the moment as most of the jobs either require making a lot of noise (sanding up rudder assembly or dagger board ready for resin), thus cannot be done in the evening without securing myself an ASBO or they require a heap of time, follow by a heap more time - glassing the hull. Last weekend was a right off as the Dad taxi was busy, so I can feel myself slipping behind schedule and needing to get on. The trouble is that getting on means stealing time away from my desk mid-week when there is lots of exciting admin and other paperwork to do. Ideally I would get the hull glassing done this week so that at the weekend I could concentrate on some legitimate Saturday morning noise-making with my sander, but nicking off midweek does still feel like...well...nicking off midweek.
I did manage to clean up the hull with some meths (that is the denatured alcohol that I have read about) and laid out the glass on the hull, trimming the excess during an extended lunch break today, but then "other things" raised there heads and I have not proceeded to mixing up some goop to start the gluing.
Perhaps I can stop procrastinating tomorrow, but at the moment I can't decide. I'll put that decision off until later I think.
Built a Skerry!
Offline
#17 27 Mar 2014 6:37 pm
- Rainbow
- Member
- From: East Devon
- Registered: 29 Sep 2012
- Posts: 75
Re: Skerry Build
Once I find the time to get into the garage, I find the build process is 40% doing and 60% researching/pondering/procrastination/working out how to do things better next time. It is all part of the fun but it does slow things down. Probably a rule - things never go as fast as expected. It would be interesting if we could repeat the same build a second time and see how much faster things would be. Your build is coming along nicely - looking good. Nice to see more current build activity on the forum.
Offline
#18 29 Mar 2014 10:12 pm
- wilddog
- Member
- From: Devon
- Registered: 22 Dec 2013
- Posts: 143
Re: Skerry Build
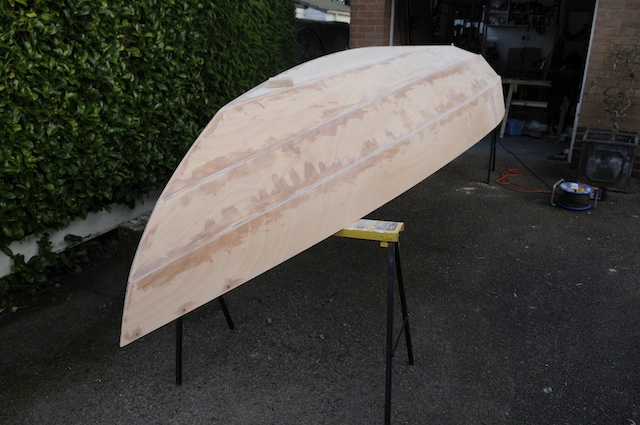
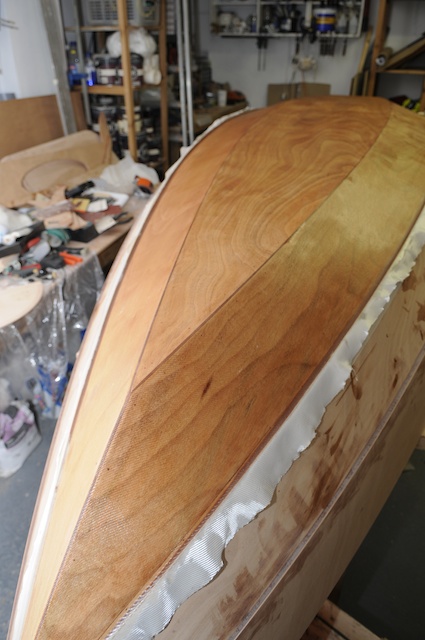
Now that I have seen by beautiful Okume ply gleaming under the glass that I applied to the hull this afternoon, it is hard to understand why people choose to paint over this fabulous material. I am now wrestling with this very demon....
The 'wetting out;' phase of the glassing went pretty well and I am now waiting for the goop to dry sufficiently to allow me to 'fill the weave'. I was surprised by how forgiving the glass fabric was and how well it flowed to the shape of the hull with no creasing or wrinkling. The trick is certainly to put a good wodge of goop on, but then to work it far and wide and as thin as possible, working from the middle of the boat out to the sides.
I started off using small squeegee, but in the end my weapon of choice was a Wickes tile grout squeegee which was twice the size of my small plastic squeegee and with its rubber face, very effective. The added benefit of this tool was being about to use two hands on it. However, I am a bit worried that the blue dye from the Wickes tool seemed to wipe off on my rag when I was cleaning up, but I have not seen any traces on the the Hull. Perhaps this is why people end up painting over the gorgeous timber (the long lasting-ness of paint not with standing...)?
Last edited by wilddog (30 Mar 2014 9:44 am)
Built a Skerry!
Offline
#19 30 Mar 2014 9:52 am
- wilddog
- Member
- From: Devon
- Registered: 22 Dec 2013
- Posts: 143
Re: Skerry Build
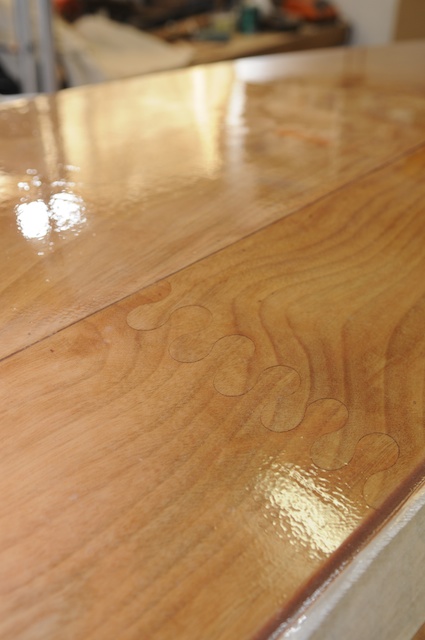
Weave filled. Not as easy as I have hoped to get a perfectly smooth finish with the second coat. Very hard to avoid squeegee marks where the blade comes on and off the hull, but I looks pretty fair and there's always the sander and top up fill I suppose.
One aspect of the build which cannot be underestimated is the thumb-twiddling amount of time between jobs as the goop cures. I had been thinking ahead to next weekend and wondering if I might get the interior glassed then too, but I don't think, with the lower part of the hull to epoxy, the rails to fit and then the fileting to do inside the boat, that glassing next weekend is a real option.
Realistically I have to allow 48 hours for the goop on the hull to cure, before I can be sure it is dry enough to turn the hull over without it sticking to my saw horses. A couple of large, long-legged objects glued to the hull will certainly slow her progress through the water I should think!
Last edited by wilddog (30 Mar 2014 5:10 pm)
Built a Skerry!
Offline
#20 31 Mar 2014 6:17 am
- mtompson
- Member
- From: Dartmouth UK
- Registered: 23 Apr 2013
- Posts: 28
Re: Skerry Build
catching me up fast! My first fill coat looked a bit nasty, orange peel effect. But adding some silica to the next two coats has resulted in a nice smooth finish. Did you add bow & stern glass tape as well?
I'm just doing my last coats of epoxy on the underside in the next few days, then skeg, then the big roll over! I'm looking forward to the breasthooks & rails, a little break from large area epoxy & sanding work!
Hoping for June at the latest...
Building a Skerry
Offline
#21 31 Mar 2014 8:51 am
- wilddog
- Member
- From: Devon
- Registered: 22 Dec 2013
- Posts: 143
Re: Skerry Build
My first fill has gone pretty well and I has hope to leave it at that, but some areas of the weave have not filled completely so I will need to give those a light sand and then re-attack them, though the hull is still a little tacky, so I am considering dropping my work for this morning and attacking this issue right now! I have some light runs in parts, but these will fair down, but I am more concerned at this stage to ensure that the weave is covered.
As for the breast hooks etc, I was a little sneaky there and I actually put those in before I flipped the boat and started work on glassing the hull. My reasoning for doing this was to try to ensure that the hull retained as much of it's shape as possible and that I was not glassing the hull into an immovable wonky wiggle. With this in mind, i also made sure that the hull was perfectly aligned on my saw horses and level, to avoid glassing in any hull twist. Not sure if this was a good plan, but the beer soaked theory was sound enough...
i will add some glass tape to the bow and the stern once I have the main hull glass finished. I'll need to rub the hull off first with some sand paper and trim up the excess glass from the main layer of glass first....much to do!
"Dear Clients, I am out of the office today in high-level tip-top executive meetings with hugely important people..." etc
Built a Skerry!
Offline
#22 31 Mar 2014 10:22 am
- wilddog
- Member
- From: Devon
- Registered: 22 Dec 2013
- Posts: 143
Re: Skerry Build
OK done.
I took advice from mtompson (above - thanks!) and from Paul and mixed up a scoop of silica to a 3 squirt mix of epoxy and this seems to have done a beautiful job of filling the weave. A TOP TIP! The silica helps the gubbins flow well over the hull and nicking off work for an hour this morning has saved me several hours of sanding I hope.
I will still need to fair the hull up well before applying the paint (there seems to be some orange peely effect in my first fill coat), but the extra hour now will be well worth I am sure! The glimmering hull gives a good idea of how the inside will look...
Built a Skerry!
Offline
#23 4 Apr 2014 5:50 pm
- wilddog
- Member
- From: Devon
- Registered: 22 Dec 2013
- Posts: 143
Re: Skerry Build
The work on the hull is progressing, though I confess I am pretty keen to flip the boat over and get on with the inside.
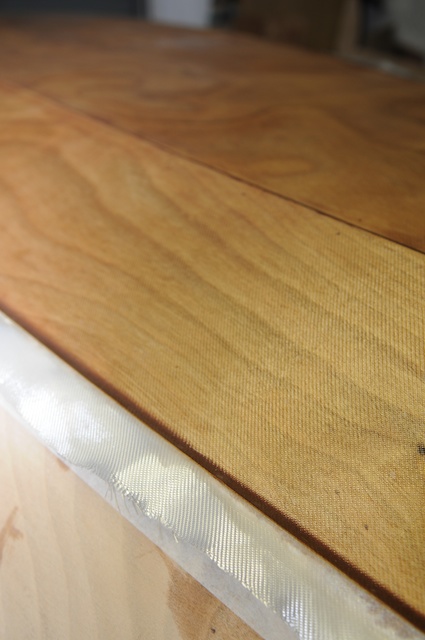
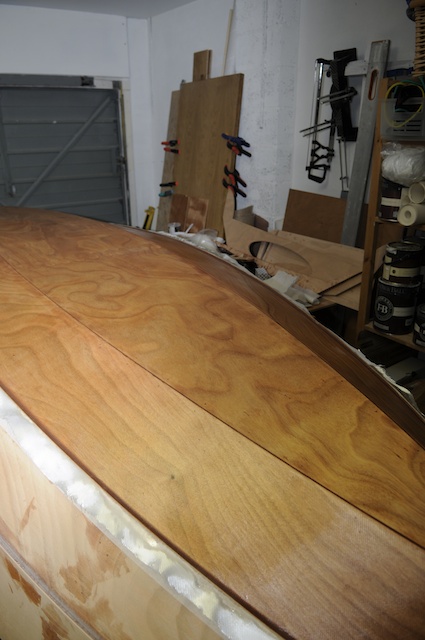
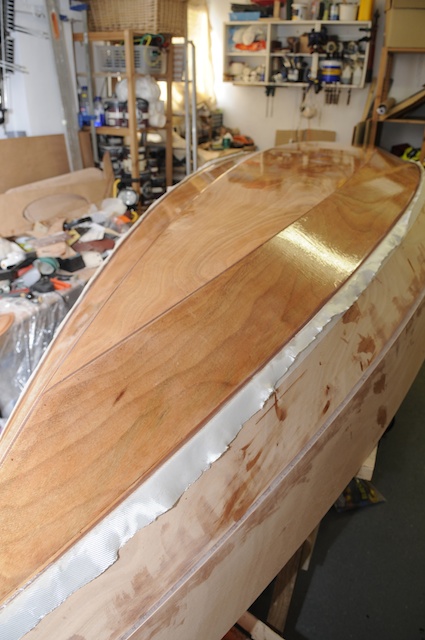
I have now glassed the stems and put a primer coat of epoxy on the top two panels and a second coat, mixed with a little silica to make it less runny to apply and to make filing the weave in the glass tape a little easier. I confess to being not that happy with the glass tape as despite saturating it heavily on the first coat and slathering lots of the thickened epoxy on the second coat it still stands proud of the hull. I will need to add a third coat. perhaps later tonight to see it faired into the hull properly.
Inevitably I am now roaring through my stock of epoxy and wondering if I have enough for the insides too! Paul & co may get another begging call for more supplies in the next week or two.
While I wait for the hull to dry I have planed the stem ends and glued the scarfs on the first set of rub rails, glued up the spars and finished the guts of my rudder assembly. I am not going to be able to turn the boat this weekend as I had hoped to start work on the insides, so I think I will be gluing up the blank for my mast, finishing off the rudder assembly and shaping the spars, so this is all done and out of the way. I'll leave any spar hole drilling until I work out the rigging for the sail which I ordered this week from my local sail maker.
A gleaming hull, but don't be fooled, it sis not a super smooth as it looks from a distance. I have a bit of orange peel here and there and to rework the title of a well known Daniel Day Lewis movie "There will be Sanding"
Rudder assembly and my spars.
The glass tape on the bow is more visible that I had hoped. More goop required.
Built a Skerry!
Offline
#24 7 Apr 2014 6:32 pm
- wilddog
- Member
- From: Devon
- Registered: 22 Dec 2013
- Posts: 143
Re: Skerry Build
It's half term so I knocked off a little early to try and push ahead with the boat. My schedule says "mast step" today...hmmm...still a wee way to go before I get there.
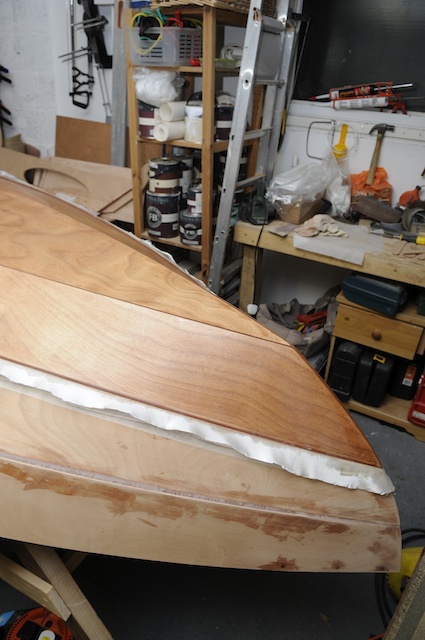
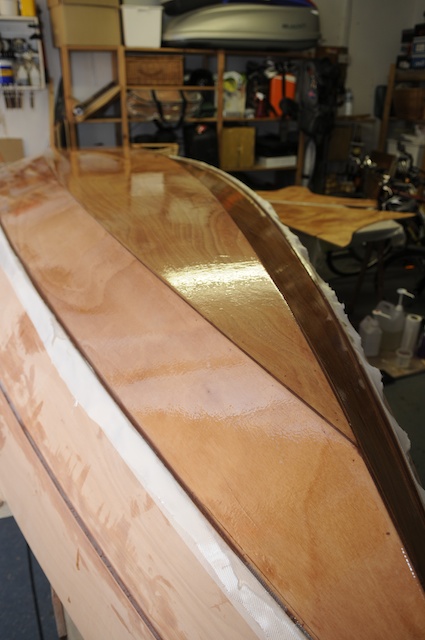
To avoid having to flip the boat to many times, I opted to install the Skeg before the rails, an operation which required a fair amount of jiggery-pokery.
I laminated the two halves together some time ago, but there was a fair old curve in fin, better suited to a cricket bat than a skeg, so it took quite a bit of effort to pull it straight. I had to shave a fair amount off the front end and then get the rasp out to shape the point where the skeg pulls rounds the stern, but it did not take long to scribe it all it.
To hold the skeg in place, I have used stainless steel screws, rather then the brass screws prescribed in the manual and these went in well. My son held the skeg in place while I scraped about for a reasonable position to get at the screws from below. To hold the ends true I have knocked in a couple of small panel pins, one on the stern stem and one a midships. These will get pulled out later and the holes filled with goop when I come to glass the skeg in tomorrow once the first lot of filets have set.
I then had to pull the skeg square and the 'duck tape' method mentioned in the manual was a very good means of doing this. I am hoping that once the filets are dry enough the skeg will stay fairly square to the hull when the tape comes off otherwise it will have to be galssed on in sections, which will be a little annoying and will take more time. At this stage I am still 48 hrs from being able to flip the boat to work on the insides.
I have also had time to shape the yard for my balanced lug rig. The idea is to keep the spars square and I am aiming for a round (-ish) mast. The spars were laminated last week and a a quick buzz with the power plane, followed by some shaving withe the hand plane for a jaunty shape seemed to work quite well. I have sanded them to 'not bad' and a final polish before they get a lick of epoxy will require a further sand. I have cut them long, so that I can adjust to the sail when it comes...
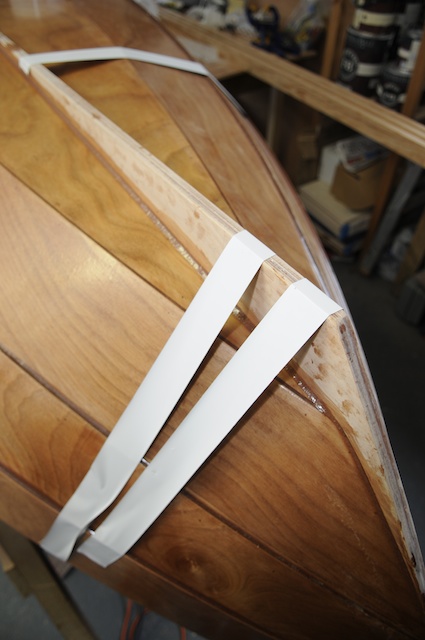
Duck tape to pull the skeg square to the hull.
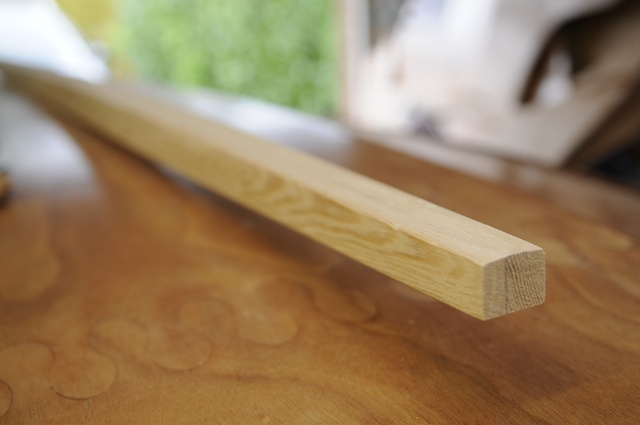
Salty looking yard for the balanced lug. I have left one side flat and then tapered the other three sides to give the spar a line. I am sure I will have to do a little more when the sail comes...
Built a Skerry!
Offline
#25 7 Apr 2014 9:06 pm
- mtompson
- Member
- From: Dartmouth UK
- Registered: 23 Apr 2013
- Posts: 28
Re: Skerry Build
moving fast! you have now overtaken me, I'm still flapping about trying to get the smoothest hull I can before I too am going to attach the skeg ( I agree, it seems better to do this now ).
I'm really looking forward to turning the boat over, I'm getting a little tired of looking at her bottom ( nice as it is! ).
But your looking good, I look forward to seeing how you progress through the inside work.
Building a Skerry
Offline